Payor: Setup Guide
Table of Contents
- Welcome
- Set Up Procore Pay
- Manage Business Entities
- Configure Lien Waivers
- Manage Sub-Tier Waivers
- Manage Payments
- Procore Pay + Workflows
Get Started as a Payor
 |
This Payor Setup Guide provides companies that have purchased Procore Pay It provides an overview of Procore Pay and shows you how to:
|
What is Pay?
Important
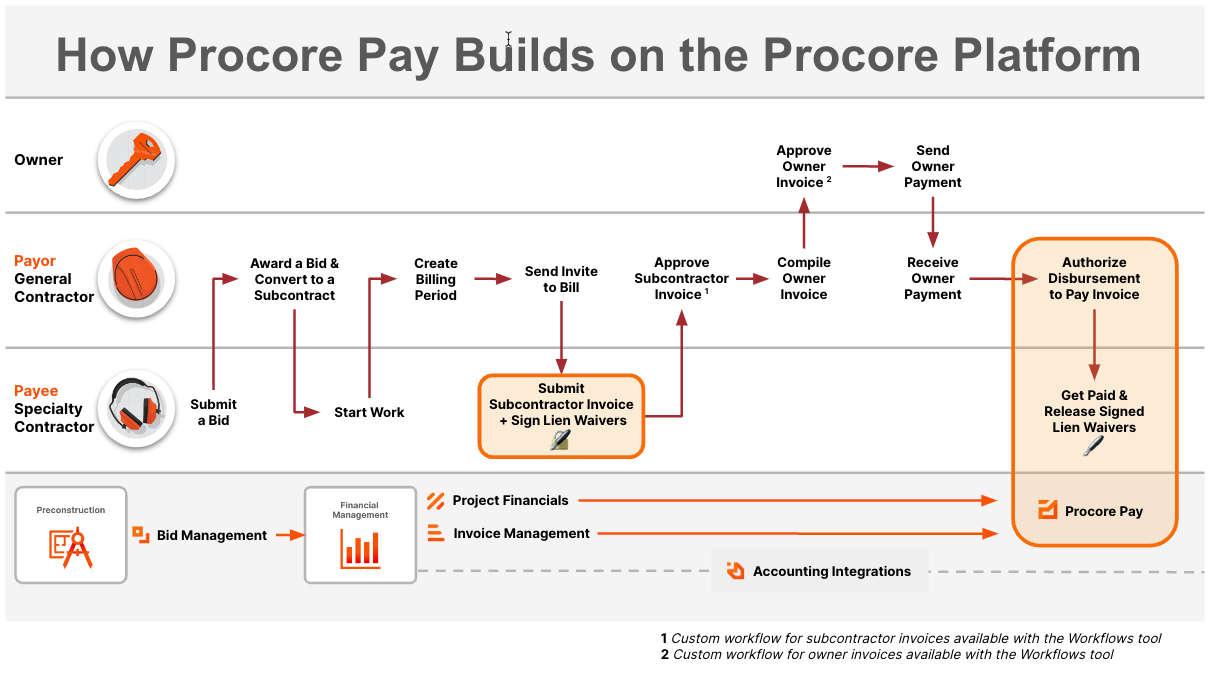
Author note: Link to source file: https://docs.google.com/presentation...98af4431df_0_0Pay builds on the existing Project Financials and Invoice Management tools in Procore to streamline the subcontractor invoice payment process and automate the lien waiver exchange.
How do funds flow?
Only a Payments Admin or a Payments Disburser can Create Disbursements in Procore Pay. Once authorized, a disbursement initiates these actions depending on your service. Payors can choose one (1) of these services:
Procore Pay with Procore Payment Services, Inc.'s Money Transmission Services
Click here to view the funds flow.
- A drawdown request is sent from Procore Payment Services, Inc.’s (PPS) For Benefit Of (FBO) account to initiate a drawdown of disbursement funds from the payor's funding account.
- PPS executes the wire transfer from the payor's funding account to the PPS FBO account.
- The PPS FBO account executes the payment orders in the disbursement.
- The individual payments in the disbursement are sent to the payee's bank accounts (a.k.a., the beneficiary accounts in the payor environment).

Procore Pay with Goldman Sachs Transaction Banking (TxB)
Click here to view the funds flow.
- A drawdown request is sent from the deposit account* to initiate a drawdown of disbursement funds from the payor's funding account.
- The financial institution executes the wire transfer from the payor's funding account into the payor's deposit account.
- The deposit account executes the payment orders in the disbursement.
- The individual payments in the disbursement are sent to the payee's bank accounts (a.k.a., the beneficiary accounts in the payor environment).

Procore Pay with Commerce Bank
Click here to view the funds flow.
- A drawdown request is sent from the deposit account* to initiate a drawdown of disbursement funds from the payor's funding account.
- The financial institution executes the wire transfer from the payor's funding account into the payor's deposit account.
- The deposit account executes the payment orders in the disbursement.
- The individual payments in the disbursement are sent to the payee's bank accounts (a.k.a., the beneficiary accounts in the payor environment).

See Also
Enable Procore Pay
- Step 1: Initial Procore Pay Setup
- Step 2: Achieve Payment Readiness
- Step 3: Payment Testing & Project Closeout
Step 1: Initial Procore Pay Setup
The Payment Operations team at Procore works with your company's key contacts and technical leads to set up Procore Pay.
Tip
- Does your company want to use Procore's Monthly Sandbox environment to test new tools and features? Companies enabling Procore Pay need to request an additional configuration to maintain access to your Monthly Sandbox. See How can I access my company's Monthly Sandbox after enabling Procore Pay?
Click here to view the steps.
During the initial phase, the Payment Operations team collaborates with your company's key contacts and tech leads to activate Procore Pay in your Procore account:
- Procore Pay Activation. The Payment Operations team will activate Procore Pay in your Procore account. They will also activate features for Payment Requirements, Lien Waivers, and the Invoice Management tools.
- Single Sign-On (SSO) Configuration. If you utilize an SSO solution, our team works with your technical leads to adjust your solution's settings to grant authorized team members Procore Pay access.
- Multi-Factor Authentication (MFA). Procore Pay requires users to authenticate their identity through MFA when logging in and before performing sensitive financial transactions. Your technical team will need to choose a TOTP-compliant one-time password application. See Why is MFA mandatory for Procore Pay and how does it work?
As the payor, you will be assisted by the Payment Operations team in establishing a deposit account with Procore's banking partner and setting up user access to Procore Pay:
- Approval of Banking Partner Agreements. You will need to complete forms to open a Procore Pay Deposit Account. Following this, we can initiate the integration of your deposit account with the transaction banking system. See Open a Deposit Account for Procore Pay as a Payor.
- Submission of Authorized Payment Administrator Form. This form empowers our Payment Operations team to grant access to your designated Payments Admins. Post-completion, we can grant user access to your Payments Admins. See Add or Remove Payments Admins as a Payor.
- MFA Setup for Payment Admins. After configuring your SSO solution, your company's authorized Payment Admins can set up MFA for Procore Pay on their mobile devices. See Set Up MFA for Procore Pay on Your Device and Log in to Procore using MFA.
This diagram details the initial Procore Pay setup workflow.

Step 2: Achieve Payment Readiness
For the next step, Procore assigns a Strategic Product Consultant to work with your company's key contacts and team members to manage your implementation process so you can achieve payment readiness. This phase typically includes payor onboarding and training with your Procore Strategic Product Consultant.
Click here to view the onboarding workflow.

Click here to view the sample training agendas.
To maximize the effectiveness of your company's training session(s), Procore encourages your key contacts and future Procore Pay to share your company's specific goals and target outcomes for Procore Pay with your Procore point of contact and Implementation Project Manager.
Sample Training Agenda: Overview Company Payments Tool
For teams interested in an overview of the Company Payments tool:
- Payment Settings. See About the Payments Settings.
- Payment Processing. Manage Payment Processing.
- Funding Accounts. See Add Funding Accounts as a Payor.
- Payment Permissions. See Manage Payments Permissions.
- Project Controls. See Manage Project Controls.
- Change History. See View the Payments Tool Change History.
- Optional. Workflow Settings. See Best Practices for Creating a Payments Workflow.
- Advanced Settings. See Manage Advanced Settings for Payment Processing.
- Payment Requirements. See Configure Payment Requirements as a Payor.
- Enabling Lien Waivers. See Enable Lien Waivers in the Company Payments Tool.
- Managing Payment Requirements. See Manage Payment Requirements as a Payor.
- Payment Processing. Manage Payment Processing.
- Subcontractor Invoices Tab. See About the Subcontractor Invoices Tab in the Payments Tool.
- Disbursements Tab. See About the Disbursements Tab in the Payments Tool.
- Beneficiaries Tab. See About the Beneficiaries Tab in the Payments Tool.
Sample Training Agenda: Streamline Lien Waiver Collection with Procore Pay
For teams interested in streamlining lien waiver collection:
- Manage Lien Waivers on Subcontractor Invoices
- As a payor:
- As a payee:
- Pay Invoices with Procore Pay
Sample Training Agenda: Manage Payment Requirements & Payment Holds on Subcontractor Invoices with Procore Pay
For teams interested in managing payment requirements and payment holds:
- Manage Payment Holds as a Payor
- Manage Payment Requirements
Sample Training Agenda: Procore Pay + Payments Workflow
For teams interested in using the Workflows tool to customize an approval process for Payments:
- Create and Configure a Payments Workflow Template. See Example Payments Workflow.
- Procore Pay + Payments Workflow
Step 3: Payment Testing & Project Closeout
Your team will work with the Payment Operations team at Procore to complete payment testing. When complete, your Procore Implementation Project Manager discusses lessons learned and works with you to close the implementation project.
Click here to view the steps.
For this step, you'll work with the Payment Operations team at Procore to and Implementation Project Manager to:
- Perform Payment Testing. The Payments Operations team will work with your Payments Admins and Payments Disbursers to test how your funding account's financial institution responds to wire requests.
- Perform Production Payments. When testing is complete, your Payments Admins and Payments Disbursers can begin sending the first round of production payments. Your Payments Admins and Payments Disbursers can initiate contact and provide feedback about your experience to the Payments Operations team.
- Lessons Learned & Project Closeout. After your first round of production payments, your Procore Implementation Manager will meet with your team to close out the implementation project and review lessons learned.
Authorize Payment Admins
Add Payments Disbursers
Add Payments Beneficiary Approvers
Set Up MFA on a Mobile Device
- Install an Authenticator App on Your Mobile Device
- Log in to the Procore Web Application
- Log in to the Procore Web Application with MFA
Install an Authenticator App on Your Mobile Device
Before you begin the login steps, install an authenticator app on your mobile device. Procore Pay's MFA solution is compatible with TOTP-compliant Authenticator apps.
Important
- You must be located in the United States. Access to Procore Pay is NOT available to users outside of the United States.
- If your device is managed by your company, you may need permission to download the TOTP-compliant password application on your Android or iOS mobile device.
Log in to the Procore Web Application
Authorized Procore Pay users will use these steps to log in to Procore Pay for the first time and enroll their device in MFA.
- On your computer, go to the Procore web application at: https://app.procore.com.
- At the login screen, enter your Procore email address and password. Then, click Log In.
If you are a designated 'Payments Admin', 'Payments Disburser', or 'Payments Beneficiary Approver' in the payor environment, the MFA solution requires you to complete the steps below. See Log in to Procore Pay with Multi-Factor Authentication.
Log in to the Procore Web Application with MFA
- On the Enter Your Password page, enter your Procore Email Address and Password again.
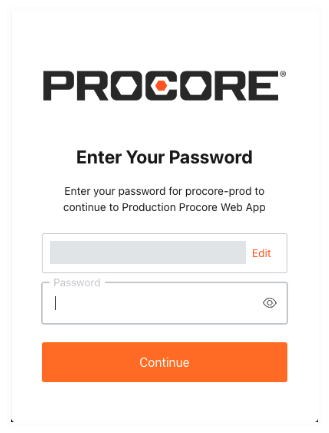
- After entering your login credentials, follow the appropriate steps below:
Examples
If Your Device is Not Enrolled in MFA
If your mobile device is NOT enrolled in MFA, the Secure Your Account page appears. You must download and install an authenticator app to scan the QR code. You will not be able to secure your account if scanning a QR code with your device's camera. Contact your company's IT department for guidance on the app to use in your environment.
Important
- The example steps below show you how to download and install the free Google Authenticator app.
- Your company may require you to use a different authenticator app. To confirm the app to use in your environment, contact your company's IT department.
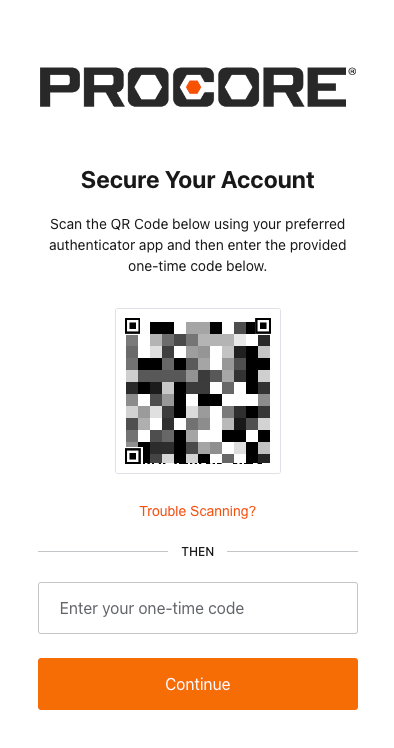
Do the following:
- With your mobile device, open your authenticator app and scan the QR code displayed on your computer's screen.
Tip
Why isn't my phone's camera scanning the QR code? To use the Scan a QR Code function, you must scan the QR code with the Authenticator app. If you are trying to scan the code using your phone's built-in camera software, it will NOT work. Instead, open the Authenticator app and then use the app's built-in scanning function. - At the Almost There page, click Copy Code and mark the I have safely recorded this code check box.
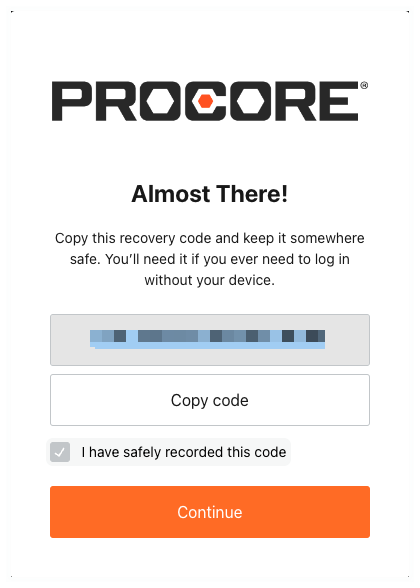
- Click Continue.
If Your Device is Enrolled in MFA
If your device has already been enrolled in MFA, the Verify Your Identity page appears. Check your mobile device's preferred one-time password application for your secret code. Then type that code in the Enter Your One-Time Code box and click Continue.

Important
If your company has implemented its own Single Sign-On (SSO) or MFA requirements, you may be required to enter additional login credentials to access Procore Pay. For assistance with those steps, contact your IT department.
Add Entities
- Navigate to the Payments tool.
- Click the Payments Settings
 icon.
icon.
This opens the Payments Settings page. The 'Business Entities' page in the 'Payments Processing' tab is active by default and lists the business entities that pay invoices for your company's Procore Pay software.
Add Business Information
- On the Business Entities page, click Open Account.
This opens the Business page. - Enter the required business information for the entity.
Important
For verification purposes, your entries must exactly match the information on legal documents. See Why does Procore Pay collect business ownership details? and How does Procore Pay collect, secure, and verify sensitive information?- Business Name. Enter the official legal name of the business, exactly as it appears on legal documents.
- Doing Business As. If your business operates under a name that's different from its legal name, enter that name here.
- Street Address. Enter the primary street address of the business, as it appears on legal documents.
- Street Address Line 2. If your address includes an apartment, suite, or unit number, enter it here.
- City. Enter the city where the business is located.
- State. Enter the state where the business is located.
- ZIP Code. Enter the ZIP code for the business address.
- Country. Select the country where the business is located.
- Phone Number. Enter the primary phone number for the business.
- Website. Provide the URL of the business's official website.
- State of Headquarters. Select the state where the business's main administrative office is located.
- State of Incorporation. Select the state where the business was legally incorporated.
- Country of Incorporation. Select the country where the business was legally incorporated.
- EIN. Enter the business's Employer Identification Number, which is required for tax purposes.
- Business Type. Choose one of these options: Corporation, LLC, or Partnership.
- Place a checkmark in the I have read and accept the Procore User Terms of Service box.
- Click Next.
Add Business Controllers
- On the Business Controllers page, choose one of the options:
- Click Add Business Controller to add the controller's information.
OR - Click Save and Exit to continue at a later time.
OR - Click Next to continue.
- Click Add Business Controller to add the controller's information.
- Enter the following information:
Important
For verification purposes, your entries must exactly match the information on legal documents. See Why does Procore Pay collect business ownership details? and How does Procore Pay collect, secure, and verify sensitive information?
- First Name. Enter the legal first name of the business controller.
- Last Name. Enter the legal first name of the business controller.
- Title. Enter the professional title or position of the business controller.
- Date of Birth. Enter the data of birth (MM/DD/YYY) of the business controller.
- Social Security Number. Enter the Social Security Number (SSN).
- If the controller owns at least 25% of the business, place a checkmark in the This person is a beneficial owner box.
- Residential Street Address. Enter the current residential street address of the business controller.
- Residential Street Address Line 2. If the street address includes an apartment, suite, or unit number, enter it here.
- City. Enter the city where the business controller is located.
- State. Enter the state where the business controller is located.
- ZIP Code. Enter the ZIP code for the residential street address.
- Country. Select the country where the residential street address is located.
- Email Address. Enter the business controller's email address.
- Phone Number. Enter the primary phone number for the business controller.
- Click Create.
- Choose one of the options:
- Click Add Business Controller to add another entry.
OR - Click Save and Exit to continue at a later time.
OR - Click Next to continue.
- Click Add Business Controller to add another entry.
Add Beneficial Owners
- On the Beneficial Owners page, choose one of the options:
- Click Add Beneficial Owner to add a beneficial owner.
OR - Click Save and Exit to continue at a later time.
OR - Click Skip and Submit if the business has no beneficial owner.
- Click Add Beneficial Owner to add a beneficial owner.
- Enter the required information:
Important
For verification purposes, your entries must exactly match the information on legal documents. See Why does Procore Pay collect business ownership details? and How does Procore Pay collect, secure, and verify sensitive information?- First Name. Enter the legal first name of the beneficial owner.
- Last Name. Enter the legal first name of the beneficial owner.
- Title. Enter the professional title or position of the beneficial owner.
- Date of Birth. Enter the data of birth (MM/DD/YYY) of the beneficial owner
- Social Security Number. Enter the Social Security Number (SSN) of the beneficial owner
- Percentage Owned. Enter the exact percentage of the business that the beneficial owner directly or indirectly owns.
- Residential Street Address. Enter the current residential street address of the beneficial owner.
- Residential Street Address Line 2. If the street address includes an apartment, suite, or unit number, enter it here.
- City. Enter the city where the beneficial owner's residential address is located.
- State. Enter the state where the beneficial owner's residential address is located.
- ZIP Code. Enter the ZIP code for the beneficial owner.
- Country. Select the country where the beneficial owner.
- Email Address. Enter the beneficial owner's email address.
- Phone Number. Enter the primary phone number for the beneficial owner.
- On the Beneficial Owners page, choose one of the options:
- Click Add Beneficial Owner to add another beneficial owner.
OR - Click Save and Exit to continue at a later time.
OR - Click Submit if you are ready to start the verification process.
To learn more about the verification process, see How does Procore Pay collect, secure, and verify sensitive information?
- Click Add Beneficial Owner to add another beneficial owner.
About Bank Accounts
Open Deposit Accounts
Add Funding Accounts
Important
Author note: Some updates to this task may need to be manually applied in Edit Funding Accounts and Link External Bank Accounts to a Construction Network Account.- Navigate to the Company level Payments tool.
- Click the Payments Settings icon.
This opens the Payments Settings page. The 'Business Entities' page in the 'Payments Processing' tab is active by default and lists the business entities that pay invoices for your company's Procore Pay software. - Go to the desired business entity and click Add Funding Account.

- In the Add Funding Account panel, do the following:
- Nickname. Enter a unique nickname for the account. Nicknames quickly identify the bank account for disbursements while helping to protect the privacy of its account number.
- Business Entity. Shows the name of the current business entity.
- Account Number. Enter the full account number in this field. See Where do I find my routing and account number?
- Reenter Account Number. Reenter the full account number in this field.
- Routing Number. Enter the routing number for this account. See Where do I find my routing and account number?
- Account Type. Choose Checking or Savings.
- Bank ID. Enter a bank identifier. Procore uses the bank ID as a prefix for a payment's check number. You can change this number at any time. However, any new changes only impact new check numbers.
Important
For companies using the ERP Integrations tool: The bank identifier must match the funding account's 'Bank ID' in your integrated ERP system.
 - Check Number. Enter a check number for the next invoice payment. This provides each check a unique identification number for this account. See How does Procore assign numbers to disbursement payouts? It also helps users who Manage Disbursements to identify transactions.
Important
For companies using the
ERP Integrations tool:- After Procore Pay processes an invoice payment in a disbursement, the 'Bank ID' and 'Check Number' combination is exported to your integrated ERP system.
- To avoid potential ERP synchronization errors, ensure the Check Number entered is higher than the last check number in your ERP system to prevent duplication in your integrated ERP system. See How do payments made in Procore Pay sync with an integrated ERP system?
- Preview. Verify that the 'Bank ID' and 'Next Check Number' are correct.
- Click Continue.
This launches the account verification steps.
Get Started with Account Verification
To protect your company's personal and financial information, verification is required. To learn more, see What is a verified bank account in Procore Pay?
- At the verification prompt, click Get Started.
- In Business Details:
- Company Name. Enter your company's name.
- Address 1*. Enter your company's street address.
- Optional. Address 2. Enter your company's additional address information, such as suite number or floor level.
- City. Enter the city.
- State. Enter a valid state or territory abbreviation.
- ZIP Code. Enter a valid ZIP code.
- Phone Number. Enter a telephone number with an area code.
- Optional. Website. Enter your company's primary website URL.
- Click Continue.
- In Taxpayer Identification Number, enter your ten-digit Business EIN for the Internal Revenue Service (IRS).
- Click Continue.
- On the Bank Account Details page:
- Account Type. Choose Checking or Savings.
- Account Number. Enter your bank account number. Entries have a 17 digit maximum. See Where do I find my routing and account number?
- Routing Number. Enter your account's nine (9) digit American Banking Association (ABA) routing transit number. See Where do I find my routing and account number
- On the Congratulations page, click Complete to start verification.
Procore Pay adds the funding account to the business entity and updates its status to Pending. The status does not change until you work with the Payment Operations team to update any required authorizations and perform testing. This helps prevent issues before you use the new account to fund disbursements. Once the account has been successfully tested, the status will be updated to Verified and the new account can be used to create disbursements to send invoice payments.Tip
- What if verification fails? Contact Support.
Edit Funding Accounts
Important
Procore Documentation Team Only: Any updates made to this task may also need to be manually applied in Add Funding Accounts.- Navigate to the Company level Payments tool.
- Click the Payments Settings icon.This opens the Payments Settings page.
The 'Business Entities' page in the 'Payments Processing' tab is active by default and lists the business entities that pay invoices for your company's Procore Pay software. - Locate the business entity to modify and click its funding account link.

- Locate the account to modify.
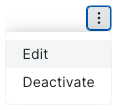
- Click the Overflow menu and choose Edit from the drop-down menu.
This opens the Edit Account Details page. - In the Edit Account Details page, do the following:
- Nickname. Enter a unique nickname for the account. Nicknames quickly identify the bank account for disbursements while helping to protect the privacy of its account number.
- Business Entity. Shows the name of the current business entity.
- Bank ID. Enter a bank identifier. Procore uses the bank ID as a prefix for a payment's check number. You can change this number at any time. However, any new changes only impact new check numbers.
Important
For companies using the ERP Integrations tool: The bank identifier must match the funding account's 'Bank ID' in your integrated ERP system. - Check Number. Enter a check number for the next invoice payment. This provides each check a unique identification number for this account. See How does Procore assign numbers to disbursement payouts? It also helps users who Manage Disbursements to identify transactions.
Important
For companies using the
ERP Integrations tool:- After Procore Pay processes an invoice payment in a disbursement, the 'Bank ID' and 'Check Number' combination is exported to your integrated ERP system.
- To avoid potential ERP synchronization errors, ensure the Check Number entered is higher than the last check number in your ERP system to prevent duplication in your integrated ERP system. See How do payments made in Procore Pay sync with an integrated ERP system?
- Preview. Verify that the 'Bank ID' and 'Next Check Number' are correct.
- Click Save.
Bulk Edit Funding Accounts
- Navigate to the Company level Payments tool.
- Click the Payments Settings
 icon.
icon.
This opens the Payments Settings page. - Click Project Controls.
- Locate the project line item and change its project controls as needed:
Note
If you want to change the project controls in bulk, see Manage Project Controls in Bulk.- Edit Pay. Choose the Enabled or Disabled setting from the drop-down list.
- Edit Business Entity. If your company operates multiple business entities, select one from the drop-down list or choose the 'Select at Disbursement' option. See Add Business Entities as a Payor.
- Edit Funding Account. Choose one of your company's linked external accounts or the Select at Disbursement option. See Add Funding Accounts as a Payor.
-
Beta Edit Early Pay Program. Choose one of your company's Early Pay Programs. To learn more, see About Early Pay Programs.
The system saves your changes automatically.
Set a Default Funding Account
- Navigate to the Company level Payments tool.
- Click the Payments Settings icon.
This opens the Payments Settings page. The 'Business Entities' page in the 'Payments Processing' tab is active by default. This page lists the business entities configured to pay invoices in your company's Procore Pay software. - Locate the business entity to modify and click its funding account(s) link.
- Locate the account to modify.
- Click the Overflow menu and choose Set as Default Funding Account.

The account is marked Default and moves to the top of the entity's Funding Accounts list.

Tip
Can I deactivate our default account at a later time? No. The default account cannot be deactivated in Procore. Before you can deactivate an account, you must remove the default designation. See Deactivate Funding Accounts as a Payor.
Add Invoice Contacts
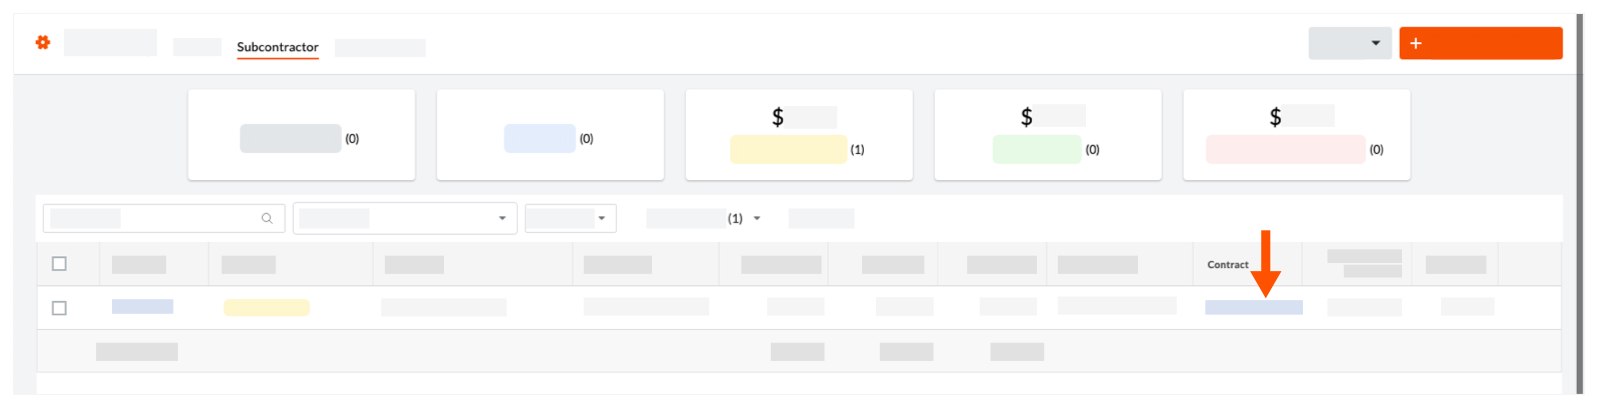
- Navigate to the project's Invoicing tool.
- Click the Subcontractor tab.
- Locate the invoice to update, and click its Contract link.
This opens the commitment. A subcontractor invoice originates from a commitment.
- In the commitment, click Edit.
- Under General Information, do the following:
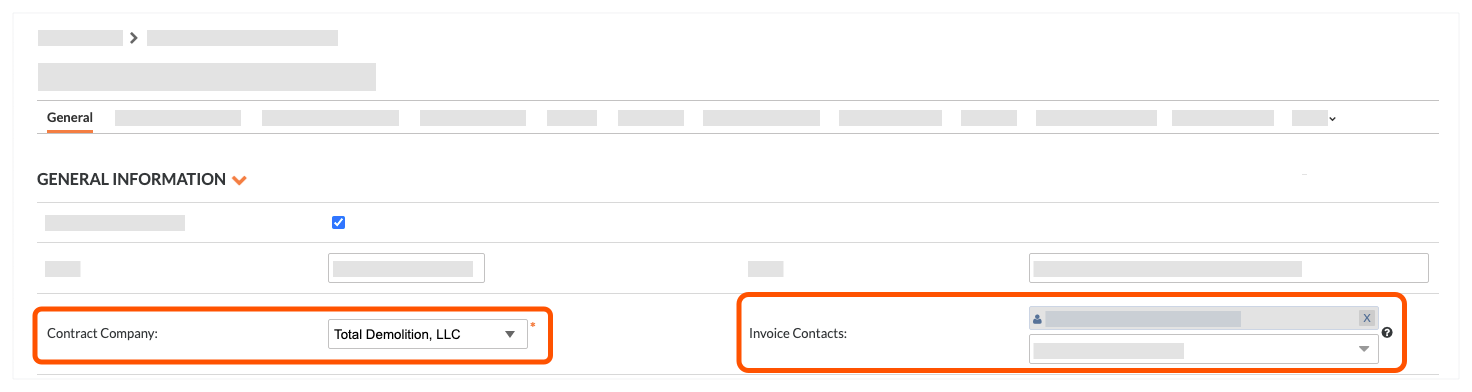
- Contact Company. Select the company record from the drop-down list.
- Invoice Contacts. Select an employee of the company from the drop-down list.
Tips
- Don't see the right company in the 'Contact Company' list? The company record must be added to the Project Directory. See Add a Company to the Project Directory.
- Don't see the desired user in the list? The user must ben an employee of the company record in the Project Directory. See Add a User Account to the Project Directory.
- Click Save.
Invite Beneficiaries to Pay
- Invite a Beneficiary from the Payments Tool
- Invite a Beneficiary from the Commitments Tool
- Invite a Beneficiary from the Invoicing Tool
Invite a Beneficiary from the Payments Tool
A Payments Admin or a Payments Beneficiary Approver can invite a beneficiary company to set up Procore Pay and add beneficiary accounts from the Payments tool.
- Navigate to the company's Payments tool.
- On the Beneficiaries tab, click Invite Company.
- In the Invite to Procore Pay prompt, take the following steps under Invite Beneficiary Company:
- Select the payee's company record from the Company drop-down list.
- Select one (1) of the company's employees from the Send Invite To drop-down list. You can invite up to 20 companies.
Tip
- Company already connected? If the
 icon and gray banner appears above the Company drop-down list, the company is already connected to the system, the system preselects the company's authorized contacts for you.
 - Can't find the company or person in the drop-down lists? If a company has already received an invite, they won't appear in this list. If you need to add a new company, see Add a Company to the Company Directory.
- Want to invite company contacts in bulk? If so, click the Add Another Company button and repeat the steps above for each company to add. You can invite up to ten (10) companies at a time.
- Company already connected? If the
- Click Invite.
An email message with the subject line 'Invitation to Procore Pay' or 'Link Bank Account to Receive Payments' is sent to the invoice contact. The message sent depends on whether the 'Contract Company' on the commitment already has a free or paid Procore account (and also if the company doesn't have a Procore company account). The invoice contact can continue with the next step.
Invite a Beneficiary from the Commitments Tool
An invoice administrator can invite invoice contacts to set up Procore Pay and add beneficiary accounts.
- Navigate to the project's Commitments tool.
- Under the Contracts tab, locate your commitment contract. Then, click the number link to open it.
- Locate the Procore Pay banner.
- Based on the button in the banner, take the following steps:
- Click Set Up Procore Pay.
- Select the invoice contact for the 'Contract Company' on the commitment. The invite is sent to this Procore user.
- Click Invite.
- Click Request Bank Account.
- Click Request.
- Click Set Up Procore Pay.
An email message with the subject line 'Invitation to Procore Pay' or 'Link Bank Account to Receive Payments' is sent to the invoice contact. The message sent depends on whether the 'Contract Company' on the commitment already has a free or paid Procore account (and also if the company doesn't have a Procore company account). The invoice contact can continue with the next step.
Invite a Beneficiary from the Invoicing Tool
An invoice administrator can invite invoice contacts to set up Procore Pay and add beneficiary accounts.
- Navigate to the project's Invoicing tool.
- Click the Subcontractor tab.
- Locate the invoice for the subcontractor and click the invoice number link.
- Locate the Procore Pay banner.
- Based on the button in the banner, take the following steps:
- Click Set Up Procore Pay.
- Select a user of the company to send an invitation to.
- Click Invite.
- Click Request Bank Account.
- Click Request.
- Click Set Up Procore Pay.
An email message with the subject line 'Invitation to Procore Pay' or 'Link Bank Account to Receive Payments' is sent to the invoice contact. The message sent depends on whether the 'Contract Company' on the commitment already has a free or paid Procore account (and also if the company doesn't have a Procore company account). The invoice contact can continue with the next step.
Next Step
Approve Beneficiary Accounts
Configure Fee Collection for Projects
- Navigate to the Company level Payments tool.
- Click the Payments Settings icon.
This opens the Payments Settings page. The Funding Accounts page is active by default. - Click Project Controls.
This opens the Project Controls page.

- In the table, locate the project.
Tip
- Looking for a specific project? Start typing the project name in the Search box to narrow the accounts in the list.
- Want to change the selected 'Pay' status? You can update also update this in the table. To learn more, see Enable or Disable Procore Pay on Your Projects.
- To edit the fee settings, click the 'Apply Fee' field and select one of the following options:
Note: 'SC Pays' is selected by default.- GC Pays. Choose this option when the general contractor is paying the fees.
- SC Pays. Choose this option when specialty contractors are paying the fees.
About Lien Waivers
Enable Lien Waivers
- Navigate to the Company level Payments tool.
- Click the Payments Settings icon.
This opens the Payments Settings page. The Payment Processing tab is active by default. - Click the Payment Requirements tab.
The Lien Waivers page is active by default. - Under Lien Waiver Settings, move the Allow Lien Waivers to be Enabled on All Projects toggle to the ON or OFF setting:
Option Setting Description 
ON - Invoice administrators can complete the steps in Enable Lien Waivers & Set Default Templates on Projects, Preview Lien Waivers on Subcontractor Invoices, and View Lien Waivers on Project Invoices.
- Invoice contacts in the payee environment can complete the steps in Sign Lien Waivers on Subcontractor Invoices and View Signed Lien Waivers on a Project.

OFF - Invoice administrators cannot perform the above steps.
- Turning the setting OFF does:
- NOT remove any existing lien waiver data from Procore.
- NOT hide the 'Lien Waiver Templates' table in the Company level Payments tool.
- NOT hide any lien waivers that were signed on project invoices before this setting was disabled.
- NOT prevent users from creating or editing custom lien waiver templates.
Create Lien Waiver Templates
- Navigate to the Company level Payments tool.
- Click the Payments Settings icon.
This opens the Payment Settings page. The External Bank Accounts tab is active by default. - Click the Payment Requirements tab.
- Click the Lien Waivers page.
- Click Create.
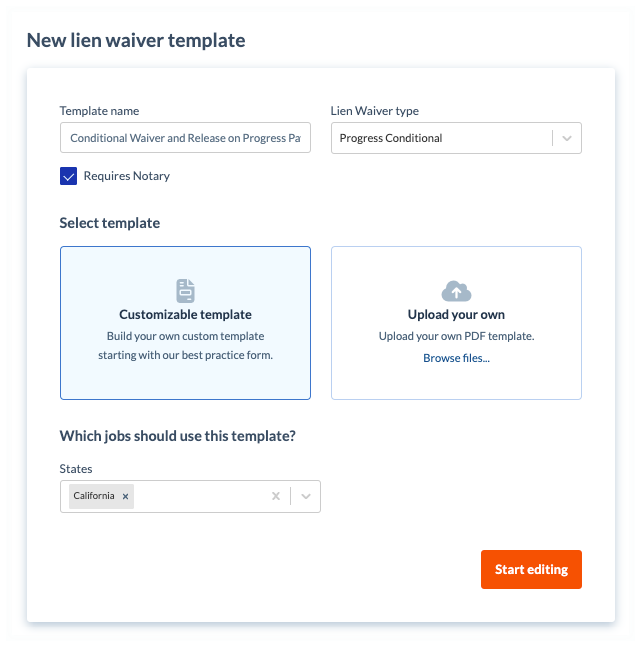
This opens the Create Lien Waiver Template panel. - Under New Lien Waiver Template, do the following:
Note
An asterisk (*) below indicates a required field.- Template Name*
Type a name for the template. - Lien Waiver Type*
Select the type of lien waiver.Tip
What does each type mean? To learn about each option, see What types of lien waiver templates can you create? - Optional: Requires Notary.
Mark the checkbox to include space for a notary public's signature and legal seal. Clear the checkbox to omit this space.
- Template Name*
- In the Select Template area, choose one of these options:
- Customizable Template
Click this option to build your own custom template using our best practice form. - Upload Your Own
Click this option and then click the Browse Files button to select a PDF file to upload from your computer or network.Note
If your PDF file contains pre-built form fields, the placeholders for those form fields are NOT imported.
- Customizable Template
- Under Which jobs should use this template? do the following:
- States. Choose from these options in the drop-down list:
- To apply the template to all states and territories, select All States. This is the default setting.
- Select the applicable options to apply the template to specific states and territories. You can select one (1) or multiple options.
Tip
Does the list of states include all of the states and territories of the United States? Procore's States list includes all 50 states, the Federal District (Washington D.C.), and three (3) major territories (Guam, Puerto Rico, and the U.S. Virgin Islands).
- States. Choose from these options in the drop-down list:
- Click Start Editing.
- In the template, use the controls in the text editor to add content and adjust the formatting and layout of the template.
- Optional: Under Variables, click and drag any variable into the appropriate position on the template.
- Optional: To preview the template, click Preview.
Note
As you build your template, Procore recommends previewing it to ensure that the finished template provides you with the desired result. To quit the Preview Template window, click the Close button. - Click Create.
Procore adds your template to the Lien Waiver Templates table.
Add Invoice Administrators
Enable Templates on Projects
Enable Lien Waivers
- Navigate to the Project level Invoicing tool.
- Click the Settings icon.
This opens the Invoicing tool's Settings page. - Scroll to the Lien Waivers section. Then choose from these options:
Tips
- Don't see any options? The lien waiver settings must be enabled for Procore Pay. See Enable Lien Waivers in the Company Payments Tool. See The project must have a 'State' selected in the Project level Admin tool on the General tab in the Project Location section.
- What do the different lien waiver types mean? To learn about the types, see What types of lien waiver templates can you create?
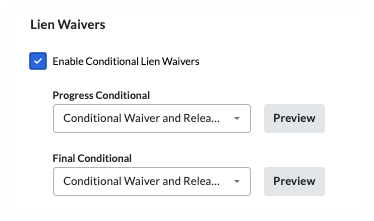
- Enable Conditional Lien Waivers
Mark this checkbox to enable the use of any conditional lien waiver templates created for use by your company. Clear the checkbox to disable the use of those templates. When you mark the checkbox, you also have the option to set the default template for the project:
Tips
- Why am I seeing a 'No template' message? If the 'No template' message appears, create a lien waiver template for the waiver type. See Create Lien Waiver Templates. To appear in this list, the 'State' defined for the template must match the Procore project's Project Location information.
- How do I know if a lien waiver is compliant with State requirements? For states that mandate the use of a specific lien waiver form, Procore Pay's Levelset integration provides lien waiver templates that comply with state requirements. For states without mandates, best practice templates are available. See Lien Waiver Release Forms - State by State
 on the Levelset website. Note: Your company must ensure that lien waiver templates comply with all applicable laws and regulations. Always consult a legal advisor.
 - Why can't I select a template from the drop-down list? If the drop-down list is grayed out and unavailable, Levelset's lien waiver database has determined that lien waiver type is unavailable in the project's State.
- What do the different lien waiver types mean? To learn about the types, see What types of lien waiver templates can you create?
- Progress Conditional
Select the template to use as your project's default lien waiver template. Click Preview to download a PDF version of the template. - Final Conditional
Select the template to use as your project's default lien waiver template. Click Preview to download a PDF version of the template.Tip
Why did the template open in a browser or third-party application? Your computer or browser settings are most likely configured to open PDF files automatically. To change your system's settings, search for instructions online or contact your company's IT department for assistance.
- Enable Unconditional Lien Waivers
Mark this checkbox to enable the use of any conditional lien waiver templates created for your company. Clear the checkbox to disable the use of those templates. When you mark the checkbox, you also have the option to set the default template for the project:
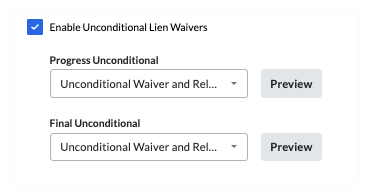
- Progress Unconditional
Select the template to use as your project's default lien waiver template. Click Preview to download a PDF version of the template. - Final Unconditional
Select the template to use as your project's default lien waiver template. Click Preview to download a PDF version of the template.
- Progress Unconditional
- Enter the name of the project's owner in the Property Owner field. This required field becomes active when the Conditional and/or Unconditional Lien Waivers options are enabled.

Note
The 'Property Owner' name can be added as a placeholder in a lien waiver template. See What variables can we include as placeholders in a lien waiver template? - Click Save.
Tip
Want to collect sub-tier lien waivers from the sub-tier contractors who perform work for your first-tier subcontractor? To learn how to enable sub-tier lien waiver collection, see Enable Sub-Tier Waivers on Subcontractor Invoices as an Invoice Administrator.Enable First- and Sub-Tier Waivers with Sworn Statements
For payors who want to collect sworn statements, contact your Procore point of contact for assistance with adding the sworn statement table to your custom template the first time.
- Navigate to the Project level Invoicing tool.
- Click the Settings icon.
This opens the Invoicing tool's Settings page. - Under First-Tier Waivers, choose one (1) or both of these options:
- Enable Conditional Lien Waivers
Mark this checkbox to enable the use of any conditional lien waiver templates created for your company. Clear the checkbox to disable the use of those templates. - Enable Unconditional Lien Waivers
Mark this checkbox to enable the use of any conditional lien waiver templates created for your company. Clear the checkbox to disable the use of those templates.Tips
- Are you planning to collect sworn statements in your lien waivers? Typically, users who enable sworn statement collection only choose the Enable Unconditional Lien Waivers option. To include sworn statements table in a custom template, contact your Procore point of contact.
- What do the different lien waiver types mean? To learn about the types, see What types of lien waiver templates can you create?
- Enable Conditional Lien Waivers
- Under When Should First Tier Lien Waivers be Requested, always choose the Request at Invoice Approval option. This option ensures Procore Pay only generates the project's lien waiver after your team has collected and/or input the required sub-tier information for the sworn statement.
- Under Sub-Tiers, mark the Enable Sub-Tier Waivers check box.
- Under How Should Sub-Tier Waivers be Collected on this Project?, always choose the Require Unconditional Waivers for the Current Invoice option.
- Mark the Display Custom Instructions about Sub-Tier Waiver Submission check box.
- Type any instructions in the Enter Custom Instructions box.
- Mark the Require Collection of Extended Sub-Tier Information for Use on Sworn Statements or Contractor Affidavits box.
- Enter the name of the project's owner in the Property Owner field. This required field becomes active when the Conditional and/or Unconditional Lien Waivers options are enabled.
Note
The 'Property Owner' name can be added as a placeholder in a lien waiver template. See What variables can we include as placeholders in a lien waiver template? - Under Templates, configure the desired lien waiver template for each enabled lien waiver type. Always select the lien waiver template that contains the sworn statement fields.
Tip
- Why am I seeing a 'No template' message? If the 'No template' message appears, create a lien waiver template for the waiver type. See Create Lien Waiver Templates. To appear in this list, the 'State' defined for the template must match the Procore project's Project Location information.
- How do I know if a lien waiver is compliant with State requirements? For states that mandate the use of a specific lien waiver form, Procore Pay's Levelset integration provides lien waiver templates that comply with state requirements. Best practices templates are available on the Levelset website. See Lien Waiver Release Forms - State by State . Your company must ensure that your lien waiver templates comply with all applicable laws and regulations. If you have questions, consult a legal advisor.
- Why can't I select a template from the drop-down list? If the drop-down list is grayed out, that type of lien waiver is not available in the project's state, according to Levelset's lien waiver database.
- Click Save.
About the Sub-Tiers Card on a Subcontractor Invoice
Enable Sub-Tier Waivers
- Navigate to the Project level Invoicing tool.
- Click the Settings icon.
- Scroll to the Lien Waivers section.
Tips
- Don't see any options? Lien waivers must enabled for Procore Pay. See Enable Lien Waivers in the Company Payments Tool.
- Mark the Enable Sub-Tier Waivers check box to show the 'Sub-Tiers' card on the 'Lien Rights' tab of the project's subcontractor invoices. Clear the checkbox to hide the sub-tier card.
- Under the How should sub-tier waivers be collected on this project? section, you have these options to collect signed waivers from sub-tier contractors:
Note
Invoice contacts must collect signatures from their sub-tier contractors outside of Procore. Next, they upload and submit the signed waivers with their subcontractor invoice for the Open billing period. See Upload Sub-Tier Waivers to a Subcontractor Invoice as an Invoice Contact.- Require unconditional waivers from all sub-tiers before paying the next invoice
Most payors collect unconditional waivers for the previous invoice before paying the next invoice. - Require either a conditional or unconditional waiver from each sub-tier before paying the current invoice, and ensure a complete set of unconditional waivers before paying the next invoice
Some payors collect either a conditional or unconditional waiver before paying the current invoice. They also ensure a complete set of unconditional waivers are collected for the previous invoice, before paying the next invoice. - Require unconditional waivers from all sub-tiers before paying the current invoice
Some payors collect only unconditional sub-tier waivers before paying the current invoice.
- Require unconditional waivers from all sub-tiers before paying the next invoice
- Mark the Display Custom Instructions About Sub-Tier Waiver Submission checkbox to type a custom instruction message about sub-tier waiver submissions in the Enter Custom Instructions box.
Example
If you only want to collect sub-tier waiver signatures from sub-tier subcontractors who invoiced over a certain amount (for example,$10,000.00), type the instructions and the amount in the text box. If you require notarized signatures on sub-tier waivers, include that in the instructions.

The 'Instructions from [General Contractor Name]' area on the sub-tiers card. If you are NOT required to collect waiver information on an invoice, the 'Sub-Tier Information for This Invoice' card appears on the invoice. If you are required to collect waivers for the current invoice or a previous invoice, the card name(s) match the project's waiver collection requirements set on the Invoicing tool by an invoice administrator. See Enable Sub-Tier Waivers on Subcontractor Invoices as an Invoice Administrator.

- Under Property Owner, type the property owner's name. Your entry appears on this project's first- and sub-tier lien waivers.
- Under Templates, select the desired lien waiver template for each lien waiver type from the drop-down lists.
Tips
- What are the different lien waiver types? What type of lien waivers can you create in Procore Pay?
- How do you enable a lien waiver type in Procore Pay? See Enable Lien Waivers & Set Default Templates on Projects and Enable Sub-Tier Waivers on Subcontractor Invoices as an Invoice Administrator.
- Click Preview to view your selected lien waiver types.

- Click Save.
Configure Payment Requirements
- Navigate to the Company level Payments tool.
- Click the Payments Settings icon.
This opens the Payments Settings page. - Click the Payment Requirements tab.
- Click Payment Requirements.
- Choose one (1) option for each requirement:
- Not Required. Doesn't track the payment requirement.
- Required but Allows Payment. Alerts users about unsatisfied payment requirements but lets them send payments.
- Required and Prevents Payment. Alerts users about unsatisfied payment requirements and prevents them from sending payments.
- Configure the options in each section as desired:
Available Payment Requirements
| Option | When ON... | When OFF... | Learn More |
|---|---|---|---|
| Holds Released | Tracks the status of any payment holds applied to invoices. Holds must be released before payment. | Doesn't track invoices for payment holds. | Manage Payment Holds as a Payor |
| Commitment Executed | Tracks the commitment associated with the invoice to ensure a check mark appears in the 'Executed' box. | Doesn't track the 'Executed' state on the commitment. | Create a Commitment Edit a Commitment |
|
Contract Compliant |
Tracks the status of the contract compliance documents for the commitment. | Doesn't track the compliance status of the insurance certificates | Manage Contract Compliance Documents & Statuses for a Commitment |
| Change Orders Executed | Tracks change orders that impact the contract associated with the invoice and require them to be in the 'Executed' state. | Doesn't track change orders. | Create a Change Order |
|
Insurance Compliant |
Tracks the status of the insurance certifications for the commitment. | Doesn't track the compliance status of the insurance certificates. | Manage Insurance & Compliance Statuses for a Commitment |
| Invoice Approved | Tracks invoices to ensure they are in one of these statuses: Approved, Approved as Noted, and Pending Owner Approval. See What are the default statuses for Procore invoices? | Doesn't track invoice status. | Bulk Edit the Status of Subcontractor Invoices with the Invoicing Tool |
| Invoice Compliant | Tracks required compliance documents on subcontractor invoices. | Doesn't track invoice status. | Add Required Compliance Documents to Compliance Templates |
| Owner Funding Received | Tracks the total 'Payment Received' entries against the 'Current Payment Due' for the owner invoice's billing period to ensure the owner invoice is fully paid. | Doesn't track 'Payment Received' entries. | Create a Record for a Payment Received |
| Sync to ERP | Tracks the invoice to ensure it is synced with an integrated ERP system. | Doesn't track invoice syncing with ERP. | ERP Integrations |
| First-Tier Conditional Lien Waiver Signed | Tracks first-tier signatures on conditional lien waivers on your invoices. Note: Only appears on an invoice when the requirement is enabled on its project. See Enable Lien Waiver Templates on a Project. |
Doesn't track signatures. | Create Lien Waiver Templates |
| First-Tier Unconditional Lien Waiver Signed | Tracks first-tier signatures on unconditional lien waivers for your invoices. Note: Only appears on an invoice when the requirement is enabled on its project. See Enable Lien Waiver Templates on a Project. |
Doesn't track signatures. | Create Lien Waiver Templates |
| Sub-Tier Waivers | Tracks when sub-tier waivers are in the 'Approved' status. This requirement will not exist on projects that has disabled sub-tier waivers. Note: If sub-tier waivers are disabled on a project, this requirement won't appear. See Enable the Sub-Tiers Card & Add Instructions on Project Invoices. |
Doesn't track signatures. | Manage Sub-Tier Waivers |
Manage Project Controls in Bulk
- Navigate to the Company level Payments tool.
- Click the Payments Settings icon.
This opens the Payments Settings page. - Click Project Controls.
This opens the Projects Controls page.

- Optional. Start typing a project name in the Search box to narrow down the list of projects.
- In the table, select one or multiple projects:
- To select one or multiple projects, mark the checkbox(es) that correspond to the desired projects.
OR - To select all projects, mark the checkbox in the heading of the Project column.
- To select one or multiple projects, mark the checkbox(es) that correspond to the desired projects.
- Choose from these options to make a change in bulk:
- Edit Pay. Choose the Enabled or Disabled setting from the drop-down list.
-
Beta Edit Early Pay Program. Choose one of your company's Early Pay Programs. To learn more, see About Early Pay Programs.Note
Can I change the Apply Fee setting in bulk? No. Fee settings must be configured individually on each project. See Configure Procore Pay Fee Collection for a Procore Project.
Changes are saved automatically. A GREEN success banner confirms the action.
Create & Apply Payment Holds
Best Practices
When Procore Pay customers enable the Company level Workflows tool, an authorized team member can create a custom workflow template to approve/reject your disbursements. Your company can create any number of Payments workflow templates. However, only one (1) of those template(s) can be assigned as the default template for Procore Pay.
1. Create and Configure Your Templates |
| Who will be your company's Workflow Manager and who must complete the workflow steps? | How do you manage end-user permissions for Procore Pay + Workflows? | How do you create a Payments Workflow Template? | How do you configure the Payments Workflow Template? |
|
Ready to learn more? |
Ready to learn more? |
Ready to learn more? |
Ready to learn more? |
2. Start Using Your Default Payments Workflow |
| How do you start the Payments workflow? | Need to submit an approve/reject response to a workflow? | Need to start, restart, or return to a previous step in a workflow? |
|
A Payments Admin or a Payments Disburser follows the steps in Create Disbursements. After selecting the funding account, Procore Pay automatically starts the Payments workflow for the disbursement when the Workflow tool is enabled. |
If you are assigned to review a disbursement, submit a response before the due date. To learn more, see Approve or Reject a Disbursement. After submitting an 'Approve' response, an Action Required banner prompts the final reviewer to Authorize the disbursement. Funds are only withdrawn after authorization. See Create Disbursements. |
If you are the designated Workflow Manager for your company's Payments Workflow, learn how to Start a Custom Workflow, Restart a Custom Workflow, or Return a Workflow to a Previous Step. You can also Add Additional Assignees when the existing assignees are unavailable. |

Important
- Invoice approval and disbursement authorization must be completed by two (2) different Procore users.
- If you are the Payments Admin or Payments Disburser who placed any of the invoices on the disbursement into the 'Approved' or 'Approved as Noted' status, Procore Pay will not permit you to approve the disbursement.
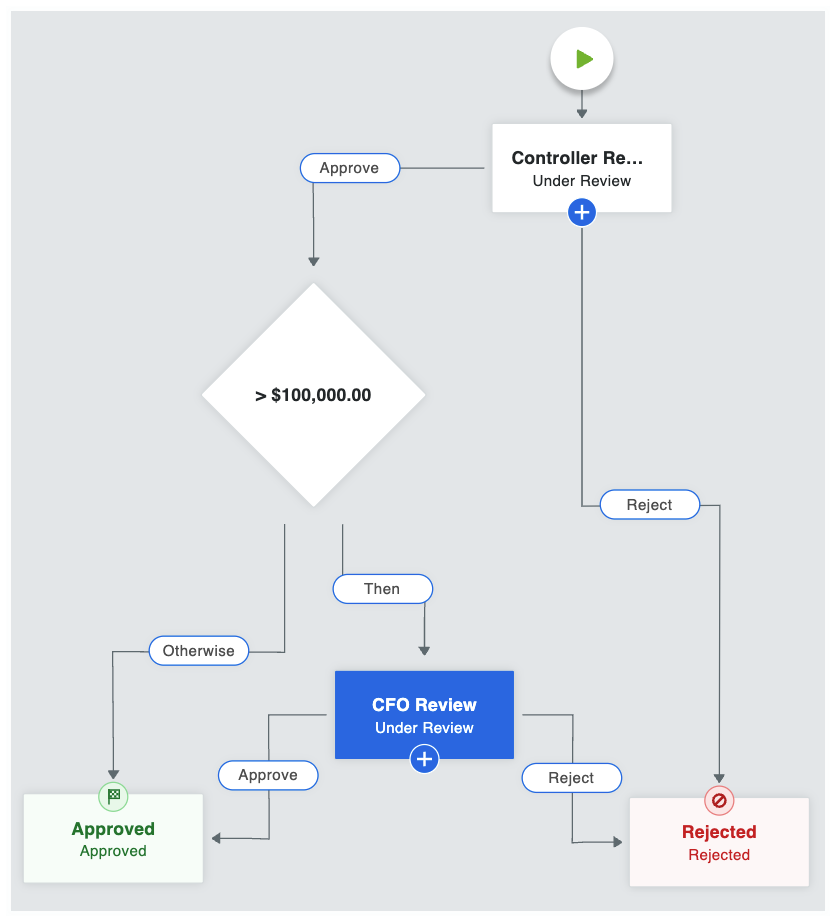
Example Payments Workflow
This is an example of a Payments workflow that starts automatically when a disbursement is created. You can use this example to create your company's Payments Workflow or you can create your own custom workflow to suit your specific business needs. For step-by-step instructions, see Create a Custom Workflow Template.
Example
This table shows you the workflow steps and step details for the example workflow. You can customize the steps and details as needed. To learn more, see What are the different types of steps in a custom workflow?
| Step Name | Step Details | What does it do? |
|---|---|---|
| Controller Review |
|
When a disbursement is created, the workflow is placed into the Under Review status and automatically assigned to the Controller. Emails are sent to the Controller, Workflow Manager & Item Creator. The Controller has five (5) days to provide an approve or reject response. |
| > $100,000.00 |
|
When a controller approves a disbursement and the aggregate disbursement amount is $100,000.00 or greater, the system requires secondary approval by the CFO. If the disbursement amount is less than $100,000, the system automatically moves the disbursement to the Approved step. To learn more about condition steps, see Optional Condition Steps for the Payments Tool. |
| CFO Review |
|
When the aggregate disbursement amount is greater than $100,00.00, the workflow remains in the Under Review status and is automatically assigned to the CFO. Emails are sent to the CFO, Workflow Manager, and Item Creator. The CFO has five (5) days to provide a response. |
| Approved |
|
When the Controller or CFO (only if secondary approval was a required condition), an 'Approve' response updates the disbursement's status to Approved. Emails are sent to the Assignees (Controller and CFO), Workflow Manager, and Item Creator. |
| Rejected |
|
When the Controller and/or CFO submit a Reject response, the system updates the disbursement's status to 'Rejected.' Emails are sent to the Assignees (Controller and CFO), Workflow Manager, and Item Creator. |
Optional Condition Steps for the Payments Tool
When creating conditional statements for the Payments tool, Workflow Managers have these options:
Payments... Show/Hide
| Condition | Definition | Example |
| Disbursement Amount | The total amount of the disbursement is greater than the amount set in the workflow. | If the total amount of a disbursement is greater than or equal to $10,000,000.00, route the disbursement to the CFO for approval. |
| Highest Invoice Amount | The total amount of any project invoice is greater than the amount set in the workflow. | If the amount on any project invoice is greater than $5,000,000.00, route the disbursement to the CFO for approval. |
| Highest Retainage Release | The total amount of retainage release is greater than the amount set in the workflow. | If the amount of retainage released on an invoice payment is greater than $0.00, route the disbursement to the CFO for approval. |
Configure Workflow Template
- Navigate to the Company level Payments tool.
- Click the Payments Settings icon.
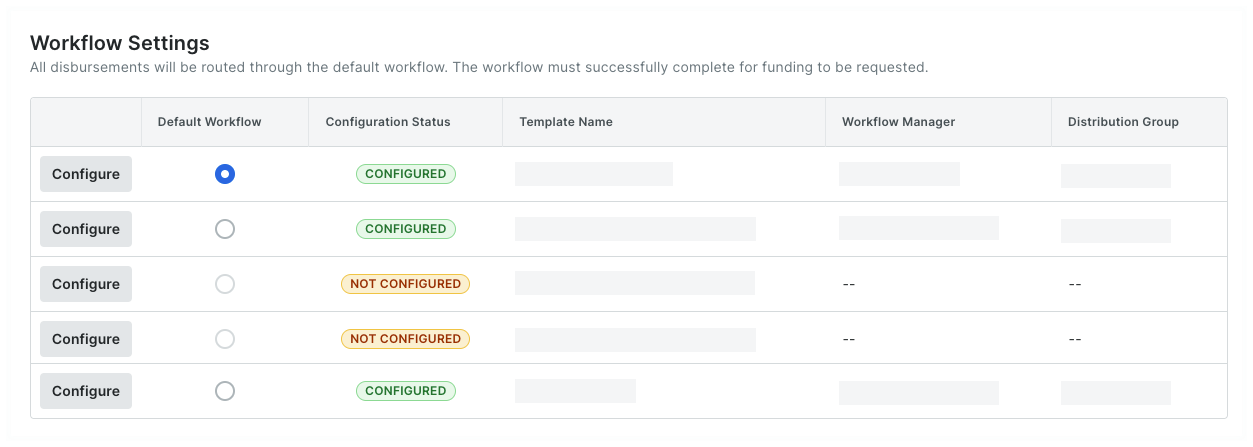
This opens the Payments Settings page. The Funding Accounts tab is active by default. - Click Workflow Settings.
- Under Workflow Settings, toggle Enable Workflows on Disbursements to the ON setting.
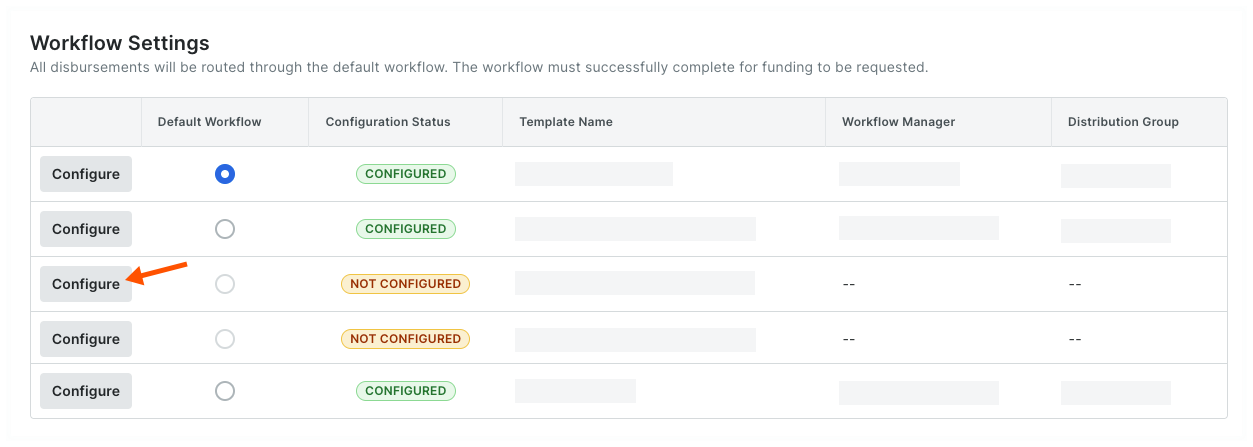
- Under Workflow Templates, locate the workflow template to configure:
- If you are configuring a new workflow template, the configuration status will be Not Configured.
- If you want to reconfigure an existing template, the configuration status will be Configured. You can change the configuration as needed.
- Click the template's Configure button.
This launches the Company level Workflows tool and opens the selected workflow template. - View the step details to configure by clicking the Show Details button.

- Complete the workflow configuration.
Example
In this tutorial, the details are configured using the example workflow from Best Practices for Creating a Payments Workflow, so you'll need to assign the following roles to perform the steps:
- A Payments Admin to be the Workflow Manager. A workflow is only considered complete when a Workflow Manager is assigned to it.
- A Payments Admin or Disburser to be an Assignee for the Controller Review step. Each unique response step in a workflow requires one or more assignees. When there are multiple assignees on a step, the first response given will move the workflow to the next step.
- A Payments Admin or Disburser to be an Assignee for the CFO Review step. Each unique response step in a workflow requires one or more assignees. When there are multiple assignees on a step, the first response given will move the workflow to the next step.
If you have created a custom workflow template, the details you configure will be unique to your environment.
- Click the Save button.
Tip
Can I edit the workflow template later? Yes. You can add or remove steps from your workflow template at a later time. See Edit a Custom Workflow Template. Once editing is complete, you will also need to perform the steps above to re-configure the workflow's details.
Assign a Default Template
- Navigate to the Company level Payments tool.
- Click the Payment Processing tab.
- Click the Workflow Settings link.
This opens a list of workflows that have been created for the Payments tool. It also shows the configuration status of each workflow.Tip
Do you have existing workflows in the Not Configured status? To learn how to configure an existing workflow, see Configure the Settings for a Payments Workflow Template. - In the Default Workflow column, choose the option button that corresponds to the workflow that will be used as the system's default. You can create up to five (5) workflows, but can only assign one (1) default workflow.
Tip
What happens if I change the default workflow? If you decide to change the default workflow, all new disbursements created in the Payments tool will automatically use the new default workflow. Any disbursements that have already started a workflow process will be unaffected by this change.