Payor: Payments Disburser Guide
Table of Contents
- Welcome
- Setup Multi-Factor Authentication
- Subcontractor Invoices Tab
- Disbursements Tab
- Lien Waivers & Templates
Get Started as a Payments Disburser
 |
IMPORtantAuthor note: Log page changes for the Payments Admin Guide in: https://procoretech.atlassian.net/browse/ILR-84 General Availability in Select Markets (United States) Procore Pay Procore Pay This Payments Disburser Guide provides project teams who collect invoices and manage payments with helpful information about how Procore Pay It provides an overview of Procore Pay and includes these topics:
|
What is Procore Pay?
Important
Author note: Link to source file: https://docs.google.com/presentation...98af4431df_0_0Pay builds on the existing Project Financials and Invoice Management tools in Procore to streamline the subcontractor invoice payment process and automate the lien waiver exchange.
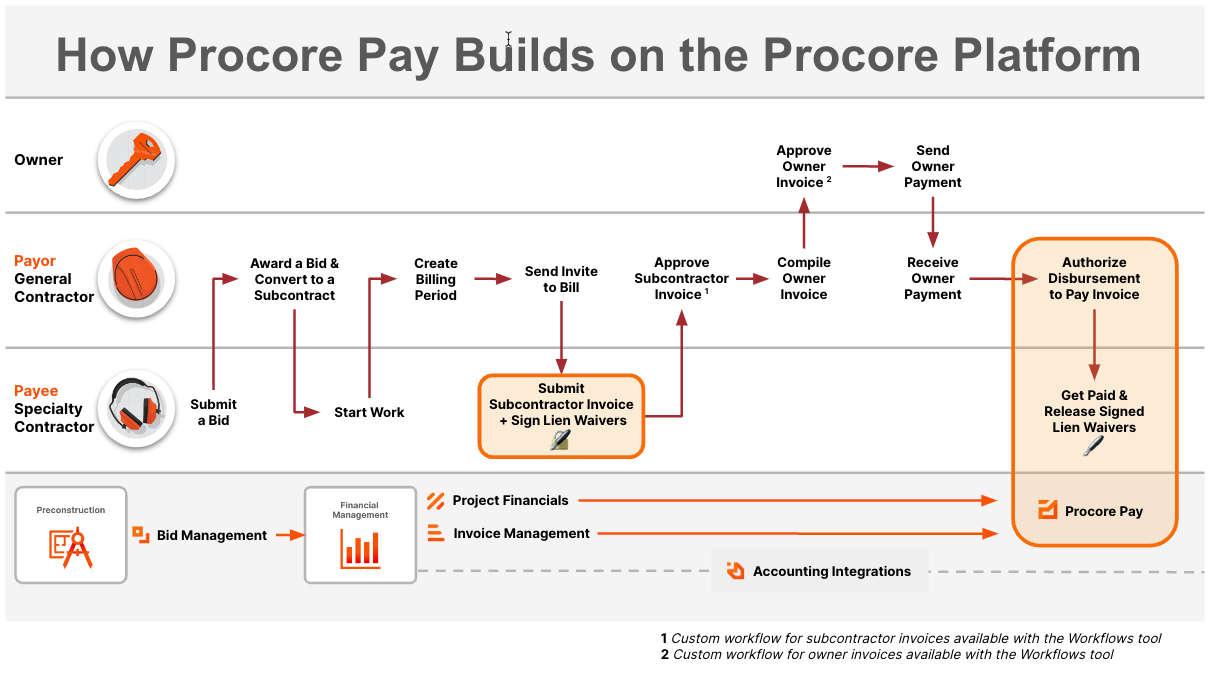
How do funds flow?
Only a Payments Admin or a Payments Disburser can Create Disbursements in Procore Pay. Once authorized, a disbursement initiates these actions depending on your service. Payors can choose one (1) of these services: This is a change
Procore Pay with Procore Payment Services, Inc.'s Money Transmission Services
Click here to view the funds flow.
- A drawdown request is sent from Procore Payment Services, Inc.’s (PPS) For Benefit Of (FBO) account to initiate a drawdown of disbursement funds from the payor's funding account.
- PPS executes the wire transfer from the payor's funding account to the PPS FBO account.
- The PPS FBO account executes the payment orders in the disbursement.
- The individual payments in the disbursement are sent to the payee's bank accounts (a.k.a., the beneficiary accounts in the payor environment).

Procore Pay with Commerce Bank
Click here to view the funds flow.
- A drawdown request is sent from the deposit account* to initiate a drawdown of disbursement funds from the payor's funding account.
- The financial institution executes the wire transfer from the payor's funding account into the payor's deposit account.
- The deposit account executes the payment orders in the disbursement.
- The individual payments in the disbursement are sent to the payee's bank accounts (a.k.a., the beneficiary accounts in the payor environment).

See Also
What is a Payments Disburser?
How does MFA work with Procore Pay?
Set Up MFA for Procore Pay
- Install an Authenticator App on Your Mobile Device
- Log in to the Procore Web Application
- Log in to the Procore Web Application with MFA
Install an Authenticator App on Your Mobile Device
Before you begin the login steps, install an authenticator app on your mobile device. Procore Pay's MFA solution is compatible with TOTP-compliant Authenticator apps.
Important
- You must be located in the United States. Access to Procore Pay is NOT available to users outside of the United States.
- If your device is managed by your company, you may need permission to download the TOTP-compliant password application on your Android or iOS mobile device.
Log in to the Procore Web Application
Authorized Procore Pay users will use these steps to log in to Procore Pay for the first time and enroll their device in MFA.
- On your computer, go to the Procore web application at: https://app.procore.com.
- At the login screen, enter your Procore email address and password. Then, click Log In.
If you are a designated 'Payments Admin', 'Payments Disburser', or 'Payments Beneficiary Approver' in the payor environment, the MFA solution requires you to complete the steps below. See Log in to Procore Pay with Multi-Factor Authentication.
Log in to the Procore Web Application with MFA
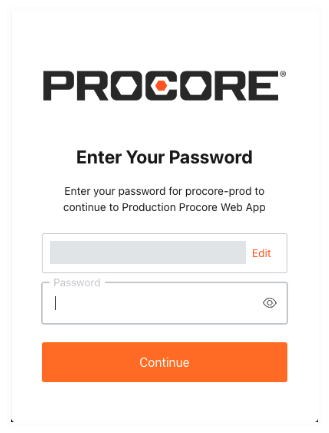
- On the Enter Your Password page, enter your Procore Email Address and Password again.
- After entering your login credentials, follow the appropriate steps below:
Examples
If Your Device is Not Enrolled in MFA
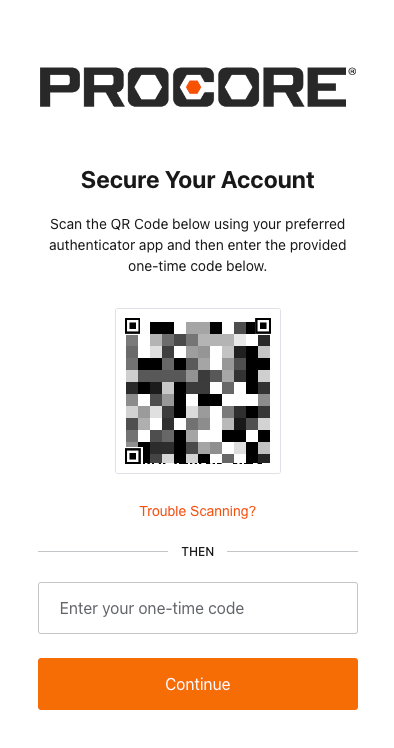
If your mobile device is NOT enrolled in MFA, the Secure Your Account page appears. You must download and install an authenticator app to scan the QR code. You will not be able to secure your account if scanning a QR code with your device's camera. Contact your company's IT department for guidance on the app to use in your environment.
Important
- The example steps below show you how to download and install the free Google Authenticator app.
- Your company may require you to use a different authenticator app. To confirm the app to use in your environment, contact your company's IT department.
Do the following:
- With your mobile device, open your authenticator app and scan the QR code displayed on your computer's screen.
Tip
Why isn't my phone's camera scanning the QR code? To use the Scan a QR Code function, you must scan the QR code with the Authenticator app. If you are trying to scan the code using your phone's built-in camera software, it will NOT work. Instead, open the Authenticator app and then use the app's built-in scanning function. - At the Almost There page, click Copy Code and mark the I have safely recorded this code check box.
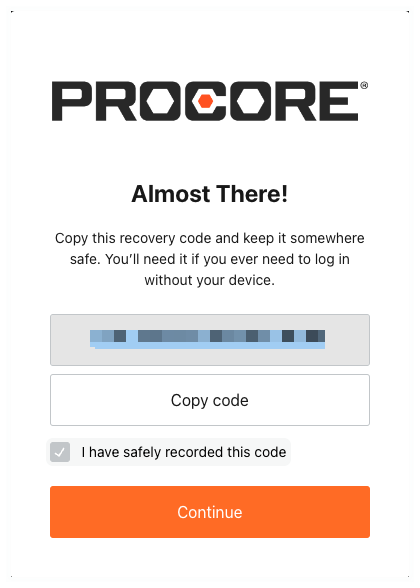
- Click Continue.
If Your Device is Enrolled in MFA
If your device has already been enrolled in MFA, the Verify Your Identity page appears. Check your mobile device's preferred one-time password application for your secret code. Then type that code in the Enter Your One-Time Code box and click Continue.

Important
If your company has implemented its own Single Sign-On (SSO) or MFA requirements, you may be required to enter additional login credentials to access Procore Pay. For assistance with those steps, contact your IT department.
Log In to Procore Pay with MFA
- Go to the Procore web application at: https://app.procore.com.
- Enter your Procore email address and password. Then, click Log In.
- Open the one-time password application on your mobile device and select your account.
Tip
Are you seeing the 'Set Up Your First Account' screen? To learn how to log in for the first time, see Set Up MFA for Procore Pay on Your Device instead of the steps below. - At the Enter Your Password screen shown below, do the following:
- Accept the email address or click Edit to modify the email address.
- Type your Password.
- Click Continue.
- Check the one-time password application on your mobile device for your secret code.
Tip
- What is a one-time password application? A One-Time Password (OTP) application is an app that is installed on a hardware device that helps to safeguard your Procore Pay account from unauthorized access. It generates a random code that you enter when challenged, to verify your identity. The code is randomly generated and changes each time you are challenged by MFA to verify your identity.
- What is an MFA device? An MFA device is an electronic device (such as a mobile phone or another device) on which you have installed the one-time password application.
- At the Verify Your Identity page, choose from these options:
- Recommended. Type your secret code in the Enter Your One-Time Code box.
OR - Click Try Another Method. Then select one of the available options. Typically, you can choose between using one of the listed authenticator apps or you can enter the recovery code that you recorded in Set Up MFA for Procore Pay on Your Device.
Tip
Why are my options different? The options that appear for you depend on the authenticator app that you installed.
- Recommended. Type your secret code in the Enter Your One-Time Code box.
- Click Continue.
If you successfully pass the login challenge, you are logged in to the Procore web application.Important
If your company has implemented its own Single Sign-On (SSO) or MFA requirements, you may be required to enter additional login credentials to access Procore Pay. For assistance with those steps, contact your IT department.Tip
Seeing a blocked account message? To safeguard your company's sensitive information, your account is automatically blocked after multiple consecutive login attempts. For assistance with resetting or recovering your account access, contact your company's Procore Administrator. Your administrator can submit an MFA reset request with Procore's Payments Operations team. See Contact Support.
About the Subcontractor Invoices Tab
- Subcontractor Invoices Table
- Default Columns
- Create Disbursement
- Manage Rows & Columns
- Apply Search & Filter Options
- Export a List
Subcontractor Invoices Table
The key feature in the Subcontractor Invoices tab is the table, which lets you view all of the invoices in your Procore projects that you have been granted permission to see. To learn about the recommended permissions, see What is a Payments Admin? and What is a Payments Disburser?
This tab contains the following elements:
- Export. Click this button to export a list of subcontractor invoices.
- Search. Enter keywords or phrases to search the list for matching items.
- Filters. Click this button to adjust the page filters.
- Select a Column to Group. Choose one or more option(s) from this list to group the table rows by the option(s) selected.
- Invoice Status. Choose an option from this list to filter the data in the list by invoice status.
- Payment Status. Choose an option from this list to filter the data by payment status.

Default Columns
This table details the default columns.
| Column | Description | Default Setting | Learn More |
|---|---|---|---|
| Invoice # | Click a hyperlink to open the corresponding invoice number at the Project level. Procore assigns an Invoice # at creation. Note: Users can also mark one (1) or more Invoice # checkboxes to activate the Add to Disbursement button to add invoices to Draft disbursements. See Add Subcontractor Invoices to a 'Draft' Disbursement. |
ON | Create Subcontractor Invoices |
| Payment Readiness: Requirements | Displays a pie chart of the invoice's payment requirements. BLACK indicates all requirements are met, GRAY indicates incomplete requirements. A unit fraction shows completed payment requirements for each invoice. Click the link to view the invoice’s payment requirements | ON | Manage Payment Requirements |
| Payment Readiness: Holds | Shows the number of holds applied to an invoice. See What is a manual payment hold on a project invoice? | ON | Manage Payment Holds |
| Payment Status | Shows the current payment status of each invoice. The status options include: Paid, Partially Paid, or Unpaid | ON | What are the default payment statuses in Procore Pay? |
| Disbursement No. | Displays the disbursement number for the subcontractor invoice, if included in a disbursement. | ON | Create Disbursements |
| Invoice Status | Shows the current status of each invoice. Use the Project level Invoicing tool to change status. See What are the default statuses for Procore invoices? | ON | Bulk Edit the Status of Subcontractor Invoices with the Invoicing Tool |
| Beneficiary Name | Shows the name of the payee. This corresponds to the 'Contract Company' set on the invoice's commitment contract. To change the company name, edit the Name field under the company's account profile in the Company level Directory tool. | OFF | Edit a Company in the Company Directory |
| Beneficiary Account Status | Shows the onboarding status of the beneficiary. | ON | What are the default statuses for Procore Pay onboarding? |
| Project | Shows the name of the Procore project associated with each invoice. | ON | Change the Name of a Procore Project |
| Billing Period | Shows the invoice billing period. An invoice administrator creates billing periods. | ON | Manage Billing Periods |
| Amounts Group | Groups the 'Amount' columns in the table | ON | - |
| Gross Amount | Shows the total amount of the invoice before subtracting retainage. | ON | Create a Commitment |
| Net Amount | Shows the actual cost of the invoice after subtracting retainage. | ON | Create a Commitment |
| Paid Amount | Shows the amount paid against the invoice to date. | ON | Create Subcontractor Invoices |
| Invoice Dates | Shows the dates entered as the Period Start and Period End on the invoice. These show the Billing Period Dates by default. You can change the dates. | ON | Create Subcontractor Invoices |
| Payment Date | Shows the Payment Date entered on the invoice. | ON | Create Subcontractor Invoices |
| Submitted Date | Shows the Submitted Date entered on the invoice. | ON | Create Subcontractor Invoices |
| Contract | Click the hyperlink to launch the Project level Commitments tool and open the commitment. | ON | View Commitments |
| Total Contract Amount | Shows the commitment contract's total amount. | ON | Create a Commitment |
| % Complete | Shows the percentage of Total Completed and Stored to Date as a % of the Total Amount of the Commitment Contract for the invoice. | ON | Create Subcontractor Invoices |
Create Disbursement
When you select more than one (1) checkbox as pictured above, the Create Disbursement button appears. To learn more, see Create Disbursements.
Manage Rows & Columns
To learn how to manage the rows and columns, see Manage Rows & Columns on the Subcontractor Invoices Tab.
Apply Search & Filter Options
To learn how to apply the search and filter options, see Search for and Apply Filters on the Subcontractor Invoices Tab.
Export a List
To learn how to export a list of subcontractor invoices, see Export Subcontractor Invoices from the Payments Tool.
Create a Disbursement
Review Invoices
- Navigate to the Company level Payments tool.
- Click the Subcontractor Invoices tab.
Note: Use the Search, Filter, and Group By options to narrow the list. See Manage Rows & Columns on the Subcontractor Invoices Tab and Search for and Apply Filters on the Subcontractor Invoices Tab. - Select one (1) or more 'Unpaid' invoice(s) by marking the checkbox(es) and click Add to Disbursement.

-
If one or more ‘Draft’ Disbursements are available to add the selected invoice(s) to, choose Add to Disbursement or Create New from the dropdown menu.

- If there are no available ‘Draft’ Disbursements to add the selected invoice(s) to, click Create New.
Important
When using a custom payments workflow, the New Disbursement page contains two sub-pages: #1 Review Invoices and #2 Select Funding Account.

When not using a custom workflow, the New Disbursement page also contains a #3 Authorize sub-page.

-
- In the #1 Review Invoices page, confirm the list of Invoices being added to the Disbursement. Use the
 icon to remove any invoices as needed.

Tip
Use the carats in the Amounts column header to expand the column group to display the Net Amount, Paid Amount, Joint Check Amount, Early Pay Fee, Amount Due, and Payment Amount for each invoice.

- Click Next or Continue.
Select Business Entity & Funding Account
-
In the #2 Select Funding Account page, enter the disbursement details:

-
Disbursement Name. Enter a unique name to help others identify the disbursement. There is a maximum character limit of 50.
-
Business Entity. If applicable, select the appropriate business entity from the drop-down list. This list only appears for companies operating with more than one (1) business entity. See Add Business Entities as a Payor.
-
Funding Account. Select your company's funding account from the drop-down list. If only one funding account is set up for the selected business entity, it’ll be preselected.
-
-
Select an option to complete the entry:
-
Save as Draft. To save the disbursement as a 'Draft'. Procore adds a 'Draft' status to the disbursement for easy identification. To add more invoices to the disbursement, see Add Subcontractor Invoices to a 'Draft' Disbursement.
-
Start Workflow. To continue with the steps in Workflows Enabled: Start the Payments Workflow & Authorize the Disbursement.
- Continue. To proceed to Authorize Disbursements.
Note: The Continue button only appears if you do not have a custom payments workflow. If you do have a custom payments workflow, the Start Workflow button will appear instead.
-
-
After clicking Save as Draft, Continue, or Start Workflow, the system checks to determine if the selected invoices are eligible for payment. If any invoices are ineligible for payment, an error message appears.

-
Click Show Details to expand the message and review the details.
-
Click Hide Details to hide the error message.
-
Click Deselect All & Start Over to remove impacted invoices and:
-
If all selected Invoices are ineligible for payment, you are returned to the Subcontractor Invoices tab in the Payments tool to start again.
-
If at least one selected invoice is eligible for payment, you are returned to the Review Invoices step in the New Disbursement panel.
-
- Click Back to return to the Review Invoices screen and address the eligibility issue(s) or click the icon to remove the affected invoice(s) from the disbursement.
See Remove Subcontractor Invoices from Disbursements as a Payor.
-
- Click Continue to proceed to the next step.
Authorize a Disbursement
The steps to follow depend on whether the Workflows tool is enabled or disabled in your environment. For instructions, see:
- Workflow Enabled: Start the Payments Workflow & Authorize the Disbursement
- Workflows Disabled: Authorize the Disbursement
Important
Once authorized, a disbursement's drawdown instructions and payment orders cannot be canceled. To cancel a disbursement before authorizing it, see Cancel Disbursements Before Authorization as a Payor.Workflows Enabled: Start the Payments Workflow & Authorize The Disbursement
If the Workflows tool is enabled, a custom payments workflow guides your team through your company's approval process. The system sends an email notification to the assignee for the first step, who then reviews the disbursement and its invoice payments. Your team may have one (1) or multiple workflow steps.
Click here to view the steps.
Start the Payments Workflow
- In the Disbursement # page, click Start Workflow.

The system starts the custom payments workflow configured for the Payments tool. The Workflow Status changes from Not Started to Under Review. A Workflows panel also opens on the right side of the page. - Each assignee(s) on the custom payments workflow must complete their assigned step. For instructions, see Approve or Reject a Disbursement with a Custom Payments Workflow.
On the Workflows panel, the system shows the name of the current workflow step, the due date, the status of the step, and the name of the assignee.
 Once all workflow steps are complete and the disbursement is approved, the Workflows panel shows a record of each step which includes the name of each approver, as well as a date and timestamp for the completed step.
Tips
- Want to hide the disbursement's Workflows panel? Click Hide Workflow.
- Want to cancel the disbursement? Click Cancel Disbursement. This action permanently removes the disbursement. It cannot be recovered, but you can create a new one to replace it.

- Continue with the next step.
Authorize the Disbursement
Once the disbursement is approved, a Payments Admin or Payments Disburser completes the authorization step. To safeguard your company from the potential for misconduct, Procore requires two (2) different users to handle invoice approval and payment authorization. This helps to prevent a single Procore user from unilaterally approving an invoice and authorizing its corresponding payment.
- In the General tab of the disbursement, click Authorize.
Tip
Don't see the Authorize button? If your company has enabled the Workflows tool, but has not configured a custom payments workflow for Procore Pay, an alert banner appears. See Best Practices for Creating a Payments Workflow and Configure the Settings for a Payments Workflow Template.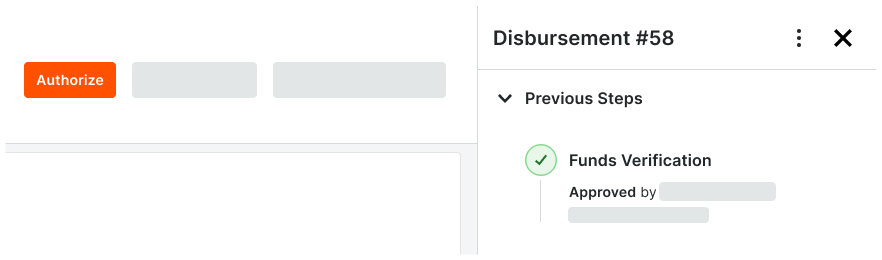
- Click Authorize.
The system performs a check to determine if there are any issues to resolve. - If an alert appears at the top of the page, resolve the issue(s) listed in the alert.
- In the Authorize panel:
- Under Drawdown, mark the checkbox to authorize the drawdown instructions.
- Under Payments, mark the checkbox to authorize the payment orders.
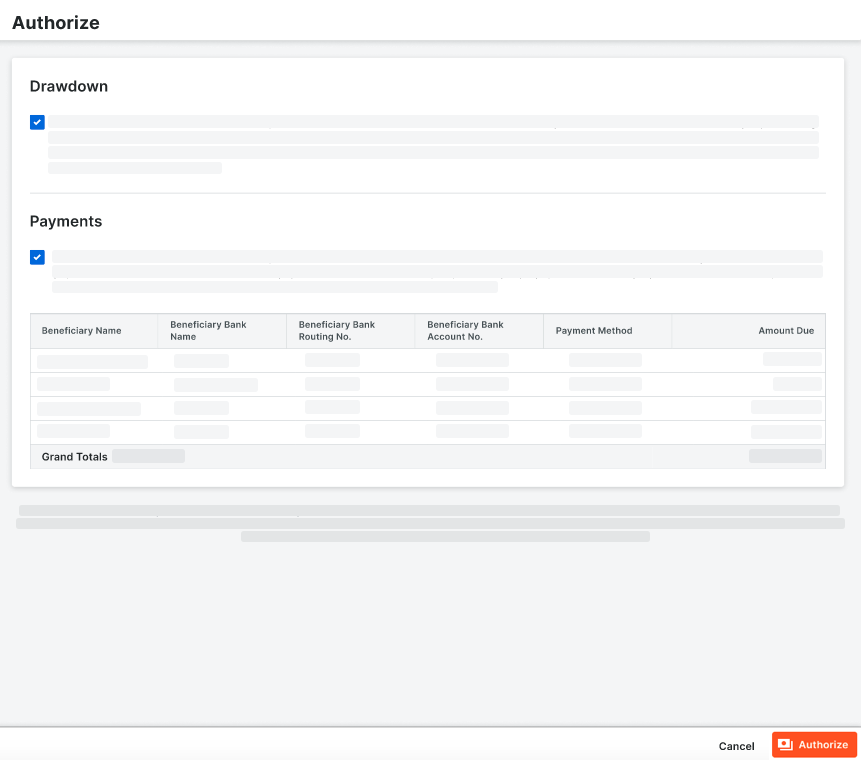
- Click Authorize.
Tips
What happens next? See these tips to learn more:
- Procore Pay issues a required Multi-Factor Authentication challenge to verify the identity of the Payment Disburser authorizing the disbursement. See Complete the Transactional MFA Challenge for Disbursements.
- Procore Pay sends the disbursement and its instructions to the bank. To learn about the status of the drawdown, see What are the default drawdown statuses in Procore Pay? and How do funds flow between bank accounts with Procore Pay?
Workflows Disabled: Authorize The Disbursement
If the Workflows tool is disabled, a third 'Authorize' step appears on the New Disbursement page. A Payments Admin or Payments Disburser must acknowledge the Drawdown and Payments for the disbursement before clicking Authorize.
Click here to view the steps.
Authorize the Disbursement
- In the Authorize panel:
- Under Drawdown, mark the checkbox to authorize the drawdown instructions.
- Under Payments, mark the checkbox to authorize the payment orders.

- Click Authorize.
Tip
What happens next? See these tips to learn more:
- Procore Pay issues a required Multi-Factor Authentication challenge to verify the identity of the Payment Disburser authorizing the disbursement. See Complete the Transactional MFA Challenge for Disbursements.
- Procore Pay sends the disbursement and its instructions to the bank. To learn about the status of the drawdown, see What are the default drawdown statuses in Procore Pay? and How do funds flow between bank accounts with Procore Pay?
See Also
Complete the Transactional MFA Challenge
About the Disbursements Tab
- Navigate to the Company level Payments tool.
The Subcontractor Invoices tab is active by default. - Click the Disbursements tab.
The key features and controls in the Disbursements tab include:
Tip
Don't see the Disbursements tab? Only a Payments Admin or Payments Disburser can view this tab. Your company's Payments Admin can assign users to the Payments Disburser role. See Add Payments Disbursers as a Payor.
Filters
You can filter the table data using these options.

This table shows the filters available in the Disbursements tab.
| Element | Type | Description | Learn More |
|---|---|---|---|
| Created On | Drop-down list | Apply one (1) or more filters to show only those invoices on the list: Last 30 Days, Last 60 Days, Year to Date. | Create Disbursements |
| Funding Account | Drop-down list | Apply one (1) or more filters to show only those invoices related to the selected funding account. Accounts are managed by a Payments Admin. | Manage Bank Accounts |
| Drawdown Status | Drop-down list | Apply one (1) or more filters to show only invoices in the selected statuses. | What are the default drawdown statuses in Procore Pay? |
| Workflow Status (Only available if your team has implemented a custom Payments workflow) | Drop-down list | Apply one of these filters to show only those invoices in the corresponding workflow status. To learn about statuses, see What are the default workflow statuses for disbursements in Procore Pay's custom payments workflow? | Best Practices for Creating a Payments Workflow |
Default Columns
This illustration shows you the default columns in the disbursements table.

This table details the default columns in the disbursements table.
| Element | Type | Description | Learn More... |
|---|---|---|---|
| Disbursement No. | Column | Shows the number assigned to a disbursement. | Create Disbursements |
| Name | Column | Shows the name assigned to a disbursement. | Create Disbursements |
| Funding Account | Column | Shows the name of the funding bank account that funded the disbursement. | Manage Bank Accounts |
| Aggregate Disbursement Amount | Column | Shows the aggregate disbursement amount. This shows the grand total of all the payment amounts in a single disbursement. | Create Disbursements |
| Drawdown Status | Column | Shows the current drawdown status of a disbursement. | What are the default drawdown statuses in Procore Pay? |
| Created By | Column | Shows the name of the Payments Admin who created the disbursement. | Create Disbursements |
| Created On | Column | Shows the date the disbursement was created. | Create Disbursements |
Optional Columns
This table details the optional columns in the disbursements table.
| Element | Type | Description | Learn More... |
|---|---|---|---|
| Workflow Status (Only available if your team has implemented a custom Payments workflow) | Column | This column reflects the current workflow status of each disbursement. To learn about statuses, see What are the default statuses for a disbursement in a Payments Workflow for Procore Pay? | Best Practices for Creating a Payments Workflow |
View a Disbursement
- Navigate to the Company level Payments tool.
- Click the Disbursements tab.
Tip
Don't see the Disbursements tab? To view this tab, your Procore user account must be assigned the Payments Disburser or Payments Admin role. - In the Disbursements tab, the table lists all the disbursements.

- In the Disbursement No. column, click a link to open a disbursement.
Tip
Why do our disbursements have different page layouts? When viewing a disbursement, the information that appears depends on whether the disbursement has been authorized:
- Before authorization, the disbursement page includes the Disbursement Details and Invoices cards.
- After authorization, the disbursement page includes the Disbursement Details, Drawdown, and Payments cards.
Examples
The examples below show you the differences between authorized and unauthorized disbursements. To learn more, see Authorize Disbursements.
Examples
In these examples, the Start Workflow and Show/Hide Workflow buttons only appear if your company implements a Payments Workflow. See Best Practices for Creating a Payments Workflow.
Before a Disbursement is Authorized
Before a disbursement is authorized, the General tab contains the Disbursement Details, Included Invoices, and Removed Invoices cards (only when invoices are removed. See Remove Subcontractor Invoices from Disbursements as a Payor).

Disbursement Details
The Disbursement Details card includes this information:
| Field | Description |
|---|---|
| Disbursement Name | Shows the name assigned to the disbursement. |
| Funding Account | Shows the bank account funding the disbursement. |
| Workflow Status (Only appears if your company implements a Payments Workflow. See Best Practices for Creating a Payments Workflow) | Shows the current approval status of the disbursement. To learn about statuses, see What are the default workflow statuses for disbursements in Procore Pay's custom payments workflow? |
| Aggregate Disbursement Amount | Shows the total sum of all invoice payments for the disbursement. |
Included Invoices
The Included Invoices card includes this information:
| Field | Description |
|---|---|
| Invoice No. | Click the hyperlink to open each invoice in the Project level Invoicing tool. |
| Beneficiary Name | Shows the beneficiary's name for each invoice. |
| Project | Shows the project name for each invoice. |
| Payment Readiness (Requirements & Manual Holds) | Shows the payment requirements and manual holds. See Manage Payment Requirements as a Payor and Manage Payment Holds as a Payor. |
| Billing Period | Shows the billing period for the included invoices. |
| Payment Due Dates | Shows the payment due date for the included invoices. |
| Amounts (Amount Due) | Shows the amount due for each invoice. |
Removed Invoices
If invoices are removed from a disbursement by a Payments Admin or Payments Disburser, they appear in the Removed Invoices card. Once removed, authorized users can add the invoice to a different disbursement. See Remove Subcontractor Invoices from Disbursements as a Payor.

The Removed Invoices card includes this information:
| Field | Description |
|---|---|
| Invoice No. | Click the hyperlink to open each invoice in the Project level Invoicing tool. |
| Beneficiary Name | Shows the beneficiary's name for each invoice. |
| Project | Shows the project name for each invoice. |
| Reason for Removal | Shows the reason entered at the time of removal. See Remove Subcontractor Invoices from Disbursements as a Payor. |
| Removed By | Shows the name of the Payments Admin or Payments Disburser who performed the removal. |
| Removed On | Shows the date and time of the removal action. |
| Amount Due | Shows the amount due for each invoice. |
After a Disbursement is Authorized
After a disbursement is authorized, the General tab contains the Disbursement Details, Drawdown, and Payments cards.

Disbursement Details
The Disbursement Details card includes this information:
| Field | Description |
|---|---|
| Disbursement Name | Shows the name assigned to the disbursement. |
| Funding Account | Shows the bank account funding the disbursement. |
| Workflow Status (Only appears if your company implements a Payments Workflow. See Best Practices for Creating a Payments Workflow) | Shows the current approval status of the disbursement. To learn about statuses, see What are the default workflow statuses for disbursements in Procore Pay's custom payments workflow? |
| Aggregate Disbursement Amount | Shows the total sum of all invoice payments for the disbursement. |
Drawdown
The Drawdown card includes this information:
| Field | Description |
|---|---|
| Funding Account | Shows the funding account for the drawdown. |
| Drawdown Method | Shows the method used to obtain the drawdown. |
| Date Initiated | Shows the date the drawdown request was started. |
| Drawdown Status | Shows the status of the drawdown request. See What are the default drawdown statuses in Procore Pay? |
| Drawdown Amount | Shows the total dollar amount of the drawdown. |
Payments
The Payments card includes this information:
| Field | Description |
|---|---|
| Procore Check No. | Shows the check number for the invoice payments. |
| Procore Invoice No. | Shows the Procore project's invoice number associated with the payment. |
| Procore Project | Shows the name of the Procore project associated with the invoice. |
| Beneficiary Name | Shows the beneficiary of the payment. This is the 'Contract Company' named in the commitment. |
| Beneficiary Bank Account | Shows the beneficiary's bank account information. |
| Payment Method | Shows the payment method. |
| Date Initiated | Shows the date the payment order was started. |
| Payment Status | Shows the status of the payment order. See What are the default payment statuses in Procore Pay? |
| Payment Amount | Shows the total dollar amount of the invoice payment. |
Removed Invoices
If invoices are removed from a disbursement by a Payments Admin or Payments Disburser, they appear in the Removed Invoices card. Once removed, authorized users can add the invoice to a different disbursement. See Remove Subcontractor Invoices from Disbursements as a Payor.
The Removed Invoices card includes this information:
| Field | Description |
|---|---|
| Invoice No. | Click the hyperlink to open each invoice in the Project level Invoicing tool. |
| Beneficiary Name | Shows the beneficiary's name for each invoice. |
| Project | Shows the project name for each invoice. |
| Reason for Removal | Shows the reason entered at the time of removal. See Remove Subcontractor Invoices from Disbursements as a Payor. |
| Removed By | Shows the name of the Payments Admin or Payments Disburser who performed the removal. |
| Removed On | Shows the date and time of the removal action. |
| Amount Due | Shows the amount due for each invoice. |
View Change History
Optional. To view user and system actions related to the disbursement, click the Change History tab. The Change History tab keeps track of this information.
| Field | Description |
|---|---|
| Date | Shows the date the action occurred. |
| Action By | Shows the name of the user who performed the action. |
| Changed | Describes the action. |
| From | Shows the From value of the action, if applicable. |
| To | Shows the To value of the action, if applicable. |
View a Disbursements List
- Navigate to the Company level Payments tool.
- Click the Disbursements tab.
Tip
Don't see the Disbursements tab? To view this tab, your Procore user account must be assigned the Payments Disburser or Payments Admin role. - In the Disbursements tab, the table lists all the disbursements.

- Optional. Filter the data table by selecting one (1) or more of these options:
- Created On. Click the button and select one of these options:
- Last 30 days. Shows only the disbursements created in the last thirty (30) days.
- Last 60 days. Shows only the disbursements created in the last sixty (60) days.
- Year to Date. Shows all of the disbursements created in the past year.
- Funding Account. Click the button to select one (1) or multiple company's funding account options.
Tip
How do you add a funding account to the drop-down menu? See Add Funding Accounts. - Drawdown Status. Click the button to select one (1) or multiple company's funding account options. See What are the default drawdown statuses in Procore Pay?
- Created On. Click the button and select one of these options:
Enable Lien Waivers
- Navigate to the Company level Payments tool.
- Click the Payments Settings
 icon.
icon.
This opens the Payments Settings page. The Payment Processing tab is active by default. - Click the Payment Requirements tab.
The Lien Waivers page is active by default. - Under Lien Waiver Settings, move the Allow Lien Waivers to be Enabled on All Projects toggle to the ON or OFF setting:
Option Setting Description 
ON - Invoice administrators can complete the steps in Enable Lien Waivers & Set Default Templates on Projects, Preview Lien Waivers on Subcontractor Invoices, and View Lien Waivers on Project Invoices.
- Invoice contacts in the payee environment can complete the steps in Sign Lien Waivers on Subcontractor Invoices and View Signed Lien Waivers on a Project.

OFF - Invoice administrators cannot perform the above steps.
- Turning the setting OFF does:
- NOT remove any existing lien waiver data from Procore.
- NOT hide the 'Lien Waiver Templates' table in the Company level Payments tool.
- NOT hide any lien waivers that were signed on project invoices before this setting was disabled.
- NOT prevent users from creating or editing custom lien waiver templates.
Create Lien Waiver Templates
- Navigate to the Company level Payments tool.
- Click the Payments Settings icon.
This opens the Payment Settings page. The External Bank Accounts tab is active by default. - Click the Payment Requirements tab.
- Click the Lien Waivers page.
- Click Create.
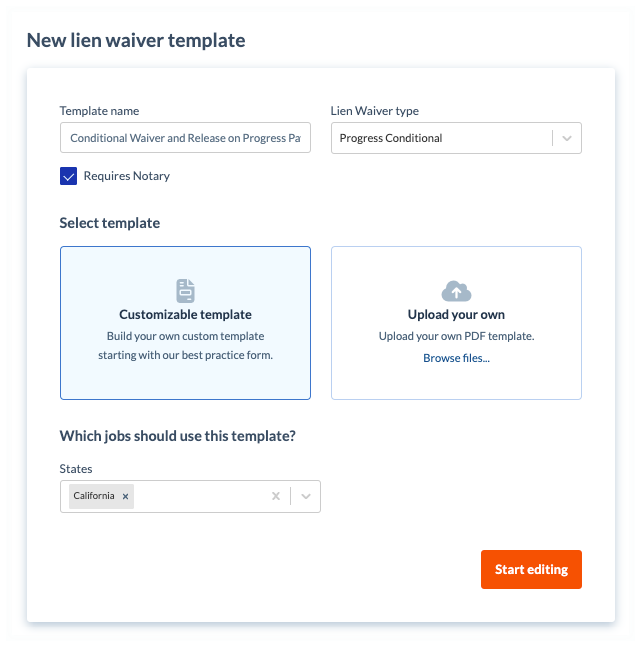
This opens the Create Lien Waiver Template panel. - Under New Lien Waiver Template, do the following:
Note
An asterisk (*) below indicates a required field.- Template Name*
Type a name for the template. - Lien Waiver Type*
Select the type of lien waiver.Tip
What does each type mean? To learn about each option, see What types of lien waiver templates can you create? - Optional: Requires Notary.
Mark the checkbox to include space for a notary public's signature and legal seal. Clear the checkbox to omit this space.
- Template Name*
- In the Select Template area, choose one of these options:
- Customizable Template
Click this option to build your own custom template using our best practice form. - Upload Your Own
Click this option and then click the Browse Files button to select a PDF file to upload from your computer or network.Note
If your PDF file contains pre-built form fields, the placeholders for those form fields are NOT imported.
- Customizable Template
- Under Which jobs should use this template? do the following:
- States. Choose from these options in the drop-down list:
- To apply the template to all states and territories, select All States. This is the default setting.
- Select the applicable options to apply the template to specific states and territories. You can select one (1) or multiple options.
Tip
Does the list of states include all of the states and territories of the United States? Procore's States list includes all 50 states, the Federal District (Washington D.C.), and three (3) major territories (Guam, Puerto Rico, and the U.S. Virgin Islands).
- States. Choose from these options in the drop-down list:
- Click Start Editing.
- In the template, use the controls in the text editor to add content and adjust the formatting and layout of the template.
- Optional: Under Variables, click and drag any variable into the appropriate position on the template.
- Optional: To preview the template, click Preview.
Note
As you build your template, Procore recommends previewing it to ensure that the finished template provides you with the desired result. To quit the Preview Template window, click the Close button. - Click Create.
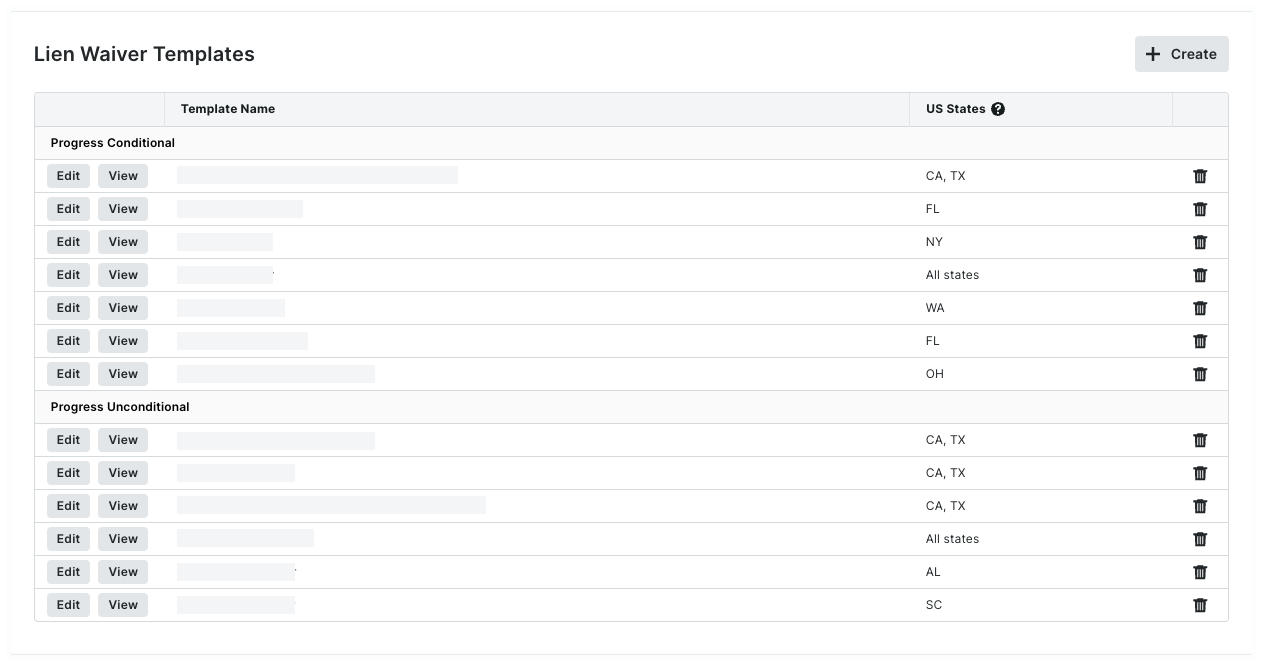
Procore adds your template to the Lien Waiver Templates table.
Edit Lien Waiver Templates
- Navigate to the Company level Payments tool.
- Click the Payments Settings icon.
This opens the Payments Settings page. The Payment Processing tab is active by default. - Click the Payment Requirements tab.
The Lien Waivers page is active by default. - In the Lien Waiver Templates table, locate the template to update. Then click Edit.
This opens the Edit Lien Waiver Template panel. - Review the template and make the desired changes.
- To change the copy, update the body of the template as needed.
- To remove a variable placeholder, click the placeholder in the body of the template and press DELETE.
- To add a variable placeholder, click a field in the Variables list and use a drag-and-drop operation to move the variable into the desired placeholder position.
Tip
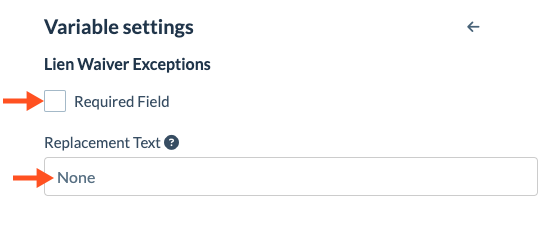
Want to make a field required or include replacement text for blank values? Certain variable placeholders have these options:
- To make the field required, place a mark in the Required Field checkbox as shown below.
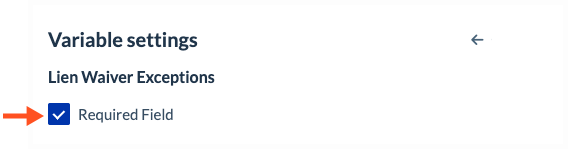
- To make a field optional, remove the mark from the Required Field checkbox. For optional fields, you can also enter a word or phrase, so the text you enter appears when a value isn't available. For example, if there are no Lien Waiver Exceptions to include, the word 'None' will appear on the lien waiver instead of a blank field.
- To make the field required, place a mark in the Required Field checkbox as shown below.
- Optional. To preview your changes, click Preview.
- Click Save.
Any updates that you make go into effect only go into effect on the next project lien waiver. Updates have no effect on existing lien waivers.
Delete Lien Waiver Templates
- Navigate to the Company level Payments tool.
- Click the Payments Settings icon.
This opens the Payments Settings page. The Payment Processing tab is active by default. - Click the Payment Requirements tab.
The Lien Waivers page is active by default. - Locate the template to delete in the table.
Tip
How is the data grouped? By default, Procore groups lien waiver templates by type. To learn more, see What types of lien waiver templates can you create in Procore? - Click the
 trash can icon to delete the template.
- In the Delete Lien Waiver Template? message, choose an option:
- To keep the template, click Cancel.
- To permanently remove the template, click Delete.
Once deleted, the template no longer appears as a selection in the Invoice Settings. See Enable Lien Waivers & Set Default Templates on Projects. Any previous lien waivers generated from the template on the project's existing invoices can continue to be previewed, signed, and viewed.