Resource Tracking and Project Financials: Setup Guide
Table of Contents
- Welcome
- Configure Work Breakdown Structure (WBS)
- Configure Company Time Settings
- Add Budget View - Real Time Labor Productivity
- Add Budget View - Labor Productivity Cost
- Configure Project Settings
- Set up your Unit Quantity Based Budget
- Track Time and Production Quantities with Timesheets
- Production Quantities Change Management
Overview
Considerations
Workflow
This workflow shows the setup instructions as well as the time entries needed to see that information in the budget view.
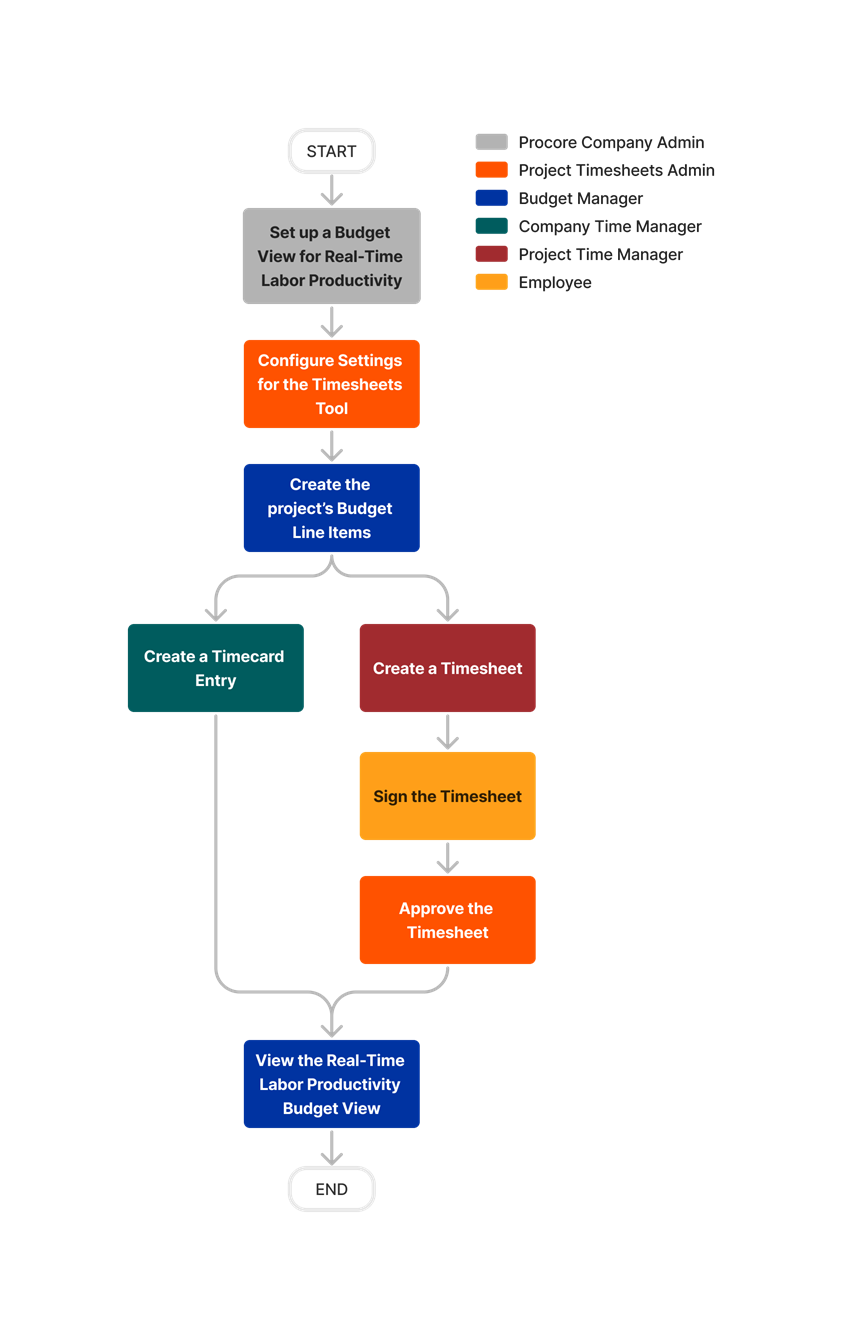


Permissions
Configure Company Level WBS
- Navigate to the Company level Admin tool.
- Click Work Breakdown Structure.
- Click the Configure Settings
 icon.
icon. - Configure one or more of the following settings:
- Sub Jobs
Make sub jobs an option on any projects within your Company.Note
Once sub jobs are in use on at least one project's budget code structure, this setting cannot be turned off. - Budget Code Structure Edits at Project Level
This setting allows users to change the order of segments in the budget code structure at the Project level. - Custom Budget Code Descriptions
This setting allows users to create custom budget code descriptions for all projects within your company.Note
Once this setting is enabled at the Company level, the budget code descriptions setting must be enabled on an individual project's Work Breakdown Structure configuration settings. - Copy Over WBS Sub Job and Cost Code Details When Project Templates Are Used
When this setting is ON and you create a new project from a template, it will inherit both the company-level standard cost codes and any custom cost codes added specifically to that project template. It will also inherit sub-jobs (if enabled). To learn more, see How do my project-specific 'Cost Code' segment items get carried over from a project template to a new project?
Note: Yardi Voyager® and MRI Platform X® users creating a Procore project with this setting enabled must ensure that all cost codes in the project template also exist in the corresponding ERP project (Yardi Voyager® or MRI Platform X®) before applying the template to the Procore project. See Things to Know about the Project Financials + Yardi Voyager® Connector or Things to Know about the Project Financials + MRI Platform X® Connector.
- Sub Jobs
- Click Save.
Add Custom Segments
- Navigate to the Company level Admin tool.
- Under 'Company Settings', click the Work Breakdown Structure link.
- In the 'Segments' table, click the Add Segment button.
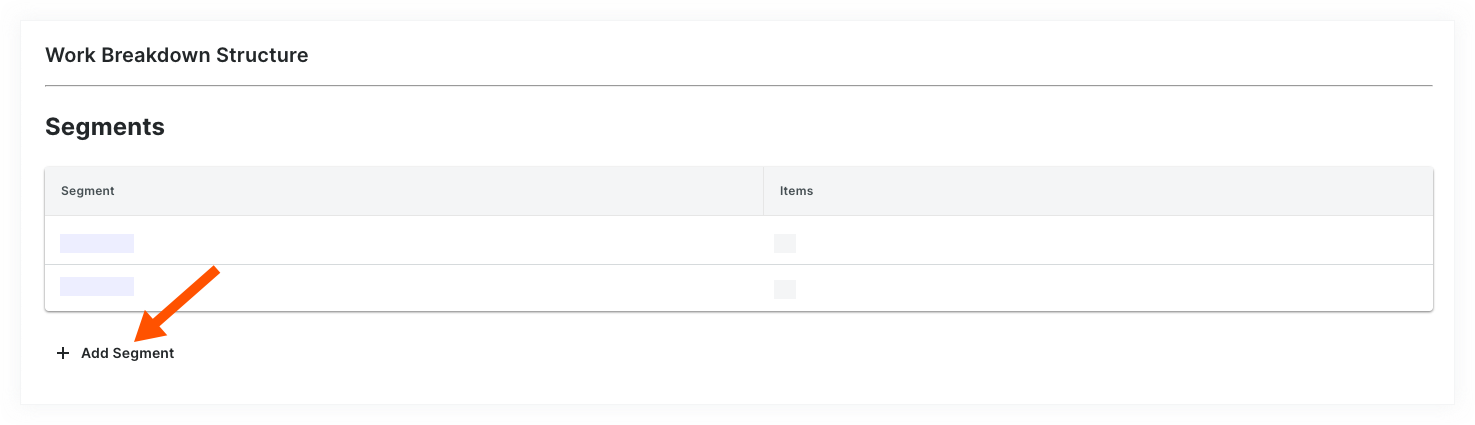
- In the 'New Segment' window, do the following:
Note
An asterisk (*) in the list below indicates a required field.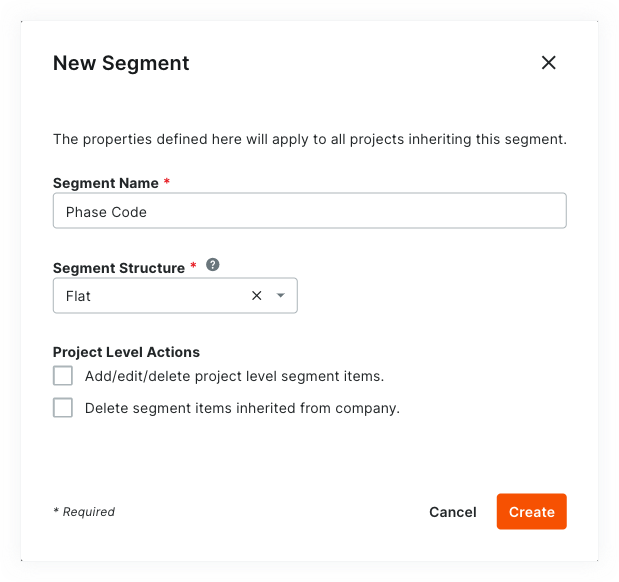
- Segment Name*. Enter a name for your new segment. This is a required field. Duplicate segment names are NOT permitted. A 'Segment Name is in use' message appears to notify if you attempt to enter a name that already exists.
Tip
Not sure what custom segments to create? To learn how other Procore clients use Work Breakdown Structure, see What custom segments should we create for our company's Work Breakdown Structure? - Segment Structure*. Select a value from the drop-down list. This is a required field. Your choices include:
- Flat. Select this option to add your segment to the list with no hierarchy.
- Tiered. Select this option to nest your segment into a tree (hierarchical) structure.
Tip
What's the difference between a flat and tiered segment? To learn the difference, see What is the difference between a flat and tiered segment in Procore's WBS?
- Segment Name*. Enter a name for your new segment. This is a required field. Duplicate segment names are NOT permitted. A 'Segment Name is in use' message appears to notify if you attempt to enter a name that already exists.
- Under the Project Level Actions section, choose one (1) or all of these options:
Note
When the 'Project Level Actions' settings are turned ON, your project administrators (users with 'Admin' level permissions on the Project level Admin tool) are permitted to perform specific tasks on segments and segment items at the project level. These settings are turned OFF by default.- Add/Edit/Delete Project Level Segment Items. Place a mark in this checkbox to provide project administrators with the ability to add, edit, and delete unused segment items on a project. This setting is turned OFF by default.
Note
When this setting is turned ON, project administrators can perform these tasks:
- Delete Segment Items Inherited from Company. Place a mark in this checkbox to provide project administrators with the ability to delete segment items inherited at the Project level from the Company level Admin tool. This is useful to project administrators who don't want new segment items created at the company level to be used on a project. See Delete Unused Segment Items from a Project.
- Add/Edit/Delete Project Level Segment Items. Place a mark in this checkbox to provide project administrators with the ability to add, edit, and delete unused segment items on a project. This setting is turned OFF by default.
- Click Create.
Procore adds the new segment to the bottom of the 'Segments' list. - Repeat the steps above for all of the new segments to add.
Tips
- Need to edit your new segment's settings? The best time to edit a new segment is before you start using it on a project. Once a custom segment is used to create a project budget code, you can edit it at any time. For details, see Edit Custom Segment Settings.
- Want to delete a custom segment? Its important to note that a custom segment cannot be deleted after it has been added to the budget code structure on one (1) or more projects in your company's Procore account. To learn more, see Delete Custom Segments.
- Want to add segment items? If your new segment is created, you can add new items now. For instructions, see Add Custom Segment Items.
- Ready to define your company's default budget code structure? You can arrange your segments in any order you want. This arrangement defines your company's budget code structure. For instructions, see Arrange Segments to Form the Company's Budget Code Structure.
Create Your Project's WBS
Objective
To adjust your company's Work Breakdown Structure (WBS) for a Procore project.
Background
After creating a new project in your company's Procore account, you can use the built-in WBS features to define the cost structure for Procore's Project Financials tools. When defining a project's WBS cost structure, you have two choices. If you are unsure which choice to make, contact your company's Procore Administrator for guidance:
- Apply your Company's Default WBS
This is the WBS defined by your company's Procore Administrator and you can use it exactly as it was created. - Copy the WBS from Another Project
This is the WBS defined on one of your existing Procore project templates. Keep in mind that you can create a unique WBS for each project in your company's account. In order to copy the WBS from another source project to your new target project, you must first save the source project as a project template. See Configure a Project Template.
Things to Consider
- Required User Permissions:
- 'Admin' level permissions on the Project level Admin tool.
- Additional Information:
- The Project level 'Work Breakdown Structure' page is similar to the Company level page. The primary differences are:
- You cannot add custom segments at the Project level. They must always be added at the Company level. See Add Custom Segments.
- You cannot edit the budget code structure at the Project level. The budget code structure is always defined at the Company level. See Arrange the Company Budget Code Structure.
- You cannot add sub jobs at the Company level. Sub jobs are always added at the Project level. See Enable Sub Jobs on Projects for WBS and Add Sub Jobs to a Project.
- The Project level 'Work Breakdown Structure' page is similar to the Company level page. The primary differences are:
- Limitations:
Prerequisites
Tip
Do you want to copy the WBS from an existing project to your new project? If so, a Procore user who meets the required user permissions will need to configure the source project as a project template. A source project is the project that contains the WBS you want to copy to your new one. For instructions see, Configure a Project Template. One that step is complete, you'll be able to select the 'Copy the WBS from Another Project' option detailed in the Steps below.Steps
- Navigate to the Project level Admin tool.
- Under 'Project Settings', click the Work Breakdown Structure link.
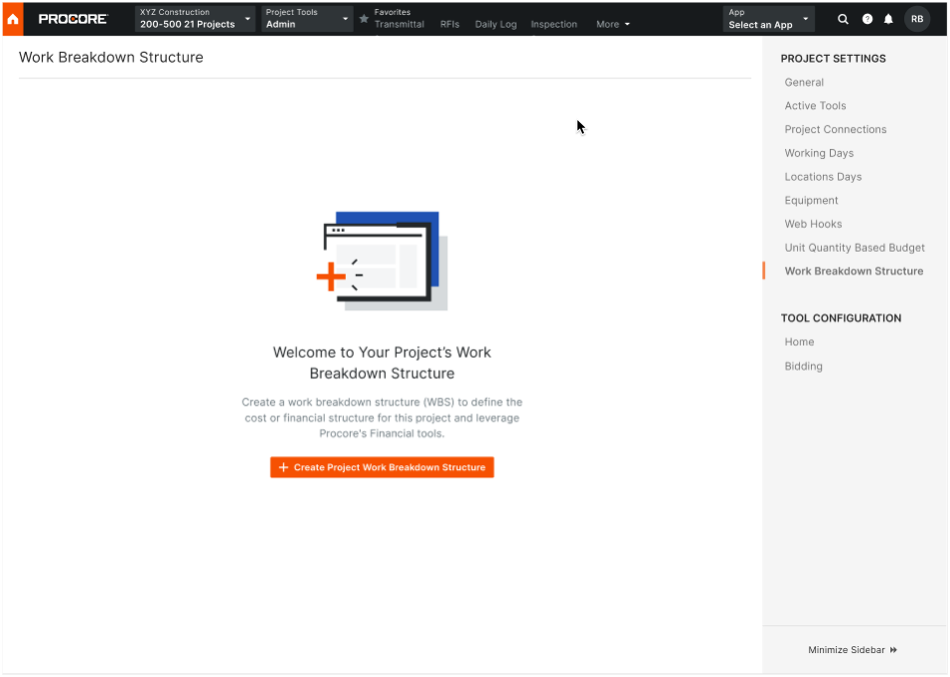
- Review the information about WBS, Budget Codes, Budget Code Segments in the dialog box sequence. Click Next.
- In the 'Create Project WBS dialog box, choose one of these optons:
- Apply the Company's Default WBS
Choose this option button if you want the project to use your company's default WBS. Your company's Procore Administrator is responsible for creating this structure.
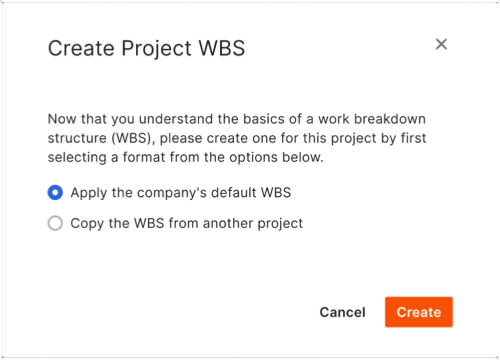
- Copy the WBS from Another Project
Choose this option button if you want to use an existing project's WBS. Then, start typing a project name and when the match appears, choose it in Select a Project list.

- Apply the Company's Default WBS
- Click Create.
Next Steps
Enable Task Codes
- Navigate to the Company level Admin tool.
- Under 'Tool Settings', select Timesheets or My Time.
- Click the Task Codes tab.
- Take one of the following actions:
- Move the toggle to the ON
 position to enable task codes.
 - Move the toggle to the OFF
 position to disable task codes.
- Move the toggle to the ON
Assign Default Cost Type
Assign the Default Cost Type for timecard entries in the Company Timesheets tool.
- Navigate to the company's Timesheets tool.
- Click the Configure Settings icon.
- Default Cost Type for Timecards. Select the cost type to assign to your project's timecard entries. If your company is using Procore's Project Financials, this action ensures that the labor costs from your project's timecards are reflected in the 'Procore Labor Productivity Cost' and 'Real-Time Labor Costing' budget views.
Note: By default, this option is set to 'Labor'.- Click Update to apply the default cost type to any future timecard entries.
- Click Apply to Existing Entries to apply the default cost type to all existing timecard entries.
Important
- Applying a new default cost type to existing timecards by clicking Apply to existing timecards is a one-time action and cannot be undone without contacting your Procore point of contact.
- If your company is using Resource Tracking with Project Financials, you must assign a Default Cost Type to timecard entries before your project teams can work with the following budget views:
- Create a Real-Time Labor Costing view for the budget. See Add a Budget View for Real-Time Labor Costing.
- Set Up the 'Procore Labor Productivity Cost' budget view. See Set Up the Procore Labor Productivity Cost Budget View.
To configure additional settings, see Configure Advanced Settings: Company Level Timesheets.
About Real Time Labor Productivity
You can leverage flexible Work Breakdown Structure (WBS) when budgeting the resource hours and associated cost, as well as a production plan based on units to install for production quantities. Flexible WBS allows your team to budget, track time and units installed in Timesheets, and report at the right level of granularity, for an enhanced real time labor productivity cost Budget View.
Example
|
With Flexible WBS:
|
Without Flexible WBS:
|


This guide shows you how to configure a real-time labor productivity budget view that integrates with Procore's ![]() Resource Tracking tools. This view provides the project's Budget tool with the ability to instantly leverage the timecard entry hours submitted by your project's field personnel in the Timecard, Timesheets, My Time (Android), and My Time (iOS) tools and update the project's budget view immediately after timecard hour entries are submitted.
Resource Tracking tools. This view provides the project's Budget tool with the ability to instantly leverage the timecard entry hours submitted by your project's field personnel in the Timecard, Timesheets, My Time (Android), and My Time (iOS) tools and update the project's budget view immediately after timecard hour entries are submitted.
For project managers, this eliminates the need to wait for timecard data to be manually input into a budget. This functionality is particularly useful for self-performing contractors who want to gain real-time insight into a project's actual labor costs, and can help to minimize the potential for labor overruns to occur on a project.
Example
Real-Time Labor Productivity Budget View in the Budget Tool
The illustration below shows you the recommended layout for the 'Real-Time Labor Productivity' budget view, as it will look when applied to your project's Budget tool.

Create a New Budget View
- Navigate to the Company Admin tool.
- Under Tool Settings, click Budget.
- Click Set Up New Budget View.
- Under Standard Views, select Procore Labor Productivity Cost.
- Click Create.
- Name your view as follows:
- View Name. Enter a name for your new view. In this example, we named it: Real-Time Labor Productivity
- View Description. Enter a description for your view. In this example, we entered: Recommended view for real-time labor productivity
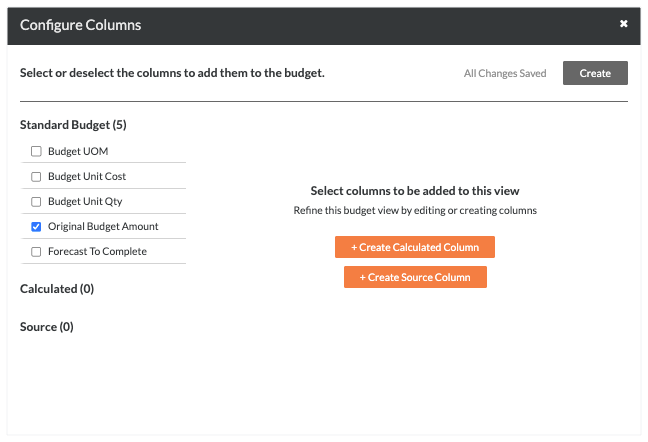
- Click Configure Columns.
This opens the Configure Columns window pictured below. From this point, continue with the next step to Add Recommended Columns.
Add Recommended Columns
Important
This is a recommended budget view. Your company's Procore Administrator creates the budget views used on your projects, so the column settings detailed below may be different in your environment. For other budget view recommendations, see Which budget views should I add to my Procore project?These are the recommended column settings for the Real-Time Labor Productivity budget view:
| Column Name | Column Type | Column Format | Description |
|---|---|---|---|
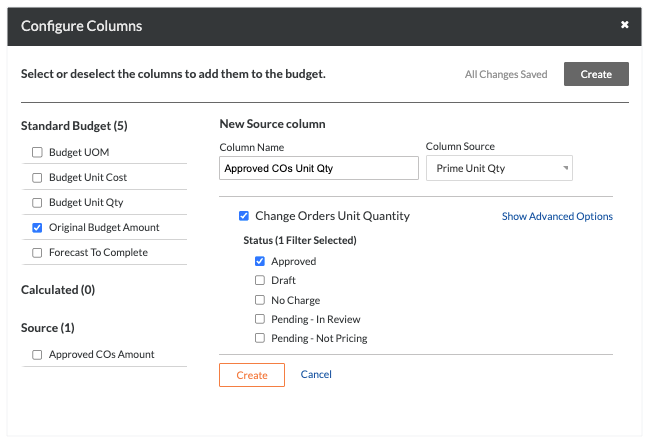
| Approved COs Amount | Source | Currency | This is a hidden column that you create to perform a calculation for the values appearing in the 'Revised Budget Amount' column. |
| Approved COs Unit Quantity | Source | Number | This is a hidden column that you create to perform a calculation on the values appearing in the 'Revised Units' column. |
| Revised Units | Calculated | Number | This shows the original Budget Unit Qty + Approved COs Unit Qty. |
| Budget UOM | Standard | n/a | This shows the Unit of Measure (UOM) for the budget line item. |
| Budget Change Production Quantity | Source | Number | Represents internal changes to budgeted production quantities to be installed (outputs). It includes Unit Quantity and UOM. |
| Budget Change Unit Quantity | Source | Number | This shows the Unit Qty and UOM amount from a Budget Change. |
| Revised Budget Production Quantity | Calculated | Number | Shows the original Budgeted Production Qty + Approved CO Production Qty + Approved Budget Changes Production Qty. |
| Revised Budget Unit Quantity | Calculated | Number | Shows the original Budget Unit Qty + Approved CO Units + Approved Budget Changes Unit Qty. |
| Revised Budget Amount | Calculated | Currency | This shows the Original Budget Amount + Approved COs Amount. |
| Actual Cost | Source | Currency | This shows the Direct Costs amount. |
| Actual Units | Source | Number | This shows the Direct Costs Unit Quantity. |
| Actual Unit Cost | Calculated | Currency | This shows the Actual Cost/Actual Units. |
| Timesheet Hours | Source | Number | This shows all Timecard Entry Hours. |
| % Hours Used | Calculated | Percent | This shows the Timesheet Hours/Revised Units. |
| Estimated Real-Time Cost | Calculated | Currency | This shows the Actual Unit Cost x Timesheet Hours. |
| Hours Remaining | Calculated | Number | This shows the Revised Units - Timesheet Hours. |
Approved COs Amount
Note: You must add this column before you can add a calculated column named 'Revised Budget Amount'.
| Steps from the Configure Columns window… | Settings |
|---|---|
|
 |
Approved COs Unit Qty
Note: You must add this column before you can add a calculated column named 'Revised Units'.
| Steps from the Configure Columns window… | Settings |
|---|---|
|
 |
Revised Units
Note: You must first create the 'Approved COs Unit Qty' column. See Approved COs Unit Qty.
| Steps from the Configure Columns window… | Settings |
|---|---|
|
 |
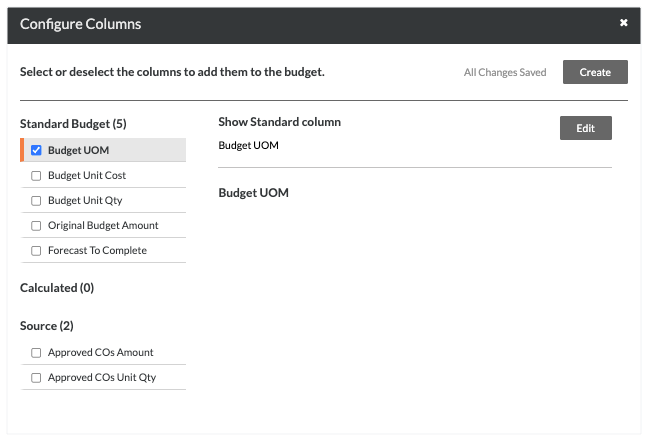
Budget UOM
Note: You must also remove all other columns under Standard Budget.
| Steps from the Configure Columns window… | Settings |
|---|---|
|
 |
Budget Change Production Quantity
Note: This adds a source column named 'Budget Change Production Quantities.' You must add this column before you can add a calculated column named 'Revised Budget Production Quantity.'
| Steps from the Configure Columns window… | Settings |
|---|---|
|
 |
Budget Change Unit Quantity
Note: This adds a source column named 'Budget Change Unit Quantities'. You must add this column before you can add a calculated column named 'Revised Budget Unity Quantity'.
| Steps from the Configure Columns window… | Settings |
|---|---|
|
 |
Revised Budget Production Quantity
Note: You must first create the Budget Change Production Quantity column. See Budget Change Production Quantity.
| Steps from the Configure Columns window… | Settings |
|---|---|
|
 |
Revised Budgeted Unit Quantity
Note: You must first create the Budget Change Unit Quantity column. See Budget Change Unit Quantity.
| Steps from the Configure Columns window… | Settings |
|---|---|
|
 |
Revised Budget Amount
| Steps from the Configure Columns window… | Settings |
|---|---|
|
 |
Actual Cost
Note
For companies using the ERP Integrations tool:
- Sage 300 CRE® can add this column only if the Direct Costs tool is enabled.
- For other ERP integrations (Vista, Integration by Procore or Sage 100 Contractor®), the 'Column Source' below must be set to 'ERP JTD Costs' column (instead of 'Direct Costs').
| Steps from the Configure Columns window… | Settings |
|---|---|
|
 |
Actual Units
Note
For companies using the ERP Integrations tool, keep in mind that you will NOT be able to configure an 'Actual Units' column on a budget view unless the Direct Costs tool is enabled and you are using the Sage 300 CRE® connector to sync job cost transactions. See Add the Columns for Job Cost Transaction Syncing to a Budget View for ERP Integrations.| Steps from the Configure Columns window… | Settings |
|---|---|
|
 |
Actual Unit Cost
Note
For companies using the ERP Integrations tool, keep in mind that you will NOT be able to configure an 'Actual Units' column on a budget view unless the Direct Costs tool is enabled and you are using the Sage 300 CRE® connector to sync job cost transactions. See Add the Columns for Job Cost Transaction Syncing to a Budget View for ERP Integrations.
| Steps from the Configure Columns window… | Settings |
|---|---|
|
 |
Timesheet Hours
When adding a 'Timesheet Hours' source column to the budget view, it is recommended that you include timecard entries in both the 'Approved' and 'Pending' status. However, your company's Procore Administrator may prefer to use a different setting for your company's account.
Important
- The 'Real-Time Labor Productivity' budget view is recommended for use by customers using Procore's Resource Tracking tools. However, the 'Timesheet Hours' column can be added to other budget views. To learn how to add the column, see Can we import our third-party timecard entries to work with the 'Timesheet Hours' column in Procore's Budget tool?
- To view hours in this column on the budget as a Procore Resource Tracking customer:
- A user with 'Admin' permission on the Company Timesheets tool must also configure the default cost types for timecard entries. See Configure Advanced Settings: Company Level Timesheets.
- When applying a new default cost type to your existing timecards by clicking the Apply to existing timecards button in the Timesheets tool, keep in mind this is a one-time action and can only be undone by contacting your Procore point of contact.
| Steps from the Configure Columns window… | Settings |
|---|---|
|
 |
% Hours Used
| Steps from the Configure Columns window… | Settings |
|---|---|
|
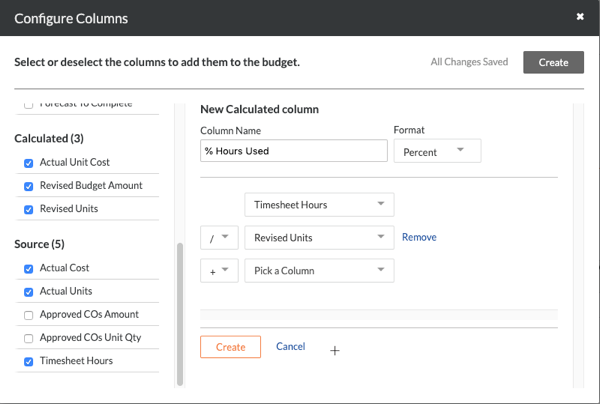 |
Estimated Real-Time Cost
| Steps from the Configure Columns window… | Settings |
|---|---|
|
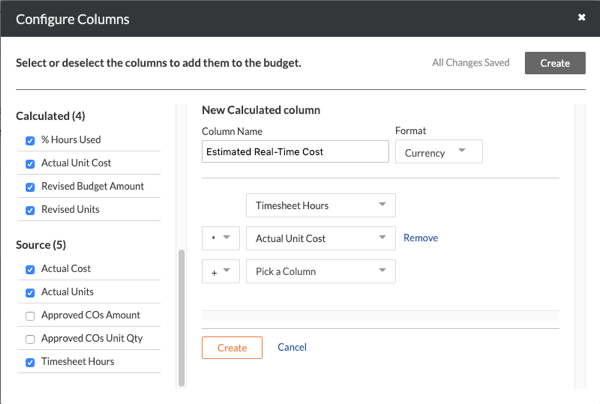 |
Hours Remaining
Note
To create the 'Hours Remaining' column, you must first create the 'Revised Units' and 'Timesheet Hours' columns as described above.| Steps from the Configure Columns window… | Settings |
|---|---|
|
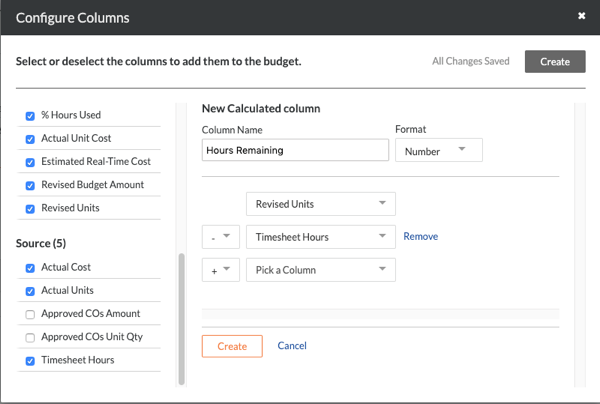 |
Hide Unused Budget Columns (optional)
If you created the 'Real-Time Labor Productivity' budget view from the 'Blank Budget View' template contains a few columns that can be hidden from this view. This is an optional step.
| Steps from the Configure Columns window… | Settings |
|---|---|
|
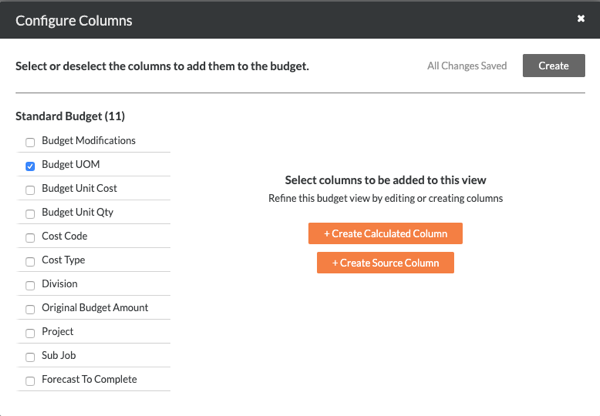 |
Assign the Budget View to your Project
- Navigate to the Company Admin tool.
- Under Tool Settings, click Budget.
- Under Budget Views, click the budget view that you want to add to one or more projects.
- Place checkmarks next to boxes of your choice in the Assign to Projects list.
- To assign the budget view to all of your company's Procore projects, place a checkmark in the All Projects Selected box.
Note: If you have enabled the Direct Costs tool and/or the ERP Integrations tool, you will see additional menu options. To learn more see Direct Costs and ERP Integrations. - To assign to budget view to one (1) or more projects, place a checkmark next to the desired projects.
- To assign the budget view to all of your company's Procore projects, place a checkmark in the All Projects Selected box.
- Repeat the steps above for each view that you want to add to your project(s).
- Click Done.
About Labor Productivity Cost
The 'Procore Labor Productivity Cost' budget view provides project teams with the ability to include production quantities on the project's budget. See What are 'production quantities'? Building off the Real-Time Labor Costing feature, the 'Procore Labor Productivity Cost' budget view is designed to provide self-performing and specialty contractors with the ability to gain greater insight into your project's production rates to make better decisions that maximize profit margins. With this release, you can:
- Add and import production units to a project's budget in Procore's Financial Management tools: Budget, Change Events, and Change Orders.
- Collect production units from field personnel with Timecard Entries in the Daily Log and both the Timecards and Timesheets tools.
- Track and compare budgeted production units to installed production units using Procore's Budget and Reports tools.
By default, Procore provides its users with a standard 'Procore Labor Productivity Cost' budget view, which is available to your company's Procore Administrator in the Company level Admin tool.
Example
Procore Labor Productivity Cost Budget View in the Budget Tool
The illustration below shows you the recommended layout for the 'Procore Labor Productivity Cost' budget view, as it will look when applied to your project's Budget tool.

Default Columns
The following table details the default columns provided with the 'Procore Labor Productivity Cost' budget view. In the Description column, the following symbols represent the operator for a calculation:
- add (+)
- subtract (-)
- multiply (*)
- divide (/)
| Column Name | Column Type | Column Format | Column Description | Column Configuration |
|---|---|---|---|---|
| Revised Budget | Calculated | Currency | Shows the Original Budget amount, plus the Budget Change amount, plus the Approved COs amount. | Original Budget Add (+) Budget Changes Add (+) Approved COs |
| Direct Costs | Source | Currency | Shows the Direct Costs amount. | Source Category: Direct Costs Source: Direct Costs Source Filtering: Status = Pending, Revise and Resubmit, Approved |
| Direct Costs Unit Cost | Source | Number | Shows the actual cost per unit for direct costs. | Direct Costs Divide (/) Direct Costs Unit Qty |
| % Budget Complete | Calculated | Percent | Shows how much of the current budget amount for the budget line item is estimated to be used based on the real-time labor hours and actual labor cost. | Estimated Cost w/ Timesheet Hours Divide (/) Revised Budget |
| Projected Labor Cost at Completion | Calculated | Currency | Shows the projected labor cost at completion for the budget line item. | Projected Hours at Completion Multiply (*) Direct Costs Unit Cost |
| Projected Labor Cost Over/Under | Calculated | Current | Shows the Revised Budget minus the Projected Labor Cost at Completion. | Revised Budget Subtract (-) Project Labor Cost at Completion |
| Revised Budgeted Unit Qty | Calculated | Number | Shows the Budget Production Qty plus the Approved COs Production Qty. | Budget Unit Qty Add (+) Approved CO Units |
| Budget UOM | Standard | n/a | Shows the Unit of Measure (UOM) for the budget line item. | n/a |
| Timesheet Hours 1 | Source | Number | Shows all Timecard Entry Hours. You can optionally apply Status filters to narrow the data in the view. | Source Category: Timecard Entry Hours Source: Timecard Entry Hours Filtering: None |
| % Hours Used | Calculated | Percent | Shows how much of the current budget unit qty (labor hours) have been used based on time submitted in Procore. | Timesheet Hours Divide (/) Revised Budget Unit Qty |
| Earned Hours | Calculated | Number | Shows the number of labor hours earned (merited) based on the work produced to date for that cost code. |
Revised Budget Unit Quantity |
| Projected Hours at Completion | Calculated | Number | Shows the estimated labor hours needed to complete production for the cost code based on the work produced to date. | Timesheet Hours Divide (/) % Complete Production |
| % Complete Production | Calculated | Percent | Shows the percentage of the production quantity has been installed to date of the current budgeted production quantity for the cost code. | Actual Qty Installed Divide (/) Revised Budgeted Production Qty |
| Production UOM | Source | n/a | Shows the UOM for the budgeted production quantity (i.e., for the cost code on the line item). | Source Category: Production UOM Source: Budgeted Production UOM Source Filtering: n/a |
| Revised Budgeted Production Rate | Calculated | Number | Shows the actual budgeted production rate based on labor hours and installed quantities to date. | Revised Budgeted Production Qty Divide (/) Revised Budget Unit Qty |
| Actual Production Rate | Calculated | Number | Shows the actual budgeted production rate based on labor hours and installed quantities to date. | Actual Qty Installed Divide (/) Timesheet Hours |
| Variance Production Rate | Calculated | Number | Shows the difference between the current budgeted production rate and the actual production rate. A positive number indicates you are performing faster than expected. A negative number indicates you are performing slower than expected. | Actual Production Rate Subtract (-) Revised Budgeted Production Rate |
1 The 'Labor Productivity Cost' budget view is only available to customers using Procore's Resource Tracking tools. However, the 'Timesheet Hours' column can be added to other budget views. To learn how to add the column, see Can we import our third-party timecard entries to work with the 'Timesheet Hours' column in Procore's Budget tool?
Create a New Budget View
- Navigate to the Company Admin tool.
- Under Tool Settings, click Budget.
- Click Set Up New Budget View.

- Under Standard Views, highlight Procore Labor Productivity Cost.
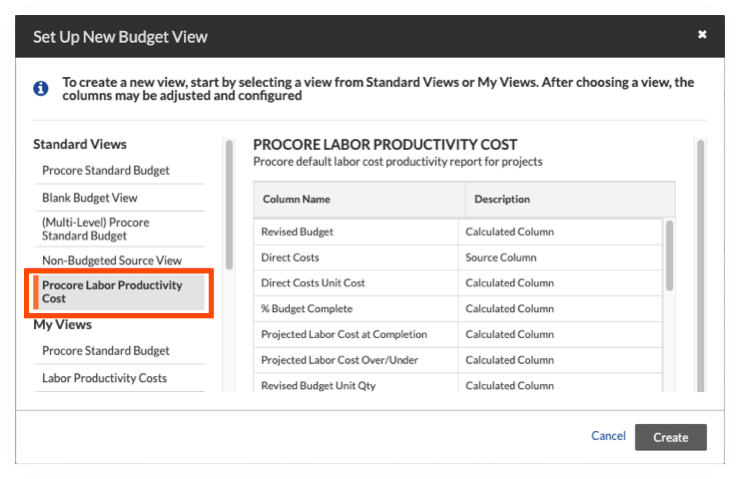
- Click Create.
- Name your view as follows:
- View Name. Enter a name for your new view. In this example, we named it: Labor Productivity Cost
- View Description. Enter a description for your view. In this example, we entered: Recommended view for labor cost productivity report
- Click Configure Columns.
This opens the Configure Columns window pictured below. From this point, continue with Step 2: (Optional) Customize the Budget View.
Customize the Budget View (Optional)
Preview the Budget View
Assign the Budget View to your Project
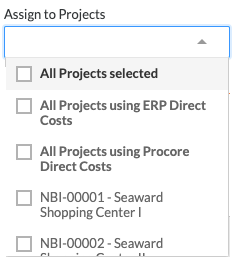
- In the 'Procore Labor Productivity Cost' view window, place checkmarks next to project boxes of your choice in the Assign to Projects list.
- To assign the budget view to all of your company's Procore projects, place a checkmark in the All Projects Selected box.
Notes:- For companies using the ERP Integrations tool, you will see the 'All Project Using ERP Direct Costs' checkbox.
- You may also see the 'All Projects Using Procore Direct Costs' checkbox. However, it only appears when the Direct Costs tool is enabled on the project.
- To assign the budget view to one (1) or more projects, place a checkmark next to the desired projects.
- To assign the budget view to all of your company's Procore projects, place a checkmark in the All Projects Selected box.
- Click Done.
Tip
After completing all of the above steps, you can provide your project teams with instructions for applying the budget view to their project budgets. For details, see Apply the View, Snapshot, Group, and Filter Options on a Budget View.Add Tools to Project
- Navigate to the project's Admin tool.
- Under 'Project Settings', click Tool Settings.
- Move the relevant toggle to 'Active' to add the following tools to your project:
- Budget
- Timecards (optional)
- Timesheets
Enable Labor Productivity
- Navigate to the project's Admin tool.
- Click the General tab under Project Settings.
- Scroll to Advanced.
- Mark the Labor Productivity for Budget, Change Events, and Change Orders check box.
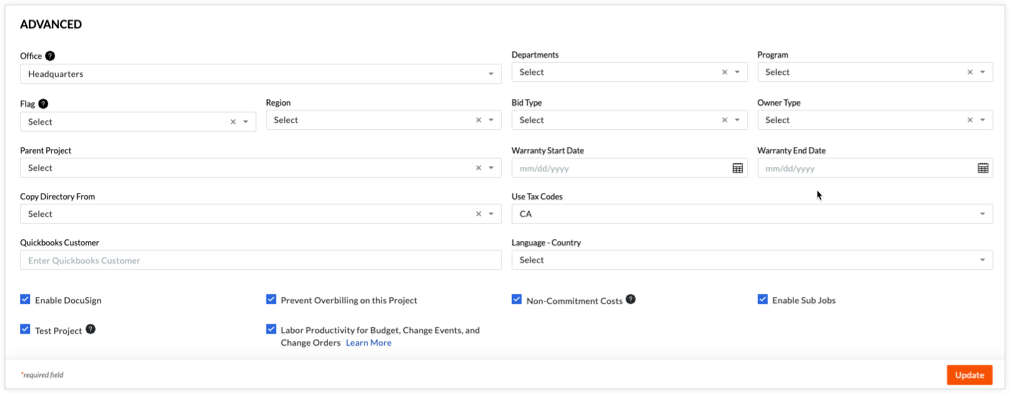
- Click Update.
Import a Budget
- Download the Budget Import Template
- Update the 'Budget Line Items' Worksheet
- Optional: Update Advanced Forecasting Curves for the Forecasting Tab
- Optional: Update the 'Budgeted Production Quantities' Worksheet
- Import the Data from the Budget Template
Download the Budget Import Template
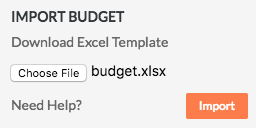
- Navigate to the project's Budget tool.
- Click the Unlock Budget button. See Unlock a Budget and Unlock a Budget with Budget Modifications.
- Under Import Budget, click Download Excel Template.
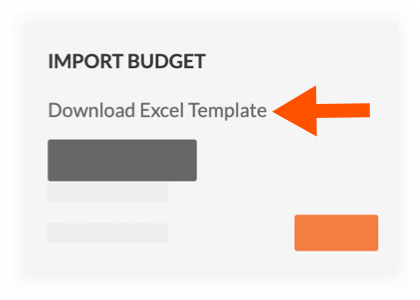
Notes
- The system downloads a copy of the budget.xlsx file to your web browser's specified download location.
- Always input your budget data in the Excel template that you downloaded from your Procore project.
- The columns in the budget import template do NOT match the columns in the budget export file generated with the Export > CSV or Export > PDF menu options. It is important to note the files from the Export menu cannot be imported into the Budget tool.
- Before proceeding with the import, review this important warning:
Warning
The budget import template that you downloaded must be used for the import. In addition, the column layout and headings in the template are required:
- DO NOT rename any column headings in the template.
- DO NOT add, remove, or change the order of the data columns in the template.
- If you require a unit of measure that is NOT included in the template's UOM drop-down list, contact your company's Procore Administrator who has the appropriate permissions to add units of measure to the UOM Master List. See Update a Unit of Measure on the Unit of Measure Master List.
- If you plan to import budget line items with cost codes:
- Every line item added to the budget import template must include a cost code.
- Cost codes in the budget import template must exactly match the cost codes in your company's or project's Work Breakdown Structure.
- Cost codes must be associated with at least one (1) cost type. See Add Company Cost Types and Assign Default Cost Types To Cost Codes. This ensures you can create budget codes when adding line items. See What is a budget code in Procore's WBS?
- You can import one (1) budget line item per cost code/cost type combination. The purpose of a budget line item is to show the total budgeted amount for each budget code on a single line item. Duplicate cost code/cost type combinations are not permitted.
- It is not necessary to delete unneeded line items where the Cost Type and Budget Amount fields are blank; if you leave these lines in the template, Procore will neither import data nor create items in your budget for these rows.
Update the 'Budget Line Items' Worksheet
- On your computer, open the downloaded budget.xlsx file in Microsoft Excel.
- Click the Budget Line Items worksheet.
- Update the budget line item data on each row as follows:

Notes
- An asterisk (*) below denotes a required field.
- Some columns in the import template will require you to choose a value for your line items from a drop-down list.
- Sub Job. This column only appears when the Sub Jobs feature is active in Procore. See Enable Sub Jobs for WBS. Choose the sub job from the drop-down list. To learn how to add sub-job codes to Procore, see Add Sub Jobs to a Project.
- Cost Code*. Choose the cost code from the drop-down list: 'Division-Code'. For example, 02-200. See What are Procore's default cost codes? and Add Company Cost Codes.
- Cost Type*. Choose the cost type from the drop-down list. For example, L=Labor, E=Equipment, M=Materials, and so on. See What are Procore's default cost types? and Add Company Cost Types.
- Description. Leave this field blank to use the default concatenated description in your company's Work Breakdown Structure. Input a description to import a custom description. To learn more about the description field, see Edit Budget Code Descriptions on a Project.
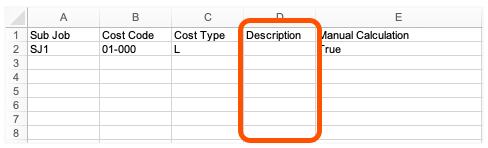
Caution
Why leave the 'Description' field blank? In order to import data into Procore, the database requires the presence of a 'Description' column in the import template. However, because Procore automatically creates a 'Description' for you (after the import), it's important to always leave the data entry rows in the 'Description' column blank.
- Update the unit-based details in the template as follows:
Note
To learn more about data entry for unit-based line items, see How do I add unit-based line item details in the budget import template?- Manual Calculation*. Choose True or False from the drop-down list:
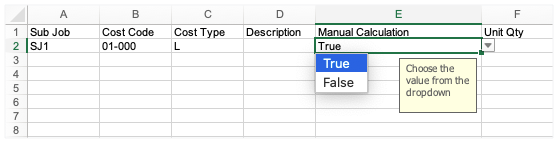
- Choose True if you want to manually enter a value in the 'Budget Amount' column. This option will override the system's automatic calculation option on the line item in the project's Budget tool.
- Choose False if you want Procore to automatically calculate the value in the 'Budget Amount' column based on your Unit Quantity, UOM, and Unit Cost entries. You will leave the 'Budget Amount' column blank in the import template. After the import, Procore will automatically calculate this value for you on the line item in the project's Budget tool.
- Unit Qty. Enter a numeric value in this box to indicate the number of units that correspond to the unit of measurement that you specify.
- Unit of Measure (UOM). Select the correct unit of measurement for each line item using the drop-down list in the template. These selections match your company's UOM Master List. For a unit to be available in the drop-down list, your Procore Administrator must update the UOM Master List before you download a copy of the template. For more information, see Which units of measure are included on Procore's master list? and Update a Unit of Measure on the Unit of Measure Master List.
- Unit Cost. Enter the monetary cost in this box to indicate the cost per unit of measurement.
- Budget Amount. If you chose 'True' in the 'Manual Calculation' column, enter the total amount for the new line item. Do not enter commas and/or currency symbols in this field. When you choose 'False' in the 'Manual Calculation' column, leave the budget amount column blank.
Example
If you select 'False' in the ''Manual Calculation' column and enter data in the Unit Qty, Unit of Measure, and Unit Cost columns, you can leave the 'Budget Amount' column blank. Procore will automatically calculate this value for you after your data is imported into the project's Budget tool.

- Manual Calculation*. Choose True or False from the drop-down list:
- Save your changes. Always choose the Excel Workbook (.xlsx) file format when saving your data.
Optional: Update Advanced Forecasting Curves for the Forecasting Tab
- To apply advanced forecasting curves to the Forecasting tab in your budget, enter the following:
Note
- To learn about advanced forecasting curves and the Procore Standard Forecast view, see About the Procore Standard Forecast View, Set Up a New Forecasting View, and Apply Advanced Forecasting Curves.
- Start Date. Enter a start date for the beginning of the forecast curve that you want to apply.
- End Date. Enter an end date for the beginning of the forecast curve that you want to apply.
- Curve. Enter the name of forecast curve that you want to apply in the Forecasting tab of the project's Budget tool. To learn about your curve options, see About the Procore Standard Forecast View.
- Save your changes. Always choose the Excel Workbook (.xlsx) file format when saving your data.
Optional: Update the 'Budgeted Production Quantities' Worksheet
Important
The 'Labor Productivity for Budget, Change Events, and Change Orders' checkbox must be marked in your project's Admin settings. See Update General Project Information- On your computer, open the downloaded budget.xlsx file in Microsoft Excel.
- Click the Budgeted Production Quantities tab in the worksheet.
- Enter your budget's production quantities line item data on each row as follows:
- Cost Code. Enter the cost code number in the following format: 'Division-Code' (For example, 02-200).
- Description. Enter the cost code description. For example, Site Preparation, Site Demolition, and so on.
- Production Qty. Enter a numeric value in this box to indicate the budgeted production quantity that corresponds to the UOM that you specify.
- UOM. Select the correct unit of measurement for each line item using the drop-down list in the template. These selections match your company's UOM Master List. For a unit to be available in the drop-down list, your Procore Administrator must update the UOM Master List before you download a copy of the template. For more information, see Which units of measure are included on Procore's master list? and Update a Unit of Measure on the Unit of Measure Master List.
- Save your changes. Always choose the Excel Workbook (.xlsx) file format when saving your data.
Import the Data from the Budget Template
- Navigate back to your project's Budget tool.
- Under Import Budget, click Choose File.
Note: The 'Import Budget' area only appears when the budget is unlocked. See Unlock a Budget. - In the window that appears, select your file. Then click Open.
- When the file name appears next to the 'Choose File' button, click Import.
- Review the imported data in the project's Budget tool to verify that the line item data was imported as you expected.
- Optional: If you want to edit your budget line items, you have these choices:
- Manually add budget line items. See Add a Budget Line Item.
- Remove any budget line items. See Delete a Budget Line Item
- Once you are satisfied with your budget, click the Lock Budget button.
Notes
- When you lock the budget, users can no longer change the 'Original Budget' amounts.
- When the Budget tab is active, the reports tab will appear differently:
- The project will no longer have the Budget Forecast Report or Budget Summary Report
- The project will gain the Budget Modifications Report and the Budget Detail Report
- To apply advanced forecasting curves to the Forecasting tab in your budget, enter the following:
Add a Budget Line Item
Add Budgeted Production Quantities
Apply Budget View to your Budget
Navigate to the project's Budget tool. Then click the Budget, Budget Details, or Project Snapshot Status tab and select an option from the View menu. To add views to this menu, see Assign a Budget View to a Project.

Note
-
Procore offers company accounts several standard budget views. See What are Procore's standard budget views?
-
Your company can create custom budget views or modify existing views. For details, see Set up a New Budget View.
Enter Time in Timesheets
Enter Production Quantities in Timesheets
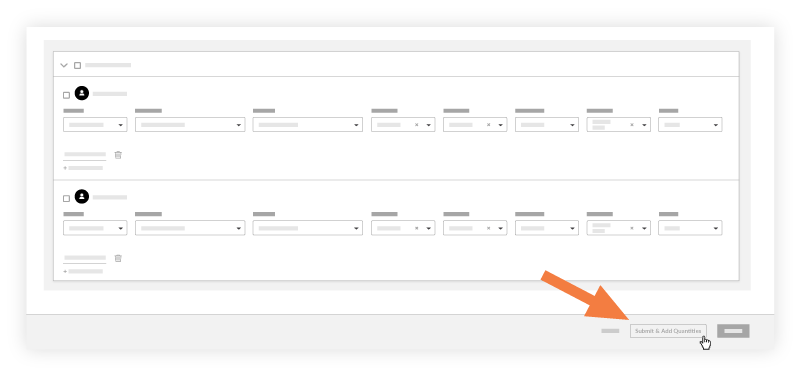
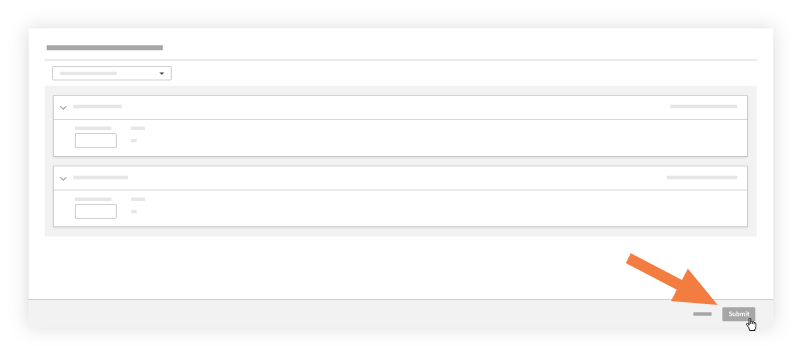
Now that you have filled out your timesheet, perform the following actions before you submit:
-
Click Submit and Add Quantities.
Note: This button will be disabled if quantities have not been uploaded to the project. See Import a Unit Quantity Based Budget.
-
Enter an amount in the Units Installed field.
Notes
- The Add Quantities page only shows cost codes that have an imported budgeted quantity associated with it.
- If the Sub Jobs feature is enabled on your project (see Enable Sub Jobs on Projects for WBS), the 'Sub Job' associated with your 'Units Installed' entry will appear in the Add Quantities window. If Sub Jobs is disabled, the 'Sub Job' field will display the word 'None.'
- The appropriate Percent Complete (%) and Unit of Measure (UOM) and Percent Complete (%) automatically with the data that was imported. See Import a Unit Quantity Based Budget.
-
Enter any notes in the 'Notes' field.
-
Click Submit.
Import Installed Quantities
- Download the Installed Production Quantities Template
- Update the Installed Production Quantities Template
- Import the Installed Production Quantities Template
Download the Installed Production Quantities Template
- Navigate to the project's Budget tool.
- Under the Budget tab, select the 'Procore Labor Productivity Cost' view from the View drop-down list.
- Under Import Installed Quantities, click the Download Excel Template link.
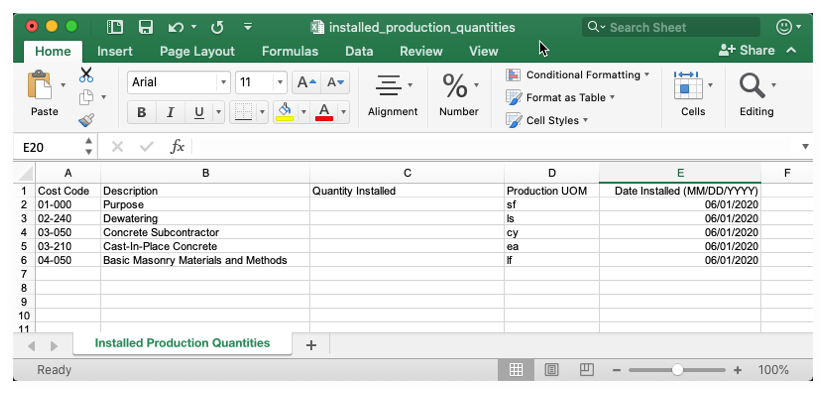
- On your computer, open the downloaded file named installed_production_quantities.xlsx.
The illustration below shows you the download file:
- Continue with the next steps.
Update the Installed Production Quantities Template
- In the installed_production_quantities.xlsx file, complete the data entry as follows for the installed production quantities that you want to update:
Important
Do NOT add new line items or change existing values in the Microsoft Excel file. It is designed only to import 'Quantity Installed' values for your existing cost codes.- Cost Code
Shows the cost code that corresponds to the installed production quantity that you want to update. Cost codes are managed in Procore's Work Breakdown Structure. - Description
Shows the cost code description. Cost codes are managed in Procore's Work Breakdown Structure. - Quantity Installed
Enter the quantity installed for that cost code using whole numbers. - Production UOM
Shows the Unit of Measure (UOM). To learn about the default selections in this list, see Which units of measure are included in Procore's master list? and Add a Unit of Measure to the Unit of Measure Master List. - Date Installed (MM/DD/YYYY)
Enter the installation date that corresponds to the 'Quantity Installed' entry using the MM/DD/YYYY format.
- Cost Code
- Save your Microsoft Excel file in the CSV format.
Import the Installed Production Quantities Template
- Navigate back to the project's Budget tool.
- Under the Budget tab, select the 'Procore Labor Productivity Cost' view from the View drop-down list.
- Under Import Installed Quantities, click the Choose File link.
- On your computer, navigate to the installed_production_quantities.csv file that you just saved and upload it.
- Click Import.
Record Changes on a Change Event
Objective
To add changes to production quantities in a change event.
Background
For companies using Procore's Project Financials and Resource Management tools with the 'Procore Labor Productivity Cost' budget view, you can log additional production quantities and production hours associated with your change event line items in the 'Production Quantities' section of a change event.
Example
Let's assume that after your project's budget is locked, the project owner requests a design change that is out of scope with the original design. The change requires additional drywall, so you first create a change event and add a line item to that change event for that drywall. If that change represents a change to production, you will also want to record that change in the 'Production Quantities' tab of the change event.
Once you record the production quantities in the change events, the values are updated in the Change Events view page. The production quantities may also be associated with any Prime potential change order or Budget Change created from a Change Event. However, you must follow these steps: Create a Prime Potential Change Order from a Change Event.
After you have submitted your prime contract change order to the owner for review, the owner can then approve or reject it. See Approve or Reject Prime Contract Change Orders. When the status of the prime contract change order changes to 'Approved', the updated production quantities are reflected in the 'Procore Labor Productivity Cost' budget view and the Field Production Report.
Things to Consider
- Required User Permissions:
- 'Standard' level permissions or higher on the project's Change Events tool.
Prerequisites
For production quantities to interact with labor productivity tracking feature, you must:
Steps
Production Quantities relate to contracts and the budget through a combination of sub job and cost code. Users may edit these fields when editing change events line items in the change events edit page. However, if the Production Quantities are associated with a Prime potential change order or Budget Change, the Production Quantity will be locked unless unlinked from the change objects.
- Navigate to the project's Change Events tool.
- Locate and open an existing change event in the Line Items tab.
OR
Create a new change event. See Create Change Events. - Scroll to the Production Quantities card.
- Click Add Line.
- Complete the line item data entry as follows:
- Sub Job. Select a sub job from the list.
- Cost Code. Select a cost code from the list.
- Description. Enter a description for the line item.
- Qty. Enter a numeric value in this box to indicate the number of units that correspond to the unit of measurement that you specify.
- UOM. Select a Unit of Measure (UOM) from the drop-down list. To learn about the default selections in this list, see Which units of measure are included in Procore's master list? and Add a Unit of Measure to the Unit of Measure Master List.
- Click Save.
See Also
Record Changes on an Internal Budget Change
Record Changes for a Prime Contract
Objective
To add changes to production quantities in a Prime Potential Change Order (Prime PCO).
Background
For companies using Procore's Project Financials and Resource Management tools with the 'Procore Labor Productivity Cost' budget view, you can log additional production quantities associated with a Prime Potential Change Order (PCO) in the 'Production Quantities' tab on the project's Prime Contract's tool.
Things to Consider
- Required User Permissions:
- 'Admin' level permissions on the project's Prime Contracts tool.
Prerequisites
For production quantities to interact with the labor productivity tracking feature, you must:
Steps
- Navigate to the project's Prime Contracts tool.
- Locate the Prime Potential Change Order (Prime PCO) to work with.
- Ensure that all of the line items that should be associated with the change event have been added.
- Click the Production Quantities tab.
- Click Edit.
- Click Add Line.
- Cost Code
Select the cost code that corresponds to the production quantity change. - Description
Enter a description for the line item. - Unit Qty
Enter a numeric value in this box to indicate the number of units that correspond to the unit of measurement that you specify. Always enter the amount that represents the change to the production quantity. - Unit of Measure (UOM)
Select a unit of measure from the drop-down list. To learn about the default selections in this list, see Which units of measure are included in Procore's master list? and Add a Unit of Measure to the Unit of Measure Master List.
- Cost Code
- Click Save.