Create a Subcontractor Invoice on Behalf of an Invoice Contact (Beta)
For Procore Customers in the United States
 When your company applies the 'Owners English' or 'Specialty Contractors English' point-of-view dictionary, you'll see different tool names and term changes in the user interface. Learn how to apply the dictionary options.
- To learn the differences: Show/Hide
Objective
Background
Things to Consider
Prerequisites
Steps
- Open the New Invoice Page
- Update the General Information Card
- Update the Schedule of Values Card
- Update the Payment Details Card
- Set an Release Retainage on SOV Line Items
- Add Attachments
- Save the Invoice
Open the New Invoice Page
Users always create invoices in the project's Commitments tool.
- Navigate to the project's Commitments tool.
- Find the commitment to create an invoice for in the 'Contracts' tab.
- Click the Number link to open it.

- At the top of the commitment, click Create and choose Create Invoice from the menu.
Tip
Is the 'Create Invoice' option inactive? To learn why, hover your mouse cursor over the tooltip. This option only activates when Prerequisites are met.
This opens the 'New Invoice for [Contract Number]' page so you can update the General Information card.
Update the General Information Card
In the New Invoice page, update the General Information card. Once updated, continue by updating the Schedule of Values.
Note
The element circled in ORANGE is only available with Procore Pay.

- Learn how to update the General Information card as an invoice administrator: Show/Hide
-
General Information Card
This table details the elements in the 'General Information' card. An invoice administrator can update this information when creating or editing an invoice of behalf of an invoice contact.
Element Field Type Description Learn More Contract Company Read Only Shows the name of the subcontracting company designated as the 'Contract Company' on the commitment. To change the company name that appears: - Assign a different company to the commitment. See Create a Commitment.
OR - Change the company name by editing the company's record in the Project Directory or Company Directory.
Status* Drop-down list Accept the default status (Draft) or select a different status from the drop-down list. - When an invoice is ready for review, remember to change its status to Under Review.
- Once reviewed, remember to change its status to Approved or Revise and Resubmit.
What are the default statuses for Procore invoices? Invoice # Alphanumeric text Procore automatically assigns invoice numbers in sequence using its default numbering system or the custom numbering system defined for your project's invoices. Read Can I customize the numbering system for financial objects in Procore? before changing this number. Billing Period* Drop-down list Accept the billing period that appears by default or select any billing period from the drop-down list.
Note: Invoice contacts and users with 'Standard' level permissions on the Commitments tool can only select a billing period when an invoice is NOT already associated with it.Only invoice administrators can Create Billing Periods. Billing Date* Calendar control Shows the billing date for the selected billing period. You can change the date for this invoice with the calendar control. Only invoice administrators can Create Billing Periods. Period Start* Calendar control Shows the start date for the selected billing period. You can change the date for this invoice with the calendar control. Only invoice administrators can Create Billing Periods. Period End* Calendar control Shows the end date for the selected billing period. You can change the date for this invoice with the calendar control.
Note: To help project managers track how invoices impact a project's budget, the 'Billing Period' date on an invoice aligns with the work performed on a project.Only invoice administrators can Create Billing Periods. Billing Type: Progress Billing
Option button Requires Procore Pay
If the subcontractor is submitting progress billings for an ongoing project, choose this option.When your company has Procore Pay, this setting works with the Invoicing Settings for Progress Conditional and Progress Unconditional lien waivers. See Enable Lien Waivers & Set Default Templates on Projects. Billing Type: Final Billing
Option button Requires Procore Pay
If the subcontractor is submitting a one-time invoice or if this is the final invoice for an ongoing project, choose this option.When your company has Procore Pay, this setting works with the Invoicing Settings for Final Conditional and Final Unconditional lien waivers. See Enable Lien Waivers & Set Default Templates on Projects. Submitted Date Calendar control Select the date the invoice was submitted to your company by the subcontractor. Typically, this is printed on the invoice that you received from the subcontracting company. - Assign a different company to the commitment. See Create a Commitment.
-
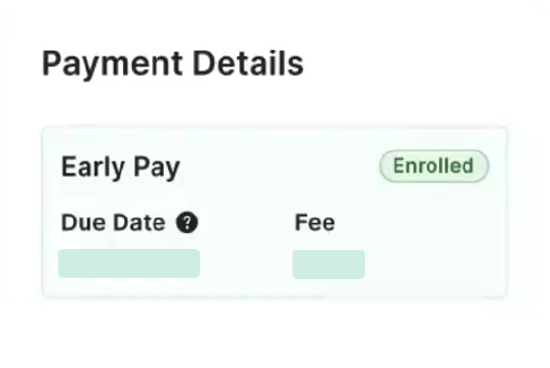
Update the Payment Details Card
The 'Payment Details' card appears next to the 'General Information card for invoice administrators with Procore Pay.
Payment Details Card
To change the payment due date for this invoice, select a new date from the Payment Due Date calendar.
In Beta - Early Pay Programs
When a payee is enrolled in an Early Pay Program, this card shows the payee's Early Pay Program enrollment Status, Due Date, and Fee. See Review and Manage Early Pay Enrollments as a Payee. The Early Pay Program assigned to the Procore Project automatically determines the Due Date and Fee. See About Early Pay Programs.
Set and Release Retainage on SOV Line Items
Add Attachments
- Scroll to the 'Attachments' section.
- Choose from these options:

- Click the Attach Files button. This opens the Attach Files dialog box, where you can upload files from your computer. Click the Attach button when finished.
OR - Use a drag-and-drop operation to move the files from your computer or network into the 'Attachments area'.
- Click the Attach Files button. This opens the Attach Files dialog box, where you can upload files from your computer. Click the Attach button when finished.
Save the Invoice
Send an Invoice with DocuSign©
Optional: If your project team wants to collect signatures on your invoices using the Procore + DocuSign© integration, click the Send with DocuSign© button at the top of the page. To use this button, the DocuSign© integration must be enabled on the project (see How do I enable the DocuSign® Integration?) and the invoice must be in the Approved, Approved as Noted, or Pending Approval status. To learn more about the DocuSign© integration and preparing envelopes for signature, see DocuSign®.
