

Add a Procore Project to QuickBooks®
Objective
To create a new project in Procore and export it to an integrated QuickBooks® Desktop system as a new job with a unique QuickBooks® Desktop Job ID.
Background
If your company implemented the Procore + QuickBooks® Desktop Connector in your environment, you have the ability to create a new project in Procore and then send that project to the ERP Integrations tool for review by accounting approvers. Upon your acceptance by an approver, Procore will export the appropriate project data and then create a new 'Job' with a unique 'Job ID' in QuickBooks® Desktop.
To accomplish this, your company must first setup the QuickBooks® Desktop Connector. See QuickBooks® Desktop: Setup Guide. The next step is to create a new project in Procore using the Steps below. Once the project is created, you will copy the "QuickBooks® Desktop Cost Codes" list to your Procore project and then send all of your new project information to the ERP Integrations tool for accounting approval.
After an accounting approver reviews and submits an 'Accept' response for the Procore project in the ERP Integrations tool (see Accept or Reject a Project for Export to QuickBooks® Desktop), Procore will export the project data during the sync process. In addition to creating a new 'Job' in QuickBooks® Desktop, the following project information in Procore is synced to the new QuickBooks® Desktop job:
- Standard Cost Codes
- Companies
Important!- Projects configured to use the 'QuickBooks® Desktop Cost Codes' list always have the 'Cost Type' in Procore assigned to 'Other'. The 'Cost Types' concept in Procore is NOT available and NOT supported by QuickBooks® Desktop.
- Procore does not export 'Customers' data to QuickBooks® Desktop.
Things to Consider
- Required User Permission:
- 'Admin' level permissions on the Company level Directory tool.
OR - 'Read Only' or higher on the company's Portfolio tool with the privilege to create new projects. See Allow Users to Create New Projects.
- 'Admin' level permissions on the Company level Directory tool.
- Prerequisites:
- Important! Your new project must use the 'QuickBooks® Desktop Standard Cost Code List' in order for the project to be eligible to be sent to QuickBooks® Desktop. See Configure Cost Code Preferences for QuickBooks® Desktop.
- Complete the steps in the QuickBooks® Desktop Setup Guide.
- If your company is planning to use the Project level Bidding tool, complete the steps in Add Project Bid Types.
- If your company is planning to organize its projects in the company's Programs tool, complete the steps in Add Programs.
- If your company uses a classification system to organize your projects by type, complete the steps in Add a Custom Project Types.
- If your project has a logo that you would like to display in the Procore application and reports, ensure that you have a logo image ready to upload. You can also upload it at a later time. See Upload a Project Logo.
Notes:
- For best results, always resize the logo image to 200 x 70 pixels (width x height) and save it in the GIF, JPG, or PNG format before you upload it.
- To resize your logo image, open the logo file in a raster-based image editor (i.e. Paint, Paint.NET, Photoshop, etc.). Next, save a copy of the logo as an image file to your computer. Then adjust the image size to 200 x 70 pixels.
- Limitations:
- Procore does not currently support sub jobs for QuickBooks® Desktop integrated projects.
- Projects using QuickBooks® Desktop cost codes will only use the cost type of 'Other' in Procore. Cost types are not available in QuickBooks® Desktop.
- Procore projects cannot be deleted. However, you can change its status to Inactive. For instructions, see Change a Project's Status to Active or Inactive.
- Additional Information:
- Before you can sync data project data between the two (2) systems, your Procore point of contact must enable the 'Can Push to Accounting' privilege for your company's accounting approvers. See What is the Accounting Approver role? This gives users with 'Standard' level permissions to the ERP Integrations tool permission to accept or reject the data that is synced between Procore and QuickBooks® Desktop. See Accept or Reject a Project for Export to QuickBooks® Desktop.
Steps
Use the Project Creation Assistant to add a new project. These are the steps:
- Launch the Project Creation Assistant
- Add Project Details
- Add and Remove Tools in the Project Toolbox
- Add Project Cost Codes
- Send a New Project to the ERP Integrations Tool
- Update Directory
- Upload Drawings
- Upload Specifications
- Upload Schedule
Launch the Project Creation Assistant
Add Project Details
- Make sure Project Details is highlighted in the right sidebar.
- Under General Information, do the following:

-
Under ERP Integration, do the following (Note: this step is only relevant to companies that are integrated with certain ERP systems):

- Allow project to be synced with ERP. Leave this checkbox marked if you plan to sync any part of the project's financials with your ERP software. This will ensure that the ERP Standard cost code list will be available to select from when configuring your Project Level cost codes.
Important
- This checkbox will be marked by default if your company has an available set of ERP cost codes, unless the template the project is created from does not have this box marked.
- If you plan to sync your new Procore project with your ERP software you MUST leave this checkbox marked. If you un-mark this box, you will not be able to re-mark it later if cost codes from a different Company Level list have been copied to the Project Level list in the Project Admin tool.
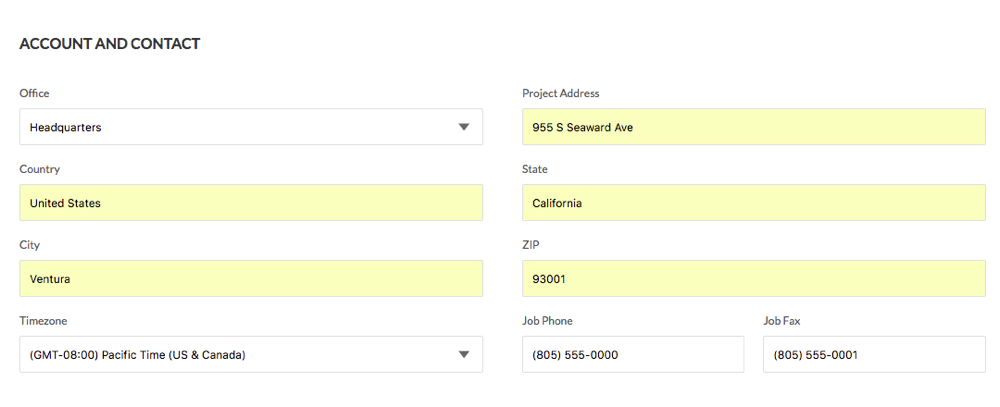
- Under Account and Contact, do the following:
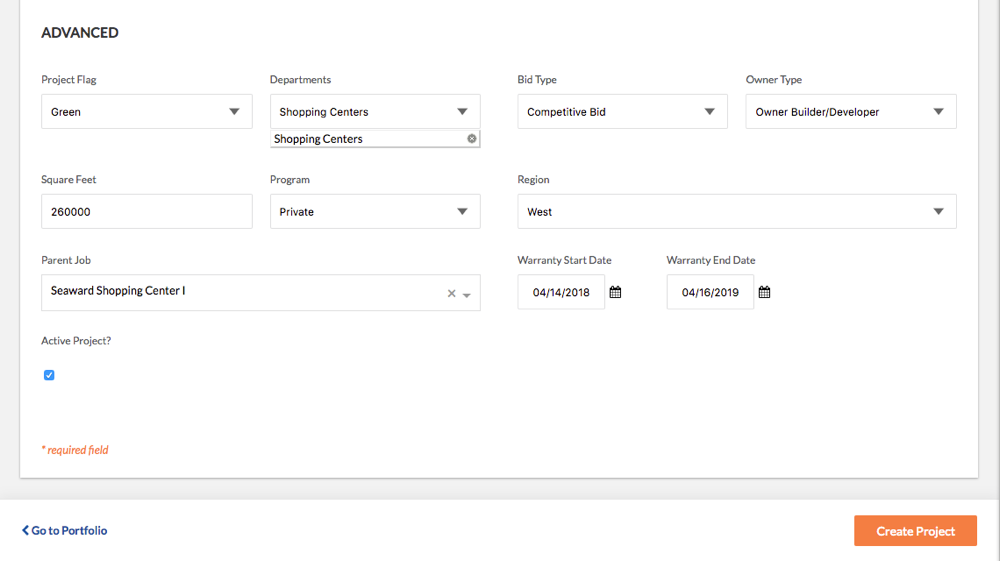
- Under Advanced, do the following:
- Click Create Project.
This button turns GREY and becomes unavailable for further use. - Choose from these next steps:
- If you applied a project template and the template defines the desired project tools, you will skip to Add Project Cost Codes.
- If you did not apply a project template or your template does not define the desired project tools, you will continue with Add and Remove Tools in the Project Toolbox.
Add and Remove Tools in the Project Toolbox
- Make sure the Tools link is highlighted in the right sidebar.
This opens the <Project Name> Active Tools page.
Important! If the Tools link does NOT appear in the project creation assistant, it is because the project template that you applied to your new project already defines the project's tools. If you want to modify tools later, you can do so after you've completed the project creation assistant. See Add and Remove Tools on a Project. - Add and remove tools for each product line as follows:

- To add all available tools, place a checkmark next to the Select All box in the top-right corner.
- To add a tool, place a checkmark next to box that corresponds to desired tool. This shows the selected tool in the project's toolbox.
- To remove a tool, remove the checkmark from the box for the desired tool. This hides the selected tool in the project's toolbox.
- Rearrange tools as follows:

- Grab the desired tool by the more menu (≡).
- Use a drag-and-drop operation to move the selected tool into the desired position in that product line.
- Click Select Tools.

The system displays a GREEN banner to confirm your settings were saved.
Add Project Cost Codes
- Make sure Cost Code is highlighted in the right sidebar.
This opens the cost code page for your new project. - Copy the desired codes to your project as follows:
- Copy All Codes
To copy all of the codes from the QuickBooks® Desktop Standard Cost Code list:- Click Copy All Codes.
The system reveals the following confirmation message: "Once you add this cost code, the source list cannot be changed." - Click OK to acknowledge the confirmation message.
This moves all the codes in the QuickBooks® Desktop Standard Cost Code List to the Project Cost Codes list.
- Click Copy All Codes.
- Copy Selected Codes
To copy only selected codes from the QuickBooks® Desktop Standard Cost Code list:- Expand the desired division folder(s).
- Highlight the desired cost codes.
- Click Copy Selected Codes.
- Copy All Codes
- Click Next.
The New Project Created page appears.

- Continue with Send a New Project to the ERP Integrations Tool.
Send a New Project to the ERP Integrations Tool
- At the New Project Created page, choose from these options:
- If you want to send your new Procore project data to the Company level ERP Integrations Tool for accounting acceptance, click the Send to ERP button. Before the data is synced between the two systems, an accounting approver must accept the data as described in Accept or Reject a Project for Export to QuickBooks.

OR - If you want to send your new Procore project data to the Company level ERP Integrations tool at a later time, click Continue Project Setup. Later, do the following:
- When you are ready to send your data to the ERP Integrations tool, see Send a Procore Project to ERP Integrations for Accounting Acceptance.
- Before the data is synced between the two systems, an accounting approver must accept the data as described in Accept or Reject a Project for Export to QuickBooks.

- If you want to send your new Procore project data to the Company level ERP Integrations Tool for accounting acceptance, click the Send to ERP button. Before the data is synced between the two systems, an accounting approver must accept the data as described in Accept or Reject a Project for Export to QuickBooks.