Upload a Project Schedule File to Procore's Web Application
NOTE: This page is linked in the Procore web app
Locations: https://app.procore.com/1004955/proj...ile_management
- Schedule > Schedule Settings > File Management > File Import > Learn More
Objective
To upload a schedule file in the Procore web application using the project's Schedule tool.
Things to Consider
- Required User Permissions:
- 'Admin' level permissions on the project's Schedule tool.
- Additional Information:
- Project schedules cannot be edited in Procore. The only field that can be edited within Procore is the 'Percent Complete' field from a mobile device, see 'How do I allow users to update the 'Percent Complete' field in the Schedule tool?'. Project schedules must always be updated in the third-party software application (e.g., Microsoft Project, Asta Powerproject, etc.) and then uploaded into Procore again.
- If you are using a file-based schedule software like Microsoft Project or Asta, and have a Windows computer, Procore recommends that you update your schedule through Procore Drive. See Integrate a Microsoft Project Schedule using Procore Drive.
Note: Any file-based scheduling software will work with Procore Drive! - If you are using Primavera P6 and have a Windows computer, Procore recommends that you update your schedule through Procore Drive. See Integrate a Primavera P6 Schedule using Procore Drive.
Important
If you are uploading an updated project schedule into Procore via the project level Schedule tool, make sure to use the same file name that was previously uploaded. This way the information in the Schedule Change Request History section will NOT be cleared. In addition, this will help ensure you do not have duplicate Lookahead Schedule Activities.
Steps
- Navigate to the project's Schedule tool.
- Click the Configure Settings
 icon.
icon. - Click File Management.
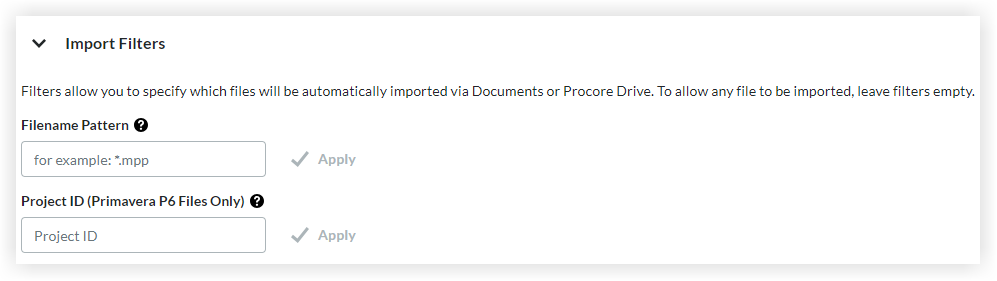
- Choose Import Filters options: Filters allow you to specify which files will be automatically imported via Documents or Procore Drive.
To allow any file to be imported, leave filters empty.
- Upload your schedule the following ways:
- Upload via Browser
- Upload files via Procore Drive
Note: To download Procore Drive, click the ellipsis icon and click Download Procore Drive.
Upload via Browser
- Click Upload via Browser.
- Click My Computer to upload files from your computer.
OR
Click Documents to upload files from Procore Documents. - Scroll to the bottom of the page and click Update.
Note: When the upload is complete, a green confirmation banner will appear. - Verify that your schedule is uploaded as expected.
Note: Use the table filter and the ellipsisicon for table configuration and column adjustments.
 - Optional: In the Schedule Filename Pattern, enter the filename pattern you would like to have automatically uploaded to the Schedule tool. For example, if you prefix your schedule file with the date (e.g. 07-26-17_Construction Schedule.mpp), you can use the asterisk (*) symbol to denote that piece of the filename that will change. For example, you would enter*_Construction Schedule.mpp into the Schedule Filename Pattern field.
- Important! Enter the exact or partial name of your schedule file in the "Schedule Filename Pattern" field. For example, you would enter "Construction Schedule.mpp" into this field. Uploaded files into documents matching this exact filename pattern will be automatically updated into the Schedule tool.
- Tip! When multiple users are accessing the schedule file and you're making changes to the file from the Documents tool, it is recommended that you check out the file so the team members don't overwrite your schedule changes as you're uploading.
- Use the table filter and the ellipsisicon for table configuration and column adjustments.
Procore Drive
- Launch Procore Drive on your computer.
- Log in Using your Procore Credentials.
- Select your company and project from the drop-down menus.
- Select the Schedule tab.
- Click Upload Schedule.
Notes: If the project scheduling preference is currently configured for a 'Primavera Integration', click the Schedule File Integration from the drop-down menu.
After the initial upload, and you subsequently proceed to update the schedule file you will do it through Procore Drive by clicking “Launch Schedule”, and that will open the schedule file in its native application (e.g. Microsoft Project, Phoenix or Asta Powerproject). - Browse your local file system and select the appropriate Microsoft Project, Phoenix or Asta Powerproject file (*.mpp, *.pp, *.ppx, etc).
- Click Open.
- Verify that you can see your schedule and all of its data under your project’s Schedule tool.
Note: After you upload your initial schedule, Procore will now manage that file and save that version in the Documents tool in a locked folder called 'Schedules'. This folder is only accessible to Document tool Admins and serves the purpose of version control and an audit record. See Update the Procore Project Schedule via Procore Drive (Microsoft Project, Asta, Phoenix). - Use the table filter and the ellipsisicon for table configuration and column adjustments.
See Also
- Clear an Integrated Schedule
- Update a Project Schedule File
- Integrate a Microsoft Project Schedule using Procore Drive
- Integrate an Asta Powerproject Schedule Using Procore Drive
If you would like to learn more about Procore's scheduling software and how it can help your business, please visit our construction scheduling software product page  .
.