About the Compliance Tab on Subcontractor Invoices with Procore Pay
Table of Contents
- Overview
- Considerations
- Details
- Configure Compliance Templates
- Manage Compliance on Invoices
- Questions
- More
Overview
Considerations
Details
The Compliance tab on a subcontractor invoice in Procore Pay includes several key features designed to streamline the management of compliance documents during the invoice process.These features collectively help ensure that all compliance-related requirements are efficiently managed, reducing the risk of payment delays due to missing or incomplete documentation.
Collect Required Compliance Documents During Invoice Submission
Payors can collect any required compliance documents from your payees during invoice submission. For example, collecting a W-9 is often contractually required for tax compliance and accurate record-keeping. Invoice administrators can perform these actions to ensure payment requirements are met and verified on project invoices from the Commitments or Invoicing tool. Payments Admins and Disbursers with invoice administrator permission can also verify the requirements before invoice approval and payment from the Payments tool. Invoice contacts may also be able to perform these actions with the payor's permission.
To learn more, see:
- Add a Compliance Document to a Subcontractor Invoice
- Upload a Compliance Document to a Subcontractor Invoice
- Delete a Compliance Document from a Subcontractor Invoice
Examples
This shows you the Compliance tab on a subcontractor invoice.

Review Submitted Compliance Documents
Once the required compliance documents have been submitted, users with invoice administrator permissions on a project can manually add or remove compliance documents as needed. Note that any manual changes do not carry over to future invoices.
Example
This shows you the Review button on the Compliance Documents tab of a subcontractor invoice.

Configure the Required Compliance Documents for Project Invoices with Compliance Templates
Company Admins can create compliance templates to manage required documents on Procore projects. Once created, they can also determine which compliance documents are required for a project or invoice by adding to the template. This helps teams standardize their compliance processes across Procore projects. For details, see:
- Add Required Compliance Documents to Compliance Templates
- Edit or Delete Required Compliance Documents from Compliance Templates
Example
This shows the Create New Requirement page in the Company level Admin tool.

Configure Compliance Documents as a Soft or Hard Payment Requirement
Payments Admins for the payor can configure the 'Invoice Compliant' requirement as a soft or hard stop requirement, providing flexibility in how compliance impacts payment processing. You also have the option to waive the requirement. To learn how, see Configure Payment Requirements as a Payor.
Example
This shows you the 'Invoice Compliant' setting on the Payment Requirements page in the Payments tool.

Know When Invoice Payment Requirements are Met
Payments Admins and Disbursers for the payor can see when compliance requirements are met in the Subcontractor Invoices tab Payments tool. Tracking requirements is crucial for informed payment decisions. To learn how other users can view payment requirements, see View Payment Requirements.
Example
This shows you the payment requirements in the Subcontractor Invoices tab of the Payments tool.

Required User Permissions
Create Templates
- Navigate to the Company level Admin tool.
- Under Tool Settings, choose the option available in your project:
- Click the Contracts tab.
OR - If you have the Change Management tools enabled, click the Contracts and Change Orders tab.
- Click the Contracts tab.
- Click the Compliance Templates tab.

- Click Create Template.
This opens the Create Template prompt. - In the Create Template prompt enter a unique name in the Template Name box.
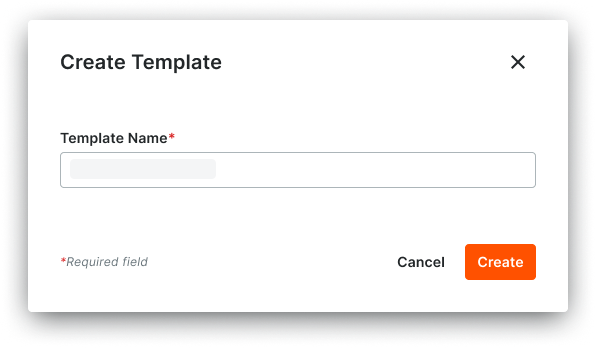
- Click Create.
The template opens on a new page. The General tab is active.
Add Requirements
- Navigate to the Company level Admin tool.
- Under Tool Settings, click Contracts.
- Click Compliance Templates.
- Locate the template to update and choose one of these options:
- Manage. Click this button to open the template.
OR - Template Name. Click this button to open the template.
- Manage. Click this button to open the template.
- In the General tab, scroll to the Required Compliance Documents card, click Add Requirement.
This opens the Create New Requirement window. - In the Document Details card, do the following:
- Document Type. Choose an option from the list: Bond, Closeout, License, Master Agreement, Other, Payroll, Permit, Project Insurance, Safety, Stored Material, or W-9.
- Document Name. Type a name for the document.
-
In the Criteria card, make the appropriate selections for the document you need to collect:

-
Collect At. This determines where the document will be collected and how it impacts Payment Requirements on invoices.
-
Commitment. Choose this option if the required document impacts the Payment Requirements of all invoices.
-
Invoice. Choose this option if the required document impacts just the individual invoice it’s being collected on.
-
-
Apply Requirement to. This determines whether to backfill this document requirement.
-
All active commitments/invoices. Applies the requirement to all commitments/invoices when an invoice is created or edited or when the commitment is edited.
-
Commitments/Invoices created on or after. Enables a date field so the requirement can be applied to commitments/invoices created after a specified date.
-
-
Commitment Type. Assign this document to
-
Purchase Orders
-
Subcontracts
-
Subcontracts & Purchase Orders.
-
-
Frequency. This determines how often the document should be required. Documents collected at the Commitment are only collected “Once”. Documents collected at the invoice can be required at the following frequencies:
-
First Billing. On the first invoice created on the commitment.
-
Every Progress Billing. On every invoice created on the commitment.
-
Final Billing. On any invoice with the Billing Type of “Final Billing”.
-
-
-
Under Additional Criteria, click Add Condition to define conditional rules.
-
Create Conditions as follows:
-
Standard Conditions (Based on Financials/Progress):
-
From the When dropdown, select a standard financial or progress field, such as:
-
% complete.
-
Materials presently stored.
-
Original contract amount.
-
Retention release. The Is dropdown will appear.
-
From the Is dropdown, choose:
-
Greater than or equal to
-
Less than A numerical/dollar amount field will appear.
-
Enter the required dollar or percentage value.
-
-
-
-
-
Custom Conditions (Based on Commitment Custom Fields):
-
From the When dropdown, choose one of the available Commitment Custom Fields. These include:
-
Commitment Custom Checkbox fields
-
Commitment Custom Single Select fields Note: Commitment Custom Fields (e.g., Single Select, Checkbox) must first be created and applied to the commitment Fieldset in the Company Admin tool to be available in the dropdown.
-
-
From the Is dropdown, choose:
-
Is
-
Is not
-
-
Select the specific value from the custom field that the commitment must match (e.g., "Minority Business Enterprise (MBE)").
-
-
-
Click Create.
-
Repeat these steps to add more requirement documents to the template.
Edit Requirements
Delete Requirements
- Navigate to the Company level Admin tool.
- Under Tool Settings, click Contracts.
- Click Compliance Templates.
- Locate the template to update and choose one of these options:
- Manage. Click this button to open the template.
OR - Template Name. Click this button to open the template.
- Manage. Click this button to open the template.
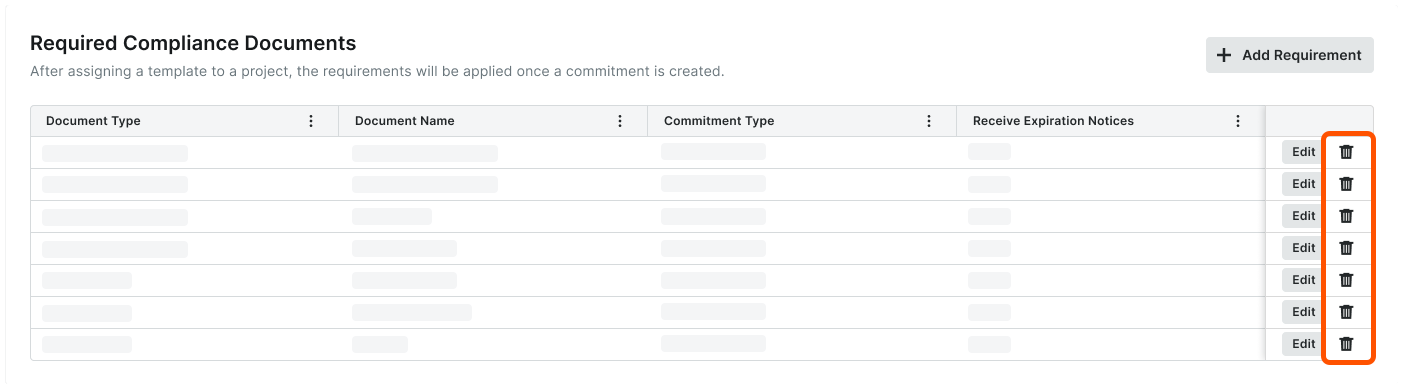
- In the Required Compliance Documents card, locate the document to delete and click the trash can
 icon.
icon.
- In the Delete Compliance Requirement? prompt, click Delete.
A GREEN success banner confirms the delete action.Caution
The compliance requirement cannot be restored to the template ones its deleted. This modification only affects new commitments (or invoices) on projects configured to use this compliance template.
- Repeat the steps above to delete any additional compliance documents from the template.
Notes
- Deleting a requirement from a template does NOT remove the requirement from any existing commitments or invoices.
- As an invoice administrator, you can delete any requirement from an project commitment or invoice, whether it originated from a template or not.
Set Payment Requirements
- Navigate to the Company level Payments tool.
- Click the Payments Settings
 icon.
icon.
This opens the Payments Settings page. - Click the Payment Requirements tab.
- Click Payment Requirements.
- Choose one (1) option for each requirement:
- Not Required. Doesn't track the payment requirement.
- Required but Allows Payment. Alerts users about unsatisfied payment requirements but lets them send payments.
- Required and Prevents Payment. Alerts users about unsatisfied payment requirements and prevents them from sending payments.
- Configure the options in each section as desired:
Available Payment Requirements
| Option | When ON... | When OFF... | Learn More |
|---|---|---|---|
| Holds Released | Tracks the status of any payment holds applied to invoices. Holds must be released before payment. | Doesn't track invoices for payment holds. | Manage Payment Holds as a Payor |
| Commitment Executed | Tracks the commitment associated with the invoice to ensure a check mark appears in the 'Executed' box. | Doesn't track the 'Executed' state on the commitment. | Create a Commitment Edit a Commitment |
|
Contract Compliant |
Tracks the status of the contract compliance documents for the commitment. | Doesn't track the compliance status of the insurance certificates | Manage Contract Compliance Documents & Statuses for a Commitment |
| Change Orders Executed | Tracks change orders that impact the contract associated with the invoice and require them to be in the 'Executed' state. | Doesn't track change orders. | Create a Change Order |
|
Insurance Compliant |
Tracks the status of the insurance certifications for the commitment. | Doesn't track the compliance status of the insurance certificates. | Manage Insurance & Compliance Statuses for a Commitment |
| Invoice Approved | Tracks invoices to ensure they are in one of these statuses: Approved, Approved as Noted, and Pending Owner Approval. See What are the default statuses for Procore invoices? | Doesn't track invoice status. | Bulk Edit the Status of Subcontractor Invoices with the Invoicing Tool |
| Invoice Compliant | Tracks required compliance documents on subcontractor invoices. | Doesn't track invoice status. | Add Required Compliance Documents to Compliance Templates |
| Owner Funding Received | Tracks the total 'Payment Received' entries against the 'Current Payment Due' for the owner invoice's billing period to ensure the owner invoice is fully paid. | Doesn't track 'Payment Received' entries. | Create a Record for a Payment Received |
| Sync to ERP | Tracks the invoice to ensure it is synced with an integrated ERP system. | Doesn't track invoice syncing with ERP. | ERP Integrations |
| First-Tier Conditional Lien Waiver Signed | Tracks first-tier signatures on conditional lien waivers on your invoices. Note: Only appears on an invoice when the requirement is enabled on its project. See Enable Lien Waiver Templates on a Project. |
Doesn't track signatures. | Create Lien Waiver Templates |
| First-Tier Unconditional Lien Waiver Signed | Tracks first-tier signatures on unconditional lien waivers for your invoices. Note: Only appears on an invoice when the requirement is enabled on its project. See Enable Lien Waiver Templates on a Project. |
Doesn't track signatures. | Create Lien Waiver Templates |
| Sub-Tier Waivers | Tracks when sub-tier waivers are in the 'Approved' status. This requirement will not exist on projects that has disabled sub-tier waivers. Note: If sub-tier waivers are disabled on a project, this requirement won't appear. See Enable the Sub-Tiers Card & Add Instructions on Project Invoices. |
Doesn't track signatures. | Manage Sub-Tier Waivers |
Assign Template to Project
- Navigate to the Company level Admin tool.
- Under Tool Settings, click Contracts.
- Click Compliance Templates.
- Under Compliance Templates, locate the template to assign to a project.
- Click the link for the desired template in the Assign to Projects column.
This opens the Assign Templates to Projects prompt. - Choose one of these options:
- To select all projects, mark the check box in the Project column.
- To select individual projects, mark the checkboxes that correspond to the desired projects.

Click Assign.
A GREEN banner indicates a successful assignment. Once assigned, Procore generates the template's insurance and contract compliance requirements on all new commitments.
Upload Compliance Docs
Add Compliance Docs
Review Compliance Docs
- Open an invoice from the Commitments, Invoicing, or Payments tool.
- Click the Compliance tab.
- In the Compliance Documents card, locate a compliance document in the In Review status.
- Click Review.

This opens a preview window for viewing the document and its details. - Click one of these buttons:
- Request Revision. Click to request a revision. This opens a window where you can enter a reason for your request. Then click the Request button to send the request to the payee's invoice contact.
OR - Approve. Click to approve the document.
- Request Revision. Click to request a revision. This opens a window where you can enter a reason for your request. Then click the Request button to send the request to the payee's invoice contact.
Delete Compliance Docs
Edit a Required Compliance Document
- Navigate to the Company level Admin tool.
- Under Tool Settings, choose the option available in your project:
- Click the Contracts tab.
OR - If you have the Change Management tools enabled, click the Contracts and Change Orders tab.
- Click the Contracts tab.
- Click Compliance Templates.
- Locate the template to update and choose one of these options:
- Manage. Click this button to open the template.
OR - Template Name. Click this button to open the template.
- Manage. Click this button to open the template.
- (Optional) In the General Information card, click Edit to change the template name. Then click Save.
- In the Required Compliance Documents card, find the requirement to update and click Edit.
This opens the Edit Requirement panel. - In the Document Details card, do the following:
- Document Type. Choose an option from the list: Bond, Closeout, License, Master Agreement, Other, Payroll, Permit, Project Insurance, Safety, Stored Material, or W-9.
- Document Name. Type a name for the document.
- In the Criteria card, choose the Collect At requirement to determine if Procore Pay tracks the requirement:
- Commitment. Assign this to a Purchase Order, Subcontract, or both Subcontract & Purchase Order. To get email alerts for upcoming or past document expirations, mark the checkbox.
OR - Invoice. Choose the commitment type. Then, set the billing cycle: First Billing, Every Progress Billing, or Final Billing.
- Commitment. Assign this to a Purchase Order, Subcontract, or both Subcontract & Purchase Order. To get email alerts for upcoming or past document expirations, mark the checkbox.
- Click Save.
A green success banner appears to confirm the update. - Repeat the steps above to update other requirements.
Delete a Required Compliance Document
- Navigate to the Company level Admin tool.
- Under Tool Settings, click Contracts.
- Click Compliance Templates.
- Locate the template to update and choose one of these options:
- Manage. Click this button to open the template.
OR - Template Name. Click this button to open the template.
- Manage. Click this button to open the template.
- In the Required Compliance Documents card, locate the document to delete and click the trash can icon.
- In the Delete Compliance Requirement? prompt, click Delete.
A GREEN success banner confirms the delete action.Caution
The compliance requirement cannot be restored to the template ones its deleted. This modification only affects new commitments (or invoices) on projects configured to use this compliance template.
- Repeat the steps above to delete any additional compliance documents from the template.
Notes
- Deleting a requirement from a template does NOT remove the requirement from any existing commitments or invoices.
- As an invoice administrator, you can delete any requirement from an project commitment or invoice, whether it originated from a template or not.