Create a Submittal
It is recommended that the majority of your submittals are generated from the Specifications tool. The following procedure can be used when additional submittals are required or you have to create a submittal that was not generated from the specifications book.
- Navigate to the project's Submittals tool.
- Click + Create > Submittal.
Add General Information
- Complete the data entry in the General tab as follows:

-
Note: If you attempt to create a submittal with a duplicate number, this message appears. You have two options for responding to this message:
- (Recommended) To create a submittal with a unique number, click Cancel and assign it the next available number.
OR - To create a submittal with a duplicate number, click OK.

- (Recommended) To create a submittal with a unique number, click Cancel and assign it the next available number.

- Notes: When the 'Final Due Date' occurs, the system sends an automated email notification to notify users that the submittal is overdue. If your system is configured to use sequential approval, the notification goes to the Submittal Manager and the Ball in Court person on the approval workflow. If your system is configured to use parallel approval, the notification goes to the Submittal Manager and members of the approval workflow).

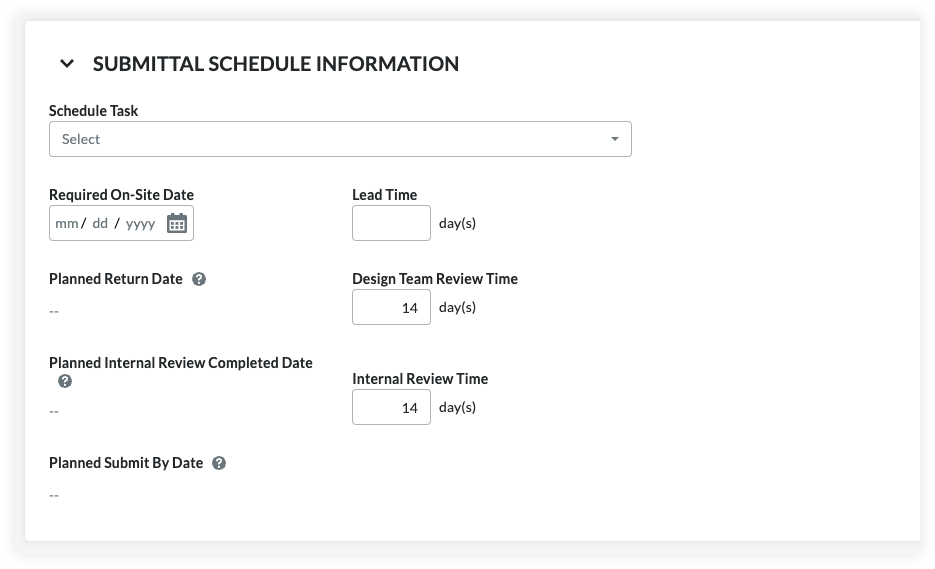
Calculate Submittal Schedule Information (If Enabled)
Submittal Schedule Calculations is an optional feature that you can enable. See Enable Submittal Schedule Calculations. When enabled, the Submittals tool will analyze your entries in the 'Required On-Site Date', 'Lead Time', 'Design Team Review Time', and 'Internal Review Time' fields to provide suggestions for the Submitter and Approver 'Due Date' on the submittal workflow. It also automatically populates the 'Planned Return Date', 'Planned Internal Review Completed Date', and 'Planned Submit By Date' fields.
- Follow the steps in Create a Submittal.
This reveals the New Submittal page. - Scroll down to the Submittal Schedule Information area.
- Set the following information:
- Schedule Task. The schedule task associated with the submittal being created. A schedule must be uploaded to the project first. See Upload a Project Schedule File to Procore's Web Application.
- Note: If you enter 7, the system subtracts '7' calendar days from the Planned Return Date to automatically populate the date entry for the Planned Internal Review Completed Date.
- Note: If you enter 10, the system subtracts '10' calendar days from the Required On-Site Date to automatically populate the date entry for the Planned Return Date.
-
Note: If you enter 5, the system subtracts '5' calendar days from the Planned Internal Review Completed Date to automatically populate the date entry for the Planned Submit by Date.
This illustration shows you an example of these entries and calculations.
Update the Delivery Information

- Anticipated Delivery Date
View the date displaying in the Anticipated Delivery Date. This is the date between the 'Lead Time' and when the submittal was distributed, and it will not populate upon the creation of the submittal. This date is calculated by Procore once the submittal has been distributed. See Distribute a Submittal. - Schedule Task
If you have enabled the Schedule tool on the project and integrated an Asta Powerproject, Microsoft Project, or Oracle Primavera schedule with Procore, you are permitted to select a project task from the Schedule Task drop-down list when you have a user account that has been granted 'Read-Only' level permission or higher on the Schedule tool. This is for reference only. - Confirmed Delivery Date
Select the date the subcontractor or supplier confirmed the freight would arrive using the Confirmed Delivery Date calendar. - Actual Delivery Date
Select the date the material arrived on site using the Actual Delivery Date calendar. Typically, this value is updated by the project superintendent.
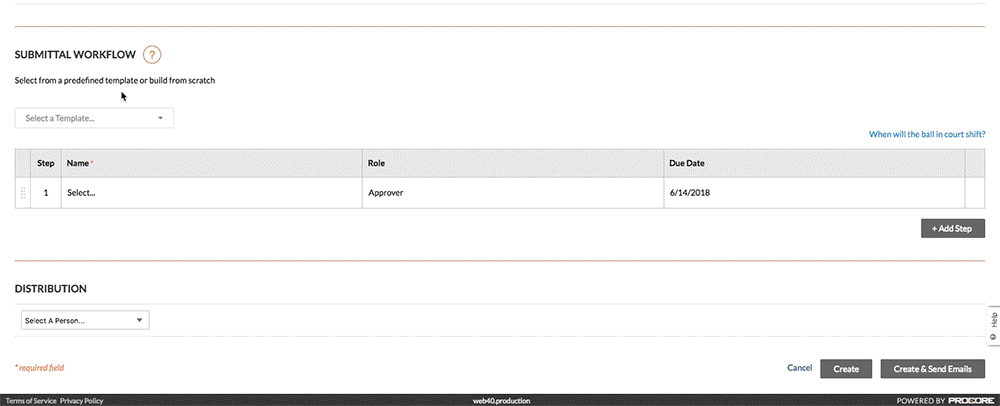
Add a Submitter and Approvers to the Submittal Workflow
A user with 'Admin' level permission to your project's Submittals tool should create submittal workflow templates which you can then add to a new submittal when you first create it. This saves a lot of data-entry time by preventing you from having to add a new submittal workflow each time you create a submittal. Some modification may still be required but if you can save even two minutes per submittal, you will save 16+ hours of work over the course of a project, simply by taking a few minutes to set up or Manage Submittal Workflow Templates periodically.
- Follow the steps in Create a Submittal or Edit a Submittal.
- Under Submittal Workflow, do the following:
- Select a Template. Select a workflow template from the drop-down list.
Notes:- This drop-down list is only visible and available to users with 'Admin' level permission on the Submittals tool.
- This action applies the person(s) named on the submittal workflow template to your submittal.
- To learn how submittal workflow templates are created, see Manage Submittal Workflow Templates.
- Select a Template. Select a workflow template from the drop-down list.
- Continue by modifying the Name, Role, and Days to Submit/Response fields as needed for the submittal. Your changes only affect the workflow on the submittal, your changes do NOT affect the submittal workflow template.
- (Optional) Continue with the steps in Add Reviewers to the Submittal Workflow.
Add to the Distribution List

- The default distribution list should be configured or updated regularly in the Submittal Configuration Settings to include the Project Manager, Assistant Project Manager, Project Coordinator, Architect, Site Manager (optional), and Assistant Site Manager (optional).
- Any other Approvers you have added to the workflow should be included in the distribution list using the Select A Person drop-down menu. The users on this list will receive email updates about the submittal, but are not required to participate in the submittal process in any way.
-
If you want to remove someone from the list, click the red X next to their name.
Update and Send the Submittal for Review
When finished with the steps above, choose one of these options:
- To save your changes without sending an email to members of the submittal workflow, distribution list members, and submittal manager, click Create.
OR - To save your changes and to send an email notification to alert the members of the submittal workflow and to alert the members of the distribution list, click Create & Send Emails.