Materials User Guide (with Financials)
Table of Contents
- Welcome
- Project Setup
- Ordering
- Receiving
- Invoicing
- Requesting and Issuing
- Adjustments and Transfers
- Manage UOSD Defects
- Reports
Overview
Workflows
Available workflows:
- Order and Receive with Commitments
- Order and Receive without Commitments
- Request and Issue
- Manage UOSD Defects
- Adjustments
- Transfers
Order and Receive with Commitments

Order and Receive without Commitments
.png?revision=7)
Request and Issue
.png?revision=3)
Manage UOSD Defects

Adjustments

Transfers

Considerations
Project Setup
Ordering Overview
Materials works with the Commitments tool to automatically pull in purchase orders and commitment change orders. Materials listed in the purchase or change order's schedule of values (SOV) are available for receiving and inventory management in the Materials tool. For purchase orders and change orders to appear in the Materials tool, the following information must be reflected in the purchase order or chance order:
- An 'Approved' status.
- A completed schedule of values (SOV) including the following information for each line item:
- Description
- Unit of Measure (UOM)
Once in the Materials tool, the following information about the order is available:
- Order name
- Description
- Vendor
- Estimated Delivery Date
- Line Items and their Quantities
Create a Purchase Order
Objective
To create a purchase order in the project's Commitments tool.
Background
Things to Consider
- Required User Permissions:
- To create a purchase order and see/enter data on the Schedule of Values (SOV) tab:
- 'Admin' level permissions on the project's Commitments tool.
OR - 'Standard' level permissions on the project's Commitments tool and the 'Allow Users to See SOV Items' setting must be enabled and your name must be selected in the 'Select a Person' drop-down list.
- 'Admin' level permissions on the project's Commitments tool.
- To create a purchase order and see/enter data on the Schedule of Values (SOV) tab:
-
For companies using the
 ERP Integrations tool: Prerequisites, requirements, limitations, and considerations might apply depending on the ERP system your Procore account is integrated with. Visit Things to Know about your ERP Integration for details.
Prerequisites
Steps
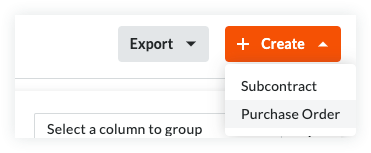
- Navigate to the project's Commitments tool.
- On the Contracts tab, click the Create button and choose Purchase Order from the drop-down list.
Note
- The Create button is available when you are viewing the Contracts and Recycle Bin tabs. New purchase orders are always added to the Contracts tab.
- The Export button is only available on the Contracts tab. To learn more, see Export a Commitments List.
- Continue with the next steps:
Add the Basic Information
Update the basic information as follows:

Notes
- There are no required fields when adding the basic information.
- If you click the Create button without completing any data entry, Procore saves the contract, lists you as the creator, and automatically places it in the Draft status.
- Contract Number
To number your contract(s), choose from these options:- If you number your contracts using a sequential numbering system, you can enter any combination of alpha-numeric characters in this box. For subsequent contracts, Procore automatically applies consecutive numbering in ascending order.
Example
The examples below show you how Procore's ascending consecutive numbering works:
- If the previous contract was 1, the next contracts are 2, 3, and so on.
- If the previous contract was PC-0001, the next contracts are PC-0002, PC-0003, and so on.
- If the previous contract was DCA00010-12-G-0001, the next contracts are DCA00010-12-G-0002, DCA00010-12-G-0003, and so on.
- If you do NOT number your contracts using sequential numbering, you can manually enter a unique number for each purchase order. To do this, type over the existing entry in the Number box. Duplicate contract numbers are NOT permitted.
Notes
- For companies using the ERP Integrations tool, your integrated ERP system may impose a maximum character limit. See What is the maximum character length for a commitment's 'Number (#)'? Important! When a commitment is exported to Integration by Procore, it must have a unique number.
- You can customize the numbering scheme for your project's commitments. To learn more, see Can I customize the numbering system for financial objects in Procore?
- If you number your contracts using a sequential numbering system, you can enter any combination of alpha-numeric characters in this box. For subsequent contracts, Procore automatically applies consecutive numbering in ascending order.
- Contract Company
Select the company responsible for fulfilling the Purchase Order (for example, American Construction Co.).
Notes:- To appear in this list as a selection, add the company to the Project Directory. For details, see Add a Company to the Project Directory or Import Users & Vendors into your Project Level Directory Tool (Procore Imports).
- Title
Type a descriptive name for the contract.Notes
- If your company has enabled the ERP Integrations tool, be aware that some integrated ERP systems impose character limits on the 'Title' field when data exported from Procore is imported into their system.
- For details about character limits, see What is the maximum character length for a commitment's 'Title'?
- Optional: Sign with DocuSign®
Move this toggle to the right to collect signatures with the Procore + DocuSign® integration. To learn how to activate the integration in Procore, see Enable or Disable the DocuSign® Integration on a Procore Project.
Update the General Information
Update the contract with more general information:
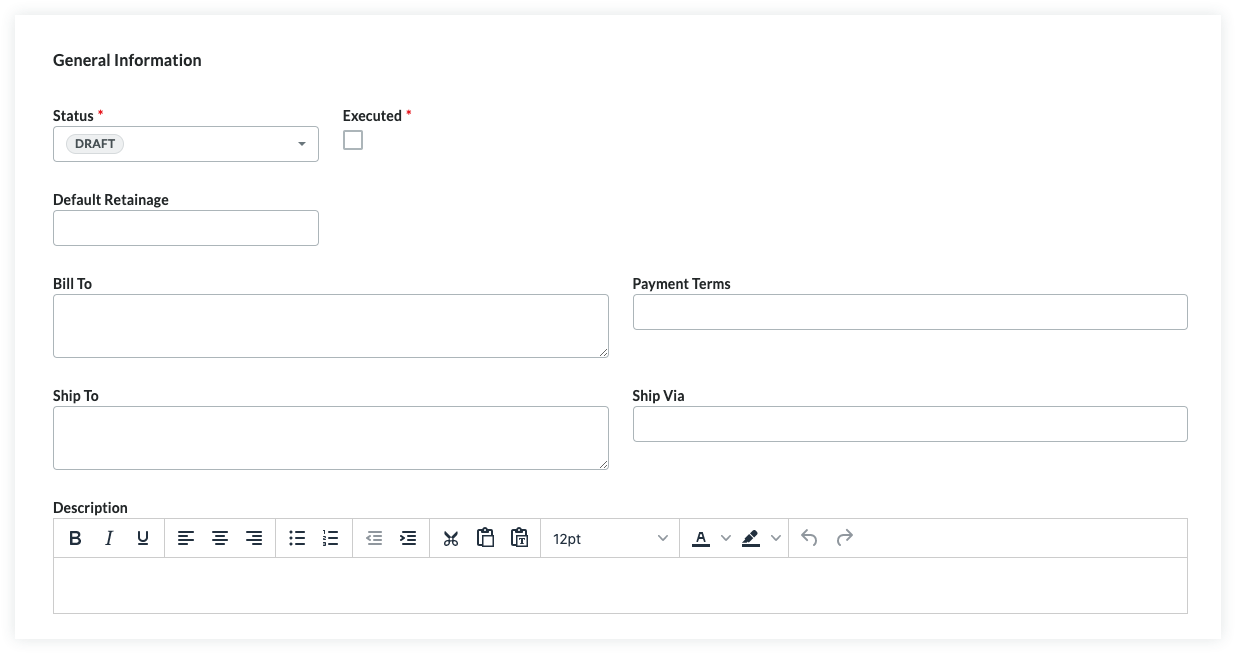
- Status
Procore automatically assigns contracts the 'Default' status. To select a different status, choose one of the status labels from the drop-down list. Options includeNote
To create change orders and invoices, your contract's status must be set to Approved or Complete. - Executed
Place a mark in this check box if the contract has been fully executed. A fully executed contract is a legally effective agreement that has been signed by authorized representatives for each party.Notes
- Many Procore users choose to place a checkmark in the 'Executed' box when placing the purchase order into the 'Approved' or 'Complete' status.
- The time at which your project team places a checkmark in the 'Executed' box should always be aligned with your project's unique business process
- Default Retainage
Enter a number to represent the percentage that will be withheld as retainage on the line items of the contract's Schedule of Values. For example, if you plan to withhold ten (10) percent of the line item's value, enter 10%.Notes
- The 'Default Retainage' amount set on the purchase order will only affect the amount on the first invoice. Editing this value after creating the first subcontractor invoice will NOT affect the retainage amount on subsequent invoices.
- In order to set or release the retainage amount on a subsequent invoice, complete the steps in Enable Retainage on a Purchase Order or Subcontract. Next, use one of these Procore tools to set or release retainage on the invoice:
- Commitments. Set or Release Retainage on a Subcontractor Invoice.
- Invoicing. Set or Release Retainage on a Subcontractor Invoice. If you would like to set up retention rules that automatically adjust withheld amounts on your subcontractor invoices, see Enable Sliding Scale Retention Rules on on a Commitment's Invoices.
- Bill To
Enter the business contact information for the party paying for the order. Procore uses this information to auto-populate the 'Bill To' address on any invoices created for this order. - Assigned To
Enter the name of the individual assigned to the Purchase Order. - Payment Terms
Enter the payment terms. For example, Net 30, Net 45, and so on. - Ship To
Enter the business contact information for the shipping destination. Procore uses this information to auto-populate the 'Ship To' address on any invoices created for this order. Keep in mind this address may be different from the 'Bill To' address. For example, you may choose to have the order delivered directly to the job site or to an off-site staging location. - Ship Via
Enter the shipping method for the order. For example, Air, International, Ocean, Truckload, Train, and so on.Note
The 'Ship Via' field is a free-form text field, so you can enter the appropriate shipping method, carrier, and/or tracking number for the order. - Description
Enter a more detailed description of the prime contract. You can apply the options in the formatting toolbar to your text.
Update the Contract Privacy
Using the privacy setting allows only project admins and the select non-admin users access. To change the contract's access permissions, do the following:
- Check or Uncheck the 'Private' box. Procore turns this setting ON by default.
- Select an employee of the 'Contract Company' from the Invoice Contact drop-down list.
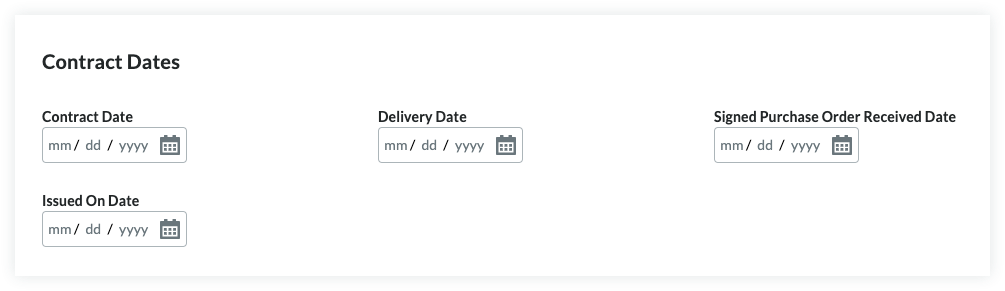
Update the Contract Dates
To update the contract with important dates, do the following:
Notes
- Your company's Procore Administrator manages the dates that appear in the 'Contract Dates' section using the configurable fieldsets feature.
- For details, see Which fields in the Commitments tool can be configured as required, optional, or hidden?
- Signed Purchase Order Received
Select the date the executed purchase order was received. - Contract
Select the contract date for the order. - Delivery
Select the expected or actual delivery date for the order. - Issued On
Select the date the order was issued by your company.
Update the Schedule of Values
There are two (2) method for updating the purchase order's SOV:
- Add Line Items to the Schedule of Values
- Import Line Items to the Schedule of Values from a CSV File
Add Line Items to the Schedule of Values
By default, you can input line items on the purchase order's SOV at any time, as long as it is NOT in the 'Approved' status.
Note
If your project team has turned the 'Enable Always Editable Schedule of Values' configuration setting ON in this tool, users with the required user permission to Edit Purchase Orders can add line items to the Schedule of Values when a purchase order is in any status. To learn specific information this setting, see What is the 'Enable Always Editable Schedule of Values' setting?To manually add line items to the Schedule of Values:
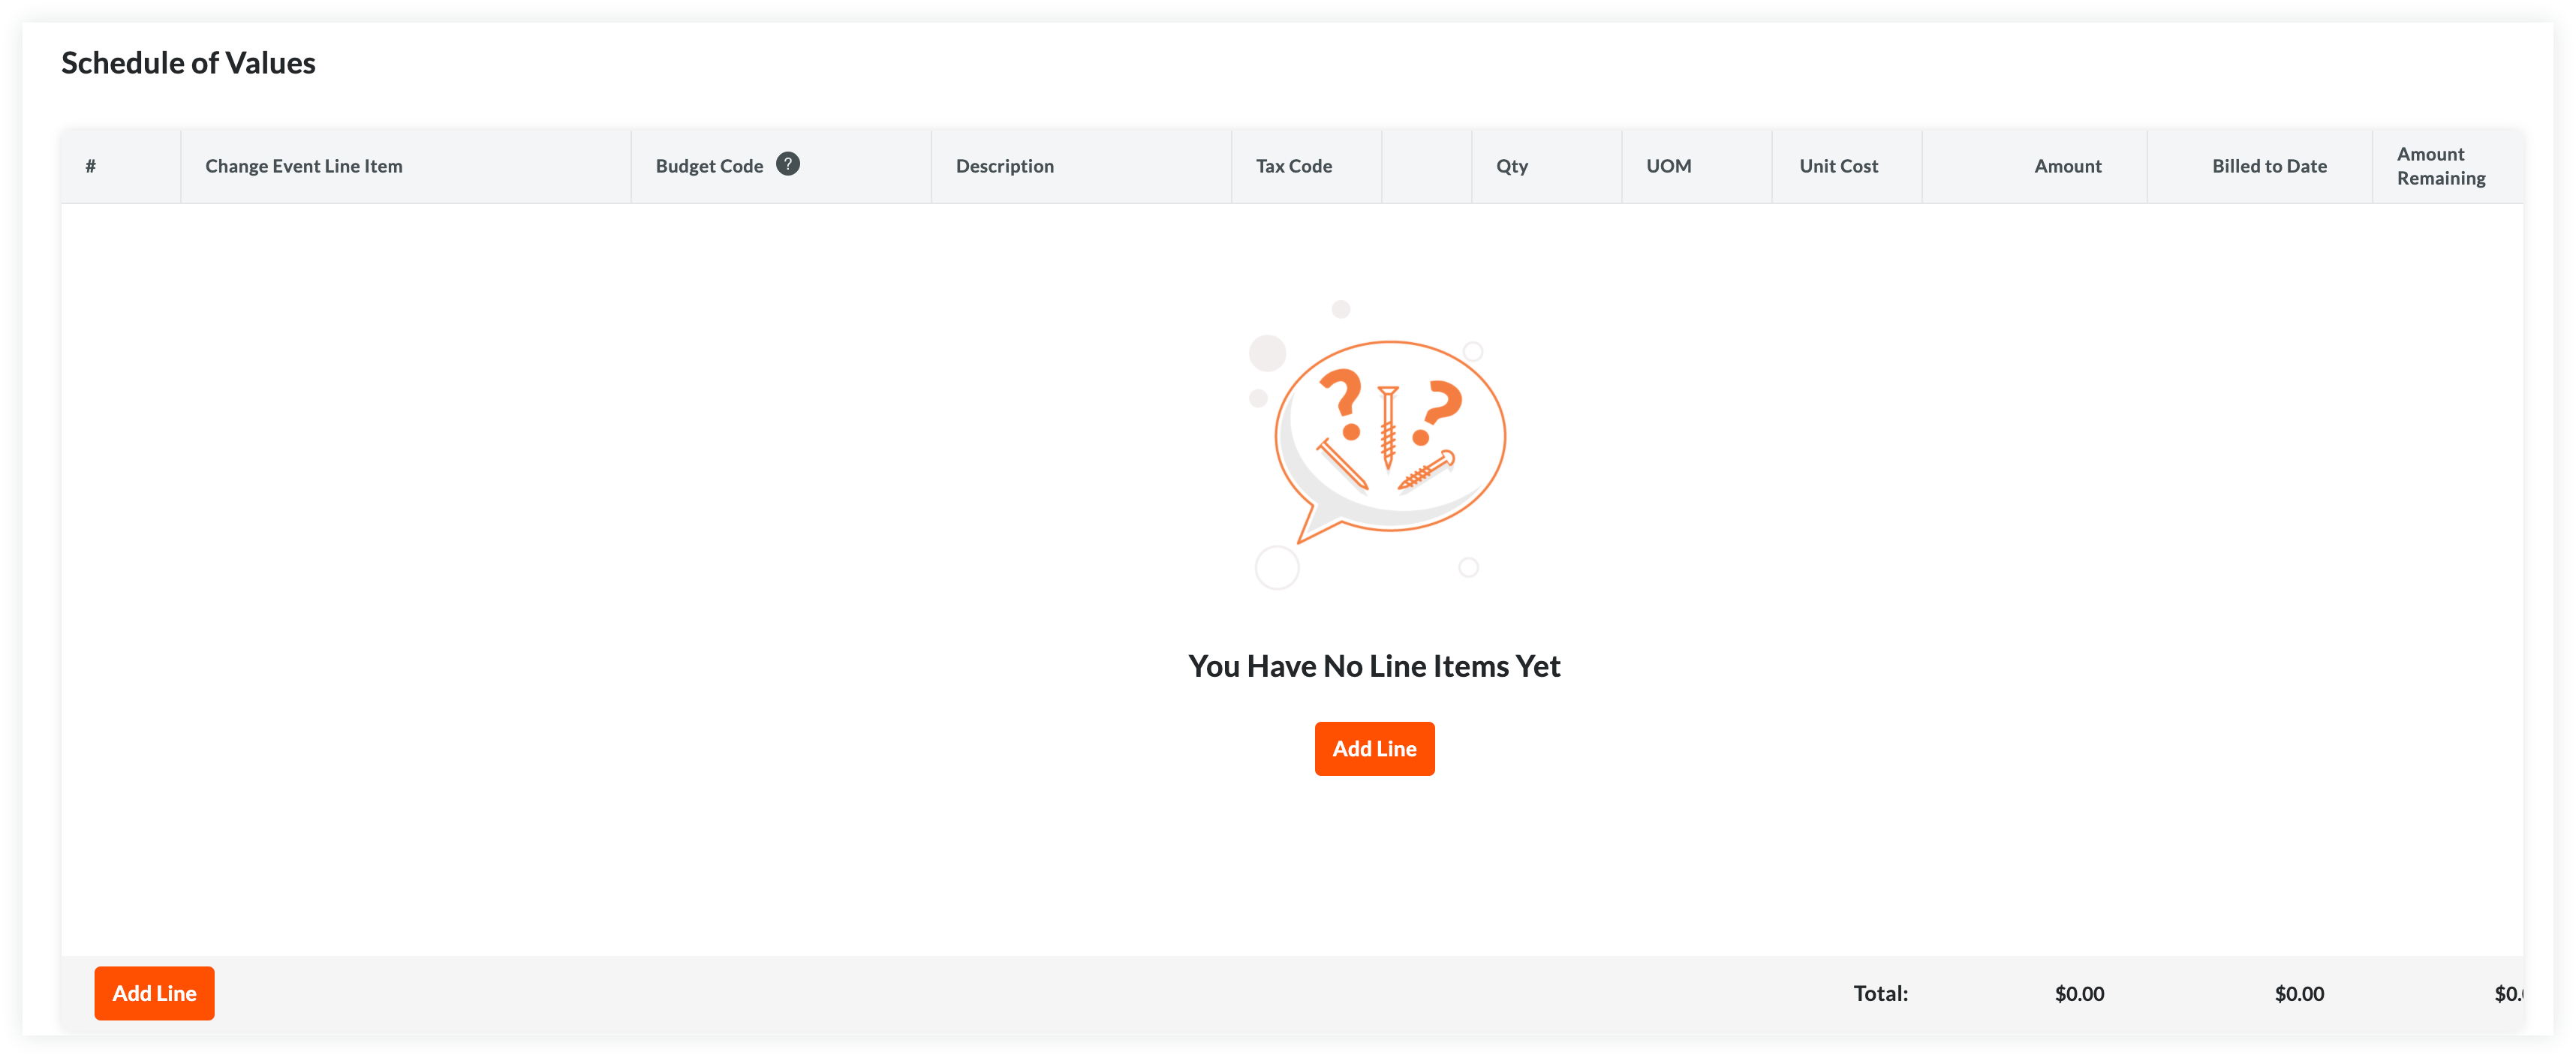
- Choose from these options:
- If the SOV is blank, click Add Line under 'You Have No Line Items Yet'.
OR - If you have existing line items, click Add Line.
Procore creates new line items starting with the number '1'. Subsequent lines are created in numerical order.
- If the SOV is blank, click Add Line under 'You Have No Line Items Yet'.
- Designate a budget code for the new line item. You have these options:
- To assign an existing budget code to the line item, start typing a code in the Search box and select the matching code from the list.
OR - To create a new budget code for the line item, click the Create Budget Code button. Next, select the appropriate segment items from the drop-down list(s) to satisfy your project's budget code pattern requirements. Then, click Create.
- To assign an existing budget code to the line item, start typing a code in the Search box and select the matching code from the list.
- Depending on the accounting method you are using, choose the appropriate steps for adding a line item:
- For an Amount-Based contract:
An Amount-Based SOV requires this data entry:- #
Procore automatically enters a line item number in sequential order. - Change Event Line Item
If you have change events enabled, you can select a change event line item if the commitment needs to be linked to a change event. - Budget Code
Select a budget code from the list or click Create Budget Code to create a new one. See What is a budget code in Procore's WBS? - Description
Enter a description for the line item. For example, type: Monthly Service Fee - Amount
Enter the amount of the cost. - Billed to Date
The system automatically calculates the amount billed on the commitment up to the current date. - Amount Remaining
Enter the amount that has NOT been billed to the current date. - Tax Code
Enter a tax code to use for this line item. This field only appears if you have enabled the tax codes feature. See How can I use tax codes on a project?
- #
- For a Unit/Quantity Based contract:
A Unit/Quantity Based SOV requires this data entry:- #
Procore automatically enters a line item number in sequential order. - Change Event Line Item
If you have change events enabled, you can select a change event line item if the commitment needs to be linked to a change event. - Budget Code
Select a budget code from the list or click Create Budget Code to create a new one. See What is a budget code in Procore's WBS? - Description
Enter a description for the line item. For example, type: Monthly Service Fee - Qty
Enter the number of units. - UOM
Enter the Unit of Measure (UOM).Note
- To view the default options in the list, see Which units of measure are included on Procore's master list?
- To update the available options in the list, see Update a Unit of Measure to the Unit of Measure Master List.
- Unit Cost
Enter the Unit Cost in the box provided. - Amount
The system automatically calculates the subtotal for you, based on the Qty, UOM, and Unit Cost entries. - Billed to Date
The system automatically calculates the amount billed on the commitment up to the current date. - Amount Remaining
Enter the amount that has NOT been billed to the current date. - Tax Code
Enter a tax code to use for this line item. This field only appears if you have enabled the tax codes feature. See How can I use tax codes on a project?
- #
- For an Amount-Based contract:
- Optional: Repeat the steps above to add as many line items as needed.
- Click Save.
Procore saves the line items on the contract's SOV.
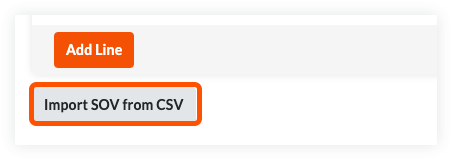
Import Line Items to the Schedule of Values from a CSV File
- In the 'Schedule of Values' card, click the Import SOV from CSV button.
- Click the Download CSV Template button and choose one of these options:
- Blank Template. Click this option to download a blank template.
OR - Template with Existing Line Items. Click this option to download a template that includes any existing line item data from your project's budget.
Note
- Procore downloads a CSV template file to your web browser's file download location.
- The name of the file is: TBD
- Blank Template. Click this option to download a blank template.
- Open the template that you downloaded on your computer.
- Enter the data that you want to upload directly into the template.
Important
Do NOT change or rearrange the Column Headings in the template file. - After entering your line item data, make sure to save your file updates in the 'Comma Separated Values' file format.
- Navigate back to Procore. Then, in the 'CSV File' section, choose one of these options:
- Click Upload File.
OR - Use a drag-and-drop operation to move the template you just updated into the 'CSV File' section.
- Click Upload File.
- Choose one of these options:
- Add Additional Line Items. Choose this option if you want to create new line items using the data in your template.
OR - Replace Existing Line Items. Choose this option if you want to erase any existing line items from the prime contract and replace them with data in your template.
Note
If the 'Enable Always Editable Schedule of Values' configuration setting is turned ON in the project's Commitments tool, the 'Replace Existing Line Items' option is grayed out and unavailable for use once an invoice is created and line items are billed. To learn more, see What is the 'Enable Always Editable Schedule of Values' setting?
- Add Additional Line Items. Choose this option if you want to create new line items using the data in your template.
- Click Import.
Attach Files
To add file attachments to the contract:
- On the 'Attachments' card, click Edit.
- Click Attach Files.
- In the 'Attach Files' dialog box, highlight the location where the files to upload are stored. Options include:
- My Computer. Click Upload Files to open your computer's finder. Select the files to upload and click Open.
- Photos. If the Photos tool is active on the project, choose the location from the Select Album list and then search for the file(s) to upload.
- Drawings. If the Drawings tool is active on the project, choose the area from the Select Area list and then search for the file(s) to upload.
- Forms. If the Forms tool is active on the project, choose the template from the Select Template list and then search for the file(s) to upload.
- Documents. If the Documents tool is active on the project, navigate to the folder storing the file(s) to upload and then highlight them.
- Click Attach.
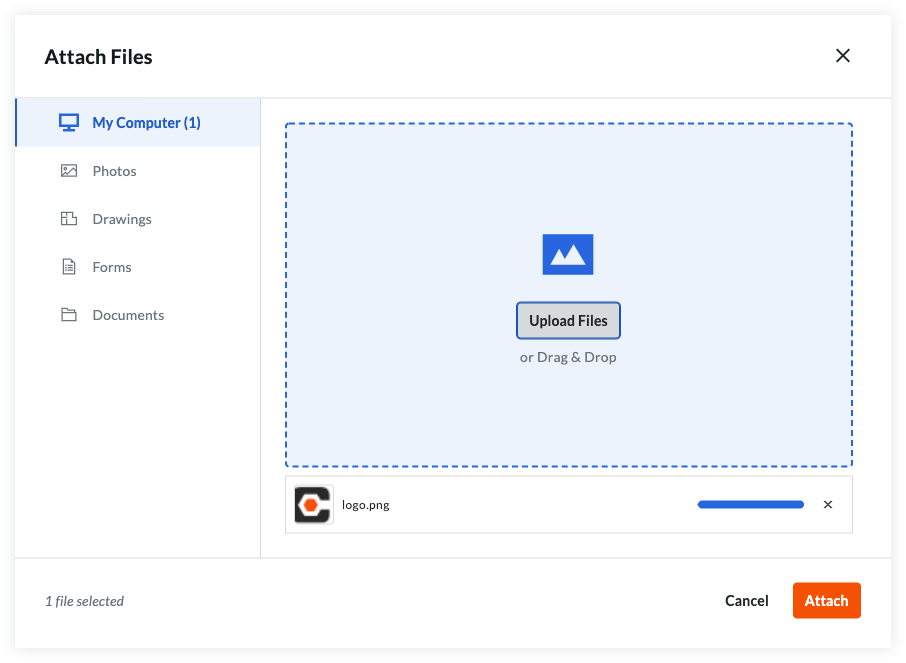
A progress indicator shows you the status of the upload. - Click the Close (X) icon on the Attach Files dialog box.
Save the Contract
To save the contract, click one (1) of these buttons:
- Create. Click this button to save the new contract and return to the 'General' tab in view mode.
OR - Complete with DocuSign®. Click this button to launch the Procore + DocuSign® integration and prepare the envelope for signature. To learn more, see DocuSign®.
OR - Cancel.
Next Steps
If your company has enabled the ERP Integrations tool:
Create a Change Order (CCO)
Objective
To create a commitment change order.
Background
In Procore, purchase orders and subcontracts are called commitments. A commitment is a contractual agreement between a buyer (for example, a project owner, a general contractor, or a specialty contractor) and a seller (for example, a contractor, a subcontractor, or a vendor). The seller is responsible for completing project work or fulfilling an order for the buyer. When you need to alter the terms of the original agreement, you can create a commitment change order.
Important
When the Change Events tool is enabled on a project
The process that you will use to create a commitment change order in Procore depends upon a few factors. First, if the Change Events tool is disabled on the project, you will use one of the processes below. Also, keep in mind that the number of steps required to create a commitment change order is dependent upon the change order tier setting that is configured on the project's Commitments tool. See Configure the Number of Commitment Change Order Tiers:
- 1-Tier configuration:
- Create a commitment change order as described below.
- 2-Tier configuration
- Create a commitment potential change order
- Create a commitment change order
PROCORE INTERNAL USE ONLY
Although not recommended, Procore also supports a 3-Tier configuration:
- 3-Tier configuration
- Create a commitment potential change order
- Create a change order request
- Create a commitment change order
Things to Consider
- Required User Permissions:
- 'Admin' level permissions on the project's Commitments tool
- 'Admin' level permissions on the project's Commitments tool
- Additional Information:
- If the Change Events tool is disabled on the project:
- The steps for creating a change order are determined by the number of change order tiers configured for the Commitments tool. See What are the different change order tier settings in Project Financials? and Configure the Number of Change Order Tiers.
- If the Change Events tool is enabled on the project:
- The Create Commitment CO button is not available.
- Instead, click Create Change Event.
- Next, follow the steps in Create a Change Event.
- Then, follow the steps in Create a Commitment Change Order from a Change Event.
- If the Change Events tool is disabled on the project:
- For companies using the ERP Integrations tool: Show/Hide
- Additional requirements, considerations, and limitations vary depending on the ERP system your company's account is integrated with. Most ERP systems have limitations on the number of characters that can be used for a commitment's title. See Things to Know About your ERP Integration for details.
Prerequisites
Steps
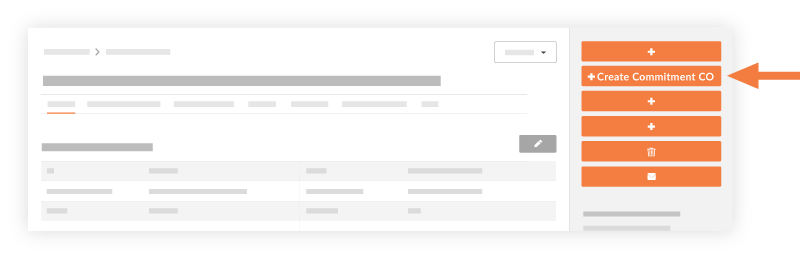
Create a Commitment Change Order
If you have created a purchase order or a subcontract and need to alter the terms of that item, use the steps below to create a commitment change order.
- Navigate to the project's Commitments tool.
- Under Contracts, locate the commitment. Then click Edit.
- Click Create Commitment CO.
Notes
If the Change Events tool is enabled on your project, the Create Commitment CO button is not available. Follow these steps instead:
- First, click Create Change Event.
- Next, follow the steps in Create a Change Event.
- Then, follow the steps in Create a Commitment Change Order from a Change Event.
- In the General tab, do the following:
- Sign with DocuSign®
If you have enabled the Procore + DocuSign® integration (see Enable or Disable the DocuSign® Integration on a Procore Project), a checkmark appears in this box by default. If you do NOT want to collect signatures with DocuSign®, remove the mark. - Number
This field automatically populates based on the number of change orders already created. By default, the number will automatically increment by one.Tip
How does Procore assign numbers to commitment change orders? To learn more, see Can I customize the numbering system for financial objects in Procore? - Revision
- Displays the change order's revision number. When a change order is first created, its revision number is zero. A change order could have multiple revisions because of feedback from a reviewer/approver.
- Date Created
Automatically populates with the date that you create the commitment change order. The date cannot be changed. - Created By
Automatically populates with the name of the user who is creating the change order. - Contract Company
Automatically populates with the name of the subcontractor or vendor listed on the subcontract. This field is only available for subcontracts. - Contract
Automatically populates with the name of the contract for which the change order is being created. This field is only available for subcontracts. - Title
Enter a name for the change order. The maximum character limit is 255 characters.Important
If you are using an integrated ERP system, the maximum character limit for the 'Title' field on a commitment is different for each system. For a list of each system and its limitation, see What is the maximum character length for a commitment's 'Title'? - Status
Select a status for the change order. To learn more, see What are the default statuses for change orders in Procore? - Private
Mark this checkbox to make the change order visible only to users with 'Admin' level permissions on the Commitments tool. - Change Reason
Select one of these reasons for the potential change order: Client Request, Design Development, Allowance, Existing Condition, or Backcharge. To learn how to configure change reasons, see Set Default Change Management Configurations. - Accounting Method
This field inherits the accounting method that was specified in the contract. - Due Date
Select a due date for when the change order must be approved by. - Invoiced Date
Select the date when the change order was invoiced. - Designated Reviewer
Select the Procore project user at your organization who will be responsible for approving or rejecting this change order later. See Approve or Reject Commitment Change Orders.Important
- The 'Designated Reviewer' can submit an approve or reject response only when a change order is in the Pending - In Review status.
- To send an email notification to the 'Designated Reviewer' to notify that person that a change order is awaiting their response, you have these options:
- You can forward the prime contract change order to the 'Designated Reviewer' by email. See Forward a Change Order to a Project User by Email.
OR - The pending change order will also be listed in the 'My Open Items' area in the project's Home page. The user can check this page at any time.
- You can forward the prime contract change order to the 'Designated Reviewer' by email. See Forward a Change Order to a Project User by Email.
- After the 'Designated Reviewer' submits an approve or reject response, the 'Reviewer' field (directly below the 'Designated Reviewer' field) shows the date/time stamp of that users response. The 'Reviewer' field is only visible to the 'Designated Reviewer.'
- Request Received From
Select a user from the project's directory who you are submitting the change order on the behalf of. - Description
Enter a detailed description of the change order.Notes
- If you are exporting the change order to Sage 300 CRE® and Integration by Procore, entries exceeding one thousand (1000) characters will be truncated during the export.
- If you will be exporting the change order to a different integrated ERP system, you can to enter an unlimited number of characters in Procore.
- Schedule Impact
If known, you can provide an estimate of the number of additional days that would potentially be added to the current project schedule if the change order were approved. - Location
Use the location drop-down menu to select a location the [item] impacts. Either select from the predefined locations, or add a multi-tiered location. See Add a Multi-tiered Location to an Item. This location may be as general as the site location at the first tier or as specific as where on the site the contractor will be working at the second tier. - Reference
Reference any other tools, materials or documents that are related to the change order. - Executed
Mark this check box if the change order has already been executed. - Field Change
Mark this check box if the change order requires a field change. - Paid in Full
Mark this check box if the cost is already covered in the budget. - Attachments
Select and add any relevant documents.
- Sign with DocuSign®
- Click Create or Create & Email to send the change order to any users listed as 'Reviewers'.
Add a Schedule of Values (SOV) to the Change Order
If there are costs associated with the change order, add line items to the change order's Schedule of Values (SOV). 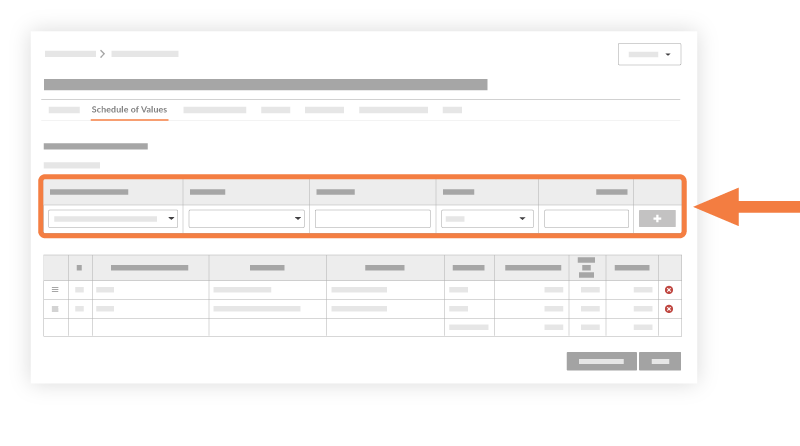
- Click the Schedule of Values tab.
- Click Edit.
- Click Add Line.
- Prime Contract Line Item
Select a line item from the drop-down list. If there is no line item that fits, select Not Budgeted. - Change Event Line Item
Select a change event line item from the drop-down list. - Sub Jobs
If the Sub Jobs feature is enabled on your project, select one from the list. See Enable Sub Jobs on Projects for WBS. - Budget Code
Select a budget code from the drop-down list. See What is a budget code in Procore's WBS? - Description
Type a description for the new change order. - Cost Amount
Enter an amount in the box. - Optional: Tax Codes
If you are using tax codes with this project, select a tax code to use for the line item.Tip
Don't see the Tax Codes field? This field only appears when the tax codes feature is enabled on the Procore project. See How can I use tax codes on a project?
- Prime Contract Line Item
- Click Add
- Repeat these steps for each line item.
- Click Save.
Note
For Companies That Have Enabled the ERP Integrations Tool
After the commitment change order is placed into the 'Approved' status in the Commitments tool, project managers will typically send the change order to the ERP Integrations tool where it must be accepted by an accounting approver for export to the integrated ERP system. For instructions, see Send a CCO to ERP Integrations for Accounting Acceptance.
Next Steps
See Also
- Create a Change Event
- Create a Commitment Change Order from a Change Event
- Configure the Number of Commitment Change Order Tiers
Overview
After your orders have been placed in the Commitments tool, materials listed in the Schedule of Values (SOV) are available for receiving and inventory management in the Materials tool. When receiving materials, you can immediately issue them for use at a job site, or you can store materials in your inventory to be issued at a later date.
Create a Shipment
Objective
To create a shipment to track materials that were shipped for your project.
Background
You can use Procore to manage materials for your project. From the Materials tool, you can create shipments to track the materials you have ordered. You can create shipments for orders you placed outside of Procore, or from approved purchase and changed orders made in Procore's Commitments tool.
Things to Consider
- Required User Permissions
- You can create a receipt from an order or a shipment. If you create a receipt from an order, it will automatically create a shipment. If you have already created a shipment for that order, it will create a duplicate. You can delete the duplicate shipment.
- The Ship Date and the Estimated Transit Time entered will calculate the Estimated Delivery Date for the shipment's line items.
- If creating a shipment for uploaded materials, you must create your receipt from the 'Create' button.
Prerequisites
Materials must be listed in your inventory by one of the following methods:
Steps
Create a Shipment from the 'Create' Button
Tip
If you uploaded your materials instead of ordering them through the Commitments tool, use this method to create your shipment.- Navigate to the project's Materials tool.
- Add materials that need to be adjusted to your list. See Add Materials to List.
- Click Create and select Receipt.
- Optional: Select a Purchase Order.
Note: Select this option if you ordered materials through the Commitments tool. - Enter the 'Vendor' information.
- Enter the 'Receipt Date'.
- Click in to any field in the 'Route' table to make adjustments based on your shipment information.
- Optional: Enter any notes.
- Under 'Line Items', click the quantity field for each line item and enter the quantity of the material that needs adjustment.

- Click Build Document.
- Optional: On the shipment, update the 'Document Status' to Released if the shipment is in transit.

Create a Shipment from an Order
- Navigate to the project's Materials tool.
- Click the Control tab.
- Click the Orders sub tab.
- Click the order number you want to create a shipment for.
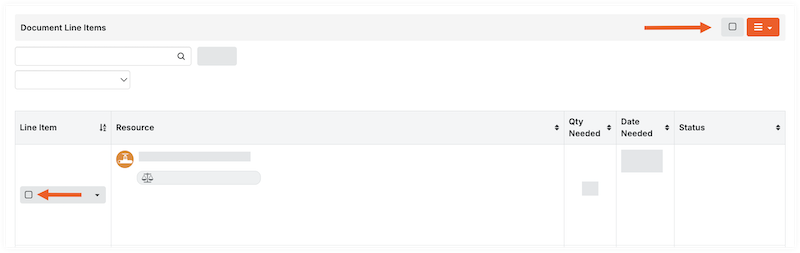
- Mark the checkboxes for the items in the shipment.

OR
Select the checkbox in the 'Document Line Items' header to select all items on the order.

- In the 'Documents Line Items' header, click the hamburger
 icon and select Create Shipment.

- Enter the shipment information:
- Optional: Shipment Number/Name. Enter the shipment number or leave it blank to auto-generate a shipping number.
- Optional: Destination. Enter the default destination assigned to all line items in the shipment. Individual line items can be updated later, or on the receipt when receiving the order. See Update a Shipment.
- Ship Date. Enter the date the items were shipped.
- Estimated Transit Time (Days). Enter how many days the shipment is expected to be in transit before arrival.
- Shipment Reference Type. Enter the reference type from one of the following
- Other/None
- Notice
- Release
- Bill of Lading
- Packing List
- Optional: Reference Number. Enter the reference number for the shipment.
- Optional: Notes. Enter any notes.
- Click Create.
- Optional: Upload Attachments to Materials
- Optional: On the shipment, update the 'Document Status' to Released if the shipment is in transit.
Next Steps
See Also
Create a Receipt
Objective
To create a receipt for materials that were received for your project.
Background
You can use Procore to manage materials for your project. From the Materials tool, you can create receipts to track the materials you have received. You can create receipts for orders you placed outside of Procore, or from approved purchase and changed orders made in Procore's Commitments tool.
Things to Consider
- Required User Permissions
- For customers using Commitments, it's recommended that you create a receipt from an order or a shipment. If you create a receipt from an order, it will automatically create a shipment. If you have already created a shipment for that order, it will create a duplicate. You can delete the duplicate shipment.
- If creating a receipt from a shipment, the Document Status for the shipment must say 'Released'. See Update a Shipment.
- If creating a receipt from uploaded materials, you must create your receipt from the 'Create' button.
Prerequisites
- Locations must already be created in Procore. See Add Locations to a Project.
- Materials must be listed in your inventory using one of the following methods:
Steps
- Create a receipt from the 'Create' button
- Create a receipt from an order
- Create a receipt from a shipment
Create a Receipt from the Create Button
Tip
If you uploaded your materials instead of ordering them through the Commitments tool, use this method to create your receipt.- Navigate to the project's Materials tool.
- Add materials that need to be adjusted to your list. See Add Materials to List.
- Click Create and select Receipt.
- Enter the 'Vendor' information.
- Enter the 'Receipt Date'.
- Select the 'Reference Type' for the receipt.
- Enter the 'Reference Number' for the receipt.
- Select the 'Inspected By Name' for the person who inspected the received materials.
- Select the 'Received By Name' for the person who received the materials.
- Optional: Enter any notes.
- Under 'Line Items', click the quantity field for each line item and enter the quantity of the material that needs adjustment.
- Click Build Document.
- Under 'Document Line Items', review the line items.
- Review the date received. If you need to make a change, see Update Material Received Date.
- Review the quantity.
- Enter the storage location for each line item:
- Update an individual line item:
- Click the Location field for the item and select the location from the drop-down menu.

- Click the Location field for the item and select the location from the drop-down menu.
- Bulk update line items:
- Mark the checkbox for each line item.
- Under 'Storage Location', select the location from the drop-down menu.

- Click Set Selected to set the location for the selected items.
OR
Click Set All to set the location for all line items.
- Add materials to a container:
- Follow steps to Add Materials to a Container.
- Update an individual line item:
- If materials received are unacceptable, over, short, or damaged (UOSD), follow the steps to Create a UOSD Defect.
- Update the Status of acceptable materials.
- Update an individual line item:
- Click the 'Status' field for the item, and select the Checked > Acceptable from the drop-down menu.

- Click the 'Status' field for the item, and select the Checked > Acceptable from the drop-down menu.
- Bulk update line items:
- Mark the checkbox for each line item.
- Under 'Status/Condition', select the Checked > Acceptable from the drop-down menu.

- Click Set Selected to set the status for the selected items.
OR
Click Set All to set the status for all line items.
- Update an individual line item:
- If a line item is a replacement for a defect, follow steps to Associate Line Items with a Defect.
- Optional: Upload Attachments to Materials.
Create a Receipt from an Order
Important
If you have already created a shipment, create the receipt from that shipment. Otherwise, you will create a duplicate shipment.- Navigate to the project's Materials tool.
- Click the Control tab.
- Click the Orders sub tab.
- Click the order number you want to create a receipt for.
- Mark the checkboxes for the items on the receipt.

OR - Select the checkbox in the 'Document Line Items' header to select all items on the order.
- In the 'Documents Line Items' header, click the hamburger icon and select Create Receipt.

- Enter the receipt information.
- Click Create.
- Under 'Document Line Items', review the line items.
- Review the date received. If you need to make a change, see Update Material Received Date.
- Review the quantity.
- Enter the storage location for each line item:
- Update an individual line item:
- Click the Location field for the item and select the location from the drop-down menu.
- Click the Location field for the item and select the location from the drop-down menu.
- Bulk update line items:
- Mark the checkbox for each line item.
- Under 'Storage Location', select the location from the drop-down menu.
- Click Set Selected to set the location for the selected items.
OR
Click Set All to set the location for all line items.
- Add materials to a container:
- Follow steps to Add Materials to a Container.
- Update an individual line item:
- If materials received are unacceptable, over, short, or damaged (UOSD), follow the steps to Create a UOSD Defect.
- If materials listed on the receipt are arriving in a separate shipment, click the 'Status' field for the item, and select the Zero Shipped.
Note: This will update the quantity of this line item to 0. - Update the Status of acceptable materials.
- Update an individual line item:
- Click the 'Status' field for the item, and select the Checked > Acceptable from the drop-down menu.
- Click the 'Status' field for the item, and select the Checked > Acceptable from the drop-down menu.
- Bulk update line items:
- Mark the checkbox for each line item.
- Under 'Status/Condition', select the Checked > Acceptable from the drop-down menu.
- Click Set Selected to set the status for the selected items.
OR
Click Set All to set the status for all line items.
- Update an individual line item:
- If a line item is a replacement for a defect, follow steps to Associate Line Items with a Defect.
- Optional: Upload Attachments to Materials.
Create a Receipt from a Shipment
- Navigate to the project's Materials tool.
- Click the Control tab.
- Click the Shipments sub tab.
- Click the shipment you want to create a receipt for.
- Mark the checkboxes for the items on the receipt
OR
Select the checkbox in the 'Document Line Items' header to select all items on the order. - In the 'Documents Line Items' header, click the hamburger icon and select Receive.
Note: The shipment's 'Document Status' must be set to Released. - Enter the receipt information.
- Click Create.
- Under 'Document Line Items', review the line items.
- Review the date received. If you need to make a change, see Update Material Received Date.
- Review the quantity.
- Enter the storage location for each line item:
- Update an individual line item:
- Click the Location field and select the location from the drop-down menu.
- Click the Location field and select the location from the drop-down menu.
- Bulk update line items:
- Mark the checkbox for each line item.
- Under 'Storage Location', select the location from the drop-down menu.
- Click Set Selected to set the location for the selected items.
OR
Click Set All to set the location for all line items.
- Add materials to a container:
- Follow steps to Add Materials to a Container.
- Update an individual line item:
- If materials received are incorrect, damaged, over, or short, follow the steps to Create a Defect.
- If materials listed on the receipt are arriving in a separate shipment, click the 'Status' field for the item, and select the Zero Shipped.
Note: This will update the quantity of this line item to 0. - Update the Status of acceptable materials.
- Update an individual line item:
- Click the 'Status' field for the item, and select the Checked > Acceptable from the drop-down menu.
- Click the 'Status' field for the item, and select the Checked > Acceptable from the drop-down menu.
- Bulk update line items:
- Mark the checkbox for each line item.
- Under 'Status/Condition', select the Checked > Acceptable from the drop-down menu.
- Click Set Selected to set the status for the selected items.
OR
Click Set All to set the status for all line items.
- Update an individual line item:
- If a line item is a replacement for a defect, follow steps to Associate Line Items with a Defect.
- Optional: Upload Attachments to Materials.
Next Steps
Optional: Create a UOSD Defect
Objective
To create a defect when you receive materials that are incorrect, damaged, over, or short.
Background
When you receive a shipment, check the materials to ensure all items are acceptable. Occasionally, you may receive materials that are unacceptable, over, short, or damaged (UOSD). If you find issues with the shipment, you can create a defect to track the issue, and resolve it with your vendor.
You can create a defect using the following statuses:
- Damaged
- Overage
- Short
- Unacceptable
Note: This is typically used if the incorrect item was sent.
Things to Consider
- Required User Permissions
- For overages and shorts, the parent receipt line quantity is updated, but the shipment quantity is kept the same. In other scenarios, the shipment quantity is automatically updated to match the receipt quantity when the receipt is posted.
- After the receipt is posted, the UOSD ticket is automatically created after the receipt is posted. See Post a Receipt.
Steps
Create a UOSD for Damaged Materials
- Navigate to the project's Materials tool.
- Click the Control tab.
- Click the Receipts sub tab.
- Click the receipt number.
Tip
Set the storage locations for all items before creating the UOSD/Defect for a line item. The defect line(s) will default to the same storage location. See Create a Receipt.
- For the materials line item, click the 'Status' field and select Checked > Damaged.

Note
This action creates two sub lines, one for the damaged materials (#.2) and one for acceptable materials (#.1). If you have multiple kinds of defects, you can add more sub lines to accurately track the quantity and status. - In the sub line #.2, complete the following information for the damaged materials:
- Enter the quantity of the damaged materials.
- Enter the location where the damaged materials are stored.
- Optional: Enter notes.
- Click Save.
- For the remaining materials, review and enter information in sub line #.1.
- Enter the quantity of materials.
- Select the 'Status/Condition'.
- Enter the location where the materials are stored.
- Optional: Enter notes.
- Optional: Attach photos by following these steps:
- Click the caret icon for the line item and select Photo/Docs.
- Click Add Files and select a file.
OR
Drag and drop files in the attachments modal. - Click Upload.
- Click Save.
- Optional: To create additional sub lines, click the add sub line
 icon. Enter the information for the sub lines, and click Save.
Tip
Click sub line #.1 before adding additional sub lines to ensure the quantity of the new UOSD Defect is split from the acceptable quantity. New sub lines will take quantity from the selected sub line except when creating an overage.
Create a UOSD for an Overage
- Navigate to the project's Materials tool.
- Click the Control tab.
- Click the Receipts sub tab.
- Click the receipt number.
Tip
Set the storage locations for all items before creating the UOSD/Defect for a line item. The defect line(s) will default to the same storage location. See Create a Receipt.
- For the materials line item, click the 'Status' field and select Overage.
Note
This action creates two sub lines, one for the overage quantity of materials (#.1.2) and one for acceptable materials (#.1.1). If you have multiple kinds of defects, you can add more sub lines to accurately track the quantity and status. - In the sub line 1.2, complete the following information for the extra materials:
- Enter the quantity of the extra materials.
- Enter the location where the extra materials are stored.
- Enter notes.
- Click Save.
- For the remaining materials, enter the information in sub line 1.1.
- Enter the quantity of materials.
- Select the 'Status/Condition'.
- Enter the location where the materials are stored.
- Enter notes.
- Click Save.
Create a UOSD for a Short
- Navigate to the project's Materials tool.
- Click the Control tab.
- Click the Receipts sub tab.
- Click the receipt number.
Tip
Set the storage locations for all items before creating the UOSD/Defect for a line item. The defect line(s) will default to the same storage location. See Create a Receipt.
- For the materials line item, click the 'Status' field and select Short.
Note
This action creates two sub lines, one for the quantity short (#.1.2) and one for acceptable materials (#.1.1). If you have multiple kinds of defects, you can add more sub lines to accurately track the quantity and status. - In the sub line 1.2, complete the following information for the short materials:
- Enter the quantity of materials that were expected, but not included in the shipment.
- Enter notes.
- Click Save.
- For the remaining materials, enter the information in sub line 1.1.
Note: The quantity automatically updates to the amount you received, taking into account the short quantity.- Select the 'Status/Condition'.
- Enter the location where the materials are stored.
- Enter notes.
- Click Save.
Create a UOSD for Unacceptable Materials
- Navigate to the project's Materials tool.
- Click the Control tab.
- Click the Receipts sub tab.
- Click the receipt number.
Tip
Set the storage locations for all items before creating the UOSD/Defect for a line item. The defect line(s) will default to the same storage location. See Create a Receipt.
- For the materials line item, click the 'Status' field and select Checked Unacceptable.
- Enter the quantity of materials that are unacceptable.
- Enter the location where the materials are stored.
- Enter any notes.
- Click Save.
- Optional: To create additional sub lines, click the add sub line icon. Enter the information for the sub lines, and click Save.
See Also
Post a Receipt
Objective
To post a receipt for materials that were received for your project.
Background
Imported materials and materials listed in approved orders from the Commitments tool appear in the Materials tool. From the Materials tool, you can create receipts to track the materials you have received. After all materials have been received, post the receipt to indicate that receiving is complete.
For companies with Procore Financials, a draft invoice is automatically created in Procore's Invoicing tool after you post the receipt.
Things to Consider
- Required User Permissions
- After you post the receipt, a draft invoice is automatically created in Procore's Invoicing tool.
Prerequisites
Steps
- Navigate to the project's Materials tool.
- Click the Control tab.
- Click the Receipts sub tab.
- Click the receipt number.
- Locate the 'Document Status'.

- Click Not Posted and select one of the following options:
- Select Post to add the materials to your inventory. In the future, you can issue materials for handover.
- Select Post > Direct Handover to Person to automatically issue and handover the materials.
- Select Post > Direct Handover to Project to automatically issue and handover the materials.
Tip
If you have an open billing period, a draft subcontractor invoice is automatically created in Procore's Invoicing tool after the receipt is posted. However, if a billing period is not open at the time the receipt is posted, a draft invoice will not be created, even if a billing period is opened at a later date.
Procore recommends that you do NOT manually create invoices for materials, as it will create a duplicate. The invoice automatically generated from the receipt cannot be deleted.
Overview and Steps
Overview
You can request materials to be used on your job site. Materials may already be in inventory, or may need to be ordered to fulfill the request. When materials are available in your inventory, your request can be approved and issued for handover.
Create a Materials Request
Objective
To create a request for materials in your inventory.
Background
You can request materials to be used on your job. Materials may need to be ordered to fulfill the request, or may already be in inventory. When materials are available in your inventory, your request can be approved and issued for handover.
Things to Consider
Prerequisites
Materials must be listed in your inventory by one of the following methods:
Steps
Create a Materials Request from the Create Button
- Navigate to the project's Materials tool.
- Add materials to your active list. See Add Materials to the List.
- Click Create and select Request.
- Optional: Fill out the form:
- Requested By. Enter the name of the requestor.
Note: If left empty, this field will default to the user creating the request. - Required By Date. Enter the date the materials are required.
Note: If left empty, this field will default to the current day. - Instructions. Enter any instructions.
- Work Package. Enter work package information.
- Notes. Enter any notes.
- Requested By. Enter the name of the requestor.
- Under 'Line Items', click the quantity field for each line item and enter the quantity you are requesting.
OR
Under the form, mark the checkbox if you want to Default Line Item Quantity to Available Resource Quantity. - Optional: Mark the checkbox if you want to Clear (Active) List After Building Document.
- Click Build Document.
Create a Materials Request from a Needs Document
- Navigate to the project's Materials tool.
- Click the Control tab.
- Click the Needs sub tab.
- Click the document name you want to create a request for.
- Mark the checkboxes for the individual items in needs document.
OR
Mark the checkbox next to the hamburger menu to select all items in the needs document.
- In the 'Documents Line Items' header, click the hamburger menu and select Create Withdrawal Request.

- Optional: Fill out the form:
- Requested By. Enter the name of the requestor.
Note: If left empty, this field will default to the user creating the request. - Instructions. Enter instructions for the request.
- Required By Date. Enter the date the materials are required.
Note: If left empty, this field will default to the current day. - Instructions. Enter any instructions.
- Work Package. Enter work package information.
- Notes. Enter any notes.
- Requested By. Enter the name of the requestor.
- Click Create.
Next Steps
See Also
Approve Materials Request
Issue Materials for Handover
Objective
To issue materials to handover to a person.
Background
When receiving materials, they can be issued and handed over directly to a person or a project. See Post a Receipt. Alternatively, received materials can be stored in your inventory.
When materials move out of inventory, they must be picked from the inventory and issued to a person, project, or location. Materials can also be issued to a third party who is resolving a UOSD defect.
You can issue materials that were requested, using the issue ticket that was automatically created from the request. See Create a Request. Or, you can bypass the request process and issue materials directly by creating an issue ticket.
An issue ticket consists of one or more pick tickets. A pick ticket allows you to assign the picking task to an employee, and filter the line items in the issue ticket by location. The issue ticket is marked as 'Fulfilled' after all line items have been fully picked.
Things to Consider
Prerequisites
- Materials must be available in inventory to be issued.
- If issuing materials from a request, the request must be approved before materials can be issued. See Approve a Materials Request.
Steps
Issue Materials from a Request or UOSD Defect
- Navigate to the project's Materials tool.
- Click the Control tab.
- Click the Issuing sub tab.
- Click the issue ticket number.
- Optional: If materials are at multiple locations, or if you want to assign the picking task to more than one person, you can split the tickets by location:
- Under 'Pick Tickets', click the caret icon for the pick ticket.

- Select one of the following options:
- Split by Inventory Locations to split by exact location.
- Split by Top Inventory Locations to split by the top location in the hierarchy.
- Mark the checkbox for the pick ticket to filter the 'Document Line Items' by location.
- Optional: To assign a pick ticket to an employee, see Assign a Pick Ticket.
- Under 'Pick Tickets', click the caret icon for the pick ticket.
- Under 'Document Line Items', enter the quantity of the line item that has been picked from the inventory.
OR
Click Quantity Picked for the line item to mark the materials picked from inventory. - Under the 'Pick Tickets' section, click the 'Status' and select Handover to Person or Handover to Project.
- Complete the form.
- Click the signature field and write your signature, confirming the handover.
- Click Accept.
Note: After all items have been fully picked, the 'Document Status' for the Issue Ticket is automatically updated to 'Fulfilled'.
Issue Materials Directly
- Navigate to the project's Materials tool.
- Add materials to your active list. See Add Materials to the List.
- Click Build and select Issue.
- Fill out the form:
- Optional: Shipment Number/Name. Enter the shipment number or leave it blank to auto-generate a shipping number.
- Requested By. Enter the name of the requestor.
- Requested By. Enter the name of the requestor.
- Optional: Instructions. Enter any instructions.
- Optional: Work Package. Enter work package information.
- Optional: Notes. Enter any notes.
- Under 'Line Items', click the quantity field for each line item and enter the quantity you are requesting.
- Optional: Mark the checkbox if you want to Clear (Active) List After Building Document.
- Click Build Document.
- Under 'Document Line Items', enter the picked quantity of the line item that has been picked from the inventory.
OR
Click the arrow icon in the 'Picked Quantity' field to mark the full amount of materials picked from inventory. - Under the 'Pick Tickets' heading, locate the 'Status' column.
- Under the 'Pick Tickets' section, click the 'Status' and select Handover to Person or Handover to Project.
- Complete the form.
- Click the signature field and write your signature, confirming the handover.
- Click Accept.
Note: After all items have been fully picked, the 'Document Status' for the Issue Ticket is automatically updated to 'Fulfilled'.
Adjustment Overview
If the available inventory quantities in the Materials tool are inaccurate, you can make a manual correction by creating an adjustment.
Create an Adjustment
- Navigate to the project's Materials tool.
- Add materials that need to be adjusted to your list. See Add Materials to List.
Tip
You can use the Storage sub tab to see items in a certain location to add to your list. See Search and Filter Materials Storage. - Click Create and select Adjustment.
- Optional: Enter the date.
- Select the 'Adjustment Type':
Note: This is the initial status that is applied to all line items. You can modify line items to any adjustment type after you click Build Document.- Add. Increases the available inventory quantity.
- Remove. Decreases the available inventory quantity.
- Scrap. Decreases the available inventory quantity.
- Surplus. Decreases the available inventory quantity, but the material retains a storage location and a special ‘Surplus’ flag. This can be used to mark materials as not required for the project anymore, but may be needed later for other uses.
- Return to Vendor. Decreases the available inventory quantity.
- Return to Stock. Increases the available inventory quantity.
- Optional: Select the 'Adjustment Reason' for your records:
Note: The available Adjustment Reasons are based on the Adjustment Type selected.- True Up. For reconciliation of actual counts.
- Damaged. Items that were damaged beyond repair.
- Found. Items that were missing but have been located.
- Lost. Items that were lost.
- Repaired. Items that were repaired by the vendor.
- Stolen. Items that were stolen.
- Optional: Add any notes.
- Under 'Line Items', click the quantity field for each line item and enter the quantity of the material that needs adjustment.
- Click Build Document.
- Under 'Document Line Items', review the line items and enter the new storage location, if needed.
- Review quantities, date, and status/condition. Click into the field to make an update.
- Enter the storage location for each line item to indicate where you added or removed the materials:
Note: This is especially important if the material is stored in multiple locations.- Update an individual line item:
- Click the To Location and select the location from the drop-down menu.
- Click the From Location field and select the location from the drop-down menu.
- Bulk update line items:
- Mark the checkbox for each line item.
- Under 'Storage Location', select the To Location or From Location from the drop-down menu.
- Click Set Selected to set the location for the selected items.
OR
Click Set All to set the location for all line items.
- Update an individual line item:
- Click Pending next to 'Document Status' and select Post to confirm the adjustment.
See Also
Transfer Overview
If you need to move materials to a new storage location, you can create a materials transfer. If the status of materials changes during the transfer, inventory counts may be impacted.
Example
You have 100 floorboards available in inventory. A transfer is created for 10 floorboards, but there is concern that the floorboards are damaged. The status of the materials in the transfer is updated to 'Unchecked', and material inventory shows 10 less floorboards available.
After the floorboards have been inspected and determined to be acceptable, you create a new transfer. In the transfer, select 'Unchecked' as the 'From Location', select the physical location of the material as the 'To Location', and set the Status for the line item to 'Checked > Acceptable'. The floorboards are again available in your inventory.
Create a Transfer
Overview
When you receive a shipment that has unacceptable, damaged, over, or short materials (UOSD), you can create a UOSD defect and manage the resolution in Procore.
Resolve UOSD Defects
Objective
To resolve a defect for received materials that were incorrect, damaged, over, or short materials.
Background
When you receive a shipment that has unacceptable, damaged, over, or short materials (UOSD), you can create a UOSD defect and manage the resolution in Procore.
Things to Consider
- Required User Permissions
- 'Unresolved' statuses do not impact inventory.
Prerequisites
- Create a Defect
- If you received replacement materials from the vendor, you must first have a receipt associated with the line item. See Associate Line Items with a Defect.
- If you are returning materials to the vendor or working with a third party, you must first Issue Materials for Handover.
Steps
- Navigate to the project's Materials tool.
- Click the Control tab.
- Click the UOSDs sub tab.
- Click the UOSD ticket number.
- Optional: Upload Attachments to Materials
- If receiving or returning materials to the vendor, take the following steps:
- Update the 'Resolution Status'.
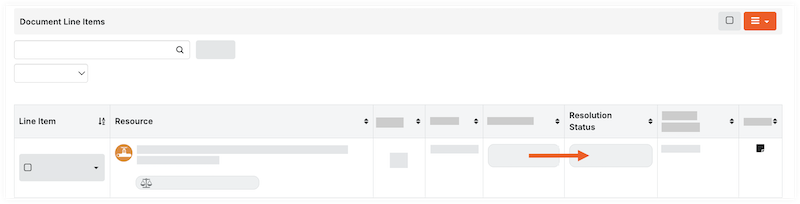
- If managing the UOSD/defect through a third party, take the following steps:
- Click the 'Resolution Status' field for the line item to Transfer and Custody.
Note: This adds the material to inventory so that it can be issued to a third-party for further resolution. - Follow steps to Issue Materials for Handover.
- Click the 'Resolution Status' field for the line item to Transfer and Custody.
- For all other use cases, click the 'Resolution Status' field and update the status for each line item:
- Resolved > Add to Stock. This automatically adds the stock to your inventory and resolves the defect.
- Resolved > Repaired on Site. This automatically adds the stock to your inventory and resolves the defect.
- Resolved > Vendor Provided Credit. This removes the short quantity from your inventory count, and resolves the defect.
- Transfer and Custody. This adds the material to inventory so that it can be issued to a third-party for further resolution.
- If managing the UOSD/defect through a third party, take the following steps:
Receive from Vendor
- Follow steps to associate line items in a receipt with a UOSD/defect.
- Follow steps to Create a Materials Adjustment to remove the damaged/unacceptable materials from inventory.
Note: If you received materials to resolve a short USOD/Defect, do not create an adjustment. The resolution status appropriately adjusts your inventory. - Update the 'Resolution Status' to Resolved > Received from Vendor.
Return to Vendor
- Mark the checkbox for the line item.
- In the 'Documents Line Items' header, click the hamburger icon and select Issue Selected Items to Vendor.
- Enter the information in the form and click Create Issue Ticket.
- Follow steps to Issue Materials for Handover.
- Update the 'Resolution Status' to Resolved > Return to Vendor.
Note: You can only set this status after the materials are returned to the vendor, and the issue ticket is marked 'Complete'.