Create Purchase Orders
Objective
To create a purchase order in the project's Commitments tool.
Background
Things to Consider
- Required User Permissions:
- To create a purchase order and see/enter data on the Schedule of Values (SOV) tab:
- 'Admin' level permissions on the project's Commitments tool.
OR - 'Standard' level permissions on the project's Commitments tool and the 'Allow Users to See SOV Items' setting must be enabled and your name must be selected in the 'Select a Person' drop-down list.
- 'Admin' level permissions on the project's Commitments tool.
- To create a purchase order and see/enter data on the Schedule of Values (SOV) tab:
-
For companies using the
 ERP Integrations tool: Prerequisites, requirements, limitations, and considerations might apply depending on the ERP system your Procore account is integrated with. Visit Things to Know about your ERP Integration for details.
Prerequisites
Steps
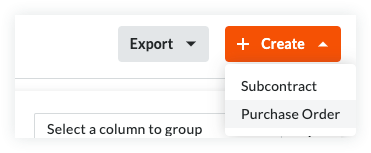
- Navigate to the project's Commitments tool.
- On the Contracts tab, click the Create button and choose Purchase Order from the drop-down list.
Note
- The Create button is available when you are viewing the Contracts and Recycle Bin tabs. New purchase orders are always added to the Contracts tab.
- The Export button is only available on the Contracts tab. To learn more, see Export a Commitments List.
- Continue with the next steps:
Add the Basic Information
Update the basic information as follows:

Notes
- There are no required fields when adding the basic information.
- If you click the Create button without completing any data entry, Procore saves the contract, lists you as the creator, and automatically places it in the Draft status.
- Contract Number
To number your contract(s), choose from these options:- If you number your contracts using a sequential numbering system, you can enter any combination of alpha-numeric characters in this box. For subsequent contracts, Procore automatically applies consecutive numbering in ascending order.
Example
The examples below show you how Procore's ascending consecutive numbering works:
- If the previous contract was 1, the next contracts are 2, 3, and so on.
- If the previous contract was PC-0001, the next contracts are PC-0002, PC-0003, and so on.
- If the previous contract was DCA00010-12-G-0001, the next contracts are DCA00010-12-G-0002, DCA00010-12-G-0003, and so on.
- If you do NOT number your contracts using sequential numbering, you can manually enter a unique number for each purchase order. To do this, type over the existing entry in the Number box. Duplicate contract numbers are NOT permitted.
Notes
- For companies using the ERP Integrations tool, your integrated ERP system may impose a maximum character limit. See What is the maximum character length for a commitment's 'Number (#)'? Important! When a commitment is exported to Integration by Ryvit, it must have a unique number.
- You can customize the numbering scheme for your project's commitments. To learn more, see Can I customize the numbering system for financial objects in Procore?
- If you number your contracts using a sequential numbering system, you can enter any combination of alpha-numeric characters in this box. For subsequent contracts, Procore automatically applies consecutive numbering in ascending order.
- Contract Company
Select the company responsible for fulfilling the Purchase Order (for example, American Construction Co.).
Notes:- To appear in this list as a selection, add the company to the Project Directory. For details, see Add a Company to the Project Directory or Import Users & Vendors into your Project Level Directory Tool (Procore Imports).
- Title
Type a descriptive name for the contract.Notes
- If your company has enabled the ERP Integrations tool, be aware that some integrated ERP systems impose character limits on the 'Title' field when data exported from Procore is imported into their system.
- For details about character limits, see What is the maximum character length for a commitment's 'Title'?
- Optional: Sign with DocuSign®
Move this toggle to the right to collect signatures with the Procore + DocuSign® integration. To learn how to activate the integration in Procore, see Enable or Disable the DocuSign® Integration on a Procore Project.
Update the General Information
Update the contract with more general information:
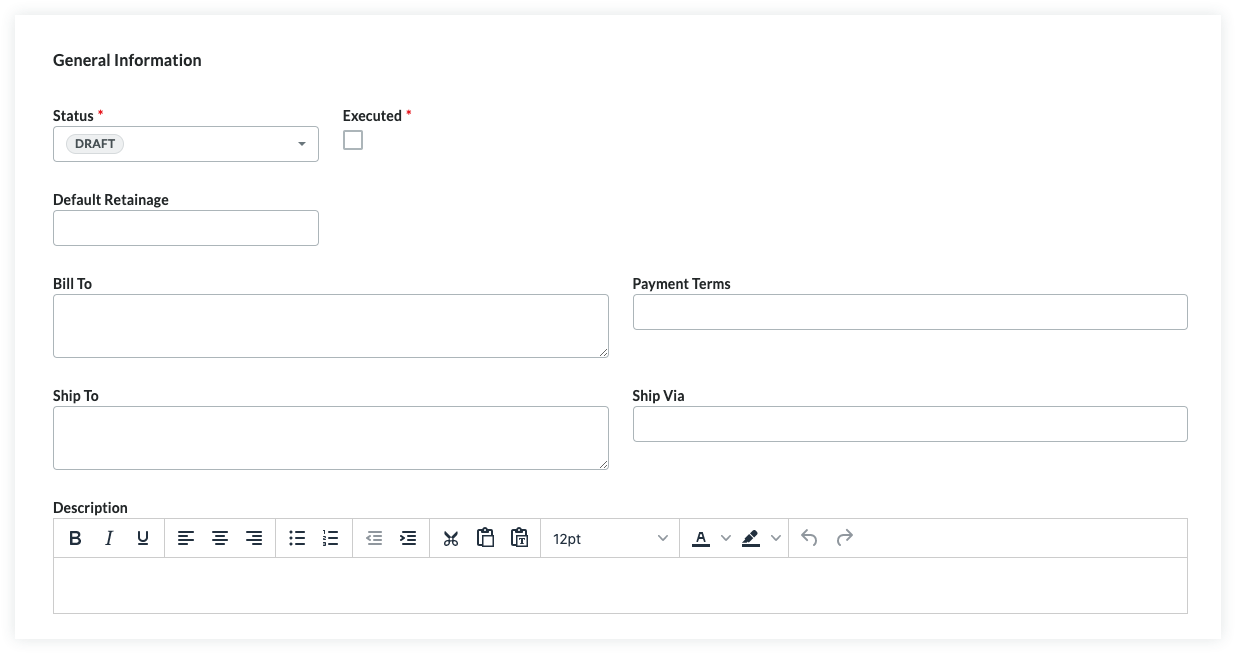
- Status
Procore automatically assigns contracts the 'Default' status. To select a different status, choose one of the status labels from the drop-down list. Options includeNote
To create change orders and invoices, your contract's status must be set to Approved or Complete. - Executed
Place a mark in this check box if the contract has been fully executed. A fully executed contract is a legally effective agreement that has been signed by authorized representatives for each party.Notes
- Many Procore users choose to place a checkmark in the 'Executed' box when placing the purchase order into the 'Approved' or 'Complete' status.
- The time at which your project team places a checkmark in the 'Executed' box should always be aligned with your project's unique business process
- Default Retainage
Enter a number to represent the percentage that will be withheld as retainage on the line items of the contract's Schedule of Values. For example, if you plan to withhold ten (10) percent of the line item's value, enter 10%.Notes
- The 'Default Retainage' amount set on the purchase order will only affect the amount on the first invoice. Editing this value after creating the first subcontractor invoice will NOT affect the retainage amount on subsequent invoices.
- In order to set or release the retainage amount on a subsequent invoice, complete the steps in Enable Retainage on a Purchase Order or Subcontract. Next, use one of these Procore tools to set or release retainage on the invoice:
- Commitments. Set or Release Retainage on a Subcontractor Invoice.
- Invoicing. Set or Release Retainage on a Subcontractor Invoice. If you would like to set up retention rules that automatically adjust withheld amounts on your subcontractor invoices, see Enable Sliding Scale Retention Rules on on a Commitment's Invoices.
- Bill To
Enter the business contact information for the party paying for the order. Procore uses this information to auto-populate the 'Bill To' address on any invoices created for this order. - Assigned To
Enter the name of the individual assigned to the Purchase Order. - Payment Terms
Enter the payment terms. For example, Net 30, Net 45, and so on. - Ship To
Enter the business contact information for the shipping destination. Procore uses this information to auto-populate the 'Ship To' address on any invoices created for this order. Keep in mind this address may be different from the 'Bill To' address. For example, you may choose to have the order delivered directly to the job site or to an off-site staging location. - Ship Via
Enter the shipping method for the order. For example, Air, International, Ocean, Truckload, Train, and so on.Note
The 'Ship Via' field is a free-form text field, so you can enter the appropriate shipping method, carrier, and/or tracking number for the order. - Description
Enter a more detailed description of the prime contract. You can apply the options in the formatting toolbar to your text.
Update the Contract Privacy
Using the privacy setting allows only project admins and the select non-admin users access. To change the contract's access permissions, do the following:
- Check or Uncheck the 'Private' box. Procore turns this setting ON by default.
- Select an employee of the 'Contract Company' from the Invoice Contact drop-down list.
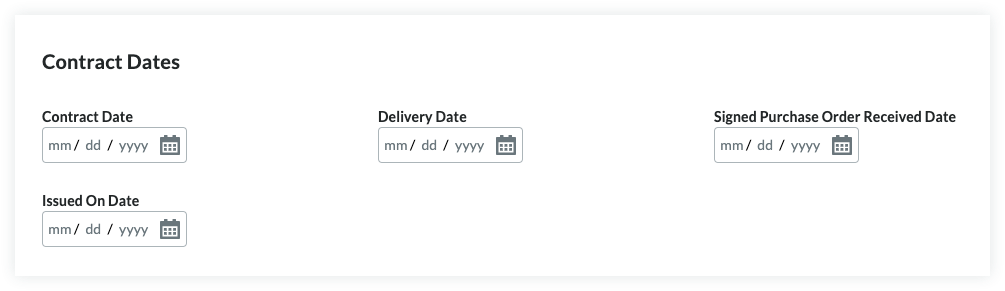
Update the Contract Dates
To update the contract with important dates, do the following:
Notes
- Your company's Procore Administrator manages the dates that appear in the 'Contract Dates' section using the configurable fieldsets feature.
- For details, see Which fields in the Commitments tool can be configured as required, optional, or hidden?
- Signed Purchase Order Received
Select the date the executed purchase order was received. - Contract
Select the contract date for the order. - Delivery
Select the expected or actual delivery date for the order. - Issued On
Select the date the order was issued by your company.
Update the Schedule of Values
There are two (2) method for updating the purchase order's SOV:
- Add Line Items to the Schedule of Values
- Import Line Items to the Schedule of Values from a CSV File
Add Line Items to the Schedule of Values
By default, you can input line items on the purchase order's SOV at any time, as long as it is NOT in the 'Approved' status.
Note
If your project team has turned the 'Enable Always Editable Schedule of Values' configuration setting ON in this tool, users with the required user permission to Edit Purchase Orders can add line items to the Schedule of Values when a purchase order is in any status. To learn specific information this setting, see What is the 'Enable Always Editable Schedule of Values' setting?To manually add line items to the Schedule of Values:
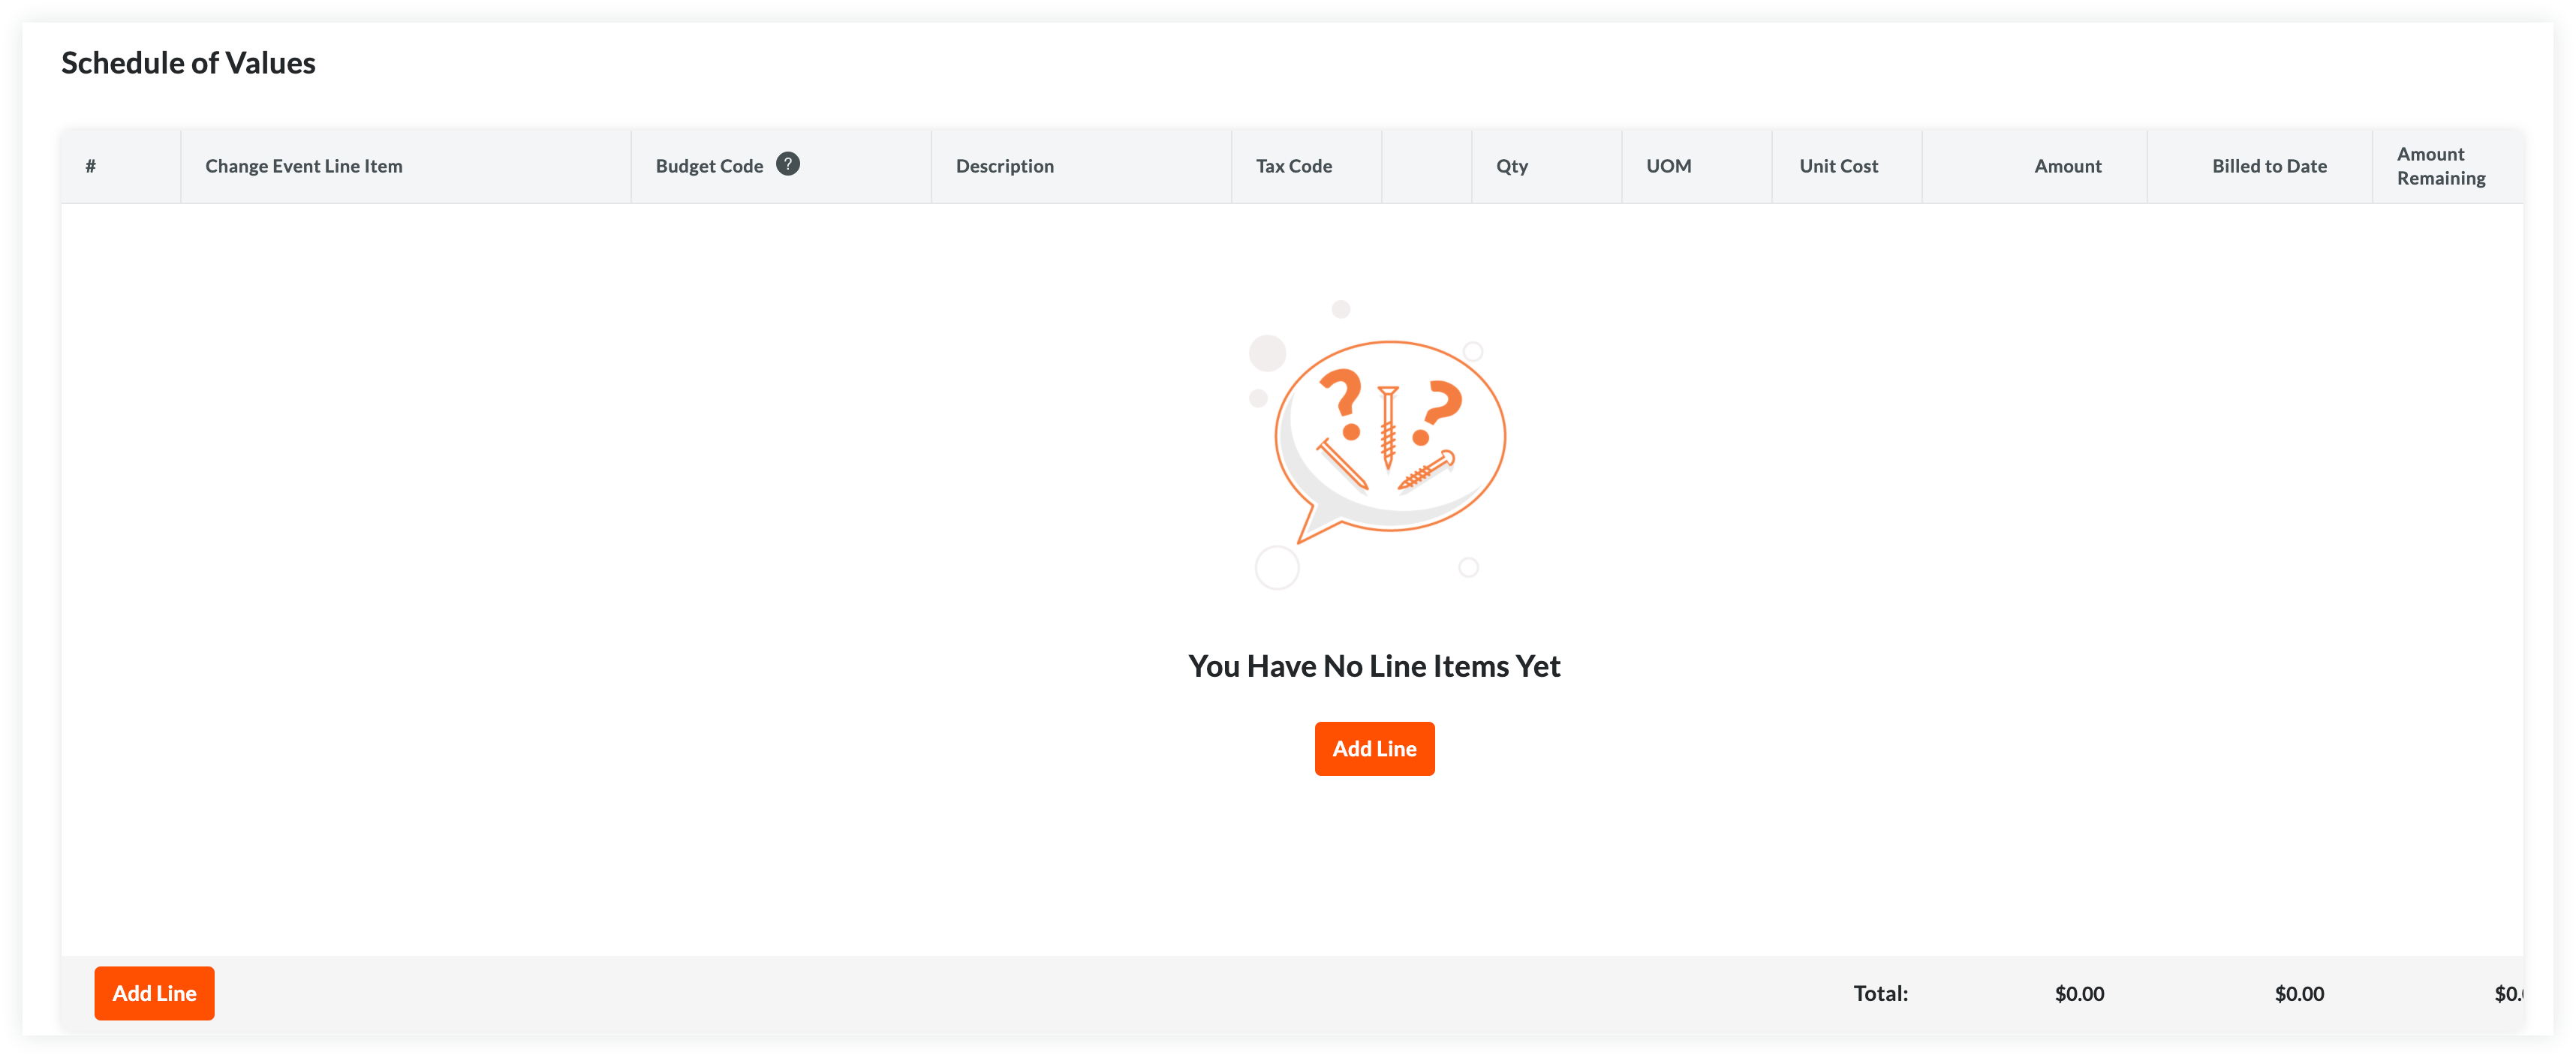
- Choose from these options:
- If the SOV is blank, click Add Line under 'You Have No Line Items Yet'.
OR - If you have existing line items, click Add Line.
Procore creates new line items starting with the number '1'. Subsequent lines are created in numerical order.
- If the SOV is blank, click Add Line under 'You Have No Line Items Yet'.
- Designate a budget code for the new line item. You have these options:
- To assign an existing budget code to the line item, start typing a code in the Search box and select the matching code from the list.
OR - To create a new budget code for the line item, click the Create Budget Code button. Next, select the appropriate segment items from the drop-down list(s) to satisfy your project's budget code pattern requirements. Then, click Create.
- To assign an existing budget code to the line item, start typing a code in the Search box and select the matching code from the list.
- Depending on the accounting method you are using, choose the appropriate steps for adding a line item:
- For an Amount-Based contract:
An Amount-Based SOV requires this data entry:- #
Procore automatically enters a line item number in sequential order. - Change Event Line Item
If you have change events enabled, you can select a change event line item if the commitment needs to be linked to a change event. - Budget Code
Select a budget code from the list or click Create Budget Code to create a new one. See What is a budget code in Procore's WBS? - Description
Enter a description for the line item. For example, type: Monthly Service Fee - Amount
Enter the amount of the cost. - Billed to Date
The system automatically calculates the amount billed on the commitment up to the current date. - Amount Remaining
Enter the amount that has NOT been billed to the current date. - Tax Code
Enter a tax code to use for this line item. This field only appears if you have enabled the tax codes feature. See How can I use tax codes on a project?
- #
- For a Unit/Quantity Based contract:
A Unit/Quantity Based SOV requires this data entry:- #
Procore automatically enters a line item number in sequential order. - Change Event Line Item
If you have change events enabled, you can select a change event line item if the commitment needs to be linked to a change event. - Budget Code
Select a budget code from the list or click Create Budget Code to create a new one. See What is a budget code in Procore's WBS? - Description
Enter a description for the line item. For example, type: Monthly Service Fee - Qty
Enter the number of units. - UOM
Enter the Unit of Measure (UOM).Note
- To view the default options in the list, see Which units of measure are included on Procore's master list?
- To update the available options in the list, see Update a Unit of Measure to the Unit of Measure Master List.
- Unit Cost
Enter the Unit Cost in the box provided. - Amount
The system automatically calculates the subtotal for you, based on the Qty, UOM, and Unit Cost entries. - Billed to Date
The system automatically calculates the amount billed on the commitment up to the current date. - Amount Remaining
Enter the amount that has NOT been billed to the current date. - Tax Code
Enter a tax code to use for this line item. This field only appears if you have enabled the tax codes feature. See How can I use tax codes on a project?
- #
- For an Amount-Based contract:
- Optional: Repeat the steps above to add as many line items as needed.
- Click Save.
Procore saves the line items on the contract's SOV.
Import Line Items to the Schedule of Values from a CSV File
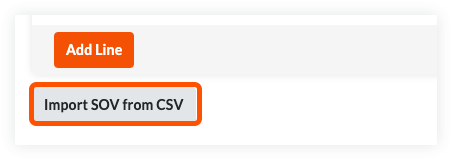
- In the 'Schedule of Values' card, click the Import SOV from CSV button.
- Click the Download CSV Template button and choose one of these options:
- Blank Template. Click this option to download a blank template.
OR - Template with Existing Line Items. Click this option to download a template that includes any existing line item data from your project's budget.
Note
- Procore downloads a CSV template file to your web browser's file download location.
- The name of the file is: TBD
- Blank Template. Click this option to download a blank template.
- Open the template that you downloaded on your computer.
- Enter the data that you want to upload directly into the template.
Important
Do NOT change or rearrange the Column Headings in the template file. - After entering your line item data, make sure to save your file updates in the 'Comma Separated Values' file format.
- Navigate back to Procore. Then, in the 'CSV File' section, choose one of these options:
- Click Upload File.
OR - Use a drag-and-drop operation to move the template you just updated into the 'CSV File' section.
- Click Upload File.
- Choose one of these options:
- Add Additional Line Items. Choose this option if you want to create new line items using the data in your template.
OR - Replace Existing Line Items. Choose this option if you want to erase any existing line items from the prime contract and replace them with data in your template.
Note
If the 'Enable Always Editable Schedule of Values' configuration setting is turned ON in the project's Commitments tool, the 'Replace Existing Line Items' option is grayed out and unavailable for use once an invoice is created and line items are billed. To learn more, see What is the 'Enable Always Editable Schedule of Values' setting?
- Add Additional Line Items. Choose this option if you want to create new line items using the data in your template.
- Click Import.
Attach Files
To add file attachments to the contract:
- On the 'Attachments' card, click Edit.
- Click Attach Files.
- In the 'Attach Files' dialog box, highlight the location where the files to upload are stored. Options include:
- My Computer. Click Upload Files to open your computer's finder. Select the files to upload and click Open.
- Photos. If the Photos tool is active on the project, choose the location from the Select Album list and then search for the file(s) to upload.
- Drawings. If the Drawings tool is active on the project, choose the area from the Select Area list and then search for the file(s) to upload.
- Forms. If the Forms tool is active on the project, choose the template from the Select Template list and then search for the file(s) to upload.
- Documents. If the Documents tool is active on the project, navigate to the folder storing the file(s) to upload and then highlight them.
- Click Attach.
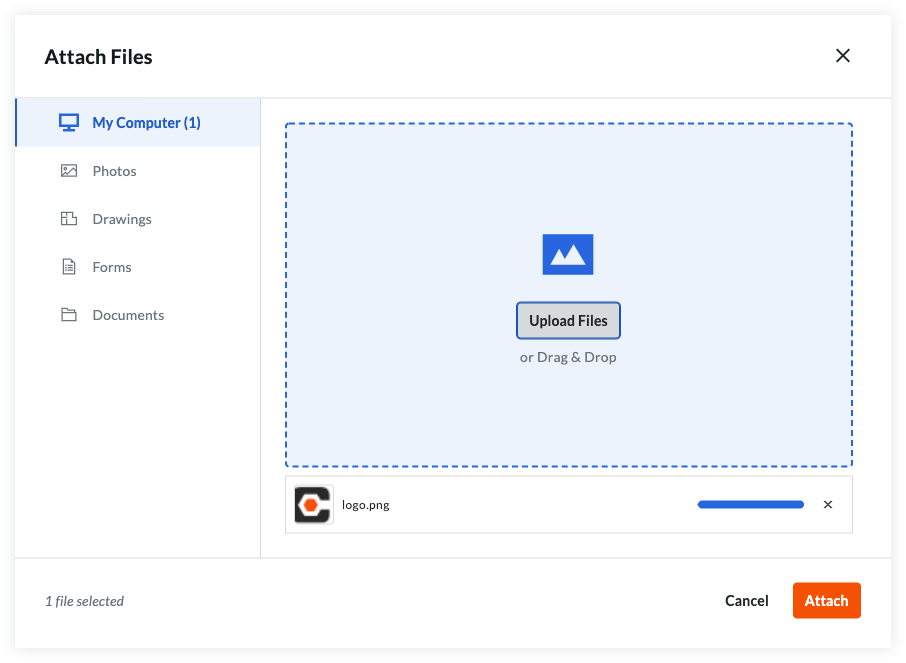
A progress indicator shows you the status of the upload. - Click the Close (X) icon on the Attach Files dialog box.
Save the Contract
To save the contract, click one (1) of these buttons:
- Create. Click this button to save the new contract and return to the 'General' tab in view mode.
OR - Complete with DocuSign®. Click this button to launch the Procore + DocuSign® integration and prepare the envelope for signature. To learn more, see DocuSign®.
OR - Cancel.
Next Steps
If your company has enabled the ERP Integrations tool: