Create a Coordination Issue
The Coordination Issues tool centralizes issue tracking and helps to automate data entry so your team can stay focused on problem-solving. Identifying and recording model issues early is critical for saving time and budget. By resolving these conflicts upfront, you significantly reduce the volume of RFIs and Change Events required later in the project.
Things to Consider
- Required User Permissions
- Additional Information:
- Clicking 'New Issue' saves your current 3D view and markups as a snapshot.
- Your New Issue panel may contain custom fields or fieldsets not documented in this tutorial. See What are configurable fieldsets and which Procore tools support them?
Tip
Did you know you can create and edit coordination issues from a variety of different Procore tools and products? To learn more, see What are the different Procore tools I can use to create coordination issues?
Steps
- Navigate to the Coordination Issues tool.
- Click the +Create button at top of the page to open the New Issue panel.
- Complete the required fields in the New Issue panel.
- Top Bullet Text: Show/Hide
-
Field Name
Description
Required?
Notes
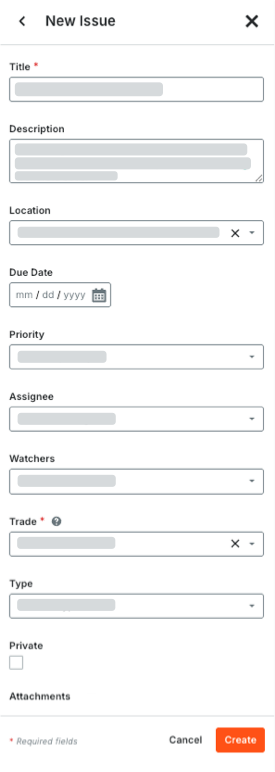
Title
Enter a concise, descriptive name for the issue to help collaborators identify it.
Yes
Coming Soon PrivateSelect this checkbox to limit issue visibility to the Creator, Assignee, and Watchers.
No
Description
Provide a detailed summary of the issue. This text is also saved as a viewpoint comment in the final NWD file.
No
When creating an issue from Clash Manager, you can also select Append Clash Comments or Append Redline Text.
Location
Choose the primary location for the issue.
No
Assignee
Select the person responsible for resolving the issue. Only users with 'Standard' or 'Admin' level permissions for the Coordination Issues tool appear in this list.
No
Watchers
Select team members to receive email updates. Watchers must have at least Read Only permissions.
No
Due Date
Set the target deadline for issue resolution.
No
Priority
Define the level of urgency: Low, Medium, High, or Critical.
No
Trade
Identify the discipline involved (e.g., Mechanical, Electrical).
No
Type
Categorize the issue for reporting. Options include: Building Code, Clash, Client Feedback, Constructability, Coordination, Design Review, Existing Condition, Requirement Change or Other.
No
Attachments
Upload up to 20 relevant images, PDFs, or documents to provide additional context.
No
Custom Fields
If your company creates custom fields for the Coordination Issues tool, they also appear in this page.
-
Click Create to create a new issue.
Procore adds a new issue in the Open status to the table on the Coordination Issues dashboard.