Objective
To create a new project in Procore and export it to an integrated NetSuite® system as a new project.
Background
You can create a new project in Procore and send it to your company's ERP Integrations tool to be reviewed by an accounting approver. Upon acceptance, Procore exports the project and the connector creates a new project in NetSuite®.
To add a Procore project to NetSuite®:
- Setup the NetSuite® Connector. See NetSuite®: Setup Guide.
- Follow the steps below to create a Procore project.
- Send the new project to the ERP Integrations tool for accounting approval.
After an accounting approver reviews and submits an 'Accept' response for the Procore project in the ERP Integrations tool (see Accept or Reject a Project for Export to NetSuite®), Procore will export the project during the synchronization process.
Things to Consider
- Required User Permissions:
- 'Standard' or 'Admin' on the company's ERP Integrations tool.
AND
- The person's account must be granted the 'Can Push to Accounting' privilege in the Company Directory. See Grant Accounting Approver Privileges.
- Requirements:
- When entering your project data, be aware of the following requirements:
- Project Number. NetSuite® projects require a 'Job ID'. If left unspecified when creating a project in NetSuite®, there are NetSuite® configurations that can auto-generate a Job ID. When creating a project in Procore and exporting to NetSuite® the project number is required to be specified by the user. This project number will then be used in NetSuite® when creating the project.
- Active Project. NetSuite® requires you to set your new project to 'Active' in Procore.
- Additional Information:
- Before you can sync project data between the two (2) systems, your Procore point of contact must enable the 'Can Push to Accounting' privilege for your company's accounting approvers. See What is the Accounting Approver role? This gives users with 'Standard' level permissions to the ERP Integrations tool permission to accept or reject the data that is synced between Procore and NetSuite®. See Accept or Reject a Project for Export to NetSuite®.
Steps
Launch the Project Creation Assistant
- Navigate to the company's Portfolio tool.
- Click Create Project.
Add Project Details
- Make sure Project Details is highlighted in the right sidebar.
- Under General Information, do the following:

-
Template. If this is the first project you are creating for NetSuite® choose 'Do Not Apply a Template'. If you have previously created a project and set up one or more project templates for your company account, select the desired template.
Notes:
- This field is only visible and available when the project templates feature is enabled on your company's Procore account.
- To select a template from the list, the desired project template must be active. See Configure a Project Template.
-
Project Photo. Click the photo area and then upload the photo that you want appear as the project photo on the project's Home page. The image must not exceed the 3MB maximum. It must also be saved in the GIF, JPG, or PNG file format. To change this photo at a later time, see Add or Edit General Project Information or Add a Project Photo.
-
Name. Enter a name for the construction project. When the ERP Integrations tool is enabled for NetSuite®, the Project Name is limited to a maximum of thirty (30) characters in length. This value displays in a variety of places in the Procore web application, including the Select a Project menu, CSV and PDF exports, and custom reports.
-
Estimated Value*. Enter the anticipated project value upon completion. Enter a value to the nearest whole number. For example, if your project's estimated value is $18 million dollars, enter $18,000,000.00 in the box.
-
Start Date*. This represents the date that the project will start and also will be used to calculate construction volume.
-
Completion Date*. Select the anticipated project completion date. Once the project has begun, you can compare this field against the actual finish date.
-
-
Type. Select a project type from the drop-down list. These selections are created in the company's Admin tool. See Add a Custom Project Type.
-
Project Number. Enter a unique project ID or number to differentiate it from other company projects.
- The Project Number is required and is used as the Job ID when creating a NetSuite® project.
-
Square Feet. Enter the project's square footage.
-
Store Number. Enter the store number for the project. This field is only visible and available if the 'Include Store Number and Designated Market Area' setting is enabled in the 'Default Project Settings' section of the Company Admin tool.
-
Description. Enter a brief project summary.
-
Under ERP Integration, do the following (Note: this step is only relevant to companies that are integrated with certain ERP systems):

- Allow project to be synced with ERP. Leave this checkbox marked if you plan to sync any part of the project's financials with your ERP software. This will ensure that the ERP Standard cost code list will be available to select from when configuring your Project Level cost codes.
Important
- This checkbox will be marked by default if your company has an available set of ERP cost codes, unless the template the project is created from does not have this box marked.
- If you plan to sync your new Procore project with your ERP software you MUST leave this checkbox marked. If you un-mark this box, you will not be able to re-mark it later if cost codes from a different Company Level list have been copied to the Project Level list in the Project Admin tool.
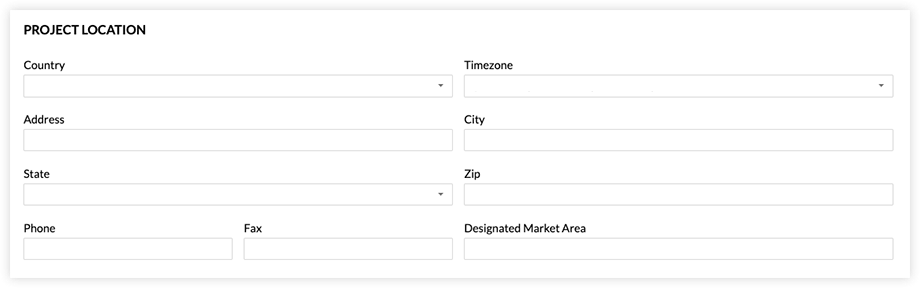
- Under Project Location, do the following:
-
Country*. Select the country from the drop-down list.
-
Timezone*. Choose the correct time zone for the project from the drop-down list. This time zone will determine time stamps on items in the project.
-
Address. Enter the address for the project's job site.
Notes:
-
City. Enter the full city name for the project.
Note: Do not abbreviate the city name.
-
State. Select the state for the project from the drop-down list.
-
Zip. Enter the ZIP/postal code for the project.
Note: Procore uses a third-party service to automatically determine the County name based on the 'Address' and 'ZIP' fields. Since this is auto-determined, there is no data-entry for County in the Create New Project page. To change the County value, see Update General Project Information.
-
Phone. Enter in the main contact phone number for the job site. Team members will be able to see this phone number.
-
Fax. Enter the onsite fax number (if available). This gives team members the ability to see and use the project's fax number when needed.
-
Designated Market Area. Enter the designated market area for the project.
Note: This field is only visible and available if the 'Include Store Number and Designated Market Area' setting is enabled in the 'Defaults' section of the Company Admin tool.
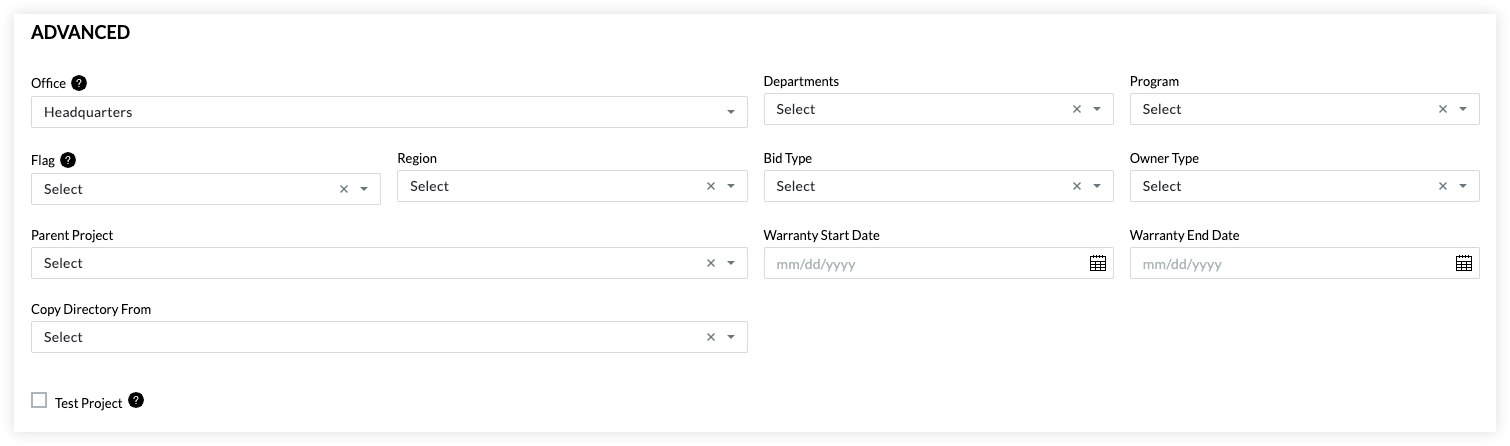
- Under Advanced, do the following:
-
Office. Choose the office that is managing this project. These selections are created in the company's Admin tool. See Add an Office Location.
-
Departments. Select one or more departments who have responsibility for the project. These selections are created with the company's Admin tool. See Custom Company Projects.
Note: These departments appear in the Timecard and Directory tool, and may also appear in other Procore tools depending on your company's specific configuration.
-
Program. Select the program to classify your project under. These selections are created with the company's Admin tool. See Add Programs.
Note: You can view your projects by program using the Programs tool.
-
Flag. Select a color for the project flag from the drop-down list. The system's default color selections are: RED, YELLOW, and GREEN. This allows you to visually organize your projects (e.g., you might want to flag internal projects as RED and commercial projects as GREEN).
-
Region. Select the region you want to classify your project into. These selections are created with the company's Admin tool. See Add Project Regions.
Note: You can view projects by region in the Portfolio tool.
-
Bid Type. Select the bid type from the list. These selections are created with the company's Admin tool. See Add a Custom Bid Type.
-
Owner Type. Select the owner type from the drop-down list. These selections are created in the company's Admin tool. See Add a Custom Owner Type.
-
Parent Project. Select the name of the parent project in Procore from the drop-down list. In Procore, a parent job is a Procore project that has been designated as the 'parent' project for one or more related project(s) in Procore's Portfolio tool. To learn more, see What's the difference between a job, a parent job, and a sub job?
-
-
-
Copy Directory From. Select one of the projects in your company's Procore account to copy the user and company information from that project's Directory into your current project's Directory tool. See Copy Directory From One Project to Another.
- Click Create Project.
- Choose from these next steps:
Add and Remove Tools in the Project Toolbox
Tools selected on this page will appear in the project's tools menu, while tools that are not selected will not appear in the tools menu, and cannot be used.
Note: If you want to change which tools are available later, you can do so by navigating to the project's Admin tool. See Add and Remove Project Tools.
- Make sure Tools is highlighted.
Important! If the Tools link does NOT appear in the Project Creation Assistant, it is because the project template that you applied to your new project already determined the project's tools.
- Add and remove tools for the project as follows:
- To add a tool individually: Mark the checkbox next to box that corresponds to desired tool.
- To add all available tools within a category: Mark the checkbox next to the category name.
OR
To add all available tools from all categories: Mark the checkbox next to Select All.
Note: Clicking the checkbox again will deselect all tools.
- To remove a tool: Clear the checkbox for that tool.
- If you want to rearrange the order of tools on the project's toolbar for all users:
- Drag-and-drop a tool to move it to a new position in the product category.
- Click Select Tools.
Note: The system displays a GREEN banner to confirm your settings were saved.
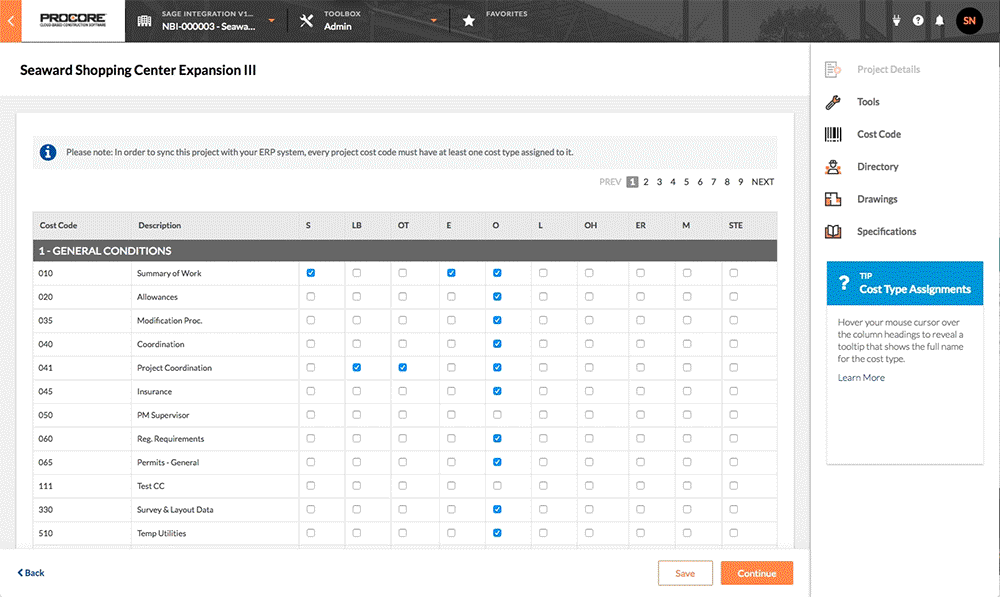
Add Project Cost Codes
- Make sure Cost Code in highlighted in the right sidebar.
This reveals the cost code page for your new project
- Copy the desired codes to your project as follows:
- Copy All Codes
To copy all of the codes from the NetSuite® Standard Cost Code list:
- Click Copy All Codes.
The system reveals the following confirmation message: "Once you add this cost code, the source list cannot be changed."
- Click OK to acknowledge the confirmation message.
This moves all the codes in the NetSuite® Standard Cost Code List to the Project Cost Codes list.
- Copy Selected Codes
To copy only selected codes from the NetSuite® Standard Cost Code list:
- Expand the desired division folder(s).
- Highlight the desired cost codes.
- Click Copy Selected Codes.
- Click Next.
The system reveals the Cost Type Assignments page.
Assign Default Cost Types to Cost Codes
- Stay on the Cost Code page.
The system reveals the Cost Types Assignments page.
- For each cost code listed, mark one (1) or more checkboxes to assign each code to one (1) or more cost type.
Important!
- To sync cost codes with NetSuite®, every project cost code must be assigned at least one (1) cost type.
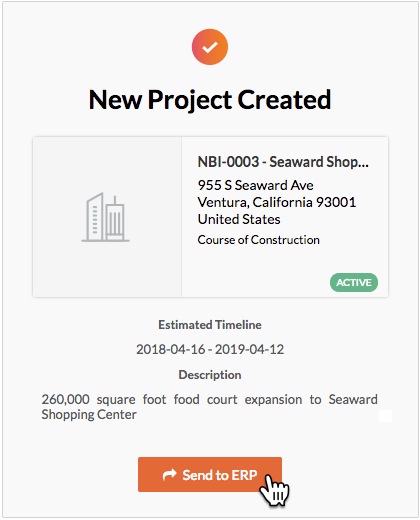
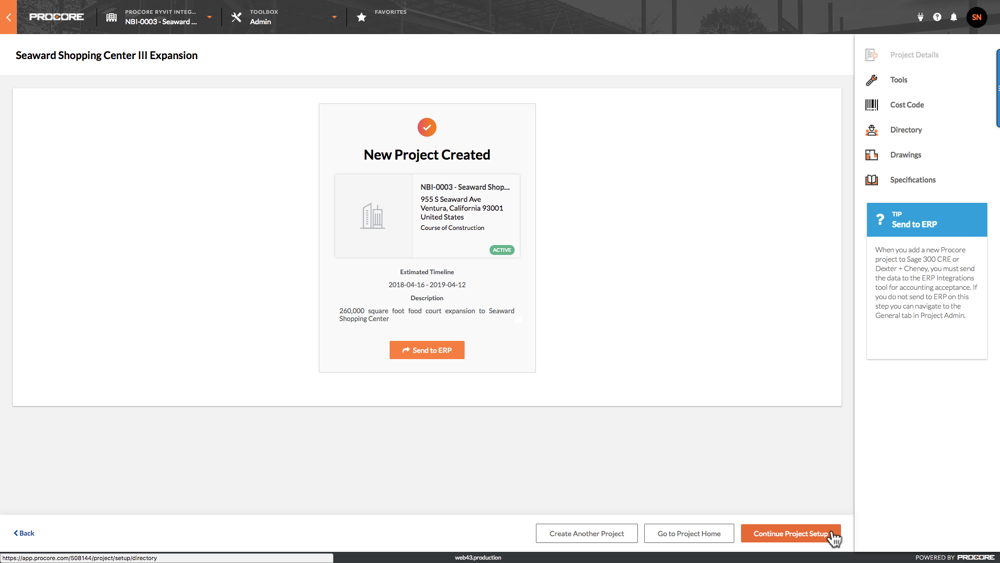
Your cost type assignments are automatically saved and Procore confirms that it has created your new project. This also reveals the New Project Created page.
- Continue with Send a New Project to the ERP Integrations Tool.
Send a New Project to the ERP Integrations Tool
- At the New Project Created page, choose from these options:
- If you want to send your new Procore project data to the Company level ERP Integrations Tool for accounting acceptance, click the Send to ERP button. Before the data is synced between the two systems, an accounting approver must accept the data as described in Accept or Reject a Project for Export to NetSuite®.
OR
- If you want to send your new Procore project data to the Company level ERP Integrations tool at a later time, click Continue Project Setup.
- When you are ready to send your data to the ERP Integrations tool, see Send a Procore Project to ERP Integrations for Accounting Acceptance.
- Before the data is synced between the two systems, an accounting approver must accept the data as described in Accept or Reject a Project for Export to NetSuite®.
Update Directory
- Make sure Directory is highlighted.
- Add contacts and companies from the Company Directory to your Project Directory as follows:
- If your project is based on an existing project template, you can add all of the companies and employees for those companies by clicking Select All in the drop-down menu.
- To add a company from Procore's Company Directory and all of that company's employees, begin typing the company name. When the system finds the appropriate match, select the company from the list. This adds both the company and people to the Project Directory.
- To add a person, begin typing the person's name. When the system finds the appropriate match, select that person from the list:
Notes:
- If you want to remove a company or a person, click the delete
 icon across from the company or person.
- If you want to remove all companies or people, click Clear All in the drop-down menu.
- For each person that you have selected to add, complete the following:
- Permission Template. Select the desired permission template from the list or choose 'Apply a Template Later.'
Important! This is a required setting for all of the users that you intend to add. To learn how the selections in this list are created, see Manage Project Permissions Templates.
- Project Role. Select the project role for the user. The selection you make here will list the person for each selected role on the project's Home page. To learn how the selections in this list are created, see Add a Custom Project Role.
- Click Next.
A GREEN banner appears at the top of the page to confirm the number of companies and people added.
Upload Drawings
- Make sure Drawings is highlighted.
- Complete the following:
- To learn how to format drawings before uploading them to a project, see How can I improve the accuracy of OCR on my drawings?
- To skip this step and upload your project's drawing(s) at a later time, click Skip. When you are ready to upload your drawings, see Upload Drawings.
- Attach File(s). Click this button to choose from these options: Upload a file from your computer, Select a file from Procore, or if you have enabled the Box integration, Select a file from Box.
OR
Drag and Drop File(s). Use a drag-and-drop operation to move files from your computer or network to this area on the page.
- Set Name. Enter a name for the drawing set.
- Set Date. Select a date for the drawing set using the calendar control.
- Default Drawing Date. Select a date for the drawing(s) using the calendar control.
- Default Received Date. Select the received date for the drawing(s) using the calendar control.
- Click Next.
The system processes the drawings in the background.
Note: You do NOT need to wait for the upload to complete. When finished, the system sends you an automated email notification with the subject line, "Drawing Upload Complete." To learn how to review and publish your drawings, see Review and Confirm Drawings and then Publish Drawings.
Upload Specifications
- Make sure Specifications is highlighted.
Notes:
- If you want to skip this step and upload a specification later, click Skip. This closes the Project Creation Assistant.
- When you are ready to upload your specifications at a later time, see Upload Specifications.
- Complete the following:
- Upload Specifications.
Notes:
- To learn how to format specifications before uploading them to a project, see How can I improve the accuracy of Specification Section Identification?
- Attach File(s). Click this button to choose from these options: Upload a file from your computer, Select a file from Procore, or if you have enabled the Box integration, Select a file from Box.
OR
- Drag and Drop File(s). Use a drag-and-drop operation to move files from your computer or network to this area on the page.
- Set Name. Enter a name for the set.
- Set Date. Select a date for the set using the calendar control.
- Default Issued Date. Select a date for the file(s) using the calendar control.
- Default Received Date. Select the received date for the file(s) using the calendar control.
- Click Next.
The system processes the specification upload.
Note: You do NOT need to wait for the upload to complete. When finished, the system sends you an automated email notification with the subject line, "Specification Upload Complete." To learn how to review and publish your specifications, see Review and Publish Specifications.
Upload Schedule
- Make sure Schedule highlighted.
Notes:
- Click Attach File(s). Then navigate to the schedule file on your computer or network. Then click Open.
Notes:
- The Project Creation Assistant only supports file upload via your web browser. It does not currently support file uploads stored in the Project level Documents tool.
- If you want to store a schedule file in the Documents tool and then upload it, see "File Upload Via Procore Documents" in the Upload a Project Schedule File to Procore's Web Application.
- You can also upload a schedule file using Procore Drive. For details, see Schedule in the Procore Drive User Guide.
- Click Next.