Best Practices: Submittals
Table of Contents
Overview
 |
Introducing Procore's best practices guides for the project's Submittals tool!In these guides, you will find our general recommendations for utilizing Procore's functionality to its greatest extent and maximizing your company's insights and productivity. These best practices guides are intended to explain the benefits of implementing certain features and are supplemented by Support Center tutorials that provide step-by-step instructions for performing the related actions. While the recommendations in these guides are generic and may not match your company's existing processes exactly, we encourage you to take a look and see what suggestions you can consider adopting |
Company Level Settings
Project Configurations
Imports
Submittal Builder
Note
This page describes recommended best practices for using Procore's original Submittal Builder. Click here to view tutorials, videos, and more about the project's Submittals tool.
Procore's AI-powered Submittal Builder is available in English to Enhanced and Premier Procore accounts in the United States, Canada, and Australia, and it's ability to detect submittal information is more advanced.
Introduction
Procore's Submittal Builder is likely one of the fastest methods to create a Submittal Registry if your project has a published specification book. Submittal Builder can find submittals based on specific formatting in a spec book and create a basic submittal register. This guide will show you best practices to help you maximize efficiency when using Submittal Builder. Are you ready?
Why should I use Submittal Builder?
Generating a submittal register at the beginning of a project helps prevent critical submittals from being forgotten. What would take someone weeks to do manually can be completed with significantly less time and effort using Submittal Builder.
Note
Submittal Builder is only available in English for the United States, Canada, and Australia.
An AI-powered Submittal Builder is available in English to Enhanced and Premier Procore accounts in the United States, Canada, and Australia, and it's ability to detect submittal information is more advanced.
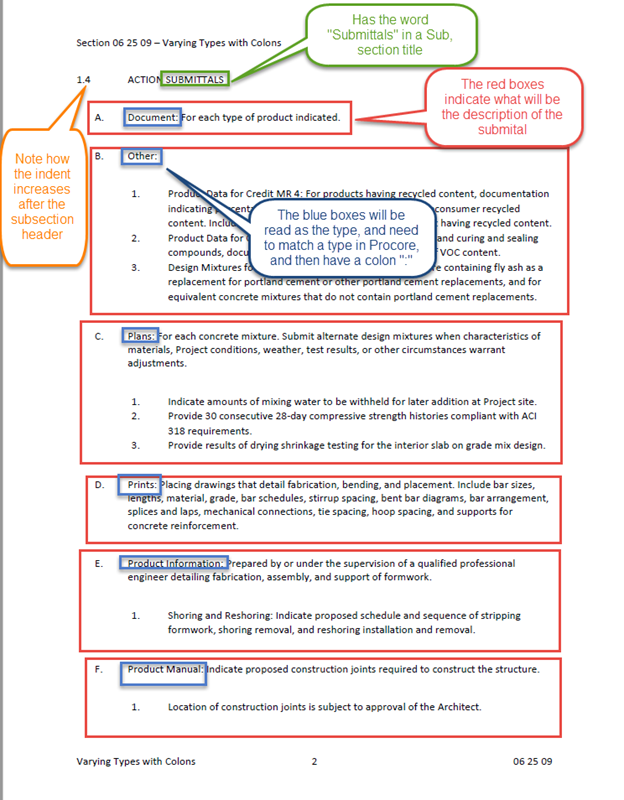
Ideal Specification Formatting for Submittal Builder
Submittal Builder looks for specific components when it processes a spec book. If these components are missing, few or no submittal items will be detected. Please review the information below and review your spec book to ensure these rules are being followed:
- OCR technology is heavily reliant on the quality of the PDF document. For this reason, we highly recommend using Vector-based PDFs whenever possible. See What is the difference between raster and vector content in PDFs? for more information.
- Submittal Builder only looks for submittal information within section headings that have the English word "submittals" in it.
- Within the "submittals" subsections, items need to be indented to be captured properly as individual submittal items.
- On each item's name, Submittal Builder looks for any exact matches to your company's submittal types (default or custom) before a colon (:). If no exact match is detected, the submittal type will be selected as "Other" by default.
Example
Here is an example of optimal formatting:
Click here to download a Microsoft Word template with specifications optimized for Submittal Builder usage.
Important
Since you can only run Submittal Builder once for each spec section revision on a project, ensuring the spec book has optimal formatting is an important first step so that the system can capture all of the possible submittals. Otherwise, you may need to fo the following:
- Manually create submittal items later.
- Delete the spec section from the project and re-upload it to run Submittal Builder again.
- Upload the spec section as a revision.
Submittal Item Creation from Submittal Builder
Before confirming submittals in the Submittal Builder's review process, you should know how you want your project's submittals organized in Procore. To better understand submittal organization in Procore, please see Best Practices: Submittal Packages - Introduction.
Submittal Builder creates submittal items with the following user-confirmed fields populated:
- Title
- Note: Since the Title usually contains text related to the submittal type, verify the "Submittal Type" field is accurate before you configure and apply the Title. Applying the configured title will automatically update any existing titles on submittals waiting to be confirmed. Changing the 'Type' of a submittal manually after configuring the titles won't automatically update the submittal's 'Title'.
- Type
- Description
- Submittal Manager
Submittal Builder creates submittal items with the following fields pre-populated by the system:
- Spec Section Number & Description
- Status (All submittals created will be in Draft status.)
- Submittal Number
- Note:
- If the project has the "Number Submittals by Spec Section" setting enabled, then the submittals will be numbered accordingly within their spec section. For example:
- 06 25 09 - 001
- 06 25 09 - 002
- 06 25 09 - 003
- If the project has the "Number Submittals by Spec Section" setting disabled, then the entire list of reviewed submittals will be numbered sequentially, regardless of the spec section number.
- If the project has the "Number Submittals by Spec Section" setting enabled, then the submittals will be numbered accordingly within their spec section. For example:
- Note:
Next Steps
Now that your submittal registry has been created with the above mentioned fields, there are many more fields that should be updated for additional context. To add this remaining information on your submittals, we recommend using Procore's bulk actions feature to edit multiple submittal items within packages. See Bulk Edit Submittals in a Package. Procore's bulk actions feature can also be used to edit multiple submittal items outside of packages. See Use Bulk Actions > Edit in the Submittals Tool.
Overview
Note
This page describes recommended best practices for using submittal packages. Click here to view tutorials, videos, and more about the project's Submittals tool.Introduction
Understanding how you want to organize your submittals within your project before you start creating and sending them will lead to a lot less problems later on. Consider not only what works best for your design teams, but also be sure to take into account your field teams. Often, field teams are not considered enough at this stage, which can lead them to struggle finding approved documents later on. Also, changing your submittal organization plans is much more difficult after some submittals have already been sent for approval due to potentially mismatched submittal numbering between you and your design teams.
Problems Around Document Packaging and Approvals
A submittal is typically considered any document submitted by the contractor to the design team for the purpose of receiving approval for usage on a project (equipment, materials, etc). Historically, most construction professionals think of a submittal package as a single PDF that includes a cover sheet and all of their submittal items. When a package like this is sent to the design team, they may provide comments on the individual items, but generally provide a single response such as "Approved" or "Revise and Resubmit" for the entire package. When approvals relate to an entire package, it can create difficulties depending upon your company's submittal revisioning process.
Option 1: Only resubmit the rejected items under a package revision
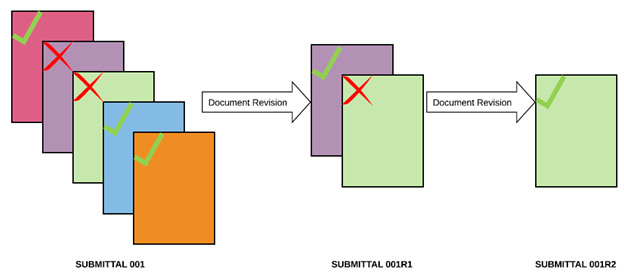
In the image above, you can see the original submittal package was partially approved, with the rejected items getting approved on subsequent revisions. This is the most common revisioning method since it's typically the fastest. However, as shown in this example, there are three versions of approved documents related to the same submittal package. This forces field teams to waste time searching through multiple submittal revisions for a single piece of data. Also, because the items are not listed in a submittal register individually, it is easy for items to get lost or forgotten.
Option 2: Resubmit the entire package under a package revision

This is not as common as Option 1, but this is the best method from a document control perspective. However, this method can cause delays for already approved items and lead to design teams wasting time on nearly duplicate reviews. There is also potential for "Approved" items changing between revisions since reviewers tend to not pay as close attention to approved items on the later revisions.
Similar to the previous option, because items are not listed individually, items can easily get lost between package revisions, especially if previously approved items are changed later. Additionally, field staff need to read through much larger documents when they are likely looking for specific data.
Both of these submittal document revision options were developed well before digital files became commonplace and managing submittals was still a paper process. Neither option is the most efficient way to provide data access to the entire project team. As a result, Procore developed a new concept for Packages.
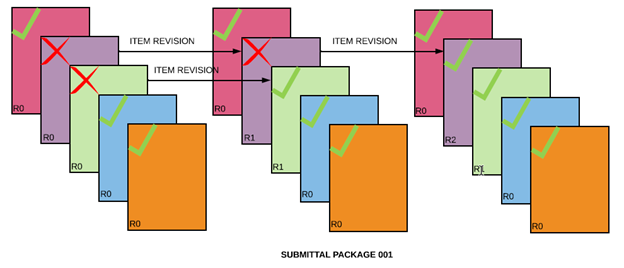
Submittal Packages in Procore
In Procore, individual items in a Submittal Package have their own workflows and approvals, instead of the package as a whole. Within Procore, individual items are more comparable to the familiar packages described above and submittal packages are more similar to a flexible grouping of related items.
The major difference with using submittal packages in Procore is how resubmittals are managed. In Procore, when resubmitting a package, only the rejected items are resubmitted but all items remain in the same package, eliminating the need to search through multiple document versions. Procore shows the most current versions of submittal items within packages.
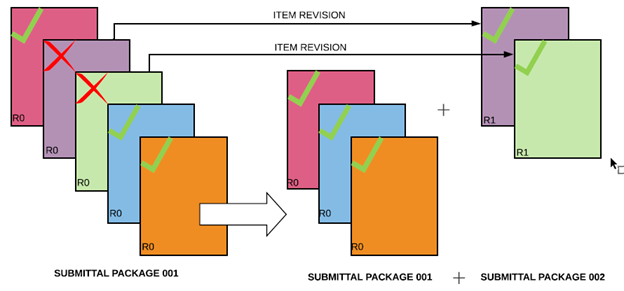
If this feels a bit too unfamiliar, revisions can also be moved to a different package (acting as a package revision) if the design team prefers to keep them separate from previous submissions (example below). However, keep in mind that we don't recommend this option as it can be inefficient for field staff who would need to look through multiple packages to find item approvals.
Procore's unique submittal package concept addresses many of the document management difficulties experienced by project teams, especially field staff.
- Because items are recommended to be listed individually, the likelihood that a critical submittal is overlooked is significantly reduced.
- Individual item organization allows for specific submittals to be expedited at any point, yet remain connected under their associated package.
- Individual items can be revised as many times as needed but only the most current version is shown at any point in time. This reduces the risk that project teams will reference a previous version.
- When items are listed individually, field staff spend less time searching through separate packages and large PDFs containing multiple items.
How should Submittal Packages be organized in Procore?
Most contractors use one of three options to organize their packages: Trade/Responsible Contractor, Specification Division, or Specification Section. We recommend organizing your packages by Spec Section since packaging by Spec Division or Trade/Responsible Contractor can be too broad and lead to large packages that are harder to manage. Also, packaging by Spec Section is typically more accommodating and less challenging for multiple trades involved in similar scopes of work.
Example 1: Package by Spec Division
| #23 Mechanical Package | |||||
|---|---|---|---|---|---|
| Spec Section | Submittal # | Revision # | Title | Type | Status |
| 23 21 13 Hydronic Piping | 1 | 0 | Hydronic Piping Product Data | Product Data | Open |
| 23 21 13 Hydronic Piping | 2 | 0 | Hydronic Pumps Product Data | Product Data | Open |
| 23 23 00 Refrigerant Piping | 3 | 0 | Refrigerant Piping Product Data | Product Data | Open |
| 23 25 00 HVAC Water Treatment | 4 | 0 | HVAC Water Treatment Product Data | Product Data | Open |
| 23 31 13 Metal Ducts | 5 | 0 | Metal Ducts Product Data | Product Data | Open |
Example 2: Package by Spec Section, Combined by Submittal Type
| #23 HVAC Water Treatment Package | |||||
|---|---|---|---|---|---|
| Spec Section | Submittal # | Revision # | Title | Type | Status |
| 23 25 00 HVAC Water Treatment | 1 | 0 | Bypass Feeders Product Data | Product Data | Open |
| 23 25 00 HVAC Water Treatment | 2 | 0 | pH Controllers Product Data | Product Data | Open |
| 23 25 00 HVAC Water Treatment | 3 | 0 | Injection Pumps Product Data | Product Data | Open |
| 23 25 00 HVAC Water Treatment | 4 | 0 | Centrifugal Separators Product Data | Product Data | Open |
| 23 25 00 HVAC Water Treatment | 5 | 0 | Multimedia Filters Product Data | Product Data | Open |
If you choose to organize your packages by specification section (Example 2), there still might be instances where you have multiple responsible contractors involved with a single package. Fireproofing is a good example and, in these cases, there are two main options to ensure each company is receiving the appropriate information.
- Create a separate package for each responsible contractor using the same spec section. For example, create the packages "Fireproofing Package for Mechanical" and "Fireproofing Package for Electrical"
- Create a separate submittal item in the same package for each different responsible contractor and process the individual items separately. For example, create a "Fireproofing Package" with "Firestopping Product Data - Electrical" and "Firestopping Product Data - Mechanical" as the submittals within the package.
Next in this Series
Itemization
Note
This page describes recommended best practices for using submittal packages. Click here to view tutorials, videos, and more about the project's Submittals tool.Introduction
Once you have determined how you will organize your submittal packages, the next step is deciding how to itemize the submittal items within each package (typically called the Submittal Registry). There is no right or wrong way to set up your submittal registry, but there are certainly pros and cons for each option.
A submittal registry traditionally begins with the specification, so let's start there. Here is a typical spec book sub-section for lighting fixture submittals:
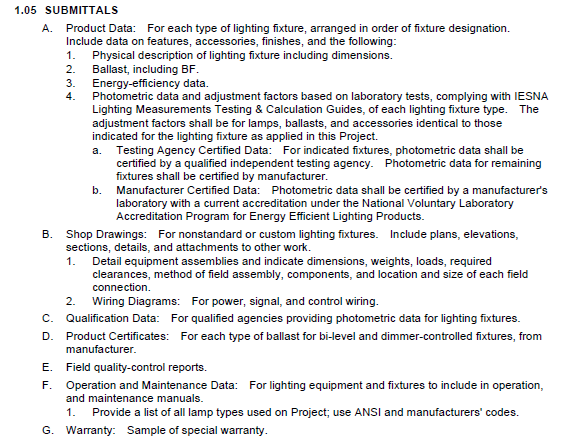
We recommend that you start building your submittal registry by creating an individual line item for each of the items identified as requirements in the specification. In our example specification section above, these items are: Product Data, Shop Drawings, Qualification Data, Product Certificates, Field Quality Control Reports, O&Ms, and Warranty.
Itemization Options
Option 1: Broad Itemizations
Since the project might have 50 separate lighting fixtures, so each of these submittal lines in this example could potentially contain 50 separate documents for each fixture to be reviewed and approved. You might choose to stop here when organizing your registry, but this option has both advantages and disadvantages.
| #165000-1.0: Lighting Fixture Package | |||||
|---|---|---|---|---|---|
| Spec Section | Submittal # | Revision # | Title | Type | Status |
| 16 50 00 Lighting | 16 50 00-1 | 0 | Light Fixture Product Data | Product Data | Open |
| 16 50 00 Lighting | 16 50 00-2 | 0 | Light Fixture Shop Drawings | Shop Drawing | Open |
| 16 50 00 Lighting | 16 50 00-3 | 0 | Light Fixture Qualification Data | Qualifications/Certifications | Open |
| 16 50 00 Lighting | 16 50 00-4 | 0 | Light Fixture Product Certificates | Qualifications/Certifications | Open |
| 16 50 00 Lighting | 16 50 00-5 | 0 | Light Fixture Quality Control Reports | Other | Open |
| 16 50 00 Lighting | 16 50 00-6 | 0 | Light Fixture O&M Data | Operation & Maintenance Manuals (O&Ms) | Open |
| 16 50 00 Lighting | 16 50 00-7 | 0 | Light Fixture Warranty Data | Product Warranty | Open |
Advantages
- It's easier to upload all documents for product data into a single submittal instead of creating separate submittals for each fixture.
- It's faster to review all documents for product data in one submittal, instead of reviewing separate submittals for each fixture.
Disadvantages
- Because items are grouped together and listed broadly, there is a higher likelihood that a critical submittal item is overlooked. If not a reviewer is not paying close attention, they might miss that they only received submittal data for 40 out of the 50 fixtures on the project.
- When revisions are needed, it can lead to multiple partially approved "Light Fixture Product Data" submittals and confusion about which revision is the most current version.
- Field staff spend more time searching through large documents that may have multiple revisions.
Option 2: Specific Itemizations
Instead of stopping with broad itemizations, you can continue to build the registry out further and get very specific with your itemizations. Using the same specification section example above, you could create as many individual submittal lines as your project needs for each fixture's product data, shop drawings, etc.
| #165000-1.0: Lighting Fixture Package | |||||
|---|---|---|---|---|---|
| Spec Section | Submittal # | Revision # | Title | Type | Status |
| 16 50 00 Lighting | 16 50 00-1 | 0 | Peerless BRM9-1-28T5-SPR-20/80 Light Fixture Product Data | Product Data | Open |
| 16 50 00 Lighting | 16 50 00-2 | 0 | Pinnacle E4A-35-28-G9G Light Fixture Product Data | Product Data | Open |
| 16 50 00 Lighting | 16 50 00-3 | 0 | Gotham EVO-SQ-30-10-4AR Light Fixture Product Data | Product Data | Open |
| 16 50 00 Lighting | 16 50 00-4 | 0 | Pinnacle F36-A-35-G-120 Light Fixture Product Data | Product Data | Open |
| 16 50 00 Lighting | 16 50 00-5 | 0 | Pinnacle EV3WG-35-28-SFS Light Fixture Product Data | Product Data | Open |
| 16 50 00 Lighting | 16 50 00-6 | 0 | Pinnacle F48-CL-35-S-120 Light Fixture Product Data | Product Data | Open |
| 16 50 00 Lighting | 16 50 00-7 | 0 | Gotham EVO-CYL-30-10-6AR Light Fixture Product Data | Product Data | Open |
Depending on how many items are in a package and on your project, you might find that you want to separate your submittal packages even further. For example, instead of just creating one "Lighting Fixtures" package, you can create packages based on your project's locations, phases, submittal types, or even separate packages for each fixture with all of the corresponding submittal items (product data, warranty, O&M, etc).
Advantages
- Because items are listed individually, the likelihood that a critical submittal or component gets overlooked is significantly reduced.
- Individual items allow for submittals to be more easily expedited at any point.
- Individual items can be revised as many times as needed and can be displayed to only show the most current version at any point in time. This reduces the risk of field teams referencing a previous version.
- Because items are listed individually, field staff can find what they need faster and spend less time searching through large documents containing multiple items.
Disadvantages
- Requires more time and effort during submittal registry creation.
- Design Teams might feel overwhelmed by the number of items requiring review and approval.
- Submittal distribution can be tedious because distribution from Procore is only available at the item level.
Which option is recommended?
The simple answer is both options are recommended for different purposes. The best choice really comes down to the project and team needs, but you can use both within the same project. For items such as drywall accessories that rarely get rejected or referenced, grouping them all together makes sense for simplicity. However, with commonly revised items such as lighting fixtures, separating that data into packages for individual fixtures is likely the better option.
Procore allows for the flexibility to support many different use cases and projects so you're always able to organize your submittals in the way that best supports the project team. If you are still not certain which option to choose, we ultimately recommend spending a little more time at the start by creating more specific submittal itemizations.
Next in this Series
Creation and Review
Note
This page describes recommended best practices for using submittal packages. Click here to view tutorials, videos, and more about the project's Submittals tool.Introduction
In this article, you'll find the recommended sequence of events to maximize the use of submittal packages.
Step 1: Create Submittal Packages and Items
Option 1: Submittal Import
The submittal import option via CSV is the quickest way to create Submittal items and packages at the same time. The first four columns in the import are specific to package information. The fields are not required to process the import, but you will save time by completing them on the import.

"Package Title" (Column A) and "Package Number" (Column B) can use whatever format works best for your organization. For recommendations on package titles, refer to the previous article Best Practices: Submittal Packages - Submittal Itemization. Keep in mind that a package's number is a user-defined field when you import, create, or edit the package. Procore does not currently allow multiple spec sections to be selected on a package, so "Package Spec Section Number" and "Package Spec Section Description" (Columns C & D) can only reference a single spec section.
Option 2: Manually Create Packages
If you used Submittal Builder or just created submittal items manually, you can always add them into packages as a follow-up step. There isn't a way to bulk add submittals to a submittal package, so we recommend Option 1 above whenever possible. If you choose to manually create packages, you can filter by a specific spec section to narrow down the available selections.
Step 2: (Optional) Manage Submittal Item Numbering in a Package
We recommend that you use 0 as a temporary placeholder for your submittals' numbers when you create them because it can be difficult to know the order in which you'll receive and send them. As you receive the submittal items but before you send them for review, click the "Edit" button on the package. In this edit mode, you can inline edit the submittal numbers. Once the submittal numbers are set, continue to the next step to bulk edit the package and send the items for review.
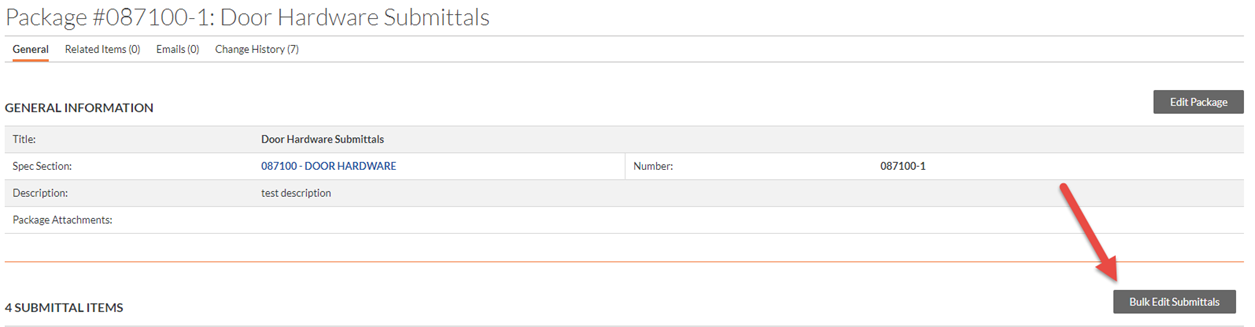
Step 3: Bulk Edit Submittal Items in a Package
When a submittal registry is created early (before buyout, for example), the known details within submittal items are generally limited. Via the "Bulk Edit" button within a submittal package, you can quickly add the missing data to multiple submittal items within a package as the information becomes known. You can also apply a workflow from the same screen. Without using packages, this would be two separate steps for each group of submittals if you did the same thing via the list view bulk edit option.
Step 4: Initiate Workflows and Digest Email Notifications
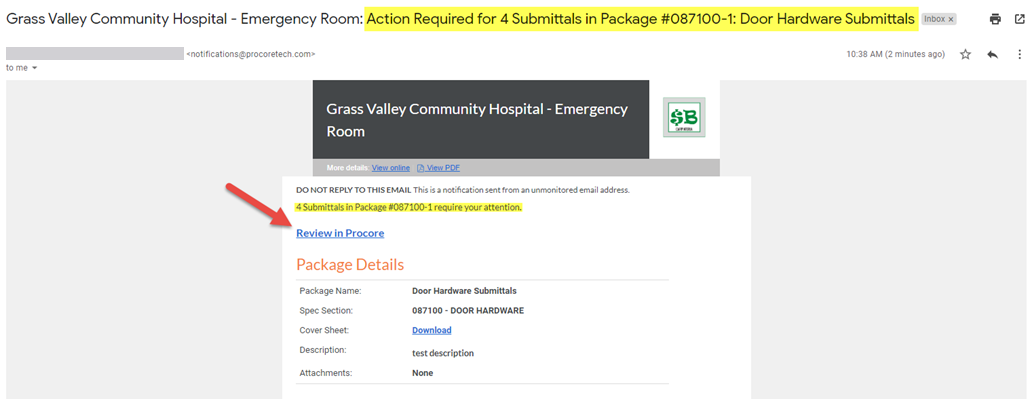
Once workflows have been added to the items within the submittal package, you are now ready to send the "Action Required" emails to the first person in the workflow. Unlike creating submittals individually where multiple notification emails go out once you click "Create and Send Email", packages take a different approach that results in a single email sent to each user.
After a workflow has been added to at least one submittal in a package, a new alert banner will appear on the package view page. This banner allows for an Admin user to initiate a single "Action Required" email to the first person in the workflow. Fewer submittal emails is a major benefit for using the package functionality.

Note
The workflows don't need to be exactly the same for all submittals within a package. The Submitters, Approvers, and Due Dates can all be different and each user will receive their own digest email based on their involvement in the workflow.We recommended that you send emails for all the submittal items within a package at the same time. You can add new items to a package at any point, but clicking "Send Now" in the package alert banner will also resend any previously sent email(s), which could cause confusion for your Submitters/Approvers.
Step 5: Submitter Role - Package Review and Response
Once you click the "Send Now" button, the "Action Required" email shows the recipient all submittals that now require their response (4 items in this example). They can click the "Review in Procore" link to go directly to the page in Procore where they can submit their requested response and documents.
In the example review page below, you can see all four items have the Door Contractor listed as the 'Ball in Court'. This view is where users can see and respond to all of their items from a single page and is another major benefit to using packages. Clicking "Review" for each item shows its Due Date and includes the fields for users to enter their response, comments, and attachments.
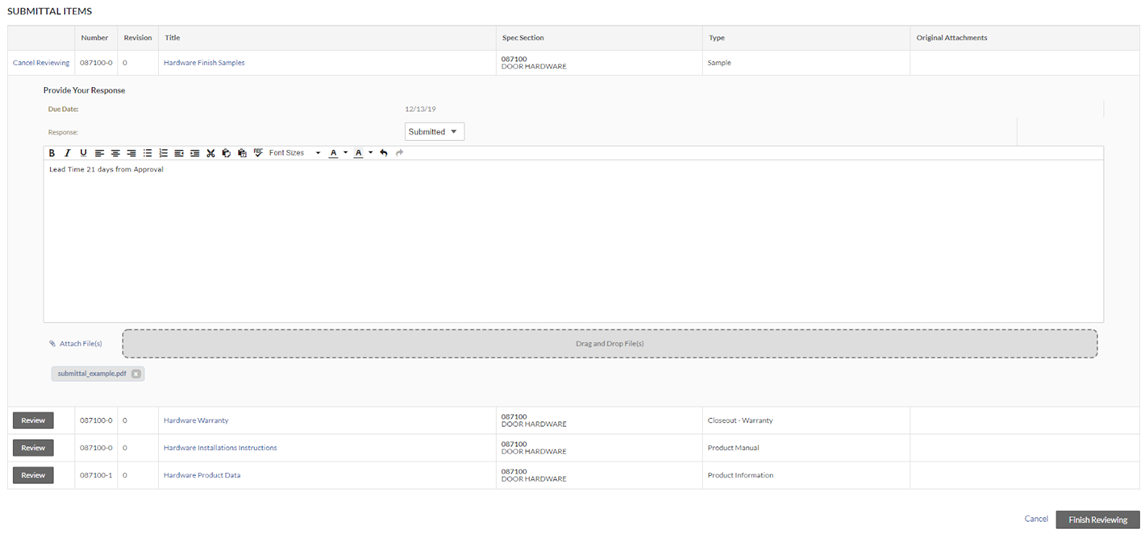
Because the workflows exist on the individual submittal items, due dates do not need to be the same for each submittal in a package. In the example above, we included a submittal item for a Closeout Warranty that is not due for several months. If the Door Contractor is not ready to submit this item right now, they can submit the other three items without getting delayed by this one closeout item. The Door Contractor will stay listed as the 'Ball in Court' for the warranty until it is submitted. Overdue email notifications will also be sent to the Door Contractor if they do not submit by the due date. This is a great way to keep on track for closeout deliverables. If your project's design teams prefer to receive "complete" packages, you can easily move any closeout item to a separate package.
Step 6: Approver Role - Package Review and Response
The Approver's process is similar to the Submitter's process described above. The Approver receives a single "Action Required" email with the three items in that package that they need to review. Following the "Review in Procore" link in the email, the review screen is nearly identical to the Submitter role. The only differences are the selections available under the "Response" dropdown and the "Previous Response" section.
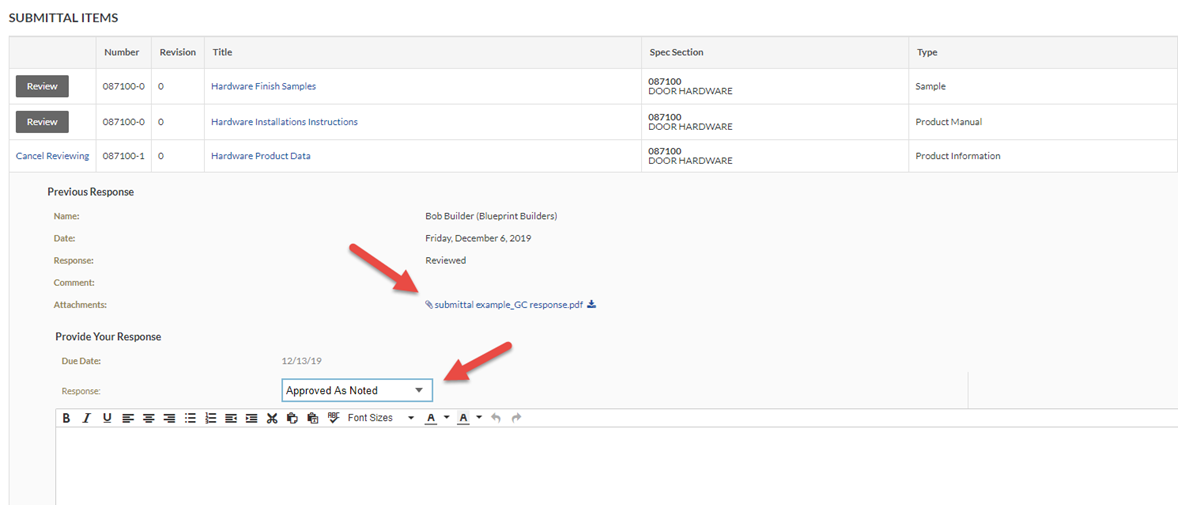
Again, because the workflows exist on the individual submittal items, they can each be forwarded to another user or approved separately. Regardless of how the submittal items proceed, each user remains listed as the 'Ball in Court' until they post their response.
Next in this Series
Best Practices: Submittal Packages - Distribution and Revision
Distribution and Revision
Note
This page describes recommended best practices for using submittal packages. Click here to view tutorials, videos, and more about the project's Submittals tool.Introduction
In this final submittal package article, we'll talk about closing a submittal, issuing it back to the creator, creating revisions, and other helpful information.
Package Distribution
Once submittal workflows have completed, the Submittal Manager typically sends individual items back to the Responsible Contractor/Submitter. Since each submittal item has its own workflow and approvals, all submittal items are distributed through separate emails as described in Distribute a Submittal.
Package Revisioning
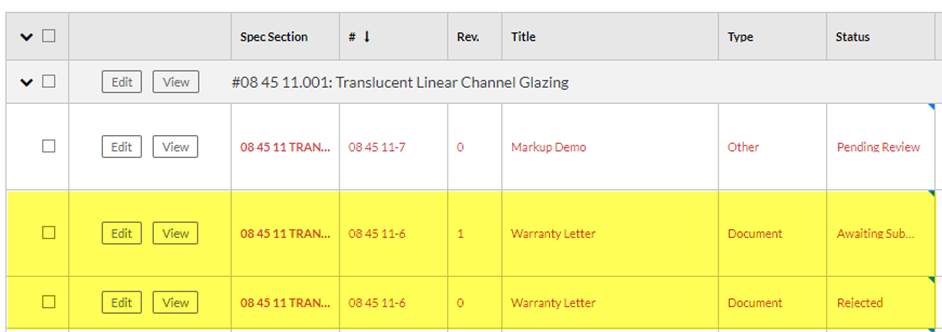
Like distribution, there are no package level revisions since submittal items are approved individually via separate workflows. Referring back to Best Practices: Submittal Packages - Introduction, this prevents needing to choose between the two options identified under the "Industry" package. Only the items that need to be resubmitted are processed, which speeds up the overall time for approvals. Revisions for items in a package can be managed in multiple ways, but here are the two most common:
Option 1: Resubmit items within the same package
When a revision is created on a submittal item, all of the previous data carries forward automatically, including the package. This assumes that you want all submittal revisions to be contained within the same package. This option is the most commonly recommended method since it keeps everything bundled together for faster referencing, especially when combined with the "Current Revision" filter.
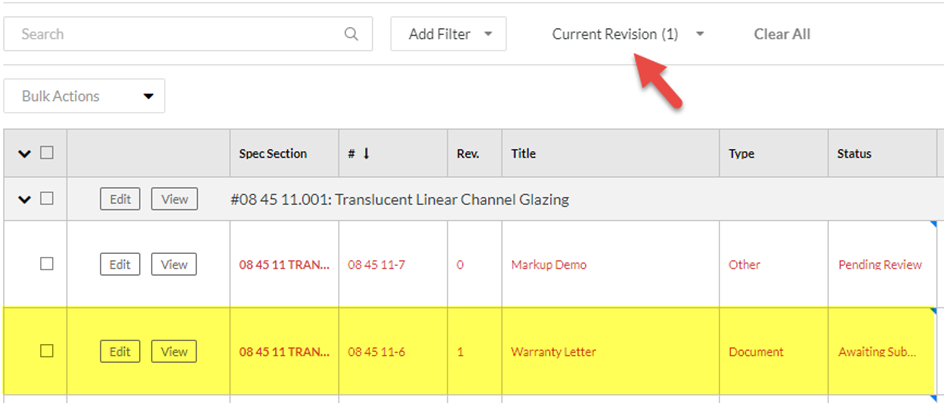
'Current Revision' Filter
Once applied on the Packages view, this filter will remain in place for your user account on a project until you remove it. This filter is especially helpful for field teams because it only displays the most current version of any submittal, regardless of the submittal's status (similar to "current set" in drawings). Below are screenshots of the filter:
Filter Off:
Filter On:
Note
This filter is one of the main reasons we recommend creating the revision immediately after the original rejected item is distributed. By doing so, you create a new line item right away that clearly indicates the item is still awaiting submission. This makes it much less likely that a field member will click on and build from an unapproved item.Option 2: Resubmit rejected items in a new package
Using this option, you add a revised submittal into a newly created package. This can be helpful when your project's design team requires very stringent package controls and numbering. However, the downside is that you will have multiple packages to search through when trying to find a specific item.
In order to prevent items from getting forgotten, we recommend creating revisions immediately after the original rejected item is distributed, especially if you are using the "Submitter" role (see Create a Submittal Revision). The due dates assigned during this process and overdue notifications will help ensure nothing gets missed.
Conclusion
We hope these articles have clarified the purpose and benefits of Procore's submittal package functionality. While we realize this functionality may not be the best fit for every project or team, please consider these closing thoughts as you think about how to organize submittals on your next project.
- Submittal packages can be utilized as simply an organizational tool without sending workflow notifications from the packages. Think of it as just another way to view and group submittal items.
- If you are still unsure how you can use submittal packages, we encourage you to give them a try using broad itemizations. This option may look closer to how you've processed items before. If you decide it's not for you, you won't have a ton of submittal items to manage.
- While using submittal packages may not be the right choice for your project currently, the functionality will continue to evolve over time and may work for you better later or on another project. To stay informed about new releases, we encourage you to register for our New Release Webinar.