

Company Equipment Setup Guide
Table of Contents
- Welcome
- Configure Equipment Settings
- Configure Telematics
- Add Equipment Records
- Set Up Automated Project Tracking (with Telematics)
- Manage Equipment Records
- View Equipment Records
- Configure Settings for Timekeeping
- Configure Settings for Inspections
- Configure Settings for Daily Log
- Add Tools to Projects
Overview
Permissions
Equipment
Important
Permissions
| | The action is available on Procore's Web, iOS, and/or Android application. Click to view the tutorial.
 Users can take the action with this permission level.
 Users can take this action with this permission level AND one or more additional requirements, like granular permissions.
What granular permissions are available for the Company level Equipment tool?
|
Equipment Tutorials |
None |
Read Only |
Standard |
Admin |
Notes |
|---|---|---|---|---|---|
|
Add or Remove from Equipment from Projects |
|
|
|
||
|
Configure Automated Project Tracking for Equipment |
|
||||
|
Configure Categories, Types, and Makes |
|
||||
|
Configure Columns for Equipment |
|
|
|
||
|
Configure Custom Statuses for Equipment |
|
||||
|
Configure Geofences for Equipment Telematics |
Users need 'Admin' level permissions to the Project's Locations tool. |
||||
|
Configure Hours and Rates for Equipment |
|
||||
|
Configure Telematics for Caterpillar |
|
||||
|
Configure Telematics for John Deere |
|
||||
|
Configure Telematics for Samsara |
|
||||
|
Configure Telematics for United Rentals |
|
||||
|
Create a Maintenance Record |
|
|
|||
|
Create an Equipment Record (Owned) |
|
|
|
||
|
Create an Equipment Record (Rented, Subcontracted) |
|
|
|
Users also need 'Read Only' level permissions or higher to the Company Directory tool. |
|
|
Delete an Equipment Record |
|
||||
|
Disconnect an Equipment Telematics Connection |
|
||||
|
Edit Equipment (Assignee Field) |
|
|
Users also need 'Read Only' level permissions or higher to the Company Directory tool. |
||
|
Edit Equipment (General Information) |
|
|
|||
|
Edit Equipment Status |
|
|
|
||
|
Edit Vendor for Rented Equipment |
|
|
|
Users also need 'Read Only' level access or higher to the company's Directory. |
|
|
Enable or Disable Equipment for Automatic Project Tracking |
|
||||
|
Generate QR Codes for Equipment |
|
|
|
||
|
Import Equipment |
|
|
|||
|
Reconnect an Equipment Telematics Connection |
|||||
|
Recover Equipment Records from the Recycle Bin |
|
|
|||
|
Search, Sort, and Filter Equipment |
|
|
|
||
|
Set Current Project |
|
|
|||
|
Set Onsite Field for Equipment |
|
|
|
Users can only update the onsite location for projects they are a part of. |
|
|
Sync Equipment Telematics Data |
|
||||
|
View Change History |
|
|
|||
|
View Equipment Details in the Company Equipment Tool |
|
|
|
||
|
View Equipment on the Map in the Company Equipment Tool |
|
|
|
||
|
View Equipment Project Assignments |
|
|


Categories, Types, and Makes
Category and Type Configuration
- Navigate to the company's Equipment tool.
- Click the configure settings
 icon.
- Under the 'Category & Type' tab, enter a category of equipment.
- Click Create.
- Under the category, enter the type of equipment.
- Mark the Active checkbox to make the option available when creating and editing equipment records.
- Click Create.
- Click the caret
 next to the category to expand the section and see the available types.
Note: Click the delete icon to remove available options.
Make Configuration
- Navigate to the company's Equipment tool.
- Click the configure settings icon.
- Click the Make Configuration tab.
- Enter the make for the equipment.
- Click Create.
- Under the make, enter the model and select the type.
- Mark the Active checkbox to make the option available when creating and editing equipment records.
- Click Create.
- Click the caret next to the make to expand the section and see the available models.
Note: Click the delete icon to remove available options.
Statuses
- Navigate to the company's Equipment tool.
- Click the configure settings icon.
- Click the Status Configuration tab.
- Under the relevant status type for 'Available', 'In Use', or 'Unavailable', enter the status you want to create.
- Click Add.
- Click the caret next to the category to see all corresponding statuses.
- To manage custom statuses:
- Mark or clear the checkbox to show or hide the status in the Equipment tool.
- Click the delete icon to remove a status option.
Configure Caterpillar
Sync Equipment Telematics to Timesheets (Beta)
Company Administrators can enable the Equipment: Telematics to Timesheets - Operating Hours Sync beta in Procore Explore. (US 2 | UK)
-
Daily cumulative operating hours automatically pull in to equipment timecards in the Timesheets tool.
-
Equipment must be 'On Site' at a project.
-
This integration is currently only available for Timesheets on Web.
Background
In the company's Equipment tool settings, you can connect your Caterpillar account so that equipment telematics data can be viewed in the Equipment tool in Procore. You can choose to automatically import your equipment records through the telematics connection to show in the Equipment tool, or you can manually add your equipment records and link them to telematics.
Things to Consider
-
Telematics information updates if the equipment record in your Procore and equipment vendor accounts have the same serial number.
-
Procore currently supports telematics connections with the following equipment vendors:
-
Caterpillar
-
John Deere
-
Samsara
-
United Rentals
-
Prerequisites
You can choose to automatically import your equipment records through the telematics connection to show in the Equipment tool, or you can manually add your equipment records and link them to telematics. If you want to manually add and link equipment, import or add your equipment first: Prepare and Import Equipment OR Create an Equipment Record.
Steps
-
Navigate to the company's Equipment tool.
-
Click the configure settings
 icon.
-
Click the Telematics Connections tab.
-
Locate Caterpillar and click Connect.
-
Optional: Mark the checkbox to 'Import equipment' from your Caterpillar account.
Tip
If your telematics connection is already established and you want to import equipment, disconnect the connection and follow these steps to reconnect. When you reconnect, the checkbox becomes available. -
Click Connect.
-
Enter your Caterpillar Client ID.
-
Enter your Caterpillar Client Secret.
Tip
Support to locate your Caterpillar Client ID and Secret can be found on the Caterpillar website.
-
Click Connect.
-
Exit the settings menu and navigate back to the Equipment Registry.
-
Connect your equipment records.
-
Equipment Imported through the Telematics Connection
-
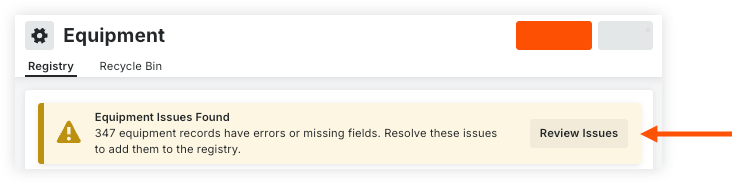
If you chose to import your equipment, click Review Issues in the banner.
-
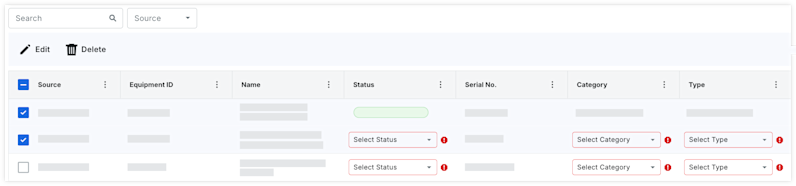
Update any required fields by selecting the option from the drop-down menu.
OR
Bulk Update Equipment-
Mark the checkboxes for the equipment records.
-
Click Edit.
-
Select the field(s) to apply to all selected equipment records.
-
Click Save.
-
-
Click Add to Registry.
-
-
Manually Added Equipment
-
If you chose to manually add your equipment, navigate back to the equipment list.
-
Hover over the equipment record and click the edit
 icon.
-
In the 'Information' tab, select the Telematics Provider.
-
Enter the Telematics Provider ID.
-
Click Save.
-
-
Configure John Deere
Sync Equipment Telematics to Timesheets (Beta)
Company Administrators can enable the Equipment: Telematics to Timesheets - Operating Hours Sync beta in Procore Explore. (US 2 | UK)
-
Daily cumulative operating hours automatically pull in to equipment timecards in the Timesheets tool.
-
Equipment must be 'On Site' at a project.
-
This integration is currently only available for Timesheets on Web.
Background
In the company's Equipment tool settings, you can connect your John Deere account so that equipment telematics data can be viewed in the Equipment tool in Procore. You can choose to automatically import your equipment records through the telematics connection to show in the Equipment tool, or you can manually add your equipment records and link them to telematics.
Things to Consider
-
Telematics information updates if the equipment record in your Procore and equipment vendor accounts have the same serial number.
-
Procore currently supports telematics connections with the following equipment vendors:
-
Caterpillar
-
John Deere
-
Samsara
-
United Rentals
-
Prerequisites
You can choose to automatically import your equipment records through the telematics connection to show in the Equipment tool, or you can manually add your equipment records and link them to telematics. If you want to manually add and link equipment, import or add your equipment first: Prepare and Import Equipment OR Create an Equipment Record.
Steps
-
Navigate to the company's Equipment tool.
-
Click the configure settings
icon. -
Click the Telematics Connections tab.
-
Locate John Deere and click Connect.
-
Optional: Mark the checkbox to 'Import equipment' from your John Deere account.
Tip
If your telematics connection is already established and you want to import equipment, disconnect the connection and follow these steps to reconnect. When you reconnect, the checkbox becomes available. -
Click Connect.
-
In the App Installation window, select Procore as the organization to which you want to provide access.
-
Click Allow.
-
Exit the settings menu and navigate back to the Equipment Registry.
-
Connect your equipment records.
-
Equipment Imported through the Telematics Connection
-
If you chose to import your equipment, click Review Issues in the banner.
-
Update any required fields by selecting the option from the drop-down menu.
OR
Bulk Update Equipment-
Mark the checkboxes for the equipment records.
-
Click Edit.
-
Select the field(s) to apply to all selected equipment records.
-
Click Save.
-
-
Click Add to Registry.
-
-
Manually Added Equipment
-
If you chose to manually add your equipment, navigate back to the equipment list.
-
Hover over the equipment record and click the edit
icon. -
In the 'Information' tab, select the Telematics Provider.
-
Enter the Telematics Provider ID.
-
Click Save.
-
-
Configure Samsara
Sync Equipment Telematics to Timesheets (Beta)
Company Administrators can enable the Equipment: Telematics to Timesheets - Operating Hours Sync beta in Procore Explore. (US 2 | UK)
-
Daily cumulative operating hours automatically pull in to equipment timecards in the Timesheets tool.
-
Equipment must be 'On Site' at a project.
-
This integration is currently only available for Timesheets on Web.
Background
In the company's Equipment tool settings, you can connect your Samsara account so that equipment telematics data can be viewed in the Equipment tool in Procore. You can choose to automatically import your equipment records through the telematics connection to show in the Equipment tool, or you can manually add your equipment records and link them to telematics.
Things to Consider
-
Telematics information updates if the equipment record in your Procore and equipment vendor accounts have the same serial number.
-
Procore currently supports telematics connections with the following equipment vendors:
-
Caterpillar
-
John Deere
-
Samsara
-
United Rentals
-
Prerequisites
You can choose to automatically import your equipment records through the telematics connection to show in the Equipment tool, or you can manually add your equipment records and link them to telematics. If you want to manually add and link equipment, import or add your equipment first: Prepare and Import Equipment OR Create an Equipment Record.
Steps
-
Navigate to the company's Equipment tool.
-
Click the configure settings
icon. -
Click the Telematics Connections tab.
-
Locate Samsara and click Connect.
-
Optional: Mark the checkbox to 'Import equipment' from your Samsara account.
Tip
If your telematics connection is already established and you want to import equipment, disconnect the connection and follow these steps to reconnect. When you reconnect, the checkbox becomes available. -
Click Connect.
-
Enter your Samsara credentials.
-
In the App Installation window, select Procore as the organization to which you want to provide access.
-
Click Allow.
-
Exit the settings menu and navigate back to the Equipment Registry.
-
Connect your equipment records.
-
Equipment Imported through the Telematics Connection
-
If you chose to import your equipment, click Review Issues in the banner.
-
Update any required fields by selecting the option from the drop-down menu.
OR
Bulk Update Equipment-
Mark the checkboxes for the equipment records.
-
Click Edit.
-
Select the field(s) to apply to all selected equipment records.
-
Click Save.
-
-
Click Add to Registry.
-
-
Manually Added Equipment
-
If you chose to manually add your equipment, navigate back to the equipment list.
-
Hover over the equipment record and click the edit
icon. -
In the 'Information' tab, select the Telematics Provider.
-
Enter the Telematics Provider ID.
-
Click Save.
-
-
Configure United Rentals
Sync Equipment Telematics to Timesheets (Beta)
Company Administrators can enable the Equipment: Telematics to Timesheets - Operating Hours Sync beta in Procore Explore. (US 2 | UK)
-
Daily cumulative operating hours automatically pull in to equipment timecards in the Timesheets tool.
-
Equipment must be 'On Site' at a project.
-
This integration is currently only available for Timesheets on Web.
Background
In the company's Equipment tool settings, you can connect your United Rentals account so that equipment telematics data can be viewed in the Equipment tool in Procore. You can choose to automatically import your equipment records through the telematics connection to show in the Equipment tool, or you can manually add your equipment records and link them to telematics.
Things to Consider
-
Telematics information updates if the equipment record in your Procore and equipment vendor accounts have the same serial number.
-
Procore currently supports telematics connections with the following equipment vendors:
-
Caterpillar
-
John Deere
-
Samsara
-
United Rentals
-
-
To complete your data share agreement and receive your telematics credentials digital@ur.com.
Prerequisites
You can choose to automatically import your equipment records through the telematics connection to show in the Equipment tool, or you can manually add your equipment records and link them to telematics. If you want to manually add and link equipment, import or add your equipment first: Prepare and Import Equipment OR Create an Equipment Record.
Steps
-
Navigate to the company's Equipment tool.
-
Click the configure settings
icon. -
Click the Telematics Connections tab.
-
Locate United Rentals and click Connect.
-
Optional: Mark the checkbox to 'Import Equipment' from your United Rentals account.
-
Click Connect.
-
Enter your United Rentals Account ID, as provided by your United Rentals point of contact.
-
Click Connect.
-
Exit the settings menu and navigate back to the Equipment Registry.
-
Connect your equipment records.
-
Equipment Imported through the Telematics Connection
-
If you chose to import your equipment, click Review Issues in the banner.
-
Update any required fields by selecting the option from the drop-down menu.
OR
Bulk Update Equipment-
Mark the checkboxes for the equipment records.
-
Click Edit.
-
Select the field(s) to apply to all selected equipment records.
-
Click Save.
-
-
Click Add to Registry.
-
-
Manually Added Equipment
-
If you chose to manually add your equipment, navigate back to the equipment list.
-
Hover over the equipment record and click the edit
icon. -
In the 'Information' tab, select the Telematics Provider.
-
Enter the Telematics Provider ID.
-
Click Save.
-
-
Create Equipment Records
Import Equipment Records
Automated Project Tracking Overview
Configure Geofences for Equipment
Background
In the Project level Locations tool, you can set up site boundary locations to create geofences.
After you set up geofences, you can configure automated project tracking to automatically update the equipment 'Onsite' field via a telematics connection. When an equipment GPS location is detected inside our outside the geofence, the system updates the equipment's Onsite field accordingly.
Things to Consider
-
You must use the polygon to create the geofence.
Prerequisites
-
The Maps tool must be enabled for the project.
1. Create a 'Site Boundary' Location
-
Create a Location Using the Create Button
-
Create a Sub Location Using Inline Creation
Create a Location Using the Create Button
-
Navigate to the project's Locations tool.
The Locations page appears with the List View by default.
Note: You can configure which table view and table column names you want to see in the Locations table. -
Click the Create button located at the top right side of the Locations page.
The New Location screen appears. -
Add information to the following fields:
Location Fields Show/Hide
-
Location Name: Enter an appropriate name for the a location you want to add (for example, Demo Area). This is a mandatory field.
-
Parent: Leave the field blank to create a Tier 1 location, or search for an existing location to make your entry a sub location (child).
Note: If you have already created a Tier location, this dropdown menu displays that location name. -
Code (optional): Enter an alphanumeric value to identify the location. This value must be unique for each project.
You can click the icon to toggle the visibility of the Code column.
Note: The Code field is used by Document Manager (available for select, non-US regions) to tag and name documents with a location. -
Type (optional): Select a pre-defined option from the dropdown menu or create a custom value to categorize your location.
The following pre-defined options are available in the Type dropdown menu:-
Site Boundary
Note: To set the boundary, you'll need to add the location to the map using the polygon to define the perimeter. -
Building
-
Level
-
Unit
-
Room
-
Zone
These pre-defined location types help in classification, filtering, improved navigation, and reporting. You can filter locations by Type in the Tree View or List View table. You can also add your own custom location types. You can create up to 100 custom location types with a limit of 255 characters each for a project. See Create and Manage Custom Location Types.
-
-
-
Click Save.
Create a Sub Location Using the Inline Creation
-
On the Locations page, hover over an existing location name in the Tree or List View table.
-
Click the vertical ellipsis
 icon.
-
Select New Sub Location.
Blank fields are displayed for entering the values. -
Type the name of the sub location under the Location Name column and complete the other column values.
-
Hit Enter to add the changes.
2. Set the Site Boundary Geofence
-
Navigate to the project's Locations tool.
The Locations page appears with the List View by default.
Note: You can configure which table view and table column names you want to see in the Locations table. -
Click the map
 icon to switch to the map view.
-
Click Filters located above the list table.
A dropdown menu appears, displaying List and Location Type fields. -
From the List dropdown menu, select Unmapped.
You can see all unmapped locations in the list table. -
Select an unmapped location from the list table and click the add
 icon in the corresponding row under the Actions column.
Note: You can also use the add icon on the map pane to add locations to the map. To learn more, see Manage Locations on the Map. -
Select one of the following geometry shapes to assign it to the location:
-
Point: For specific spots (for example, a column or valve).
-
Path: For linear routes (for example, a pipeline or trench).
-
Polygon: For defined areas and site boundaries (for example, a room, slab, or zone).
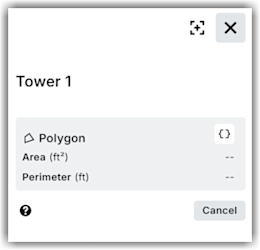
When you select a shape, the Detail Card appears in the Map pane.
-
-
On the Map pane, do one of the following:
-
To draw, click on the map to place your points.
-
For Point: Click to place the point on the map.
The Details Card displays the coordinates in designated measurement units. -
For Path: Click to place vertices. Double-click or hit Enter to finish your drawing.
The Details Card displays the length in designated measurement units. -
For Polygons: Click to place vertices. Double-click or hit Enter to close the shape and finish your drawing. The Details Card displays the area and perimeter in designated measurement units..
When your drawing is complete, the geometry shape is saved and the location is added to the map automatically.Note
The measurement unit system (metric or imperial) is determined by the user's browser region. Metric units are supported for specific regions. Perimeter and area cannot be entered manually; they are automatically calculated by the Locations tool based on the drawn geometry.
-
-
To enter coordinate values directly, click on the map to place your points.
-
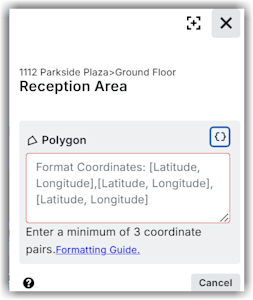
Click the Enter Coordinates icon on the Details Card.
-
Enter the coordinate values in the text box. See GeoJSON Formatting Guide for Locations for detailed information.
-
Click outside the text box. The defined geometry shape is saved and the location is added to the map automatically.
-
-
-
To edit details of a geometry shape on the map pane, do the following:
-
Select the geometry shape for which you want to edit the details.
-
In the Details Card, click Edit.
-
Click the Enter Coordinates icon on the Details Card.
-
Modify the details in the text box.
-
Click Save in the text box.
-
See Also
Set Projects for Automated Tracking
Things to Consider
-
Project must have locations with site boundaries to allow for automated project tracking.
Steps
-
Navigate to the Company level Equipment tool.
-
Click the settings
icon. -
Click the Automated Project Tracking tab.
-
Click Edit to see a list of all projects with geofenced 'Site Boundary' locations.
-
Mark the checkbox for each project you want to allow Automated Project Tracking.
-
Click Save.
Enable or Disable Equipment for Tracking
Things to Consider
Steps
Enable or Disable a Single Equipment Record
-
Navigate to the Company level Equipment tool.
-
Click the equipment ID for the record.
-
Click the Telematics tab.
-
Move the Automated Equipment Tracking toggle
 ON.
Bulk Enable or Disable
-
Navigate to the Company level Equipment tool.
-
Mark the checkbox for each equipment record you want to manage Automated Project Tracking for.
-
In the bulk actions menu, click More Options and select from the following:
-
Enable Automated Project Tracking
-
Disable Automated Project Tracking
-
Add and Remove Equipment from Projects
- Navigate to the company's Equipment tool.
- Mark the checkboxes for the equipment you want to assign.
- Click Add to Projects.
- Select the projects.
- Optional: For each project, move the toggle
 ON if the equipment has arrived onsite.
- Click Add.
Set Current Project
-
Set a Single Record
-
Bulk Set Equipment
Set Equipment Onsite
-
Navigate to the Company or Project level Equipment tool.
-
Inline, click the field in 'Onsite' column.
-
Company Level
-
Select the project to mark the equipment onsite, or click the X to remove it from onsite.
-
-
Project Level
-
Select Yes or No to indicate if equipment is onsite.
-
-
Set Equipment Onsite in Bulk
-
Navigate to the Company or Project level Equipment tool.
-
Mark the checkboxes for the equipment you want to assign.
-
Mark equipment onsite accordingly:
-
Company Level
-
Click Add to Projects.
-
Select the projects.
-
Optional: For each project, move the toggle
ON if the equipment has arrived onsite. -
Click Add.
-
-
Project Level
-
Click the Onsite drop-down menu and select Yes or No.
-
-
Edit Equipment Records
-
Update a Single Piece of Equipment
-
Bulk Update Equipment
Update a Single Piece of Equipment
-
Navigate to the company's Equipment tool.
Tip
You can edit the 'Status' and 'Onsite' columns inline, by clicking the field and making your selection. -
Edit the Equipment.
-
Click the Equipment ID number.
-
Hover over the equipment record and click the edit
icon.
-
-
-
Click Save.
Bulk Update Equipment
Tip
You can also bulk update equipment using the equipment import.-
Navigate to the company's Equipment tool.
-
Mark the checkbox for the relevant equipment.
-
Take any of the following steps:
-
Add to Projects
-
Click Add to Projects.
-
Mark the checkbox for each project, then click Add.
-
-
Update Status
-
Click Status and select the relevant status.
-
-
Update Onsite Status
-
Click Add to Projects.
-
Mark the checkbox for each project.
-
Move the 'Onsite' toggle
ON for each project. -
Click Add.
-
-
Delete Equipment Records
Delete a Single Record
- Navigate to the company's Equipment tool.
- Hover over the equipment record and click the delete icon.
- Click Delete to confirm.
Bulk Delete Records
- Navigate to the company's Equipment tool.
- Mark the checkboxes for the records you want to delete.
- Click Move to Recycle Bin.
- Click Delete to confirm.
Recover Equipment Records
Configure Columns
-
Navigate to the Company or Project level Equipment tool.
-
Configure your view.
-
Column Data
-
Click the table settings
 icon to configure what data is displayed in the table.
-
Move the toggles
ON or  OFF to show or hide a column.
The following fields are available:-
Assignees
-
Category
-
Equipment ID
-
Groups
-
Make
-
Model
-
Name
-
Notes
-
Onsite
-
Ownership
-
Projects (count; Company level only)
-
Rental Start Date
-
Rental End Date
-
Rate per Hour
-
Serial Number
-
Status
-
Type
-
Vehicles
-
Vendor
-
Year
-
-
-
Column Order
-
Click and hold the column header. Then move it to the desired location using a drag and drop operation.
-
-
Column Sort
-
Click the column. Click again to switch between ascending or descending order:
-
 Ascending
-
 Descending
-
-
-
Pinning and Sizing
-
Click the vertical ellipsis
 for the column. Then select from the following options:
-
Pin Column: Click to pin the column to a specific side or remove the pin.
-
Pin Left
-
Pin Right
-
No Pin
-
-
Autosize This Column: Click to automatically adjust the size of this column.
-
Autosize All Columns: Click to automatically adjust the size of all column.
-
Reset Columns: Click to reset the columns to the default settings.
-
-
-
Search and Filter
Details
-
Navigate to the company's Equipment tool.
-
Hover over the equipment record and click the edit
icon. -
Click the relevant tab to see information:
-
Information. Includes general information and specifications about the equipment.
-
Rates. Includes information about the equipment's cost and billable rates.
-
Telematics. Includes informations from your telematics integration.
-
Projects. Includes current projects where the equipment is assigned.
-
Maintenance Records. Includes information about maintenance records.
-
Change History. Includes changes made to the equipment record.
-
Enable Task Codes
- Navigate to the Company level Admin tool.
- Under 'Tool Settings', select Timesheets or My Time.
- Click the Task Codes tab.
- Take one of the following actions:
- Move the toggle to the ON position to enable task codes.
- Move the toggle to the OFF
 position to disable task codes.
- Move the toggle to the ON
Setup Equipment Configurable Fieldset for Timesheets
Configure Timesheets Settings
Things to Consider
Steps
Add Equipment Default Cost Type for timecard entries in the Company Timesheets tool.
- Navigate to the company's Timesheets tool.
- Click the Configure Settings
 icon.
- Click the Configurations tab.
- Under 'Limit Available Cost Codes by Cost Type', mark the checkboxes for Equipment and Labor.
Note: If Labor and Equipment are configured as your Default Cost Type for Timecards and Equipment, the word 'Default' will display instead of a checkmark.
To configure additional settings, see Configure Advanced Settings: Company Level Timesheets.
Add Equipment to Configurable Fieldsets
To use equipment in Inspections, the 'Equipment' field must be enabled on your Inspections fieldsets, and assigned to your projects.
Add Equipment to Existing Fieldset
- Navigate to the Company level Admin tool.
- Under 'Tool Settings', click Inspections.
- Click Edit next to the fieldset you want to modify.
- Click the toggle for Equipment to the ON position.
- For all other fields, click the toggle to the ON position to make the field visible in the section.
OR
Click the toggle to the OFF position to hide the field in the section. - Mark the 'Required' checkbox to designate the field as required.
OR
Clear the 'Required' checkbox to designate the field as optional.
Notes:- Fields without a checkbox are optional by default and cannot be changed to required.
- A gray marked checkbox
 indicates that the field is required by default and cannot be changed to optional.
- Click Save.
- In the 'Apply changes to [#] project(s)?' window, click Assign Projects to add the fieldset to projects.
- In the 'Assign Projects' window, mark the checkbox next to each project you want to apply the fieldset to and click Update.
- In the 'Apply changes to [#] project(s)?' window, click Confirm.
- Optional: To set a fieldset as the default for new projects, click the
 icon at the end of its row on the 'Fieldsets' tab and select Set as New Project Default.
Create a New Configurable Fieldset
- Navigate to the Company level Admin tool.
- Under 'Tool Settings', click Inspections.
- Click Create New across from the Inspection Type you want to configure fieldsets for.
- Enter a name for the fieldset and click Create.
- Click the toggle for Equipment to the ON position.
- For all other fields, click the toggle to the ON position to make the field visible in the section.
OR
Click the toggle to the OFF position to hide the field in the section. - Mark the 'Required' checkbox to designate the field as required.
OR
Clear the 'Required' checkbox to designate the field as optional.
Notes:- Fields without a checkbox are optional by default and cannot be changed to required.
- A gray marked checkbox indicates that the field is required by default and cannot be changed to optional.
- Click Save.
- In the 'Apply changes to [#] project(s)?' window, click Assign Projects to add the fieldset to projects.
- In the 'Assign Projects' window, mark the checkbox next to each project you want to apply the fieldset to and click Update.
- In the 'Apply changes to [#] project(s)?' window, click Confirm.
- Optional: To set a fieldset as the default for new projects, click the icon at the end of its row on the 'Fieldsets' tab and select Set as New Project Default.
Add Equipment to Company Inspection Templates
After the 'Equipment' field has been added to your fieldsets and assigned to projects, you can add the field to an existing inspection template or create a new template.
Add Equipment to Existing Template
- Navigate to the Company level Inspections tool.
- Click Edit next to the template you want to edit.
Note: It must have the same Inspection Type as the fieldset where the Equipment field was added (for example, Safety). - Under Inspection Items, add sections and items to your inspection as follows related to your equipment:
- + Add section: Click this button to add a section to your inspection template.
- + Add item: Click this button to add an item within the current section.
- + Quick Add: See What is Inspection Template Item Quick Add?
Note: You can reorder individual items within a section of your template by dragging your item with the reorder icon. To reorder an entire section, click the toggle on
 icon next to Reorder Sections and drag the sections of your choice. Turn off Reorder Sections to continue creating your template.
- + Add References: Click this button to attach files from your computer for additional inspection item details.
- Select a response type for individual items from the Response Type menu.
OR
To select the same response type for multiple items, mark the checkboxes next to the individual items or the section header, then click the Edit Response Type button. - To turn on inspection item requirements, tab or scroll over to the Require Observations On or Require Photos On columns.
Note: If the requirement is not provided by the user, the inspection response will not be saved. - Click Select a Response.
- Status: You can select either a 'Conforming' or 'Deficient' status, or you can select both.
- Responses: You can select either 'Pass', 'Fail', or 'N/A' responses, or you can select a combination of the three. You can also select 'Not Required'.
- Click 'X' to remove any of your response types.
- Click Update.
Create a New Template
- Navigate to the Company level Inspections tool.
- Click Create.
Note: You can also Clone an Existing Company Level Inspection Template. - Enter the General Information.
- For the Type, choose the Inspection Type that includes the Equipment in the configurable fieldset (for example, Safety).
Note: The Equipment field does not display in the template but is available when the inspection is created in a project. - Under Inspection Items, add sections and items to your inspection as follows related to your equipment:
- + Add section: Click this button to add a section to your inspection template.
- + Add item: Click this button to add an item within the current section.
- + Quick Add: See What is Inspection Template Item Quick Add?
Note: You can reorder individual items within a section of your template by dragging your item with the reorder icon. To reorder an entire section, click the toggle on icon next to Reorder Sections and drag the sections of your choice. Turn off Reorder Sections to continue creating your template. - + Add References: Click this button to attach files from your computer for additional inspection item details.
- Select a response type for individual items from the Response Type menu.
OR
To select the same response type for multiple items, mark the checkboxes next to the individual items or the section header, then click the Edit Response Type button. - To turn on inspection item requirements, tab or scroll over to the Require Observations On or Require Photos On columns.
Note: If the requirement is not provided by the user, the inspection response will not be saved. - Click Select a Response.
- Status: You can select either a 'Conforming' or 'Deficient' status, or you can select both.
- Responses: You can select either 'Pass', 'Fail', or 'N/A' responses, or you can select a combination of the three. You can also select 'Not Required'.
- Click 'X' to remove any of your response types.
- Click Create.
Assign Company Templates to Projects
- Navigate to the Project level Inspections tool.
- Click the Configure Settings icon.
Note: For more information on configuring your advanced settings, see Configure Advanced Settings: Inspections. - Click the Templates tab.
- Click Import Company Templates.
Note: This button will be disabled if you have not first Created a Company Level Inspection Template. - Mark the checkbox next to one or more company inspection templates to use on this project.
Notes:- Only templates that you haven't added to your project will appear for you to select.
- To narrow your options down, filter templates by Type or Trade by clicking the Add Filter drop-down menu.
- Click Import Templates.
Note: Project templates may be modified here throughout the duration of the project, but changes will only be reflected on project inspections that are created from the modified template.
Add Equipment to Project Inspection Templates
After the 'Equipment' field has been added to your fieldsets and assigned to projects, you can add the field to an existing inspection template or create a new template.
Add Equipment to Existing Template
- Navigate to the Project level Inspections tool.
- Click the Configure Settings icon.
- Click the Templates tab.
- Click Edit next to the template you want to edit.
Note: It must have the same Inspection Type as the fieldset where the Equipment field was added (for example, Safety). - Under Inspection Items, add sections and items to your inspection as follows related to your equipment:
- + Add section: Click this button to add a section to your inspection template.
- + Add item: Click this button to add an item within the current section.
- + Quick Add: See What is Inspection Template Item Quick Add?
Note: You can reorder individual items within a section of your template by dragging your item with the reorder icon. To reorder an entire section, click the toggle on icon next to Reorder Sections and drag the sections of your choice. Turn off Reorder Sections to continue creating your template. - + Add References: Click this button to attach files from your computer for additional inspection item details.
- Select a response type for individual items from the Response Type menu.
OR
To select the same response type for multiple items, mark the checkboxes next to the individual items or the section header, then click the Edit Response Type button. - To turn on inspection item requirements, tab or scroll over to the Require Observations On or Require Photos On columns.
Note: If the requirement is not provided by the user, the inspection response will not be saved. - Click Select a Response.
- Status: You can select either a 'Conforming' or 'Deficient' status, or you can select both.
- Responses: You can select either 'Pass', 'Fail', or 'N/A' responses, or you can select a combination of the three. You can also select 'Not Required'.
- Click 'X' to remove any of your response types.
- Click Update.
Create a New Inspection Template
- Navigate to the Project level Inspections tool.
- Click the Configure Settings icon.
- Click the Templates tab.
- Click Create.
- Enter the General Information.
- For the Type, choose the Inspection Type that includes the Equipment in the configurable fieldset (for example, Safety).
Note: The Equipment field does not display in the template but is available when the inspection is created in a project. - Under Inspection Items, add sections and items to your inspection as follows related to your equipment:
- + Add section: Click this button to add a section to your inspection template.
- + Add item: Click this button to add an item within the current section.
- + Quick Add: See What is Inspection Template Item Quick Add?
Note: You can reorder individual items within a section of your template by dragging your item with the reorder icon. To reorder an entire section, click the toggle on icon next to Reorder Sections and drag the sections of your choice. Turn off Reorder Sections to continue creating your template. - + Add References: Click this button to attach files from your computer for additional inspection item details.
- Select a response type for individual items from the Response Type menu.
OR
To select the same response type for multiple items, mark the checkboxes next to the individual items or the section header, then click the Edit Response Type button. - To turn on inspection item requirements, tab or scroll over to the Require Observations On or Require Photos On columns.
Note: If the requirement is not provided by the user, the inspection response will not be saved. - Click Select a Response.
- Status: You can select either a 'Conforming' or 'Deficient' status, or you can select both.
- Responses: You can select either 'Pass', 'Fail', or 'N/A' responses, or you can select a combination of the three. You can also select 'Not Required'.
- Click 'X' to remove any of your response types.
- Click Create.
Configure Settings for Daily Log
Add Tools to Projects
Important
If you have existing integrations for a project that depend on equipment listed in the Project Settings of the project Admin tool, we recommend NOT enabling Equipment tool at this time.
Enabling the Equipment tool on a project disables existing third party integrations for that project that rely on the equipment listed in the in the project's Admin tool.
- Navigate to the project's Admin tool.
- Under 'Project Settings', click Tool Settings.
- Move the relevant toggle to 'Active' to add the following tools to your project:
- Equipment
Tip
You can also enable the following tools that work with the Equipment tool:
- Budget
- Daily Log
- Incidents
- Inspections
- T&M Tickets
- Timesheets
- Equipment