Create a New Subcontractor Invoice as an Invoice Contact
For Procore Customers in the United States
 When your company applies the 'Owners English' or 'Specialty Contractors English' point-of-view dictionary, you'll see different tool names and term changes in the user interface. Learn how to apply the dictionary options.
- To learn the differences: Show/Hide
Objective
To create a new subcontractor invoice as an invoice contact on a commitment using the Commitments tool.
Background
As an invoice contact, you may receive an 'Invite to Bill' to remind you to submit an invoice. The subject line of the email message reads "Project Name: User Name has invited you to bill." If your 'Invite to Bill' is lost or missing (or if you are unsure whether an invoice administrator sent one), invoice contacts can always create a new invoice for a commitment.
Important
Things to Consider
- Required User Permissions:
- You must be an invoice contact on a commitment.
- You must submit your invoice before the 'Due Date' on the invoice.
Steps
- Step 1: Create a New Invoice in Procore
- Step 2: Enter an Invoice Number
- Step 3: Update the Schedule of Values
- Step 4: Add Attachments
- Step 5: Save or Submit an Invoice
Step 1: Create a New Invoice in Procore
- Navigate to the project's Commitments tool.
- Under the Contracts tab, locate the contract in the table. Then, click the Number link to open it.

- Click the Create Invoice button.
This opens the 'Create New Invoice' page.
Step 2: Enter an Invoice Number
- In the 'New Invoice for' page under 'General Information,' do the following:
- Enter the downstream collaborator's invoice number in the Invoice # box.
- Verify the information in the following fields. Procore automatically completes the following dates for you.
Note
The billing period dates on an invoice are set by the invoice administrator. These fields are required.
- Billing Date
Indicates the due date for the billing period. - Period Start
Indicates the start date for the billing period. - Period End
Indicates the end date for the billing period.
- Billing Date
- Continue with the next step.
Step 3: Update the Schedule of Values
- In the Schedule of Values section, click one (1) or both of the BLUE arrows next to 'Commitment Line Items' or 'Change Orders'. This expands the selected row in the table.
Notes
- The 'Change Orders' section is only visible and available when the company's Procore Administrator has enabled the two (2) or three (3) tier change order configuration on the commitment. See Configure the Number of Commitment Change Order Tiers.
- After expanding a line in the 'Change Orders' section, click the commitment change order line(s) and potential change order line(s) in order to expand them until you reach the data entry line items.
- Determine which accounting method was set for the contract. This determines which data entry form you use to update the Schedule of Values:
- Amount Based Accounting Method
- Unit-Based Accounting Method
Tip
How does an invoice administrator set the accounting method for a contract? For step-by-step instructions, see How do I set the accounting method for a contract or funding?
Amount Based Accounting Method
Use this method to invoice lump-sum amounts for the invoice line items on the Schedule of Values (SOV). Procore automatically calculates and adjusts the other entries on the line item for you. If you want to release retainage, enter a dollar amount as needed. Depending on your specific commitment, you may also have the option to bill for stored materials. See About Stored Materials on Invoices.
Click here for more detailed information about the Amount Based accounting method.
Unit-Based Accounting Method
Use this method when invoicing for materials you've ordered in quantity. With this method, you either enter a percentage value 'Total Progress' column or a monetary value in the 'Work Progress' column. Procore automatically calculates and adjusts the other entries on the line item for you. If you want to release retainage, you can enter a dollar amount in the 'Retainage Released' column needed. Depending on your specific commitment, you may also have the option to bill for stored materials. See About Stored Materials on Invoices.
Click here for more detailed information about the Unit-Based accounting method.
The Unit-Based accounting method requires you to enter a quantity and unit price for each line item on the SOV. With this method, Procore automatically calculates line item totals for you.
Note
An asterisk (*) in the list below indicates that you can edit the value of the SOV line item on your invoice.- Quantity
Shows the total number of units for the line item. - Unit Price
Shows the expense incurred for each unit for the line item. - Value
Shows the total dollar amount of the line item. This is the sum of the Unit Price + Quantity values. - Previous Quantity
Shows the total number of units invoiced in previous billing periods. - Previous Value
Shows the total dollar amount invoiced in previous billing periods. - Total Progress %.*
Enter a percentage amount that reflects your total progress. Your entry must reflect the cumulative progress of any previous billing periods and the current billing period. - New Quantity.*
Enter a new quantity to reflect the quantity being billed this period on the new invoice.Note
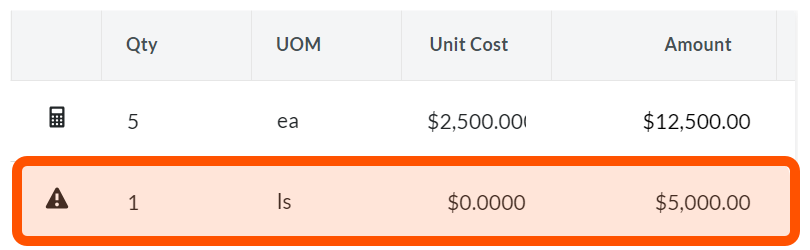
A
 calculator icon indicates that Procore automatically calculates the line item's Amount based on the entries in the Qty, UOM, and Unit Cost fields. Click here to see an example.
 - New Value.*
Enter a new value to reflect the value of the line item being billed this period on the new invoice.Note
A
 warning icon indicates a user's Amount entry overrides the automatic calculation with a custom amount. Click here to see an example.
 - Retainage Released.*
Enter a dollar amount of retainage to be released this billing period. - Total Retainage
Shows the total dollar amount of retainage to be released for the line item.
Step 4: Add Attachments
If you have any files to add as an attachment to the invoice, you can add them now. For example, you might be required to add a lien waiver or a signed PDF copy of the invoice.
- Scroll to the Attachments section.
- Click Attach Files or use a drag-and-drop operation to move the files from your computer or network to the GRAY area of the page.

- Upload any files that may be required from your computer.
Notes
- Collaborators and users with 'Standard' level permissions on the project's Commitments tool can use the Attach Files option after an invoice is 'Approved'.
- Continue with the next step.
Step 5: Save as Draft or Send for Review
If you are ready to submit the invoice for review, you may do so now. If you want to submit the invoice at a later time, you have the option to save the invoice. Choose one (1) of these options:

- If you are NOT ready to send the invoice, click Save as Draft. This sets the invoice's status to Draft.
OR
Tip
If you want to email a copy of your invoice to others before submitting it for review, Procore recommends following the steps in Export a Subcontractor Invoice. You can then add your invoice as an attachment to a message using your company's email system. - If you are ready to send the invoice, click Send. This automatically sets the invoice's status to Under Review.
Important
- You will NOT be able to edit the invoice after you send it unless an invoice administrator changes the invoice's status to 'Revise & Resubmit.' For details, see Review a Subcontractor Invoice as an Admin.
- To learn more about statuses, see What are the default statuses for Procore invoices?