Payee: Setup Guide
Table of Contents
- Welcome
- Enable the Pay Tool
- Accept Employee Requests (Admins)
- Manage Pay Permissions
- Set Up Your Bank Account
- Success
Get Started as a Payee
 |
This Payee Setup Guide provides specialty contractors with setup and configuration information so you can receive payments from a general contractor using Procore Pay. Your company must have it's own free or paid company Procore account to receive payments. This guide provides an overview of Procore Pay and shows you how to:
Tip for Specialty ContractorsAre you a Specialty Contractor onboarding to Procore Pay? To learn about the start-to-finish process, visit the Procore website and sign up to view the Procore Pay Subcontractor Onboarding webinar here |
|
|
|

What is Pay?
Important
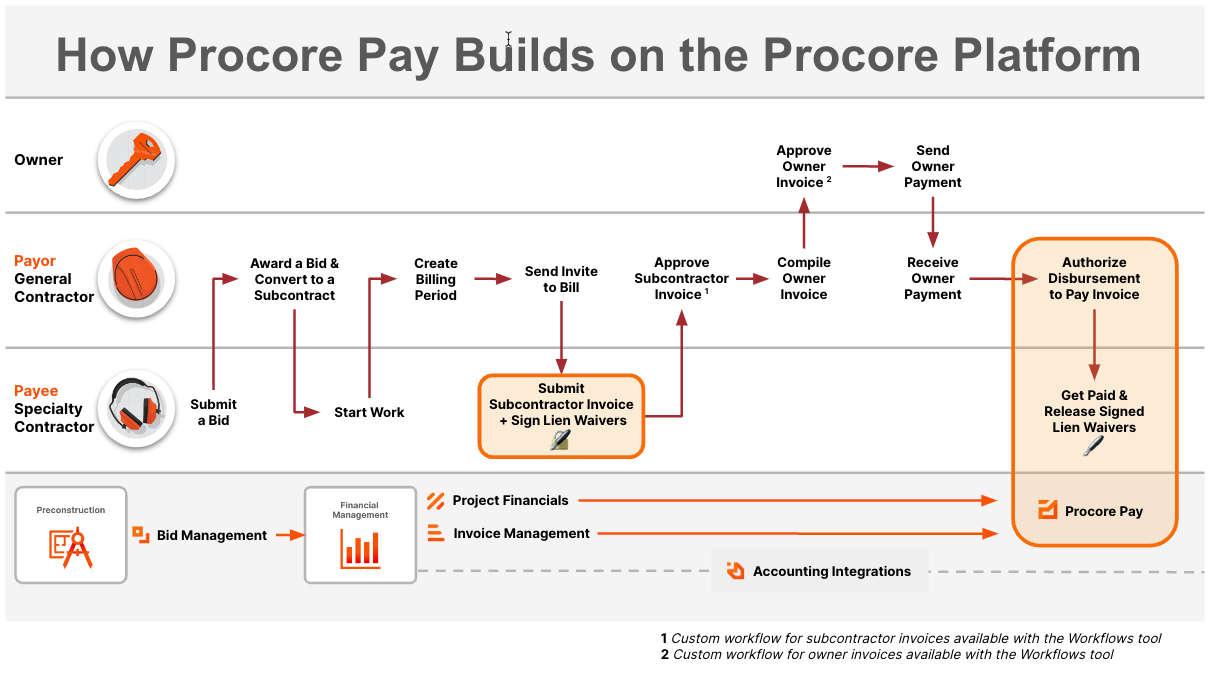
Author note: Link to source file: https://docs.google.com/presentation...98af4431df_0_0Pay builds on the existing Project Financials and Invoice Management tools in Procore to streamline the subcontractor invoice payment process and automate the lien waiver exchange.
Accept an Invitation from a Payor
- Go to your email client and look for the Procore Pay email.
The subject line is "Set Up Procore Pay to Receive Payments from [Company Name]."

Important
Are you authorized to establish your company's Procore account and add its bank account information to Procore Pay? If you are not the correct person to set up your company’s Procore account or add bank information to Procore Pay, click Reassign Invite now and follow the steps Reassign a Procore Pay Invitation to assign this task to the appropriate person at your company.
- Click Open Procore.
This opens the 'You Have Been Invited to Receive Payments Through Procore Pay' page.

- Click Get Started.
The steps depend on whether your company has a Procore company account:Once you know the answer, choose the scenario that best applies to your company:Tip
Unsure if your company has a Procore account? See How can I tell if I have a free or paid Procore company account?
Scenario 1: Your Company Does Not Have a Procore Account
If your company needs a Procore account, you can set up a free Procore account, add your bank information, and accept any existing Procore Pay Agreements.
Click here to view the steps.
- At the Log in to your Account page, enter your email and password. Then click Log In.
This opens the Business Details page. - Under Set Up Your Business.
- Enter the following information for your company:

- Legal Business Name. Enter your company's business name as it appears on legal documents and tax forms.
- Doing Business As. Enter your company's doing business as name.
- Business EIN. Enter your business's Employer Identification Number (EIN).
- Street Address. Enter the primary street address of your company's physical location. This should include the building number and street name.
- Street Address Line 2. Enter any additional address information necessary to ensure accurate mail delivery. This may include a suite number, floor number, or other relevant details. If no additional information is needed, leave this field blank.
- City. Enter the city in which your company's business address is located.
- State. Enter the state in which your company's business address is located.
- Zip Code. Enter the postal code for your company's business address.
- Country. Enter the country where your company's business address is located. To use Procore Pay, your business must be located in the United States.
- Phone Number. Enter the primary telephone number for your business.
- Click Next.
The system searches for any existing company records that match your entry. - In the Add Your Bank to Receive Payments page, enter the following:
Important
Are you authorized to add its bank account information to Procore Pay? If you are not the correct person to add bank information to Procore Pay, click Reassign now and assign the task to your Company Admin.

- Bank Nickname. A unique nickname for your company's bank account.
Tip
Why does an account need a nickname? A bank account requires a nickname to help you identify the account. It protects your financial privacy by eliminating the need to provide the payment distributors with your full account number. - Account Number. Your company's bank account number. Account numbers can be up to 17 digits.
- Re-Enter Account Number. Your company's bank account number. Account numbers can be up to 17 digits.
- Routing Number. Your company's bank account's nine (9) digit American Banking Association (ABA) routing transit number. It is typically printed on the bottom of your checks.
- Account Type. Click Checking or Savings.
- Bank Nickname. A unique nickname for your company's bank account.
- Click Add Bank.
This opens the Review Procore Pay Agreement page. See What is a 'Procore Pay Agreement'? - Choose from these options:
- If there are no Procore Pay Agreements currently available, click Continue. This opens the Welcome to Your Payments Dashboard page. To learn more, see Get Started: Payee Guides.
- If there is a current Procore Pay Agreement, review its Fee Details. If you have multiple agreements available, review and accept each one. See Are there fees for Procore Pay payments?
- Under Payment Method, enter a payment method for the Procore Pay fee:

- Card Number. Enter the credit card number.
- CVC. Enter the card verification code. The location of this code on the card varies by credit card company.
- Expiration date. Enter the credit card's expiration date.
- Set a Default Payment. Mark the checkbox if this should be the default payment method for processing fees.
- Cardholder Name. Enter the holder's name as it appears on the card.
- Email Address. Enter a valid email address for the cardholder.
- Address 1. Enter the cardholder's primary address.
- Address 2. Enter additional address information.
- City. Enter the cardholder's city.
- State. Enter the cardholder's state.
- Postal Code. Enter the postal code.
- Country. Enter the country.
- Contact Phone Number. Enter the cardholder's telephone number.
- Click Accept Agreement.
This opens the Welcome to Your Payments Dashboard page. To learn more, see Get Started: Payee Guides.
Scenario 2: Your Company Has an Existing Procore Account (Free or Paid Subscription)
If your company has an existing Procore account (free account or paid subscription), you can connect that company account, add your bank information, and accept any existing Procore Pay Agreements.
Click here to view the steps.
- At the Log in to your Account page, enter your email and password. Then click Log In.
This opens the Business Details page. - Under Confirm Your Company, a list of matching businesses appears.

- If you see the correct company name and address in the list, click Select.
The system displays a message for you to confirm the setup.
Caution
Double-check the company name and address before clicking Confirm. This action is permanent. If you confirm the wrong company by mistake, you cannot reverse it. Contact support@procore.com to report your mistake.

- At the Set Up Procore Pay confirmation, click Continue.
Note
If you don't have a linked bank account, the Add Your Bank to Receive Payments page appears. If you have already added a bank account, you can click the More icon to change your company's default bank account or you can add a new one by clicking Link Bank Account. To learn more, see Add a Bank Account as a Payee. - In the Add Your Bank to Receive Payments page, enter the following:
- Bank Nickname. A unique nickname for your company's bank account
- Account Number. Your company's bank account number. Account numbers can be up to 17 digits.
- Re-Enter Account Number. Your company's bank account number. Account numbers can be up to 17 digits.
- Routing Number. Your company's bank account's nine (9) digit American Banking Association (ABA) routing transit number. It is typically printed on the bottom of your checks.
- Account Type. Click Checking or Savings.
- Click Add Bank.
- Click Next.
This opens the Review Procore Pay Agreement page. See What is a 'Procore Pay Agreement'? - Choose from these options:
- If there are no Procore Pay Agreements currently available, click Continue. This opens the Welcome to Your Payments Dashboard page. To learn more, see Get Started: Payee Guides.
- If there is a current Procore Pay Agreement, review its Fee Details. If you have multiple agreements available, review and accept each one. See Are there fees for Procore Pay payments?
- Under Payment Method, enter a payment method for the Procore Pay fee:
- Card Number. Enter the credit card number.
- CVC. Enter the card verification code. The location of this code on the card varies by credit card company.
- Expiration date. Enter the credit card's expiration date.
- Set a Default Payment. Mark the checkbox if this should be the default payment method for processing fees.
- Cardholder Name. Enter the holder's name as it appears on the card.
- Email Address. Enter a valid email address for the cardholder.
- Address 1. Enter the cardholder's primary address.
- Address 2. Enter additional address information.
- City. Enter the cardholder's city.
- State. Enter the cardholder's state.
- Postal Code. Enter the postal code.
- Country. Enter the country.
- Contact Phone Number. Enter the cardholder's telephone number.
- Click Accept Agreement.
This opens the Welcome to Your Payments Dashboard page. To learn more, see Get Started: Payee Guides.
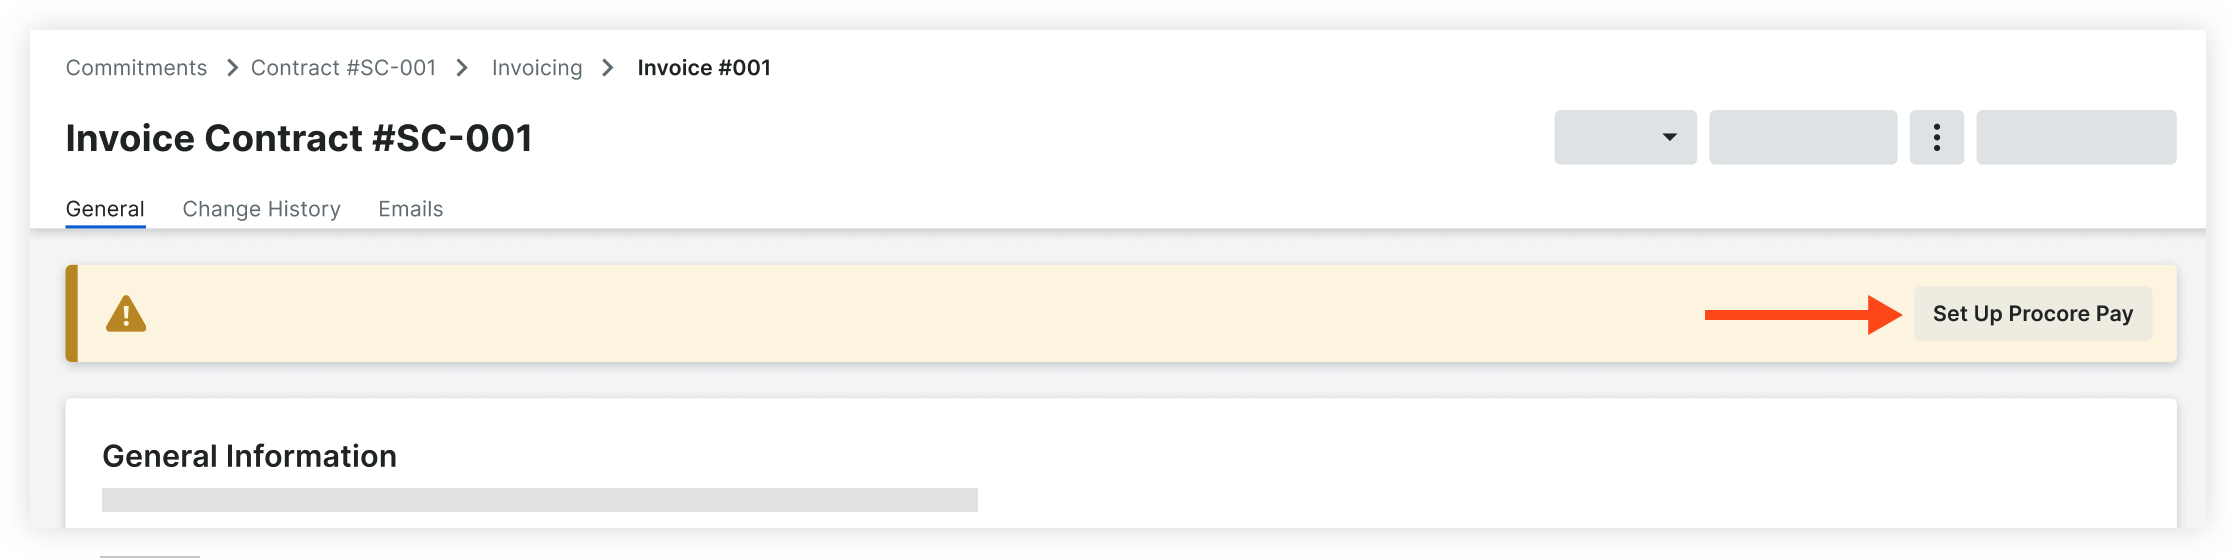
Request the Pay Tool as an Invoice Contact
- Navigate to the project's Commitments tool.
- Under the Contracts tab, locate your commitment contract. Then, click the number link to open it.
- In the commitment contract, click the Invoices tab.
- Locate the invoice and click the invoice number link.
- Click Set Up Procore Pay in the banner.
Note: The banner is only visible if the general contractor is able to make payments through Procore Pay.
- To receive payments through Procore, your company must have its own Procore Company Account. You will be prompted to log in with your existing log in credentials to identify whether you are marked as an employee on an existing free or paid company account. See How can I tell if I have a free or paid Procore company account?
Depending on your account, the following will happen:- No Company Account
- If your company does not have its own free or paid account, you will be prompted to create a free Procore company account and add a bank account.
- Paid Company Account
- If your company has its own paid account and you are marked as an employee, users with 'Company Admin' permissions at your company will receive an email inviting them finish setting up the Payments tool and link a bank account.
- Free Company Account
- If your company has its own free account and you are listed on their Team page, users with 'System Administrator' permissions at your company will receive an email inviting them finish setting up the Payments tool and link a bank account.
- No Company Account
PROCORE SUPPORT: INTERNAL NOTES
If a user is already an employee of the company, after they request Procore Pay, all current 'Company Admins' or 'System Administrators' will have a 'Payment Admin' permission applied to their permission settings on the back end. Current Payment Admins are visible in the Payment Settings.
If the user needs to first be added as an employee, they can search companies and request to join. When they join, they are marked as an employee of that company and assigned a permission level. After they are marked as an employee, the 'Payment Admin' permission is added to all current 'Company Admins' or 'System Administrators'.
Especially for paying customers, it may not make sense for an Invoice Contact to have 'Company Admin' level permissions in Procore. Because the 'Payment Admin' permission is applied to all current 'Company Admins' or 'System Administrators', the Invoice Contact does not need to have 'Company Admin' or 'System Administrator' permissions themselves. Options:
- Another user with 'Company Admin' or 'System Administrator' permissions can take the next step and add a bank account.
- The Company or System Admins can take an additional step to add the user as a Payment Admin. This is an additive permission to their assigned permission template in Procore.
What are employee requests?
Paid Accounts - Accept Employee Request
Free Accounts - Accept Employee Request
Manage Pay Permissions
Important
Author notes:
- Log page changes in https://procoretech.atlassian.net/browse/ILR-502
- Content is reused in the Payee Setup Guide
General Availability in Select Markets (United States)
 Procore Pay
 Objective
To manage payment permissions as a payee for Procore Pay.
Background
Payment Administrators have access to the Payments tool and permissions to take any action within the tool. When the tool is initially set up for a payee company, either by setting up Procore Pay or accepting an invitation to Procore Pay, the existing Company Administrators and System Administrators are given Payment Administrator permissions.
After the initial set up, Payment Administrator permissions are managed solely in the Payments tool.
Things to Consider
- Required User Permissions
- After Procore Pay has been enabled for your company, permissions to the Payments tool are solely managed in the Payments tool. Newly created Company Administrators or Systems Administrators are NOT automatically given Payment Administrator permissions.
Prerequisites
Pay must be enabled for your company's Procore account:
Steps
Add Payment Administrator
- Navigate to your company's homepage. See How do I change companies?
- Navigate to the Payments tool.
- Click the Configure Settings
 icon.
icon. - In the Payment Processing Tab, click Payments Permissions.
- Click Add Admins.
- Select the user and click Continue.
- Click Add Payments Admin to confirm.
Remove Payment Administrator
- Navigate to your company's homepage. See How do I change companies?
- Navigate to the Payments tool.
- Click the Configure Settings icon.
- Click Payments Permissions.
- Click the delete
 icon next to the user you want to remove as a Payments Administrator.
 - Click Delete Admin to confirm.
Add Your Bank Account
- Navigate to your company's homepage. See How do I change companies?
- Navigate to the Payments tool.
- Click the Configure Settings icon.
- Click External Bank Accounts.
- Click Add External Account.
- If prompted, re-enter the Account Number for the current default bank account. Then click Next.
- Enter your company's Business Details.
- Business Name on Bank Account. Your company's name as it appears on your bank account.
- Doing Business As. The name your company does business as. This may be the same or different than your legal business name.
- Business EIN. Your Business EIN for the Internal Revenue Service (IRS).
Note
Your Business EIN must be a valid Taxpayer Identification Number for the IRS. This information is used by the service provider to verify the identity of the bank account linked to Procore Pay. Acceptable entry options include these numbers:
- Social Security Number (SSN)
- Individual Taxpayer Identification Number (ITIN)
- Employer Identification Number (EIN)
- Street Address. Your company's street address.
- City. Your company's city.
- State. Your company's valid state or territory abbreviation.
- ZIP Code. Your company's valid ZIP code.
- Phone Number. Your company's telephone number with an area code.
- Click Next.
- Enter your company's Bank Information.
- Bank Nickname. A unique nickname for your company's bank account.
Tip
Why does an account need a nickname? A bank account requires a nickname to help you identify an account. It protects your financial privacy by eliminating the need to provide the payment distributors with your full account number. - Account Number. Your company's bank account number. Account numbers can be up to 17 digits.
- Re-Enter Account Number. Your company's bank account number. Account numbers can be up to 17 digits.
- Routing Number. Your company's bank account's nine (9) digit American Banking Association (ABA) routing transit number. It is typically printed on the bottom of your checks.
- Account Type. Click Checking or Savings.
- Bank Nickname. A unique nickname for your company's bank account.
- Read the Terms and Conditions.
- Mark the checkbox confirming that you read and accept Procore's User Terms of Service.
- Click Submit.
Upload Bank Verification Documentation
Important
Author notes:
- Log page changes in https://procoretech.atlassian.net/browse/ILR-455
- Content is reused in the Payee Setup Guide
NOTE: This article is linked in the Procore app under the Payments tool in External Bank Account Section.
General Availability in Select Markets (United States)
Procore Pay Objective
To add documentation to verify your bank information as a payee using Procore Pay.
Background
With Procore Pay, a payee must add a bank account to receive payments. You may be required to upload an acceptable document to verify your bank account.
Things to Consider
- Required User Permissions
Note: Permissions differ based on whether your company has a free or paid Procore account. See How can I tell if I have a free or paid Procore account? - An acceptable document to verify your bank account is in the form of a bank issued statement:
- issued within the last three (3) months.
- includes the bank's name.
- includes your company's account name.
- reflects at least the last four (4) digits of your company's account number.
Note: You can hide or redact sensitive data, like account balances and transactions. -
Important
If your statement does not meet all the requirements above, an agent may reach out to obtain additional documentation to help verify your account.
Prerequisites
Steps
- Navigate to your company's homepage. See How do I change companies?
- Navigate to the Payments tool.
- Click the Configure Settings icon.
- Click External Bank Accounts.
- Click Upload next to the account with the 'Pending Verification' status.
- Click or drag and drop your document from your computer into the box.
- Click Send Document.
- Click Close.
Next Step
- The payor must approve your bank account. See Approve a Beneficiary Bank Account as a Payor.
Troubleshooting: Bank Information
For Procore Pay companies, you must link your bank account information to the system to send or receive payments. Once your account is verified, payors can send payments and payees can receive payments. To find this information, see the bottom of the bank account's checks or contact the banking service provider.
