View Drawings
Steps
View Drawings
- Navigate to the project's Drawings tool.
- If your project uses drawing areas, click the drawing area you want to open. See What are Drawing Areas?
- The page will automatically open to the Current Drawings page.
Note: This shows the list of drawings that are current, based on the drawing revisions that have been uploaded. - The following information is displayed for each drawing:
- Drawing No.
- Drawing Title
- Revision
- Drawing Date
- Received Date
- Set
- Status
- Optional: Search or filter drawings from this page. See Search for and Filter Drawings.
- To view all drawings in the project or drawing area:
- Click Drawing Sets.
- From the Thumbnails
 view, click the drawing set you want to open.
OR - From the List
 view, click View next to the drawing set you want to open.
- From the Thumbnails
- Click Drawing Sets.
- To view a list of all drawings (including those marked as obsolete), click All Sets and Revisions. See View the All Sets and Revisions Report.
View Drawing Information
- Navigate to the project's Drawings tool.
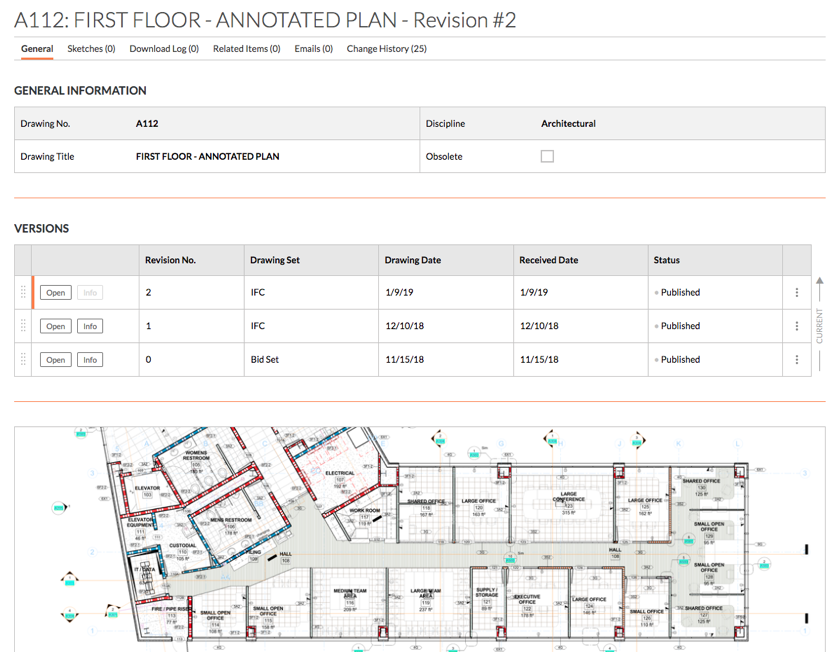
- Click Info next to the drawing you want to view.
Note: You will see an image of the drawing and its general information. Additional information can be found within the related tabs (Sketches, Download Log, Related Items, Emails, and Change History).

Note:- Most fields can be edited in-line while viewing a drawing. See Edit Drawings.
- If you want to reorder revisions of the drawing, click the grip handle (⁞⁞) next to a drawing version and use a drag-and-drop operation to place them into a new order. See Reorder Revisions of a Drawing.
Open a Drawing in the Viewer
You can open drawings to see a larger version of the drawing. From the viewer mode, you can also add markups to the drawing, use the search bar, view detailed information, and download the drawing.
- Navigate to the project's Drawing tool.
- Click Open next to the drawing that you want to view in full-screen mode.
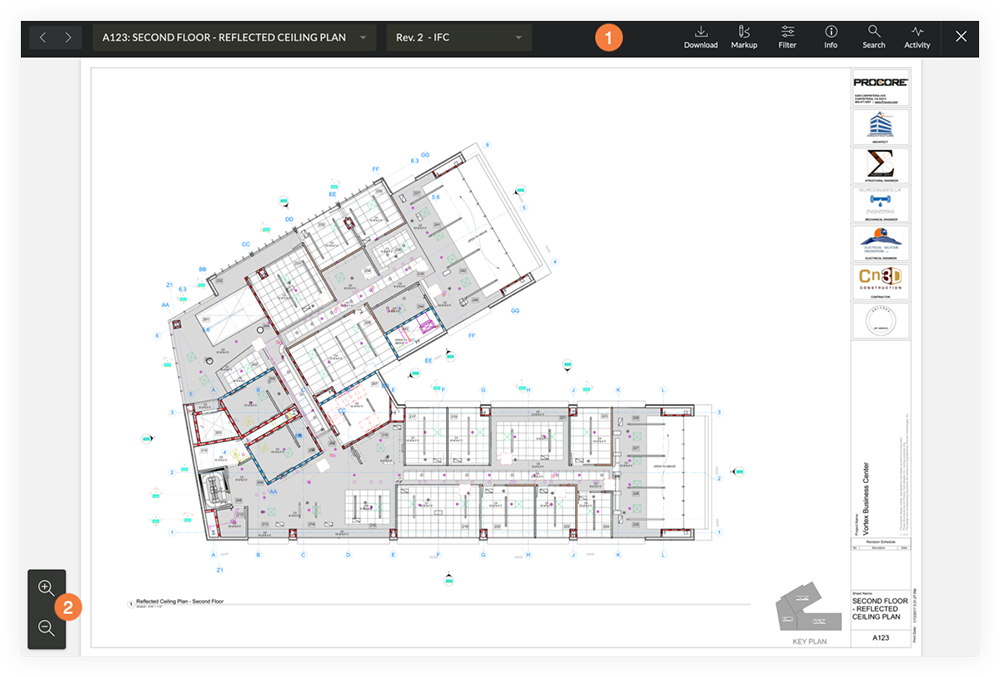
Note: This opens the drawing in the full-screen viewer. - The following information and actions are available in full-screen mode:

 Viewer Toolbar:
- Drawing Navigation: Clicking the forward and backward arrow icons to switch between different drawings or revisions. Use the drop-down menus to navigate to different drawings or drawing revisions.
Tip! You can also press the arrow keys on your keyboard to browse through different drawings and revisions.- Left Arrow: Previous drawing.
- Right Arrow: Next drawing.
- Up Arrow: Newer revision of the drawing.
- Down Arrow: Older revision of the drawing.
- Download: Click to download the drawing to your computer. See Download a Drawing from the Viewer.
Note: When downloading a drawing from the Viewer, all personal and published markups on the revision are included. - Markup: Click to open the markup toolbar. See Mark Up a Drawing.
- Filter: Click to filter between layers and markup types on the drawing. See Filter Drawing Markups.
- Info: Click to view general information about the drawing. Click Go to Info Page to navigate back to the Info page.
- Search: Click to initiate a drawings search. See Search for and Filter Drawings.
- Activity: Click to view any markup activity for the drawing.
- Exit: Click the X to exit out of the viewer.
 Viewing Options:
- Zoom in or out of the drawing by clicking the magnifying glass + and - icons.
- Pan across a drawing by clicking and dragging on the drawing.

