Add a Procore Project to Sage 300 CRE®
Objective
To create a new project in Procore and export it to an integrated Sage 300 CRE® system as a new job with a unique Sage 300 CRE® Job ID.
Background
You can create a new project in Procore and send it to your company's ERP Integrations tool to be reviewed by an accounting approver. Upon acceptance, Procore exports the project and the connector creates a new 'Job' with a unique 'Job ID' in Sage 300 CRE®.
To add a Procore project to Sage 300 CRE®:
- Setup the Sage 300 CRE® Connector. See Sage 300 CRE®: Setup Guide.
- Follow the Steps below to create a Procore project.
- Copy the "Sage 300 CRE® Cost Codes" list to your Procore project.
- Assign at least one (1) cost type to each cost code.
- Send all of your new project information to the ERP Integrations tool for accounting approval.
After an accounting approver reviews and submits an 'Accept' response for the Procore project in the ERP Integrations tool (see Accept or Reject a Project for Export to Sage 300 CRE®), Procore will export the project during the synchronization process.
In addition to creating a new 'Job' and 'Job ID' in Sage 300 CRE®, the following project information in Procore will be synced with your new Sage 300 CRE® job:
- Cost Codes
- Cost Types
- Job Cost Data (see the 'Job Costs' subtab)
Things to Consider
- Required User Permissions:
- Prerequisites:
- With the help of your Procore point of contact, the setup of a Job ID Format (e.g., 12-324.12) is required, this configuration is often times completed during the initial implementation of the Sage 300 CRE® Integration. This is required to validate that the new Procore project's corresponding Sage 300 CRE® 'Job ID' matches the format specified in Sage 300 CRE®.
Important! If you attempt to export a new Procore project to Sage 300 CRE® and the Sage 300 CRE® Job ID that doesn't match the specified format, the synchronization an error message will notify you about synchronization failure.
- With the help of your Procore point of contact, the setup of a Job ID Format (e.g., 12-324.12) is required, this configuration is often times completed during the initial implementation of the Sage 300 CRE® Integration. This is required to validate that the new Procore project's corresponding Sage 300 CRE® 'Job ID' matches the format specified in Sage 300 CRE®.
- Requirements:
- All cost codes must have at least one (1) cost type assignment before the Procore project can be exported to create a new Job in Sage 300 CRE®.
- If your cost codes already have cost type assignments, your company has already configured the cost type assignments for your cost codes. For details, see Assign Default Cost Types to Cost Codes.
- When entering your project data, be aware of the following requirements:
- Project Name. Sage 300 CRE® imposes a maximum of thirty (30) characters limit. If your project name exceeds this limit, your project name will be truncated in Sage 300 CRE®.
- Project Address. Sage 300 CRE® does not permit the use of commas (,) in the 'Project Address' field.
- Active Project. Sage 300 CRE® requires you to set your new project is 'Active' in Procore.
- Limitations:
- Cost Code Cost Type Assignments cannot be selected when the Budget tool is enabled. Instead of you these options:
- Set up all of the cost codes on the budget with the appropriate cost type assignments as shown below. This will automatically set the cost types in the project's Admin tool and then export it to Sage 300 CRE® during the sync process.
OR - Temporarily remove the project's Budget tool from the project. Next, set all of the cost type assignments. Then, add the Budget tool back to the project. See Add and Remove Tools on a Project.
- Set up all of the cost codes on the budget with the appropriate cost type assignments as shown below. This will automatically set the cost types in the project's Admin tool and then export it to Sage 300 CRE® during the sync process.
- Cost Code Cost Type Assignments cannot be selected when the Budget tool is enabled. Instead of you these options:
- Additional Information:
- Before you can sync data project data between the two (2) systems, your Procore point of contact must enable the 'Can Push to Accounting' privilege for your company's accounting approvers. See What is the Accounting Approver role? This gives users with 'Standard' level permissions to the ERP Integrations tool permission to accept or reject the data that is synced between Procore and Sage 300 CRE®. See Accept or Reject a Project for Export to Sage 300 CRE®.
Steps
- Launch the Project Creation Assistant
- Add Project Details
- Add and Remove Tools in the Project Toolbox
- Add Project Cost Codes
- Assign Default Cost Types to Cost Codes
- Send a New Project to the ERP Integrations Tool
- Update Directory
- Upload Drawings
- Upload Specifications
- Upload Schedule
Launch the Project Creation Assistant
Add Project Details
- Make sure Project Details is highlighted in the right sidebar.
- Under General Information, do the following:

-
Under ERP Integration, do the following (Note: this step is only relevant to companies that are integrated with certain ERP systems):

- Allow project to be synced with ERP. Leave this checkbox marked if you plan to sync any part of the project's financials with your ERP software. This will ensure that the ERP Standard cost code list will be available to select from when configuring your Project Level cost codes.
Important
- This checkbox will be marked by default if your company has an available set of ERP cost codes, unless the template the project is created from does not have this box marked.
- If you plan to sync your new Procore project with your ERP software you MUST leave this checkbox marked. If you un-mark this box, you will not be able to re-mark it later if cost codes from a different Company Level list have been copied to the Project Level list in the Project Admin tool.
-
Under Project Location, do the following:
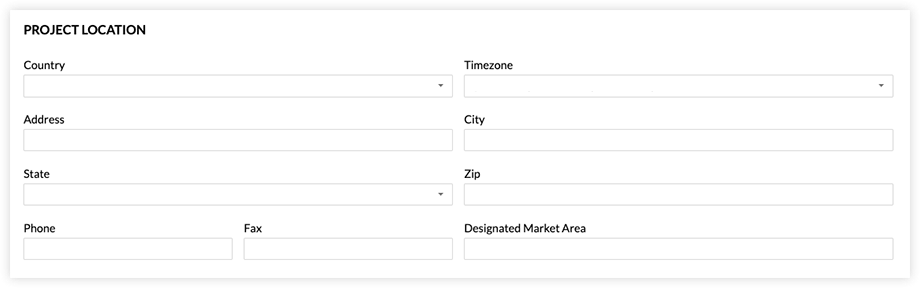
- Under Advanced, do the following:
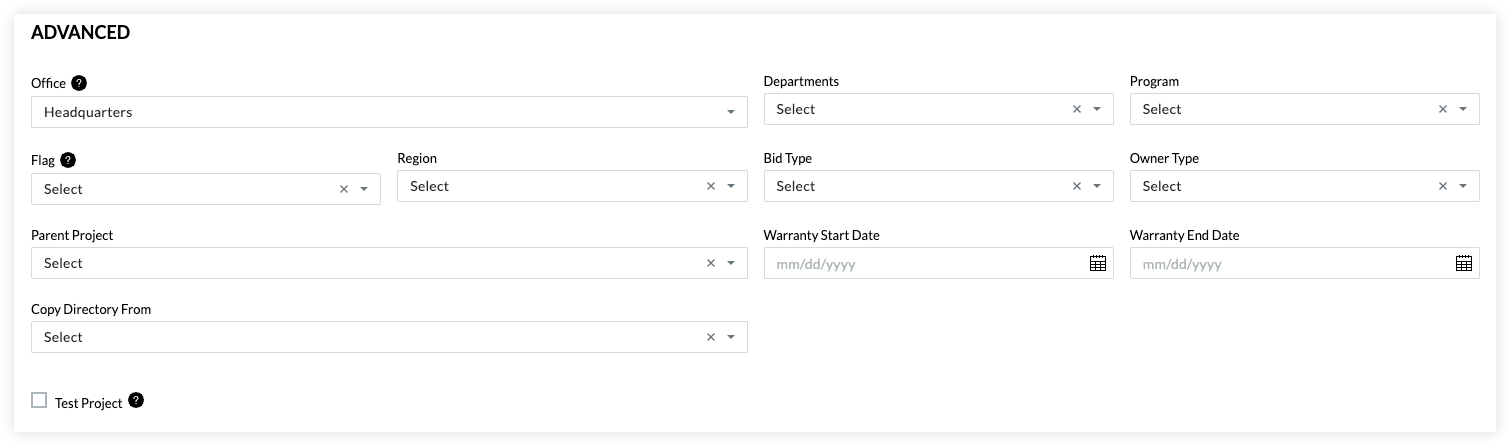
- Click Create Project.
- If you applied a project template and the template defines the desired project tools, you will skip to Add Project Cost Codes.
- If you did not apply a project template or your template does not define the desired project tools, you will continue with Add and Remove Tools in the Project Toolbox.
- Choose from these next steps:
Add and Remove Tools in the Project Toolbox
Add Project Cost Codes
- Make sure Cost Code in highlighted in the right sidebar.
This reveals the cost code page for your new project. - Copy the desired codes to your project as follows:
- Copy All Codes
To copy all of the codes from the Sage 300 CRE® Standard Cost Code list:- Click Copy All Codes.
The system reveals the following confirmation message: "Once you add this cost code, the source list cannot be changed." - Click OK to acknowledge the confirmation message.
This moves all the codes in the Sage 300 CRE® Standard Cost Code List to the Project Cost Codes list.
- Click Copy All Codes.
- Copy Selected Codes
To copy only selected codes from the Sage 300 CRE® Standard Cost Code list:- Expand the desired division folder(s).
- Highlight the desired cost codes.
- Click Copy Selected Codes.
- Copy All Codes
- Click Next.
The system reveals the Cost Type Assignments page.
Assign Default Cost Types to Cost Codes
- Stay on the Cost Code page.
The system reveals the Cost Types Assignments page. - For each cost code listed, mark one (1) or more checkboxes to assign each code to one (1) or more cost type.
Important!- To sync cost codes with Sage 300 CRE®, every project cost code must be assigned at least one (1) cost type.
- If your company's Procore account is using the Procore + Sage 300 CRE® connector, Cost Types are created and maintained in Sage 300 CRE®.
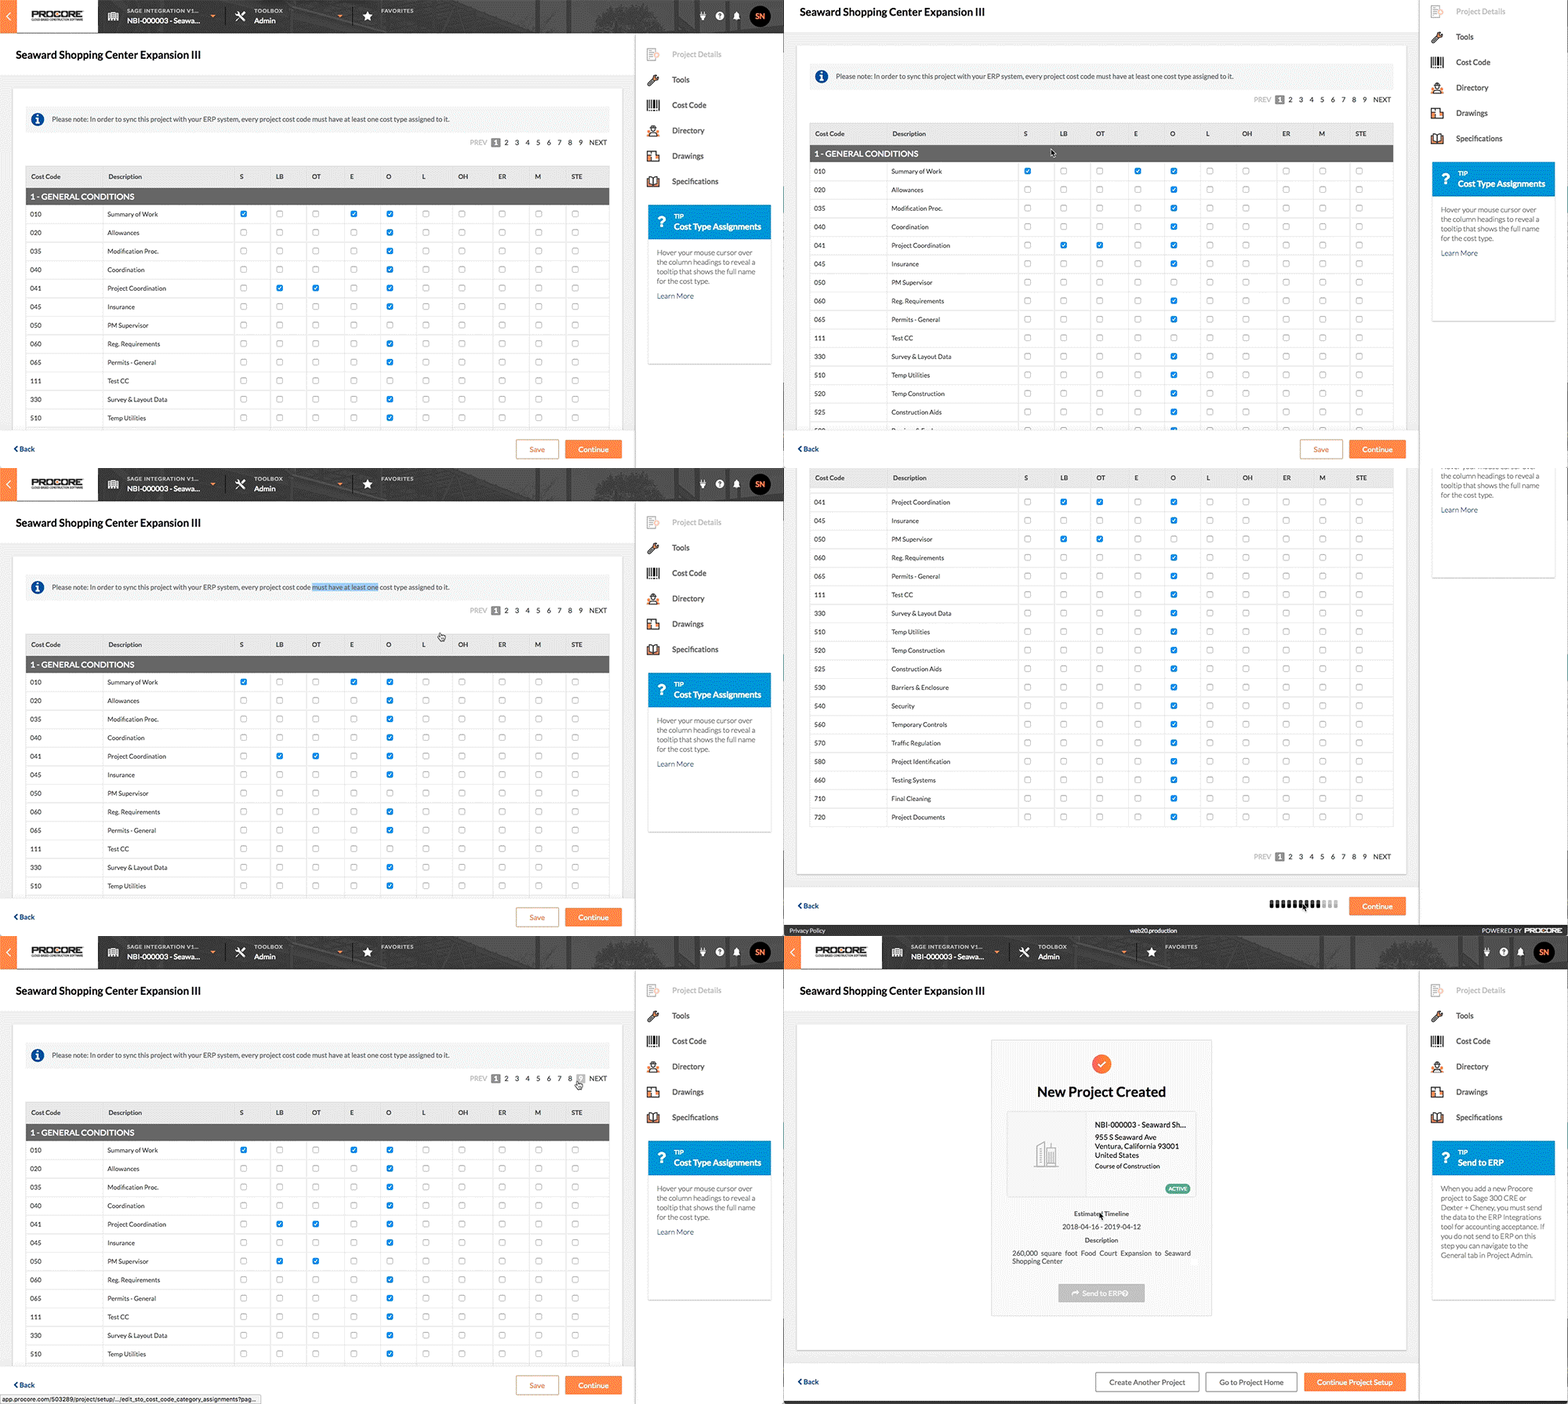
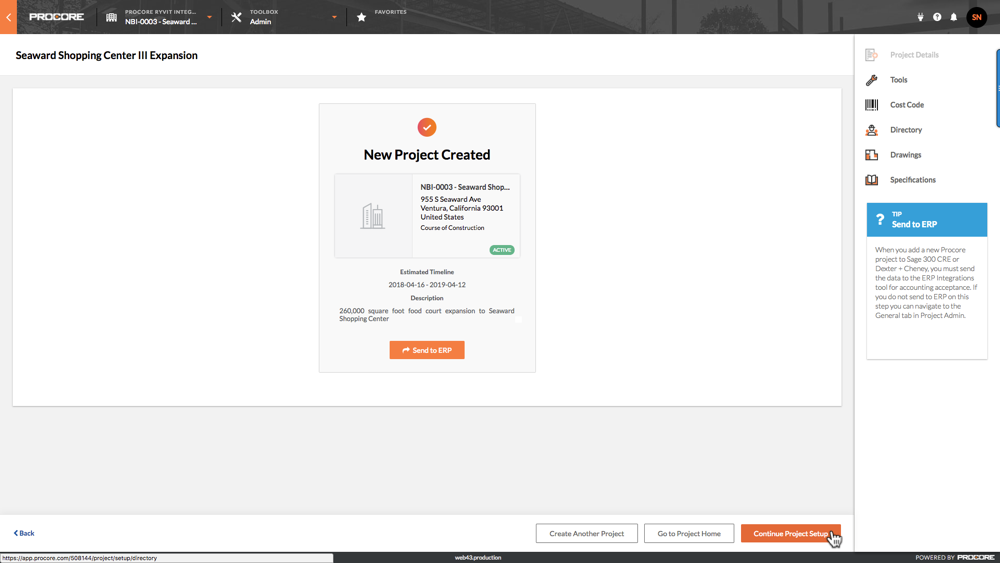
Your cost type assignments are automatically saved and Procore confirms that it has created your new project. This also reveals the New Project Created page.
- Continue with Send a New Project to the ERP Integrations Tool.
Send a New Project to the ERP Integrations Tool
- At the New Project Created page, choose from these options:
- If you want to send your new Procore project data to the Company level ERP Integrations Tool for accounting acceptance, click the Send to ERP button. Before the data is synced between the two systems, an accounting approver must accept the data as described in Accept or Reject a Project for Export to Sage 300 CRE®.
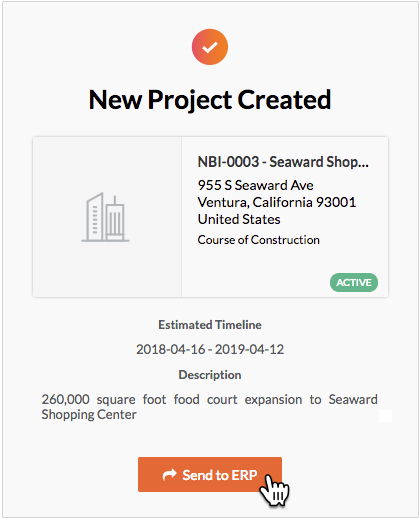
OR - If you want to send your new Procore project data to the Company level ERP Integrations tool at a later time, click Continue Project Setup.
- When you are ready to send your data to the ERP Integrations tool, see Send a Procore Project to ERP Integrations for Accounting Acceptance.
- Before the data is synced between the two systems, an accounting approver must accept the data as described in Accept or Reject a Project for Export to Sage 300 CRE®.
- If you want to send your new Procore project data to the Company level ERP Integrations Tool for accounting acceptance, click the Send to ERP button. Before the data is synced between the two systems, an accounting approver must accept the data as described in Accept or Reject a Project for Export to Sage 300 CRE®.