Create a Materials Adjustment
Background
If the 'Available' inventory quantities in the Materials tool are inaccurate, you can make a manual correction by creating an adjustment.
Alternatively, if you imported materials, you can create an adjustment to add available quantities to the materials you imported.
Available quantities are updated when adjustments are finalized.
Things to Consider
-
You can have multiple line items with different kinds of adjustments in a single adjustment.
-
Adjustment Type controls whether quantities are added or subtracted from inventory.
-
Adjustment Reason will eventually be available in reporting.
-
Item Condition
-
'Acceptable' Materials
-
Are added or removed from the 'Quantity Available' in your inventory when the adjustment is finalized.
-
You can only remove items with an 'Acceptable' condition, even if the item's Adjustment Reason is 'Damaged' or 'Unacceptable'.
-
-
'Damaged' and 'Unacceptable' Materials
-
If you add 'Damaged' or 'Unacceptable' materials, the quantities are not added to the 'Quantity Available' count.
-
-
Prerequisites
-
Materials must be listed in your inventory by one of the following methods:
-
The Commitments tool was used to create a commitment change order or purchase order for materials, and includes the following information:
-
The status is Approved
-
The Schedule of Values (SOV) includes the following for each line item:
-
Description
-
Unit of Measure (UOM)
-
-
-
You must be in the Items view.

Steps
-
Navigate to the project's Materials tool.
-
Click the Inventory tab.
-
Mark the checkboxes of the materials you want to adjust.
-
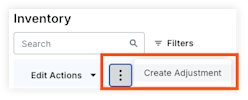
Click the vertical ellipsis
 in the bulk actions area, and select Create Adjustment.
-
Enter the general adjustment information.
-
Enter the adjustment for each line item.
-
Save or submit the adjustment.
-
Click Save as Draft to save the adjustment as a draft.
-
Click Submit to submit the adjustment for approval.
-