Manage Custom and Default Fields and Fieldsets for the Document Management Tool
Objective
To manage custom fields, default fields, and field options for documents in the Document Management tool.
Things to Consider
- Required User Permissions:
- 'Admin' level permission to the Company level Admin tool.
Note: Users with 'Admin' level permissions to Document Management tool can show or hide default field options for a specific project on the Configure Settings page. See Configure Settings: Document Management.
- 'Admin' level permission to the Company level Admin tool.
- Additional Information:
- Default fields required by Procore can't be turned off or removed. See Why can't I turn off certain document 'Types' for the Document Management tool?
Steps
Fields for the Document Management tool can be managed at the Company and Project level. See the following options:
Configure Custom Fields, Fieldsets, and Default Fields for Projects
Create Custom fields
- Navigate to the Company level Admin tool.
- On the sidebar, scroll down to 'Tool Settings' and click Document Management.
- Click the Custom Fields tab.
- Click Create Custom Field.
- Enter a name and select a field type for your custom field.
- Click Create.
- Your new custom field is now available for use in the following scenarios:
- Fieldsets
- Naming standard - Consider adding a custom field to the naming standard if it's one of the following field types: company, location, number, plain text (short), or single select (dropdown)
- Document upload requirements
- Permission groups - Consider adding a custom field to the permission standards if it's one of the following field types: company, location, or single select (dropdown).
- Column in the Document Management tool's search results
- Filter for the Document Management tool's search results, including when exporting column data.
Create and edit Configurable Fieldsets
- Navigate to the Company level Admin tool.
- On the sidebar, scroll down to 'Tool Settings' and click Document Management.

- The Fieldsets tab opens automatically.
- Click Create New.
- Enter a name for the fieldset and click Create.
- On the 'Edit Fieldset' page, make the following choices:
- Toggle off
 any fields you want hidden in the fieldset. You cannot hide these fields: Date Uploaded, File (original file name), Format, Size, Uploaded By, and Version.
Note: If you hide a field that is already part of a permissions group, saved view filter, or upload requirements in one or more projects using this fieldset, it triggers an error message where the field is missing in Procore. Toggle the field back on to remove the error messages, or you can edit groups, filters, and requirements so they don't use the hidden field.
 - Mark the Required checkbox next to any additional fields you want to require. You must require the following fields: Name, Version, Status, and Type.
- For more information on the fields, see What are the different fields in the Document Management tool?
- Toggle off
- Optional: Click Add Custom field to create a new custom field or to select from existing custom fields.
A banner at the top tells you how many existing custom fields you've already added to the current fieldset. For information about where custom fields appear, see Create Custom Fields. - Click Save.
- In the 'Apply changes to project(s)?' window, click Assign Projects to add the fieldset to projects.
- In the 'Assign Projects' window, mark the checkbox next to each project you want to apply the fieldset to and click Update.
- In the 'Apply changes to project(s)?' window, click Confirm.
- Optional: To set a fieldset as the default for new projects, click Set as Default.
Edit Default Fields
- Navigate to the Company level Admin tool.
- On the sidebar, scroll down to 'Tool Settings' and click Document Management.
- Click the Default Fields tab.
You can manage options for the following fields:- Discipline: The discipline associated with this document, such as 'Electrical'.
- Document Stage: The document’s current purpose in the lifecycle, such as 'Concept Design', 'Handover', or 'Use'.
- Level: The level of the building or structure, such as 'Level 1' , 'B', or 'arch'.
- Status: The state of a document as it goes through a process (usually an approval workflow), such as 'Draft', 'In Review', or 'Approved'.
- Type: The different categories of documents, such as 'Drawing', 'Specification', or 'Model'.
- Volume / System: A complete set of equipment that works together for one role or purpose, such as 'Volume16'.
- Click the arrow
 icon next to a field name to show options for that field.
 - Click Edit.
- Modify the options for the field as necessary:
- To rename an option's Code or update its Description, click into the field and enter the updated text.
- To hide an option, clear the checkbox.
- To show an option, mark the checkbox.
- To add an option, click Add Option.
- To delete an option, click the delete icon.
- When you're ready to save the changes, click Save.

Note
Procore also allows project Admins to edit field option descriptions for a single project from the Document Management tool's Configure Settings Configure SettingsShow or Hide Options for a Field
Within a project's Document Management tool, you can customize which options show for fields that have multiple options. For example, you can select which options show for the 'Discipline' field, since it's a Single Select Dropdown menu.
- Navigate to the project's Document Management tool.
- Click the Configure Settings
 icon.
icon. - Click the Documents tab.
- Click the arrow icon next to 'Document Fields' to expand the section.
Each field is listed with its name, field type, and description. - Click on the field that you want to manage.
Note: Currently, you can only manage field options for Single Select Dropdown fields (such as Status, Type, and Discipline). If you click on another field type, you'll see information about the field, with no 'Edit' button available. - Click Edit Field.
- Select which field options you want people to be able to select in the tool:
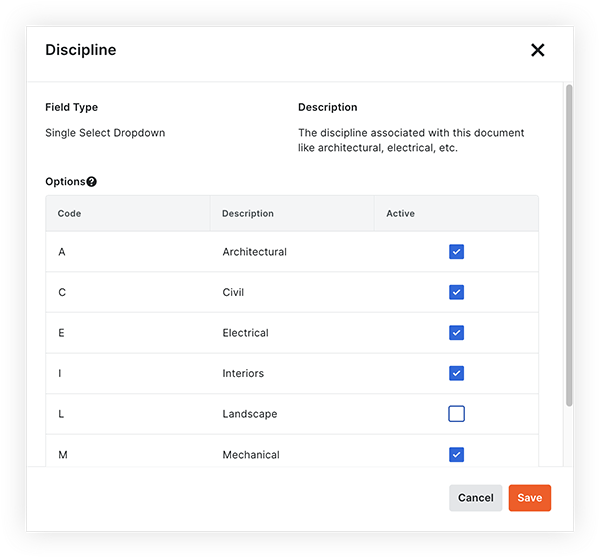
- To hide an option, clear the checkbox.
- To show an option, mark the checkbox.
- Click Save.