Configure Advanced Settings: Timecard
Objective
To set your preferences for the company's Timecard tool.
Things to Consider
- Required User Permissions:
- To Configure Timecard Settings, 'Admin' level permissions on the company's Timecard tool.
- To Set User Permissions, 'Admin' level permissions on the company's Timecard tool AND 'Admin' level permissions on the Company Directory.
Steps
Configure Timecard Settings
- Navigate to the company's Timecard tool.
- Click the Configure Settings
 icon.
icon. - Set your preferences for the following:
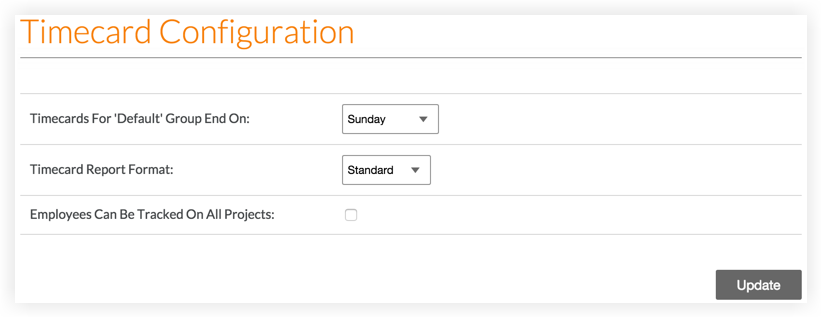
- Timecards For "Default" Group End On: Select the day you would like your timecard entries to end on. In the example above, every timecard entry will end on a Sunday.
- Timecard Report Format: Select whether you would like to have your timecard report in the standard format, or if you would like to have it displayed in Timberline (Sage) format.
- Employees Can Be Tracked On All Projects: Check this checkbox if you would like to allow your employees to be tracked on all projects. This means that you can give them hours for any project in your company instead of only on those they are added to the Project Directory.
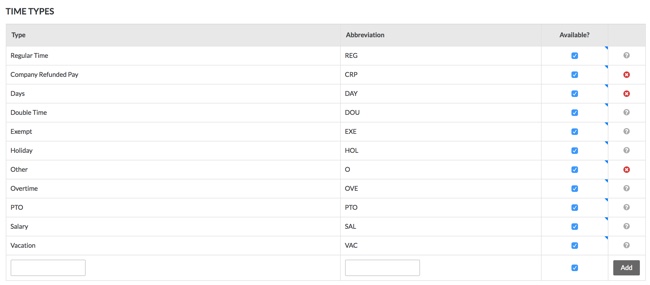
- Time Types: When you Add a Timecard Entry or Create a Timesheet, you must set a type of pay the person is receiving. Procore allows you to choose from "Regular Time", "Double Time", "Exempt", "Holiday", "Overtime", "PTO", "Salary", and "Vacation".
To add custom pay types:- If you would like to add your own custom pay types, enter in the Type and Abbreviation into this section.
- Click Add to add and save the time types.
Note: You do not need to click "Update" to save these changes. After you click Add, it will automatically be reflected in the "Time Types" drop-down menu when you create a timecard entry. - If you would like to exclude certain pay types, in the Available? column, deselect the checkboxes next to the pay types you would like to hide from the "Time Types" drop-down menu when you create a timecard entry.
- Default Cost Type for Timecards. Select the cost type to assign to your project's timecard entries. If your company is using Procore's Project Financials, this action ensures that the labor costs from your project's timecards are reflected in the 'Procore Labor Productivity Cost' and 'Real-Time Labor Costing' budget views.
Note: By default, this option is set to 'Labor'.- Click Update to apply the default cost type to any future timecard entries.
- Click Apply to Existing Timecards to apply the default cost type to all existing timecard entries.
-
If your company is integrated with an ERP system Show/Hide
- Default Cost Type for Timecards on Non-ERP Synced Projects. If your company's ERP system is integrated with Procore, select the cost type to assign to timecard entries for non-ERP synced projects.
- Click Update to apply the default cost type to any future timecard entries.
- Click Apply to Existing Timecards to apply the default cost type to all existing timecard entries.
- Default Cost Type for Timecards on Synced Projects. If your company's ERP system is integrated with Procore, select the cost type from your payroll system to assign to your project's timecard entries.
- Click Update to apply the default cost type to any future timecard entries.
- Click Apply to Existing Timecards to apply the default cost type to all existing timecard entries.
- Default Cost Type for Timecards on Non-ERP Synced Projects. If your company's ERP system is integrated with Procore, select the cost type to assign to timecard entries for non-ERP synced projects.
Set User Permissions
- Navigate to the company's Timecard tool.
- Click the Configure Settings icon.
- In the right pane, click Permissions Table.
- Set the access permission level for the tool's users by clicking the icon in the permission column until the GREEN checkmark appears:
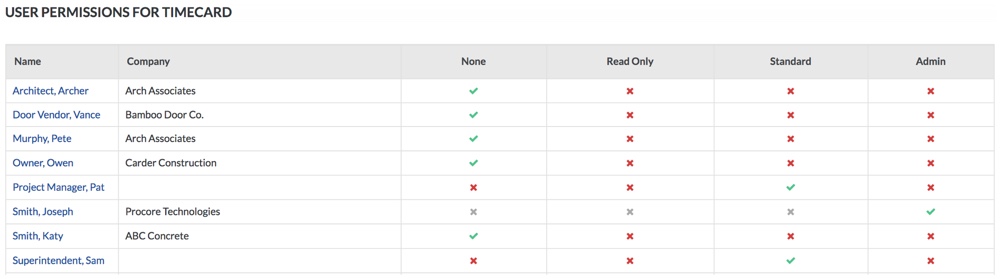
The color-coded icons in the user permissions area denotes the user's access permission level to the tool. To learn more, see What are the default permission levels in Procore?
Icon Color Definition 
GREEN The user has been granted this access permission level to the tool. 
RED The user has NOT been granted this access permission to the tool. 
GREY The user is either a Procore Administrator or has been granted permissions to the Procore tools in this company using a permissions template (see What is a permissions template?). To change the user's permission level to this tool, see Manage Company Permissions Templates.