Procore

Materials User Guide (without Financials)

Overview

The Materials tool brings powerful, industry-leading materials management capabilities to the Procore platform for current and future Procore customers.

Materials includes core material management flows, including the following:

  • Gives customers insights into the supply chain;

  • Allows customers to receive and manage material inventory;

  • Enables issuing and tracking of materials as they are being moved or installed on the job site.

Considerations

  • Required User Permissions

  • Use of the Materials tool currently requires the following:

    • Locations created in the project's Admin tool.

Project Setup

Materials are managed by project. You can use the Materials tool in a new project or an existing project. After your project is created, you need to create locations for your project, including where your materials will be stored.

Materials are managed by project. You can use the Materials tool in a new project or an existing project. After your project is created, you need to create locations for your project, including where your materials will be stored.

  1. Create your project:

  2. Create locations in one of the following ways:

  3. Manually create storage locations, such as warehouses, by following these steps:

Process Diagrams

  • Order and Receive without Commitments

  • Manage Defects

Order and Receive without Commitments

Diagram - Materials - Order and Receive without Commitments

Manage Defects

Materials - Manage Defects

Create Materials Requirements

Background

 Note
The process for importing materials and creating material requirements is the same.

When managing your materials, you can import a list of the required materials to the Materials tool.

After you import your materials, a requirements document is automatically created for the scope of that work. After its finalized, required inventory quantities are updated, and you can create shipments and receipts to track orders placed outside of Procore.

To update an existing requirements document, upload a new version with the existing document's name in the 'Materials Requirements Document Name' column. The Requirements document will be updated to match your latest upload.

'Closing' a requirements document indicates that the scope of work is complete. The Materials tool automatically removes those 'Required' quantities from your inventory to ensure your stock levels accurately reflect the current and remaining needs of the project.

Things to Consider

  • Required User Permissions

  • The 'Quantity' in your imported file automatically updates the 'Quantity Required' field in the Inventory tab.

  • If the same materials are added with a different Unit of Measure (UOM), it will create a separate line item.

  • You can import a maximum of 20,000 rows per import.

  • Most errors cause the entire import to fail, requiring you to fix the errors and import again. However, if a document is in a 'Final' state, only items for that specific requirements document will fail, while the rest will import.

  • Inventory quantities are updated when a requirements document is finalized.

  • Creating a New Requirements Document

    • A new requirements document will be created when the 'Material Requirement Document Name' is unique.

  • Updating a Requirements Document

    • To update an existing requirements document, ensure the 'Material Requirement Document Name' for your new upload exactly matches the original.

    • All line items and required 'Quantities' are updated to match the new upload.

    • If line items are removed from the upload:

      • The items will be deleted from the Requirements document.

      • The items stay in your inventory, but the removed quantities are deducted from the 'Required Quantities' column.

Prepare Materials for Import

  1. Navigate to the project's Materials tool.

  2. Click the Requirements tab.

  3. Click the Import.

  4. Click Download Excel Template.

  5. Open the template in your spreadsheet software.

  6.  

    Fill out the template with the materials you want to import. Show/Hide Fields

    Important

    If the same materials are added with a different Unit of Measure (UOM) it will create a separate line item in your inventory.

    For example, if you create a line item for sheet metal with a UOM of cubic feet, and another line item for sheet metal with a UOM of each, it will create two separate line items for sheet metal in your inventory.

    • Material Needs Document Name. The name of your materials requirements (or scope) document.

    • Required On Site Date. Must be in the format of MM/DD/YYYY.

    • Item Name. The name of the material.

    • Item Description (Optional). The description of the material.

    • Quantity. The quantity of the materials required.

    • UOM. The unit of measurement for the quantity.

    • Custom Field (Optional). Custom fields that you want to add to the materials. Rename any 'Custom Field' column headers to your preferred labels before importing. Columns with unchanged headers will not be imported.

       Note
      To update an existing requirements document, ensure the Material Requirement Document Name for your new upload exactly matches the original.
  7. Save the file.

Import Materials

  1. Navigate to the project's Materials tool.

  2. Click the Requirements tab.

  3. Click Import.

  4. Attach the file.

    • Click Attach Files and select the prepared Materials import template. Then click Open.

    • Drag and drop the prepared Materials import template from your desktop to the 'Drag and Drop' section.

  5. Click Upload.

Review and Submit Requirements

  1. Navigate to the project's Materials tool.

  2. Click the Requirements tab.

  3. Click the 'Draft' requirements document you imported.

  4. Review the requirements document.

  5. Click Submit.


Finalize Materials Requirements

Background

 Note
The process for importing materials and creating material requirements is the same.

When managing your materials, you can import a list of the required materials to the Materials tool.

After you import your materials, a requirements document is automatically created for the scope of that work. After its finalized, required inventory quantities are updated, and you can create shipments and receipts to track orders placed outside of Procore.

To update an existing requirements document, upload a new version with the existing document's name in the 'Materials Requirements Document Name' column. The Requirements document will be updated to match your latest upload.

'Closing' a requirements document indicates that the scope of work is complete. The Materials tool automatically removes those 'Required' quantities from your inventory to ensure your stock levels accurately reflect the current and remaining needs of the project.

Things to Consider

  • Required User Permissions

  • Requirements with 'Final' status:

    • You can only attach files, add notes, or add custom fields to finalized requirements.

    • 'Required' quantities are added to your inventory.

  • Requirements with 'Closed' status.

    • 'Required' quantities are removed from your inventory to ensure your stock requirements accurately reflect the current and remaining needs of the project.

Steps

  1. Navigate to the project's Materials tool.

  2. Click the Requirements tab.

  3. Click the 'Ready for Review' requirements document.

  4. Click Finish Review and select Mark as Final.


Overview

When managing your materials, you can import a list of the required materials to the Materials tool.

After you import your materials, a requirements document is automatically created, and you can create shipments and receipts to track orders placed outside of Procore.

Create a Shipment

Background

You can use Procore to manage materials for your project. From the Materials tool, you can create shipments to track the materials you have ordered. You can create shipments for orders you placed outside of Procore, or from approved commitment change orders or purchase orders made in Procore's Commitments tool.

Things to Consider

  • Required User Permissions

  • Once submitted, you can only add files, notes, or custom fields to your shipment.

  • Submitted shipments cannot be deleted.

Prerequisites

  • Materials must be listed in your inventory using one of the following methods:

Steps

  1. Navigate to the project's Materials tool.

  2. Click Create and select Shipment.

  3.  

    Enter the shipment information. Show/Hide Fields

    • Shipment Name. The name of the receipt.

    • Associated Purchase Order. The associated purchase order that was created in the Commitments tool.

    • Vendor. The vendor supplying the materials.

    • Estimated Delivery Date. The date you expect the items to be delivered.

    • Delivery Location. The location where you expect the delivery.

    • Notes. Any notes related to the shipment.

    • Attachments. Upload any attachments related to the receipts.

      1. Click Attach File.

      2. Select the file and click Open to attach it.

  4. Add Items to Include in the Shipment.

    • Click Add All Order Items to include all items from the associated purchase order.

    • Click the search bar to add items from the associated purchase order. If no purchase order has been associated with the shipment, you can add any ordered material to the shipment.

    • Optional: Click the delete Icon Delete Trash6 icon to delete the line item.

  5. Save or submit the receipt.

    • Click back to the Materials main menu to save the receipt as a Draft.

    • Click Submit to finalize the shipment.
      Note: You can only attach files, add notes, or add custom fields to submitted shipments. Submitted shipments cannot be deleted.

Next Steps


Create a Receipt

Background

You can use Procore to manage materials for your project. From the Materials tool, you can create receipts to track the materials you have received, and any defects. You can create receipts for orders placed outside of Procore, or approved commitment change or purchase orders made in Procore's Commitments tool.

Things to Consider

  • Required User Permissions

  • If you selected an Associated Purchase Order, line items are filtered to the purchase order.

  • If you selected an Associated Shipment, you can only add the items in the shipment, not the entire purchase order.

  • When splitting line items, the item quantities will always equal the total quantity received.

  • Defect Creation

    • Defects are automatically created when a receipt is Finalized.

    • If the quantity received is less than the the quantity expected, a Short defect is created.

    • If the quantity received is more than the quantity expected, an Overage defect is created.

    • If the condition for items marked as Damaged or Unacceptable a defect is created.

Prerequisites

Steps

  1. Navigate to the project's Materials tool.

  2. Click Create and select Receipt.

  3. Enter the Date Received.

  4.  

    Enter the receipt information. Show/Hide Fields

    • Receipt Name. The name of the receipt.

    • Associated Purchase Order. The associated purchase order that was created in the Commitments tool.

    • Associated Shipment. The associated shipment that was created in the Materials tool.

    • Shipment Reference . A reference number provided by the vendor.

    • Receiving Location. The receiving location, which is automatically applied as the storage location for each item on the receipt. Storage locations can be updated later.

    • Received By. The user in your project's Directory who received the shipment.

    • Attachments. Upload any attachments related to the receipts.

      1. Click Attach File.

      2. Select the file and click Open to attach it.

    • Custom Field. A custom field specific to the receipt.

      1. Click Create Custom Field.

      2. Enter the Field Name.

      3. Select the Field Type.

      4. Click Create.

      5. Enter the information into the field.

  5.  

    Enter the line item information. Show/Hide Fields

    1. Add Line Items

      • Click Add All Order Items to include all items from the associated purchase order.
        Note: If you select an Associated Shipment, this option is not available. Instead, you may only add the items in the shipment.

      • Click Add All Shipment Items to include all items from the associated shipment.

      • Click the search bar to add items from the associated purchase order or shipment.
        Note: If no purchase order or shipment has been associated with the receipt, you can add any ordered material to the receipt. However, it will not update remaining quantities for any orders or shipments.

    2. Optional: Click the delete Icon Delete Trash6 icon to delete the line item.

    3. Enter the Quantity Expected.
      Note: If there is an associated purchase order, this field is automatically set to the quantity left to receive.

    4. Enter Quantity Received.

    5. Update the Condition and Storage Location.

      1. Click the condition field for the item and select its condition.

        • Acceptable

        • Damaged

        • Unacceptable

      2. Click the storage location for the item and select a new location.

      3. Line items are automatically saved. If needed, click Close.

        Splitting Line Items for Condition or Location

        You can split line items, either to indicate some of the received quantities are not in acceptable condition, or to allocate quantities to different storage locations.

        1. In the line item's row, next to the storage location, click the add Icon Plus icon.
        2. Enter the Condition of the items.
        3. Enter the Quantity of those items.
        4. Enter the Storage Location for those items.
  6. Save or submit the receipt.

    1. Click Save as Draft to save the receipt as a draft.

    2. Click Submit to submit the receipt for approval.


Review and Finalize Receipts

Things to Consider

  • Required User Permissions

  • A receipt must be submitted before it can be reviewed and finalized.

  • When a receipt is finalized, the status is changed to 'Final'.

  • After a receipt has been finalized, you cannot change the status or edit core details. However, you can still add notes, attach files, or update custom fields.

  • Finalizing a receipt updates each item’s 'Quantity Received' and 'Quantity Available' inventory count.

  • The received amount cannot exceed the ordered or shipped quantity. To receive more than the ordered or shipped quantity, an overage must be created on the receipt to account for the extra materials.

  • Defect Creation

    • Defects are automatically created when a receipt is Finalized.

    • If the quantity received is less than the the quantity expected, a Short defect is created.

    • If the quantity received is more than the quantity expected, an Overage defect is created.

    • If the condition for items marked as Damaged or Unacceptable a defect is created.

  • For Customers using Project Financials:

    • To finalize a receipt, you must also have 'Standard' level permissions or higher to project's Commitments tool.
      Notes:

      • 'Standard' users can only finalize receipts during an open billing period because the system automatically generates an invoice.

      • 'Admin' users can finalize receipts in any existing billing period, whether it is open or closed.

Steps

  1. Navigate to the project's Materials tool.

  2. Click the Receipts tab.

  3. Click the receipt number.

  4. Click Finish Review.

    1. Select Move back to Draft if there changes that need to be made to the receipt.

    2. Select Mark as Final to finalize the receipt.


Issue Materials

Background

Once you have available quantities of materials in your inventory, you can issue them for use. This helps track which materials are available and which have been issued for installation.

Things to Consider

  • Required User Permissions

  • Users must be added to your project's Directory to appear in the 'Issued to' field.

  • After you submit a direct issue document and the status is 'Final', you can only edit the following fields:

    • Attach files

    • Custom Fields

    • Notes

  • 'Available' and 'Issued' quantities are updated when you submit the direct issue document.

Prerequisites

  • Materials must have a 'Quantity Available' in inventory to be issued:

Steps

  1. Navigate to the project's Materials tool.

  2. Click the Inventory tab.

  3. Mark the checkbox next to the materials you want to issue.

  4. Click Add to New Document and select Direct Issue.

  5. Enter the general issue document information.

    Show/Hide Fields

    • Direct Issue Name. The name of the direct issue document.

    • Issued to. Select the user in your project's Directory to issue the materials to.

    • Notes. Notes about the direct issue document.

    • Attachments. Upload any attachments related to the direct issue document.

      1. Click Attach File.

      2. Select the file and click Open to attach it.

  6. Enter the issue information for each line item.

    Show/Hide Fields

    1. Enter the Quantity of items to issue from each location, or click Add All to issue all quantities from that location.

    2. Enter any Notes.

  7. Save or submit the direct issue document.

    1. Click Save as Draft to save the it as a draft.

    2. Click Submit to submit it as final.


Resolve Defects

Background

If you receive materials that are unacceptable, damaged, over, or short, Procore creates a 'defect' once you finalize the receipt. This allows you to track and resolve the issue directly within the Materials tool.

Things to Consider

  • Required User Permissions

  • A defect is generated when you finalize the item's receipt.

  • After you resolve a defect, the 'Quantity Available' for the line item is adjusted in your inventory based on your selection.

Prerequisites

Steps

  1. Navigate to the project's Materials tool.

  2. Click the Defects tab.

  3. Click the defect ticket number.

  4. Click Resolve for the line item.

  5. Select how the resolution impacts inventory.

    • Resolve and add to inventory.

    • Resolve without adding to inventory.

  6. Enter notes about how the issue was resolved.

  7. Click Resolve to finalize.


Create a Transfer

Background

If you need to move materials to a new storage location, you can create a materials transfer. If the status of materials changes during the transfer, 'Quantity Available' inventory counts are updated accordingly.

Things to Consider

  • Required User Permissions

  • You can have multiple line items with different locations in a single transfer.

  • After you submit a transfer and the status is 'Final', you can only edit the following fields:

    • Attach files

    • Custom Fields

    • Notes

    • Post Transfer Condition

  • 'Quantity Available' counts are updated when the transfer is submitted and the status is 'Final'.

  • Post-Transfer Item Condition

    • Quantities of 'Acceptable' materials are included in the 'Quantity Available' in your inventory.

    • Quantities of 'Damaged' and 'Unacceptable' Materials are excluded from the 'Quantity Available' in your inventory.

Prerequisites

Steps

  1. Navigate to the project's Materials tool.

  2. Click the Inventory tab.

  3. Mark the checkbox next to the materials you want to transfer.

  4. Click Add to New Document and select Transfer.

  5. Select Transfer.

  6. Enter the general transfer information.

    Show/Hide Fields

    • Transfer Name. The name of the transfer.

    • Notes. Notes about the transfer.

    • Attachments. Upload any attachments related to the transfer.

      1. Click Attach File.

      2. Select the file and click Open to attach it.

  7. Enter the transfer for each line item.

    Show/Hide Fields

    1. Select the From Location where you are transferring the materials from.

    2. Select the Pre-Transfer Condition.

      • Acceptable

      • Damaged

      • Unacceptable

    3. Enter the Quantity of items to transfer.

    4. Select the To Location where you are transferring the materials to.

    5. Select the Post-Transfer Condition.

      • Acceptable

      • Damaged

      • Unacceptable

    6. Enter any Notes.

  8. Save or submit the transfer.

    1. Click Save as Draft to save the adjustment as a draft.

    2. Click Submit to submit the adjustment as final.


View Inventory

Steps

  1. Navigate to the project's Materials tool.

  2. Click the Inventory tab.

  3. View Materials.

    • View by Item or Location
      ss - materials - items or locations

      • Click Items to see a total for each unique item.

      • Click Locations to see materials broken out by the location.

    • View Quantities (available in 'Items' view)

      • Quantity Required. How much material is currently required, based on 'Final' Requirements documents.

      • Quantity Ordered. How much has been ordered using the Commitments tool.

      • Quantity Received. How much has been received using receipts.

      • Quantity Issued. How much has been issued for use.
        Note: Issuing functionality is not yet available in the open beta.

      • Quantity Available. How much has been received, but not yet issued.


Create an Adjustment

Background

If the 'Available' inventory quantities in the Materials tool are inaccurate, you can make a manual correction by creating an adjustment.

Alternatively, if you imported materials, you can create an adjustment to add available quantities to the materials you imported.

Available quantities are updated when adjustments are finalized.

Things to Consider

  • Required User Permissions

  • You can have multiple line items with different kinds of adjustments in a single adjustment.

  • Adjustment Type controls whether quantities are added or subtracted from inventory.

  • Adjustment Reason will eventually be available in reporting.

  • Item Condition

    • 'Acceptable' Materials

      • Are added or removed from the 'Quantity Available' in your inventory when the adjustment is finalized.

      • You can only remove items with an 'Acceptable' condition, even if the item's Adjustment Reason is 'Damaged' or 'Unacceptable'.

    • 'Damaged' and 'Unacceptable' Materials

      • If you add 'Damaged' or 'Unacceptable' materials, the quantities are not added to the 'Quantity Available' count.

Prerequisites

  • Materials must be listed in your inventory by one of the following methods:

    • Import Materials

    • The Commitments tool was used to create a commitment change order or purchase order for materials, and includes the following information:

      • The status is Approved

      • The Schedule of Values (SOV) includes the following for each line item:

        • Description

        • Unit of Measure (UOM)

  • You must be in the Items view.
    ss - materials - items or locations

Steps

  1. Navigate to the project's Materials tool.

  2. Click the Inventory tab.

  3. Mark the checkboxes of the materials you want to adjust.

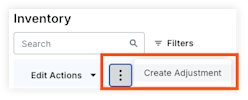
  4. Click the vertical ellipsis Icon Ellipsis Vertical in the bulk actions area, and select Create Adjustment.
    create-adjustment-ellipsis

  5. Enter the general adjustment information.

    Show/Hide Fields

    • Adjustment Name. The name of the adjustment.

    • Notes. Notes about the adjustment.

    • Attachments. Upload any attachments related to the adjustment.

      • Click Attach File.

      • Select the file and click Open to attach it.

  6. Enter the adjustment for each line item.

    Show/Hide Fields

    1. Select the Adjustment Type.

      • Add to Stock

        1. Select the Adjustment Reason.

          • True Up

          • Found

          • Repaired

        2. Select the Item Condition.

          • Acceptable

          • Unacceptable

          • Damaged

      • Remove from Stock

        1. Select the Adjustment Reason.

          • True Up

          • Lost

          • Damaged

          • Stolen

          • Scrapped

          • Recycled.

        2. Select the Item Condition.

          • Acceptable

    2. Select the Storage Location.

    3. Enter the Quantity of items to add or remove.

    4. Enter any Notes.

  7. Save or submit the adjustment.

    1. Click Save as Draft to save the adjustment as a draft.

    2. Click Submit to submit the adjustment for approval.


Finalize an Adjustment

Things to Consider

  • Required User Permissions

  • An adjustment must be submitted before it can be reviewed and finalized.

  • When an adjustment is finalized, the status is changed to 'Final'.

  • After an adjustment has been finalized, you cannot change the status or edit core details. However, you can still add notes, attach files, or update custom fields.

  • Finalizing an adjustment updates each item’s 'Quantity Available' inventory count.

Steps

  1. Navigate to the project's Materials tool.

  2. Click the Adjustments tab.

  3. Click the adjustment number.

  4. Click Finish Review.

    1. Select Move back to Draft if there changes that need to be made to the receipt.

    2. Select Mark as Final to finalize the receipt.