Upload Drawings (Tucker HiRise)
| Back | Current Lesson - 6/17 | Lesson 7 - Next |
Background
When you upload drawings to Procore, Procore scans the PDF file using Optical Character Recognition (OCR) technology to intelligently discover and pre-fill the Drawing No., Title, and Discipline fields with the relevant values. When uploading a multi-page a PDF, Procore automatically splits each page into a separate drawing. After uploading drawings, they will need to be confirmed and reviewed.
Steps
- Navigate to the project's Drawings tool.
Note: If your project uses Drawing Areas, open the drawing area you want to upload drawings to. - Click Upload Drawings.
Note: This opens a drawing upload window. - Attach one or more drawing PDF files:
Tip! Make sure your drawings are best formatted for OCR. See How can I improve the accuracy of OCR on my drawings?- In the Attach File(s) window, select one or more drawing PDF files to upload.
- To attach files from your computer:
- Make sure My Computer is selected in the window.
- Drag and drop one or more files into the 'Drag and Drop' box.
OR
Click Attach File(s) to browse your computer and select the files.
- To attach files from the project's Documents tool:
- Click Documents in the window.
- Mark the checkbox next to a folder that you want to attach files from.
- To attach files from your computer:
- In the Attach File(s) window, select one or more drawing PDF files to upload.
- Click Attach.
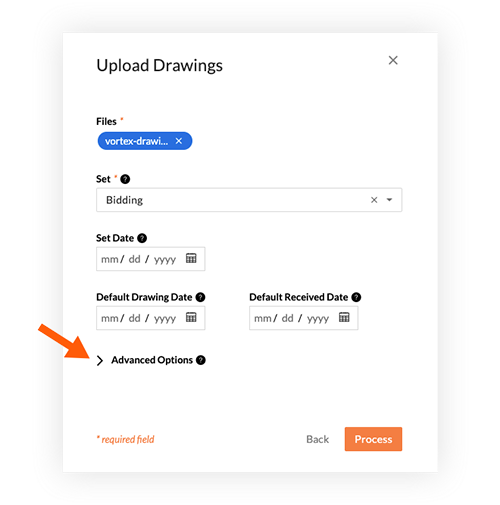
- Fill out the following information as necessary.
Note: An asterisk (*) denotes a required field.- Set*: Choose whether you want to upload the drawings into a new or existing set.
- To select an existing set:
- Click the drop-down menu.
- Select the name of an existing set.
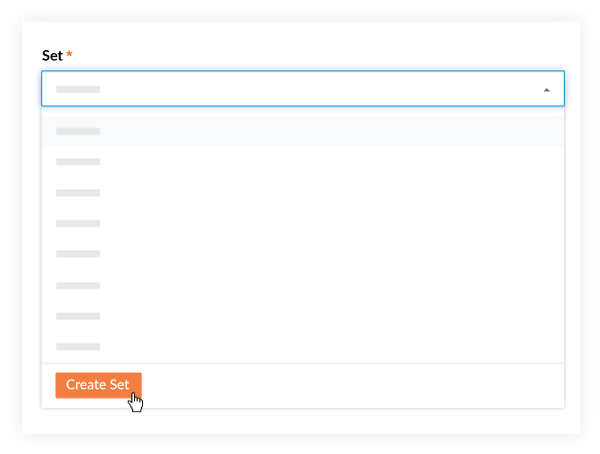
- To create a new set:
- Click the Select or Create Set drop-down menu.
- Type a name for the new set in the Search field.
Note: The drawing set name must be less than 100 characters.

- Click Create Set.
- To select an existing set:
- Set Date: This is the date that the architect sent out the set of drawings.
- If adding to an existing set, Procore populates this field automatically.
- If creating a new set, click into the field to select a date from the calendar.
- Default Drawing Date: Indicates the date the drawings were authored. The date selected here will appear as the 'Drawing Date' on all drawings in the set.
- Click into the field to select a date from the calendar.
- Default Received Date: Indicates the date a drawing was received or issued by the creator of the drawings (i.e. the design team).
- Click into the field to select a date from the calendar.
- Advanced Options: Click the caret
 icon next to Advanced Options to expand the following options.

- Drawing Revision: If your set has a default drawing revision number or letter, you can enter it here. The revision entered here will be set as the 'Revision' on all drawings in this upload. This should be used when the revision is known and is the same for all drawings in the upload. If a default revision is not specified, Procore will use the drawing number to determine the revision.
- Drawing Number:
- Contains Revision: Mark the checkbox if the drawing numbers in this set have a decimal number followed by 2 digits at the end (e.g. A203.01). The number will be separated at the decimal. For example: The first portion becomes the Drawing Number (e.g. A203), and the portion following the decimal becomes the Revision (e.g. Rev 01). This revision number or letter will appear in the drawings list page after uploading, and in the 'Revision' field in the Drawings tool.
- Get From Filename: Mark the checkbox if you want Procore to pull the number and title of an individual drawing based off of the filename. This will bypass OCR and result in higher accuracy in the naming of your drawings.
Important!- It is important that the filename exactly matches the following format: Number_Title.pdf
- If there is no underscore between the number and title, the entire filename becomes the drawing number.
- Drawing Language: Procore's OCR can scan for drawings in English, French, and Spanish. The language for your drawings is automatically selected based on the locale of the project or company, but you can select another language from the drop-down menu if the drawings are in another language. See Can I change the language that Procore scans my drawings for?
- Set*: Choose whether you want to upload the drawings into a new or existing set.
- Click Process.
Note: A progress indicator exists in the side panel. When your upload completes, you will receive a notification email. - After the upload is complete, click Click here to review to review the drawings.

Things to Consider
- Required User Permissions:
- 'Admin' permissions on the Drawings tool.
OR
'Read Only' or 'Standard' permissions with the 'Upload Drawings' or 'Upload and Review Drawings' granular permission enabled on your permission template.
- 'Admin' permissions on the Drawings tool.
- Additional Information:
- Drawings must be uploaded in the PDF file format.
- Notification emails are sent after the upload has completed processing. See Who receives a notification for updates in the Drawings tool?
- If an 'Admin' on the Drawings tool has uploaded drawings, only that user will receive a notification email.
- If a user with 'Read Only' or 'Standard' permissions has uploaded drawings, all users with 'Admin' on the project's Drawings tool will receive a notification email so that the drawings can be reviewed and confirmed.
- If your drawing upload fails, it could be due to a file that is encrypted, password protected, or corrupt. See Why are my drawing uploads failing?

