Create a Commitment Change Order (CCO)
| Previous | Current Lesson - 2/9 | Next |
Create a CCO
If you have created a commitment (i.e., a purchase order or a subcontract) and need to alter the terms of that commitment, use the steps below to create a CCO. If you have enabled the DocuSign integration, follow the steps in Create a Commitment Change Order (CCO) with DocuSign©.
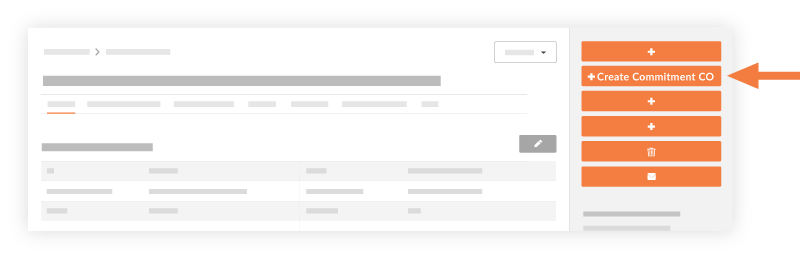
- Navigate to the project's Commitments tool.
- Click the Summary or Detailed tab.
- Locate the purchase order or subcontract. Then click Edit.
- Click Create Commitment CO.
Notes:- If the Change Events tool is enabled on your project, the Create Commitment CO button is not available. Instead, click Create Change Event.
- Next, follow the steps in Create a Change Event.
- Then, follow the steps in Create a CCO from a Change Event.
- In the General tab, do the following:
- Number. Procore assigns numbers to CCOs in sequential order (e.g., 001, 002, 0033, and so on). You can change the numbering scheme, if desired (for example, CCO-01, CCO-02, CCO-03, and so on). If you manually change this number, Procore automatically assigns the next number in sequential order, using the number you defined.
- Revision. This field displays the CCO's revision number. When a CCO is first created, its revision number is zero. A CCO could have multiple revisions because of feedback from a reviewer/approver.
- Date Created. This field automatically populates with the date that you create the commitment change order. The date cannot be changed.
- Created By. This field automatically populates with the name of the user who is creating the CCO.
- Contract Company. This field automatically populates with the name of the subcontractor or vendor listed on the subcontract.
(Note: This field is only visible if the CCO is for a subcontract.) - Contract. This field automatically populates with the name of the contract for which the CCO is being created.
(Note: This field is only visible if the CCO is for a subcontract.) - Title: Enter a name for the CCO. The maximum character limit for this field in Procore is 255 characters.
Important
If you are using an integrated ERP system, the maximum character limit for the 'Title' field on a commitment is different for each system. For a list of each system and its limitation, see What is the maximum character length for a commitment's 'Title'? - Status. Select the current state of the CCO:
Note: The statuses below are for the Procore Standard Budget view. To learn about views, see Set up a New Budget View. Statuses may used differently in your environment.- Approved. The CCO has been approved. Costs are reflected as 'Approved' changes in the budget.
- Draft. The CCO still needs to be modified before it can be submitted for review. Costs are NOT reflected in the budget.
- Pending - In Review. The CCO is currently being reviewed by an approver. Costs are reflected as 'Pending' changes in the budget.
- Pending - Revised. The CCO has been modified since its initial submission. Costs are reflected as 'Pending' changes in the budget.
- Pending - Pricing. The CCO is pending and is currently out for pricing. Costs are reflected as 'Pending' changes in the budget.
- Pending - Not Pricing. The CCO is pending and is not actively being priced. Costs are reflected as 'Pending' changes in the budget.
- Pending - Proceeding. The CCO is still pending and the work is being completed. Costs are reflected as 'Pending' changes in the budget.
- Pending - Not Proceeding. The CCO is pending and the work is not currently taking place. Costs are reflected as 'Pending' changes in the budget.
- Rejected. The CCO was rejected. Costs are NOT reflected in the budget.
- No Charge. The CCO will be performed at no charge. Costs are NOT reflected in the budget.
- Private. Mark this checkbox to make the CCO visible only to users with 'Admin' level permissions on the Commitments tab.
- Change Reason. Select one of these reasons for the potential CCO: Client Request, Design Development, Allowance, Existing Condition, or Backcharge. To learn how to configure change reasons, see Set Default Change Management Configurations.
- Accounting Method. This field inherits the accounting method that was specified in the contract.
- Due Date. Select a due date for when the CCO must be approved by.
- Invoiced Date. Select the date when the CCO was invoiced.
- Designated Reviewer. Select a designated reviewer to approve the CCO. See Review and Respond to Commitment Change Orders (CCO).
- Request Received From. Select a user from the project's directory who you are submitting the CCO on the behalf of.
- Description. Enter a detailed description of the CCO.
Note: If you will be exporting the CCO to an integrated third-party ERP system, you can enter an unlimited number of characters in Procore. However, any entries exceeding one thousand (1000) characters will be truncated when it is exported to Sage 300 CRE and Integration by Ryvit. - Schedule Impact. If known, you can provide an estimate of the number of additional days that would potentially be added to the current project schedule if the CCO were approved.
- Location. Use the location drop-down menu to select a location the [item] impacts. Either select from the predefined locations, or add a multi-tiered location. See Add a Multi-tiered Location to an Item. This location may be as general as the site location at the first tier or as specific as where on the site the contractor will be working at the second tier.
- Reference. Reference any other tools, materials or documents that are related to the change order.
- Executed. Check this box if the CCO has already been executed.
- Field Change. Check this box if the change order requires a field change.
- Paid in Full. Check this box if the cost is already covered in the budget.
- Attachments. Select and add any relevant documents.
- Click Create or Create & Email to send the CCO to any reviewers listed on the change order.
Add a Schedule of Values (SOV) to the CCO
If there are costs associated with the CCO, add line items to the CCOs Schedule of Values (SOV). 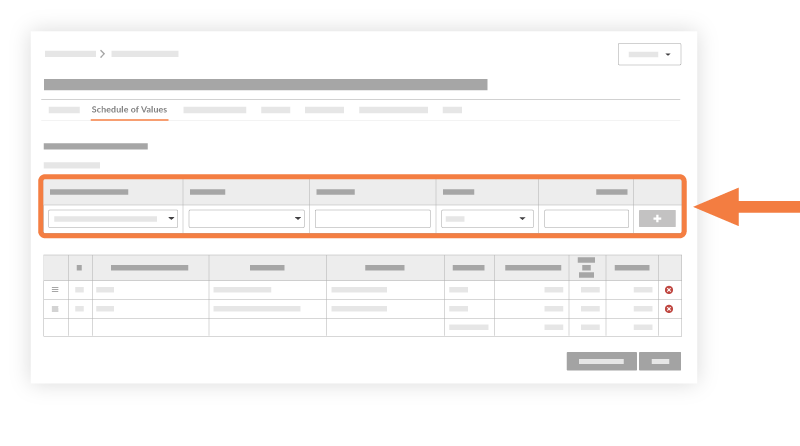
- Click the Schedule of Values tab.
- Click Edit.
- Click Add Line.
- Prime Contract Line Item. Select a line item from the drop-down list. If there is no line item that fits, select Not Budgeted.
- Change Event Line Item. Select a change event line item from the drop-down list.
- Sub Jobs. If the Sub Jobs feature is enabled on your project, select one from the list.
- Budget Code. Select a budget code from the drop-down list. See What is a budget code?
- Description. Type a description for the new CCO.
- Cost Amount. Enter an amount in the box.
- Tax Codes. If you are using tax codes with this project, select a tax code to use for the line item. This field only appears if the tax codes feature is enabled. See How can I use tax codes on a project?
- Click Add
- Repeat these steps for each line item.
- Click Save.