Add Takeoffs in Procore Estimating
Objective
To add takeoffs for a project in the standalone Procore Estimating application.
Background
The Takeoff page in Procore Estimating (estimating.procore.com) is where you can add and manage a wide variety of takeoffs for different trades. Procore Estimating offers advanced features to help manage takeoffs with ease.
Things to Consider
- Required User Permissions:
- 'Estimator' user role or higher. See What are the different 'user roles' in Procore Estimating?
- Additional Information:
- Before starting a material count, make sure that the plan scale is properly configured. See Set the Drawing Scale for Takeoffs.
Video
Steps
- Log in to Procore Estimating.
- Select the relevant project and click the Take-Off tab.
Click to jump to the relevant steps below:
To Add Count Takeoffs
- Click Add Takeoff.
- Complete the following information:
- Material Name: Enter a material name, or click Catalog to select an item from the material catalog.
Note: If you select a material from the catalog, always check to make sure that it matches the client’s specification and unit prices. - Measurement Type: Click the drop-down menu and select Count as the measurement type.
- Symbol: Click the drop-down menu to select a symbol that you want to use for the counts.
- Size: Click the drop-down menu to select a size.
- Color: Click the drop-down menu to select a color.
- Material Name: Enter a material name, or click Catalog to select an item from the material catalog.
- Click Add to Plan.
Note: After adding the material, an indicator will be displayed that it is now active and ready for use. You will be able to choose from manually counting materials, or 'Auto-Count', which automatically counts similar symbols using Procore Estimating's advanced symbol recognition feature.
To use Auto-Count
The Auto-Count feature in Procore Estimating' automatically counts similar symbols based on your selection. This method provides a faster way of counting materials with precision.
- Click Auto-Count.
- Draw a rectangle around the symbol that you want counted automatically:
- Click to start drawing the rectangle, and click again to confirm the selection.
Note: If you want to draw the rectangle again, click the x icon.
- Click to start drawing the rectangle, and click again to confirm the selection.
- Click the checkmark icon to confirm the selection and continue with the auto-count.
- Select one of the following options for where you want to run the auto-count:
- Run on All Plans: The auto-count will be run on all plans within the project.
- Run on Active Plan Only: The auto-count will only be run on the plan that is currently selected.
- Manually Select Plans to Run On: The auto-count will be run on only the plans that you select. If using this option, mark the checkboxes next to the plans you want to include.
- Click Run Auto-Count.
- Symbol matches and possible matches are displayed for verification. Review the selections:
- In the 'Matches' section, check to see if all the symbols match. If not, click on the match to deselect the symbol.
- In the 'Possible Matches' section, check to see if any other symbols match the selected one.
- If you want to clear or select all selections in the Matches or Possible Matches sections, click Clear Selection or Select All.
- When you are finished reviewing the auto-count results, click Save & Close.
The selected symbols will be marked and counted. The counted number of materials will appear under the takeoff name.
To Add Linear Takeoffs
- Click Add Takeoff.
- Complete the following information:
- Material Name: Enter a material name, or click Catalog to select an item from the material catalog.
Note: If you select a material from the catalog, always check to make sure that it matches the client’s specification and unit prices. - Measurement Type: Click the drop-down menu and select the Linear measurement type.
- Line Width: Click the drop-down menu to select a line width.
- Color: Click the drop-down menu to select a color.
- Material Name: Enter a material name, or click Catalog to select an item from the material catalog.
- Click Add to Plan.
Note: After adding the material, an indicator will be displayed that it is now active and ready for use. This takeoff should be selected (and highlighted in blue) before starting to plot the segments. - On the Active Plan pane, point and click the cursor to the Starting point of the measurement and repeat it by segment until you reach the Endpoint of the linear measurement.
Note: Add multiple points or segments to accommodate the preferred linear measurement.- To delete a segment, press the BACKSPACE or DELETE key on your keyboard. To delete the entire line placement, press the ESC key on your keyboard.
- A linear measurement will appear:
- Double-click to complete the measurement.
The measured distance value will appear under the takeoff name.
- Double-click to complete the measurement.
To Add Area or Volume Takeoffs
- Click Add Takeoff.
- Complete the following information:
- Material Name: Enter a material name, or click Catalog to select an item from the material catalog.
Note: If you select a material from the catalog, always check to make sure that it matches the client’s specification and unit prices. - Measurement Type: Click the drop-down menu and select the Area / Volume measurement type.
- Color: Click the drop-down menu to select a color.
- Material Name: Enter a material name, or click Catalog to select an item from the material catalog.
- Click Add to Plan.
Note: After adding the material, an indicator will be displayed that it is now active and ready for use. This takeoff should be selected (and highlighted in blue) before starting to plot the segments. - On the 'Active Plan' pane, click the starting point of the area followed by different points to cover the area that you want to measure.
- To delete a point, press the BACKSPACE or DELETE key on your keyboard. Delete multiple points by pressing the BACKSPACE key one point at a time. To delete the entire measured area, press the ESC key on your keyboard.
- Double-click to complete the measurement. The selected area will be highlighted by the selected color, and the measured area will appear under the Take-Off name
- Optional: You can add additional parameters for the takeoff to add more detail for the set on the estimate.
- In the list of takeoffs, click the vertical ellipsis
 for the takeoff you are working on.
 - Click Additional Parameters.
- Click the toggle
 ON for a parameter that you want to add details for.
 - Enter information as necessary.
- Click Close.
- In the list of takeoffs, click the vertical ellipsis
Manage Takeoffs
- Log in to Procore Estimating.
- Select the relevant project and click the Take-Off tab.
- Click the takeoff you want to manage.
- View the tables below to see the actions that are available on the Take-Off page:
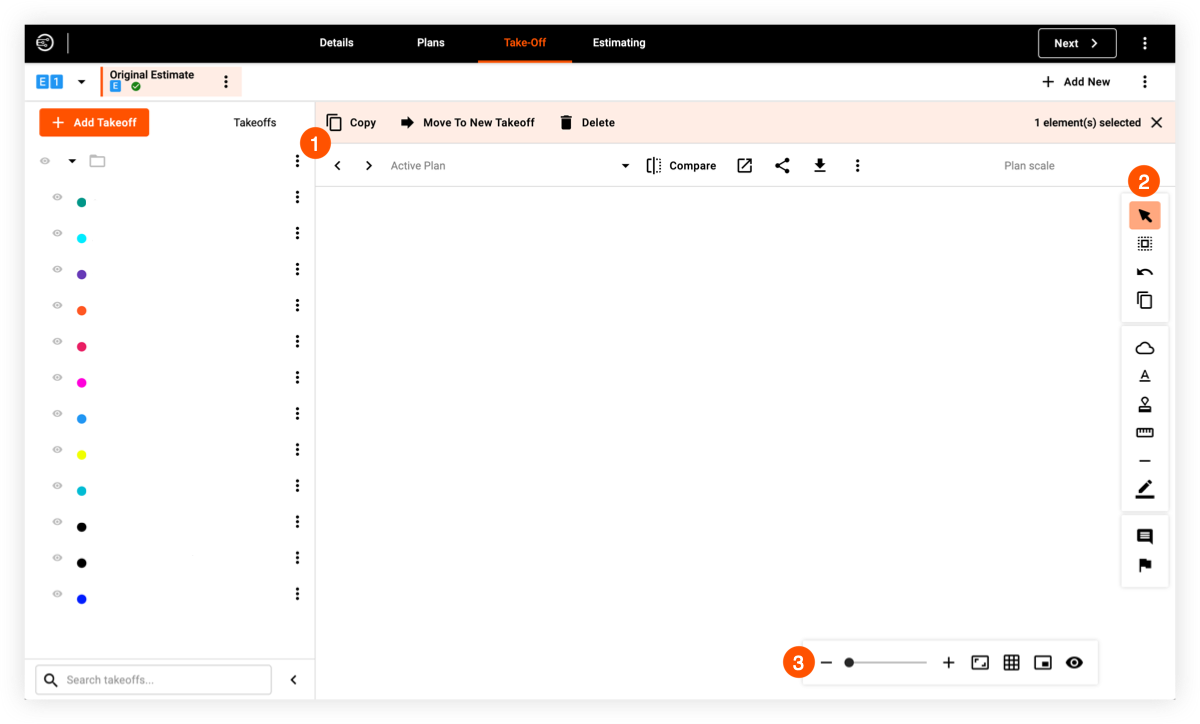
 Top Toolbar
| Icon | Tool | Description |
|---|---|---|
| Copy | Click Copy to copy the current selection to the clipboard. | |
| Paste | Click Paste to paste a selection that has been copied to the clipboard. | |
| Move to New Takeoff | Click Move to New Takeoff to move selected items to another takeoff. | |
| Delete | Click Delete if you want to delete selected items or materials on the drawing. Select the item or material using the Edit or Multiselect tool, then click Delete. | |
| Compare | Click the Compare icon to select another drawing to compare the current drawing with. | |
| Open | Click the Open icon to open the drawing in a new tab. | |
| Share | Click the Share icon to share the drawing through email. | |
| Download | Click the Download icon to download a PDF version of the drawing. |
 Tool Pallet
| Icon | Tool | Description |
|---|---|---|
| Edit / Selection | Click the Edit / Selection tool to select single items from the drawing. When an item is selected, you are able to edit, move, or delete it. | |
| Multiselect | Click the Multiselect tool to select multiple items from the drawing. When these items are selected, you are able to edit, group, move, or delete them | |
| Undo | Click the Undo icon if you want to undo the last action. | |
| Duplicate Drawing Area Tool | Click the Duplicate Drawing Area icon to duplicate the selected area of the drawing. After confirming the selection, a new drawing will be created. | |
| Cloud | Click the Cloud tool to add callouts on a section or area of the drawing. This is useful if you want to add notes, descriptions, feedback, and suggestions to your clients. This tool best works with the Annotation Tool, which allows you to add characters to the call outs. | |
| Annotation | Click the Annotation tool to create annotations, labels, notes, descriptions, suggestions, and feedback on materials or areas of the drawing. This tool works best with the Cloud Tool, which allows you to add callouts on a section or area of the drawing. | |
| Symbol Stamp | Click the Symbol Stamp tool to add symbols to existing drawings. This is a powerful tool that lets you add missing materials or client requested materials to a drawing. You can choose from a wide variety of designs by trade, or add custom symbols. | |
| Measure | Click the Measure tool to measure distance based on the drawing scale. This tool generates the actual distance of a measured area. | |
| Line / Arrow / Arc | Click the Line / Arrow / Arc tool to add lines, arrows, or arcs to the drawing. Hold the SHIFT key down while using a tool as needed. | |
| Highlight | Click the Highlight tool to highlight an area of the drawing. You can point and click on the area that you want to highlight, and drag it to complete. | |
| Note | Click the Note tool to add notes on the drawing. | |
| Task | Click the Task tool to add and assign tasks on the drawing. |
 Bottom Toolbar
| Icon | Tool | Description |
|---|---|---|
| Show Grid | Click the Show Grid icon to add overlayed grids to the drawing. The specialized grids are customizable depending on needs. This tool is useful for fire safety planning since you can efficiently add fire sprinklers and other related materials. | |
| Show Legend | Click the Show Legend icon to add a legend to the drawing indicating the material name and individual count of each material. | |
| Takeoff Settings | Click the Takeoff Settings icon to configure display settings for the takeoff. | |
| Zoom In | Click the plus icon to zoom in on the drawing. | |
| Zoom Out | Click the minus icon to zoom out on the drawing. |