Set the Drawing Scale for Takeoffs
Objective
To set the Drawing Scale of uploaded drawings to create estimates in the Estimating, Bid Board, or Portfolio Planning tool.
Background
By default, when viewing uploaded drawings to create estimates, the drawing scale is not configured. Setting up the drawing scale is imperative, since it determines the measurement between the plan and actual project. When configuring drawing scale for uploaded drawings, you can choose to use common scales or set the scale manually.
Things to Consider
- Required User Permissions for the Bid Board tool.
- Required User Permissions for the Estimating tool.
- Required User Permissions for the Portfolio Planning tool.
Prerequisites
- When using the Estimating tool, you must upload drawings.
Note: Drawings for Bid Board have already been added by the solicitor.
Steps
- Navigate to the Bid Board or Portfolio Planning tool and select the project.
OR
Navigate to the project's Estimating tool. - Click the Takeoffs tab.
- Next to 'Drawing Scale' click Not Defined Yet.
- You can choose between using common scales or manually set the scale. Follow the relevant steps for your preference below:
To Use Common Scales
- Click the Common Scales option.
- Click the drop-down menu to select the relevant scale.
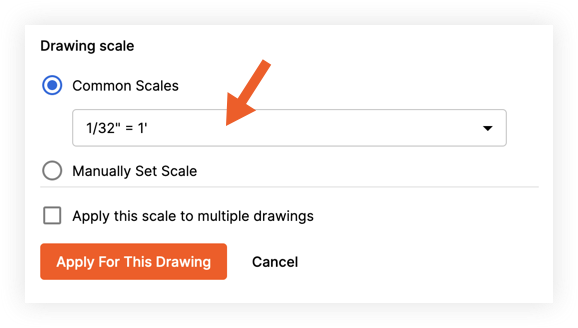
- Click Apply for This Drawing.
Note: If you want to apply the same scale for all plans, mark the checkbox next to Apply this scale to multiple drawings. - Optional: If you need to change the scale later, click the link next to 'Drawing Scale' to return to the Drawing Scale options.
To Manually Set Scales
- Click the Manually Set Scale option.
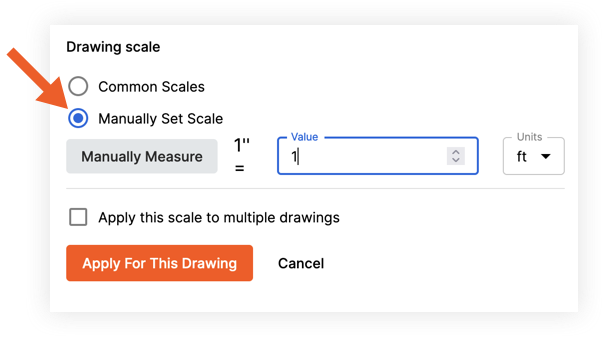
- Click Manually Measure:
This enables the reference line setting on the plan. - Draw a reference line on the plan by clicking a point for the start and end of the distance.
- Enter the known length of the distance in the feet (ft) and inches (in) fields.
- Click Save to apply the plan scale.
- Review the configured plan scale and click Apply for This Drawing.
Note: If you want to apply the same scale for all plans, mark the checkbox next to Apply this scale to multiple drawings. - Optional: If you need to change the scale later, click the link next to 'Drawing Scale' to return to the Drawing Scale options.