Objective
To create a transmittal using the project's Transmittals tool.
Background
Using the project's Transmittals tool, you can create a record of project information that has been sent to others via fax and shipping channels. When you create a transmittal and email a copy of it to your recipients, all of the information is captured and stored with your Procore project, including the names of the sender, recipient, and any relevant dates. For example, perhaps a user's email system is down and the only way to send an official response is via fax or a phone call. In such cases, you would want to create a transmittal in order to keep track of the correspondence, so a historical record is available for audit purposes in Procore.
Things to Consider
- Required User Permissions:
- To create a transmittal, 'Standard' or 'Admin' level permissions on the project's Transmittals tool.
- To be added to the 'To' or 'Cc' fields on a transmittal, the user must be added to the Project Directory. See Add a User Account to the Project Directory.
Steps
Create a Transmittal
- Navigate to the project's Transmittals tool.
- Click Create.

- Continue with these steps:
Add General Information to the Transmittal
- Scroll to General Information.
- Complete the data entry as follows:
-
Number: Procore automatically assigns numbers to new transmittals in sequential order. You may change this number as desired.
-
Subject: A descriptive subject for the transmittal.
-
To: Select people or distribution groups from the project's Directory. This action assigns the transmittal to the named individuals. If you choose to click the Create and Email button (or 'Save and Email' if you are an 'Admin' user editing an existing transmittal), the system will automatically email a notification about the transmittal to the recipients.
-
CC: Select people or distribution groups from the project's Directory. This action carbon copies the transmittal to the named individuals. If you choose to click the Create and Email button (or 'Save and Email' if you are an 'Admin' user editing an existing transmittal), the system will automatically email a notification about the transmittal to the recipients.
-
Sent Via: Select Attached to attach an item from Procore to the transmittal or Under Separate Cover. If you select Under Separate Cover, you can also select one of these options: Email, US Mail, Hand Delivery, FedEx, UPS, DHL, Express Mail, Fax, and Other.
-
Private: Mark this checkbox to hide the transmittal from everyone except 'Admin' level users, designated users in the 'To' and 'Cc' fields, and members of the default distribution group (see Configure Advanced Settings: Transmittals).
-
Submitted For: Mark the checkboxes that correspond to the reason the transmittal is being submitted. You have these choices: Approval, Your Use, As Requested, Review and Comment, or Further Processing.
-
Action as Noted: Mark the checkboxes that correspond to the desired action. You have these choices: Out for Signature, Approved as Submitted, Approved as Noted, Submit, Resubmitted, Returned, Returned for Corrections, Resubmit, Due By, Received, Received as Noted, and Sent Date. (Note: It is recommended that you work with your project's management to define the proper use for each of these default actions in your environment).
- Continue with Add Items to the Transmittal.
Add Items to the Transmittal
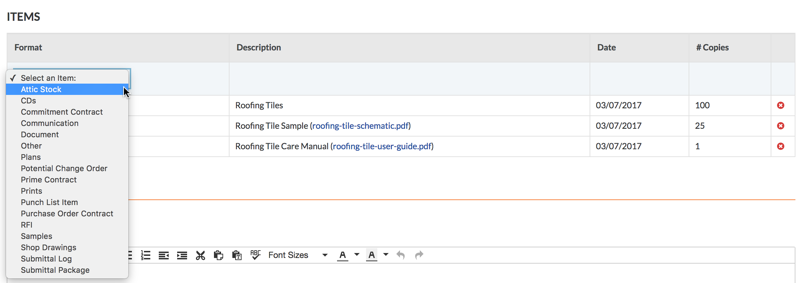
- In the New Transmittal page, scroll down to the Items area.
- Select an item from the Format drop-down list.
Notes:
- You can add multiple items to a transmittal.
- When adding items to a transmittal, the system lets you attach multiple files at once for these formats: Documents, Plans, Prints, Samples, and Shop Drawings. See How do I attach multiple files at once to a transmittal?
Depending on the Procore tools that are enabled in your environment, you may have these options:
-
Attic Stock: Select this option to create a transmittal for any attic stock Then enter a description, select a date from the calendar, and enter the number of copies.
-
CDs: Select this option to create a transmittal for a compact disc. Then enter a description, select a date from the calendar, and enter the number of copies.
-
Commitment Contract: Select this option to create a transmittal for subcontract (see Create a Subcontract). Next, select a subcontract from the Description list, the date of the subcontract is captured automatically, and then enter a number of copies.
-
Communication: Select this option to create a transmittal for an email message in the project's Emails tool.
-
Document: When you select this option, the system prompts you to select a document from the project's Documents tool.
-
Other: To create a different type of submittal, select this option. Then enter a description, select a date from the calendar, and enter a number of copies.
-
Plans: Select this option to create a transmittal for any construction plans. Then enter a description, attach any files to the item, select a date from the calendar, and enter a number of copies.
-
Potential Change Order: When you select this option, the system prompts you to select a potential change order from the project's Prime Contracts tool.
-
Prime Contract: When you select this option, the system prompts you to select a contract line item from the project's Prime Contracts tool.
-
Prints: Select this option to create a transmittal for prints. Next, enter a description of the print(s), attach a file of the print, select a date from the calendar, and enter a number of copies.
-
Punch List Item: When you select this option, the system prompts you to select a punch list item from the project's Punch List tool.
-
Purchase Order Contract: Select this option to create a transmittal for a purchase order (see Create a Purchase Order). Then select a purchase order from the Description list, the system sets the date automatically, and enter a number of copies.
-
RFI: When you select this option, the system prompts you to select an RFI from the project's RFIs tool.
-
Samples: Select this option to create a transmittal for a sample. Then type a description of the sample, attach a file to the item, select a date from the calendar, and enter a number of copies.
-
Shop Drawings: Select this option to create a transmittal for shop drawing. Then type a description of the shop drawing, attach a file to the item, select a date from the calendar, and enter a number of copies.
-
Submittal Log: Select this option to create a transmittal for a submittal. Then select a submittal from the Description list and specify the number of copies.
-
Submittal Package: When you select this option, the system prompts you to select a submittal package from the project's Submittals tool.
- Click Add.
Note: If you attached multiple files to the transmittal, each file is added as a separate line item.
- Repeat the steps above to add additional line items.
The illustration below shows you an example of a completed Items area.
Note: The system does NOT permit you to edit existing items. If you need to correct an item, click the RED 'x' to delete it. Then add the item again.

- Continue with Add Comments to the Transmittal.
Add Comments to the Transmittal
- In the New Transmittal page, scroll to the Comments area.
- Type any additional information about the transmittal in the Comments box.
- Continue with Create or Create and Send the Transmittal.
Create or Create and Send the Transmittal
- Scroll to the bottom of the New Transmittal page.
- Choose from these options:
- To create the transmittal without sending an email to the people listed in the 'To' and 'Cc' fields, click Create.
OR
- To create the transmittal and send an email notification to the people listed in the 'To' and 'Cc' fields, click Create and Email.
Notes: After a transmittal is created, the system makes the Related Items, Emails, and Change History tabs visible. The Emails tab gives users the ability to forward a transmittal to other project team members. See Forward a Transmittal by Email.
 .
.