Configure Single Sign-On in the Company Admin Tool
Objective
To configure Single Sign On (SSO) in the Company level Admin tool.
Background
Procore supports SP-initiated and IdP-initiated SSO with Okta, OneLogin, and Microsoft Azure AD. See What is the difference between SP- and IdP-Initiated SSO? Procore also supports SSO with other service providers that are SAML 2.0 and SHA 256 compliant.
Things to Consider
- Required User Permissions:
- 'Admin' level permissions on the Company level Admin tool.
- 'Admin' level permissions on the Company level Admin tool.
- Additional Information:
- Please contact your SSO service provider if you need assistance locating the Issuer URL, Target URL, and x509 Certificate.
Prerequisites
- Configure the Procore application in your identity provider's SSO software or solution.
- Obtain the required SSO Settings from your identity provider's SSO software or solution.
Steps
- Navigate to the Company level Admin tool.
- Under 'Company Settings,' click Single Sign On Configuration.
Note: The data you enter on the page below is always obtained from the issuer (e.g., Okta, OneLogin, or Microsoft Azure AD).Tip
See the links below for more detailed instructions about configuring SSO with Okta, OneLogin, Azure Active Directory, and Google.

- Enter the Single Sign On Issuer URL. This is commonly referred to as the issuer and is a unique URL that identifies the provider issuing a SAML request.
- Enter the Single Sign On Target URL. This is the URL that will receive SAML requests from the provider.
- Enter the Single Sign On x509 Certificate. This is the encrypted digital certificate information.
Optional - Unique Entity ID
When configuring SSO for a single Procore instance, you should NOT check this box.
If your company licenses more than one Procore instance, and you want to configure unique Procore enterprise applications within your IdP tenant for each instance, you can by enabling Unique Entity ID. If enabled, you are still limited to one (1) enterprise application per Procore company instance.
Important: SSO for Procore targets users by email domain. An email domain can only be targeted once in all of Procore, so if you're considering setting up SSO with Unique Entity IDs across multiple Procore instances, remember that you can only target an email domain once, in a single instance.
To generate a Unique Entity ID for an enterprise application, check the Enable Unique Entity ID box in the Procore Admin tool's SSO configuration page for the Procore instance you want to specify on an enterprise application. Checking this box will generate a unique Entity ID URL in the field below, which you will then copy and paste into the appropriate Entity ID field in your IdP's configuration page.
Notes: You must save your configuration with the box checked to generate the Unique Entity ID. Enabling this feature does not impact user membership or access to a given instance. Access to a company in Procore is determined by a user's presence in the Directory tool, and their configured permissions within Procore. Auto-provisioning with SSO is not supported at this time.
- Click Save Changes.
- Reach out to Procore Support or your company's Procore point of contact to request to target the email domains of users who will be authenticating through SSO.
- After you receive confirmation that the SSO configuration is ready, mark the Enable Single Sign On checkbox on the 'Single Sign On Configuration' page.
- Click Save Changes.
SUPERUSER ONLY
Important
Before adding the SSO settings from the supported integration into Procore, ensure that you have done the following in the SSO provider's console (e.g., Azure AD, Okta, or OneLogin). After those changes have been made, make sure that you update the x509 certificate with the SSO provider before copying them into Procore using the steps below.
Change from: https://app.procore.com
Change to: https://login.procore.com
Change from: https://app.procore.com/saml/consume
Change to: https://login.procore.com/saml/consume
- Log into Procore as a Superuser.
- Determine if the client requires one of the following
- Single Domain SSO Support
With single domain support, the client's end users will log into Procore from a single domain. Typically, this is the same domain as the end users email address. However, this is NOT always the case with all customers. You must verify the domain name entry with the customer's Procore Administrator.
OR - Multiple Domain SSO Support
With multiple domain support, the client's end users will log into Procore from multiple domains. This is more common for enterprise customers, who may manage their end users across multiple domains. For example, if one Procore user's login email address is @example-east.com and another user's login email address in @example-west.com, you will need to enter BOTH those domains.
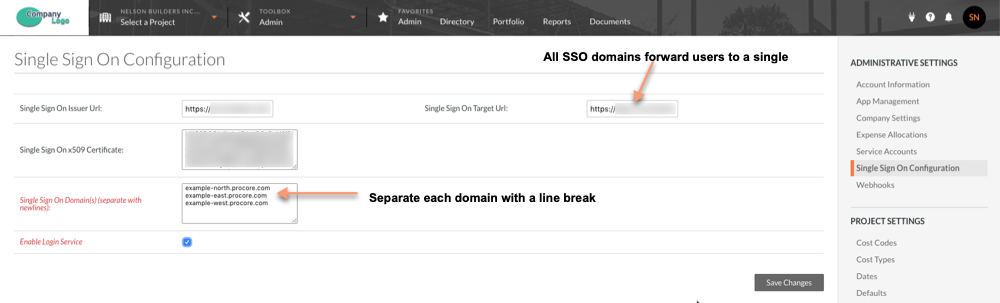
Important! There is no limit to the number of domains that you can enter in this list. However, you must separate each domain by a line break.
- Single Domain SSO Support
- Navigate to the Company level Admin tool.
- Under Administrative Settings, click Single Sign On Configuration.
- Ensure that the customer's Procore Administrator has entered the following information:
- Single Sign On Issuer URL. The issuer URL identifies the SAML provider. It is a unique URL that is provided to the client by the SSO provider (e.g., Azure AD, Okta, or OneLogin).
- Single Sign On Target URL. The target URL. There is always only one (1) URL, regardless of whether the client's account will use multiple domain support or single domain support.
- Single Sign On x509 Certificate. The certificate is always provided by the provider and entered by the client.
- In the Single Sign on Domain field, you can enter as many domains as needed. Make sure to separate each domain by a line break.
Note: All of the Single Sign On Domain entries will will forward to the Single Sign On Target URL.