Create and Send a Correspondence Item from Gmail
Objective
Create and Send a Correspondence Item from your Gmail client to Procore.
Background
You can use your Gmail client to create and send a correspondence item that is based on a specific correspondence type, such as a General Correspondence to Procore. You can create the correspondence item directly from an email item in your inbox and then have it sent to your Procore Web app.This article will use General Correspondence as the correspondence type for the correspondence item creation tutorial, however you can replace the 'General Correspondence' name throughout this tutorial with any other correspondence type you create to learn how to create a correspondence item for that correspondence type.
Things to Consider
Required User Permission:
- 'Standard' or 'Read Only' level permission on the project's Correspondence tool.
Prerequisites
To create and send a Correspondence Item to Procore from your Gmail client, you first need to do the following:
- Install the Procore Gmail plugin. For more information, see Install an App from the App Marketplace.
- Install the the Procore Gmail add-on on your Gmail client. For more information, see Install the Procore Gmail Add-on.
In addition, you must have the appropriate correspondence type (for this tutorial we are using "General Correspondence') created at the company level. See Create a New Correspondence Type or Edit a Correspondence Type.
Steps
- Open your Gmail client.
- Click the Procore icon on the left side bar to expand the Procore add-on menu.

- Select an from which you want to create your correspondence item and open it.
- In the right side panel, in the Procore add-on menu, complete the following instructions:
- Select a company from the dropdown menu.
- Select a Procore project from the dropdown menu.
- Click Create Draft Correspondence.
- From the dropdown list, select the Correspondence type, for which you want to create a correspondence item, and then click Continue For this tutorial, select General Correspondence.
- Click Continue. The content of the email you selected will display in the right panel. Scroll to the bottom of the panel to the 'Correspondence Description' section.
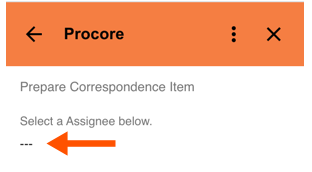
- Click Add Assignee.
- Under Select an Assignee below click the horizontal ellipsis, and select your assignee.
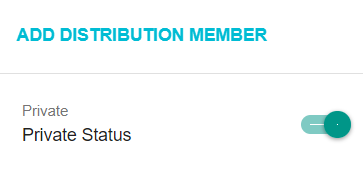
- Click Add Distribution Member.
- Under Select an Distribution below click the horizontal ellipsis, and select your distribution member.
- To make your correspondence item private, click the toggle next to Private Status.
- Click Send to Procore.
- After the correspondence item has been successfully sent, you will see a Success! message.
To view the correspondence item in the Procore Web app, click Open Correspondence in Procore.