Procore

Perform Bulk Actions on RFIs

PREVIOUS CURRENT LESSON (26 of 30) NEXT

  1. Navigate to the project's RFIs tool.
  2. Click the Items tab.
    This reveals a list of all the RFIs on the project. It does NOT include RFIs sent to the Recycle Bin. See Send an RFI to the Recycle Bin.
  3. Locate the RFIs that you want to modify in the Items list. Then do the following:
    • To select all of the RFIs in the list, mark the checkbox at the top of the left column.
      OR
    • To select one or more of the RFIs in the list, mark the check box to the left of each desired RFI. 
  4. Open the Bulk Actions menu and click Edit in the drop-down list. 
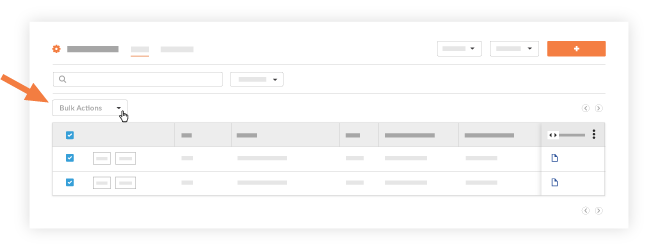
    perform-rfi-bulk-actions.png
    Note: The Bulk Actions menu is supported in the Items view. It it grayed out and unavailable in the Recycle Bin view. 
    This reveals the Bulk Edit page. The '# RFIs Selected' box shows the individual RFIs to which your edits will be applied. 
  5. Choose from these options to edit the selected RFIs:
    • RFI Manager*. Select an RFI Manager from the drop-down list. See What is the RFI Manager role?
      Notes:

      • By default, the name of designated RFI Manager appears here. See Designate the Default RFI Manager for a Project's RFIs.
      • If you are a user with 'Admin' level permission on the RFIs tool, you may select yourself or another user with 'Admin' level permission from the list. 
      • If you are a user with 'Standard' level permission, this list only populates with the names of users who have 'Admin' level permission to the RFIs tool. You may only select another user with 'Admin' level permission from the list. 
    • Responsible Contractor. This field is automatically prefilled with the company that is associated with the user selected in the 'Received From' field.

    • Received From. Select the person from whom the RFI question was received from the drop-down list. 

    • Location. Select the location pertaining to the RFI from the drop-down list. 
      Note: If Procore is configured to allow users to create locations (see Allow or Disallow Users to Create Locations Within a Tool), you can click the Create a New Location button at the bottom of the list. 

    • Private. Select Yes or No from the drop-down list. Yes indicates the RFI(s) will be marked Private. No indicates the RFI(s) will NOT be marked Private. For more information about privacy, hover your mouse cursor over the question mark icon (?) to view a tooltip.

    • Cost Impact. Select one of the following options from the drop-down list. 

      • Yes. Select this option if you know the amount by which the cost will be impacted. Then enter a number in the $ box to indicate the cost impact.
      • Yes (Unknown). Select this option if you know the cost will be impacted, but the amount is not know. 
      • No. Select this option if there is no impact to the cost. 
      • TBD. Select this option if you have yet to determine if there is a cost impact. 
      • N/A. Select this option if the cost impact is not applicable to this RFI. 
    • Schedule Impact. Select one of the following options from the drop-down list. 

      • Yes. Select this option if you know the number of days by which the schedule will be impacted. Then enter a number in the Days box to indicate the total number of calendar days.
      • Yes (Unknown). Select this option if you know the schedule will be impacted, but the number of days is not known. 
      • No. Select this option if there is no impact to the schedule. 
      • TBD. Select this option if you have yet to determine if there is a schedule impact. 
      • N/A. Select this option if an impact to the schedule is not applicable to this RFI. 
    • Due Date. Enter or select a date from the calendar for the RFI response to be due. This field is only visible and available to users with 'Admin' level permissions on the project's RFIs tool.
      Note: The 'Due Date' field is automatically populated based on the default number of days specified on the RFIs tool's Configure Settings page. See Configure Advanced Settings: RFIs. The due date also respects which days are set as 'working days' for the project. See Set Project Working Days.

  6. Click Save Edits
    This applies the specified edits to all the selected RFIs. A GREEN banner appears to confirm the total number of RFIs that were successfully edited. A RED banner will appear in the event that the edits were not successfully saved.