Budget & Forecast Snapshots: User Guide
Table of Contents
- Overview
- Considerations
- Key Features
- Manage Access
- For a Project
- For the Company
- More
Overview
Considerations
Key Features
These are the key features:
Create Ad Hoc or Project Status Snapshots
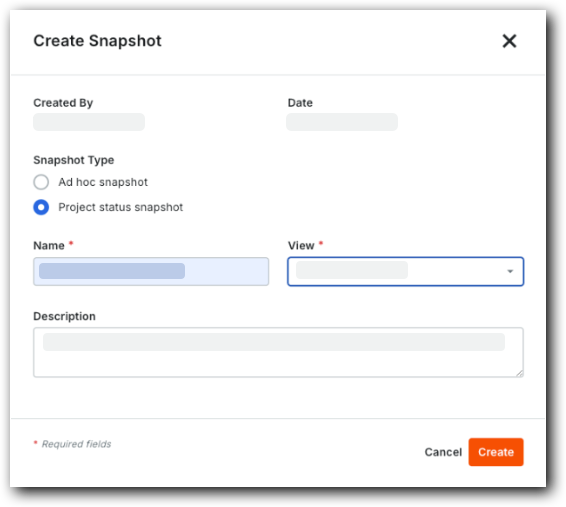
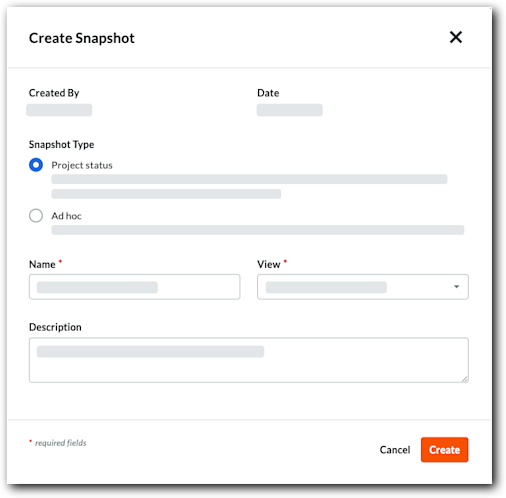
The Create Snapshot window in the Project level Budget tool contains these options to create snapshots. To learn more about snapshots, see Create a Snapshot from the Budget Tool and What is the difference between an ad-hoc snapshot and a project status snapshot?
Important
It's essential to note that once your company enables this feature, all previous snapshots in your Procore project(s) will be automatically classified as ad-hoc.Example
This is an example of the Snapshot Type options in the Create Snapshot window of the Project level Budget tool.
View Historical Project Status Snapshots
The Project Status Snapshots tab in the Budget tool allows your team to view all project snapshots in one place. This includes the snapshot's name, a description (if entered), and its status in your workflow. The table also includes a date and time stamp showing when it was created and the creator's user name.
Example
This is an example of the Project Status Snapshots tab.

Manage the Review Workflow for Project Status Snapshots
For teams with a formal process for reviewing project status snapshots, users can conveniently click the drop-down menus in the Status column to indicate the snapshot's status. This is helpful for teams who review snapshots regularly (i.e., weekly, monthly, and so on). Users can change the status of a snapshot line item in the Project Status Snapshots tab in the Project level Budget tool or with the Company level Project Status Snapshots tool.
Example
This shows the drop-down menus in the Status column of the Project Status Snapshots tab in the Budget tool.

Configure Columns
Users can click Configure to choose which columns to show and hide. Once configured to show, users can drag-and-drop the table's columns to any location in the table. For example, if users want to see whether a budget line item is over or under its projected value, move the Projected over Under column to the left side of the table. If users want to see the estimated cost of the budget line item at completion, move the Estimated Cost at Completion column to the left.
Users can configure the columns to show/hide in the Project Status Snapshots tab in the Budget tool or with the new Company-level Project Status Snapshots tool. See Configure Columns for the Project Status Snapshots Tool.
Example
This is an example of the Configure option on the Project Status Snapshots tab.

Analyze Budget Variance Between Project Status Snapshots
To analyze budget variance, click the Variance icon in the data table's column headers. This expands the selected column group to show the line item's current value, previous value, and variance. This eliminates the need to calculate variance in third-party spreadsheets.
Example
This shows the Variance icon in a column header with an expanded column group showing the Current and Previous values for the budget line items, as well as the Variance.

Export Project Status Snapshots
Users can click Export to download the list snapshots in the Project Snapshots tab to a Comma Separated Values (CSV) file format for offline access.
Example
This shows the Export option on the Project Status Snapshots tab.

Monitor and Review Snapshots Across Projects
The Company level Project Status Snapshots tool transforms how your teams monitor and review snapshots by consolidating all of your project's status snapshots in a single location. Access to the tool is controlled by the company permission templates that an administrator configures for your team. This lets your team save valuable time by eliminating the need to distribute project snapshots by alternate means, such as email. Users also no longer need to post PDF copies and manage copies in an outside information silo.
Example
This shows the Company level Project Status Snapshots tool.

Manage Company Level Access Permissions with Permission Templates
Company-level permission templates are the best way to control who can create or view snapshots with the Company level Project Status Snapshots tool. An administrator can then manage access based on user roles and responsibilities.
Control Access to the Company Level Project Status Snapshots Tool
In a company permissions template's Financial Management section, the default permission setting is None. You can only configure access to Read Only or Standard; Admin level permissions are unavailable for the Project Status Snapshots tool.

Adjusting Permission Settings:
- To allow users to view all project status snapshots, choose 'Read Only' level permissions.
- To allow users to change the status of a project status snapshot or export a snapshot list, choose 'Standard' level permissions.
Manage Access
Company and project permission templates are the best way to control who can create or view snapshots. An administrator can then manage access based on user roles and responsibilities.
Things to Consider
- Required User Permissions:
- To manage company and project permission templates, 'Admin' level permissions on the Company level Permissions tool.
Manage Access to Project Status Snapshots at the Company Level
An administrator controls access to the Company level Project Status Snapshots tool using company permissions templates. See these steps:
Example
In a company permissions template's Financial Management section, the default permission setting is None. You can only configure access to Read Only or Standard; Admin level permissions are unavailable for the Project Status Snapshots tool.
Adjusting Permission Settings:
- To allow users to view all project status snapshots, choose 'Read Only' level permissions.
- To allow users to change the status of a project status snapshot or export a snapshot list, choose 'Standard' level permissions.
Manage Access to Snapshots at the Project Level
To see project status snapshots in specific Procore projects and their own ad hoc snapshots, users need access to the Budget tools within those projects. Users only see data for the projects they have permission to access. See these steps:
Example
This example shows the available permission levels for the Budget tool in the Financial Management section of a project permissions template. A template's default setting is None.

Create a Snapshot
Create a Snapshot from the Budget Tab
Users can create a Project Status Snapshot or an Ad Hoc Snapshot from the Budget tab. Only Project Status Snapshots are saved.
-
Navigate to the project's Budget tool.
-
Click the Budget tab.
-
Click Create Snapshot.
This opens the Create Snapshot window.
-
Under Snapshot Type, choose an option:
-
Project status. Choose this option for official reporting, such as a monthly report that needs review.
-
Ad hoc. Choose this option for a simple snapshot.
-
-
Enter the snapshot information:
-
Name. Enter a name for the snapshot.
-
View. Select a budget view for the snapshot.
-
Description. Enter a description of the snapshot.
-
-
Click Create.
When complete, the Snapshot Created banner appears at the top of the page.

Create a Snapshot from the Forecasting Tab
Users can create an ad hoc snapshot from the Forecasting tab.
-
Navigate to the project's Budget tool.
-
Click the Forecasting tab.
-
Click Create Snapshot.
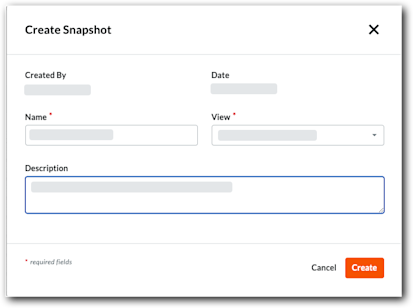
This opens the Create Snapshot window.
-
Enter the snapshot information:
-
Name. Enter a name for the snapshot.
-
View. Select a budget view for the snapshot.
-
Description. Enter a description of the snapshot.
-
-
Click Create.
When complete, the Snapshot Created banner appears at the top of the page.
View a Snapshot
There are different ways to view snapshots in the Budget tool.
View a Project Status Snapshot from the Project Status Snapshots Tab
Any user can view a project status snapshot tab from this tab. Ad-hoc snapshots are not saved and do not appear in this tab.
- Navigate to the Project level Budget tool.
- Click the Project Status Snapshots tab.
- In the Name column, click the snapshot to open.
- The system opens the snapshot in your web browser. A Viewing from Snapshot banner appears.

- Click the View Current Data button to return to your project's current budget data
View a Project Status Snapshot from the Project Status Snapshots Tab
Any user can view a project status snapshot tab from this tab. Ad-hoc snapshots are not saved and do not appear in this tab.
- Navigate to the Project level Budget tool.
- Click the Project Status Snapshots tab.
- In the Name column, click the snapshot to open.
- The system opens the snapshot in your web browser. A Viewing from Snapshot banner appears.
- Click the View Current Data button to return to your project's current budget data.
View a Project Status Snapshots as the Snapshot Creator
Snapshot creators can also view a snapshot immediately after it's created.
- Complete the steps in Create a Budget Snapshot.
When saved, the Snapshot Created banner displays.

- Click View Snapshot Data.
- The label on the banner changes to Viewing from Snapshot.
- Review the snapshot as needed.
- Click the View Current Data button to return to your project's current budget data.
View an Ad-Hoc Snapshot as the Snapshots Creator
Ad Hoc snapshots can only be viewed after creation. Only project status snapshots are saved.
- Complete the steps for an ad-hoc snapshot in Create a Budget Snapshot.
When saved, the Snapshot Created banner displays.

- Click View Snapshot Data.
- (Optional) See Export a Budget Snapshot if you want to save it.
Important
Ad-hoc snapshots aren't saved after the current session. You must export it if you want to see it later. - Click the View Current Data button to return to your project's current budget data.
Configure Columns
- Navigate to the Project level Budget tool.
- Click the Project Status Snapshots tab.
- Click Configure Columns.
This opens the Table Settings panel.

- Under Configure Columns, you have these choices for each available column:
- Show columns. Move the toggle switch to the right. The system's default setting is to show all available columns.
- Hide columns. Move the toggle switch to the left.
- When finished, click the Close (x) icon on the panel.
Apply a Budget View
Navigate to the project's Budget tool. Then click the Budget, Budget Details, or Project Snapshot Status tab and select an option from the View menu. To add views to this menu, see Assign a Budget View to a Project.

Note
-
Procore offers company accounts several standard budget views. See What are Procore's standard budget views?
-
Your company can create custom budget views or modify existing views. For details, see Set up a New Budget View.
View a Budget Snapshot
Navigate to the project's Budget tool. Then, click the Budget or Forecasting tab and select an option from the Snapshot menu. To add snapshots to this menu, see Create a Budget Snapshot.

Analyze Variance
Analyze Line Item Variance on the Budget Tab
In Beta
An enhanced budget table is available for analyzing line item variance between budget snapshots. See Analyze Line Item Variance Between Budget Snapshots (Beta).This action analyzes variance by comparing a snapshot with the active budget.
-
Navigate to the project's Budget tool.
-
Click the Budget tab and select a standard or custom budget view from the View menu.
-
Click Analyze Variance.
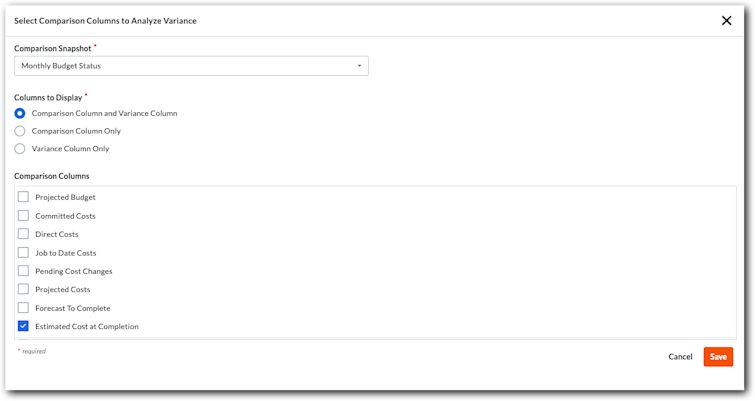
This opens the Select Comparison Columns to Analyze Variance window. -
From the Comparison Snapshot menu, select the snapshot to compare it with your budget data.
-
Under Columns to Display, choose one (1) option:
-
Comparison Column and Variance Column. Shows both values.
-
Comparison Column Only. Shows the value from the comparison snapshot.
-
Variance Column Only. Shows the variance between the comparison snapshot and active budget.
-
-
Under Comparison Columns, mark one or more checkboxes to select the columns to analyze for variance.
-
Click Save.
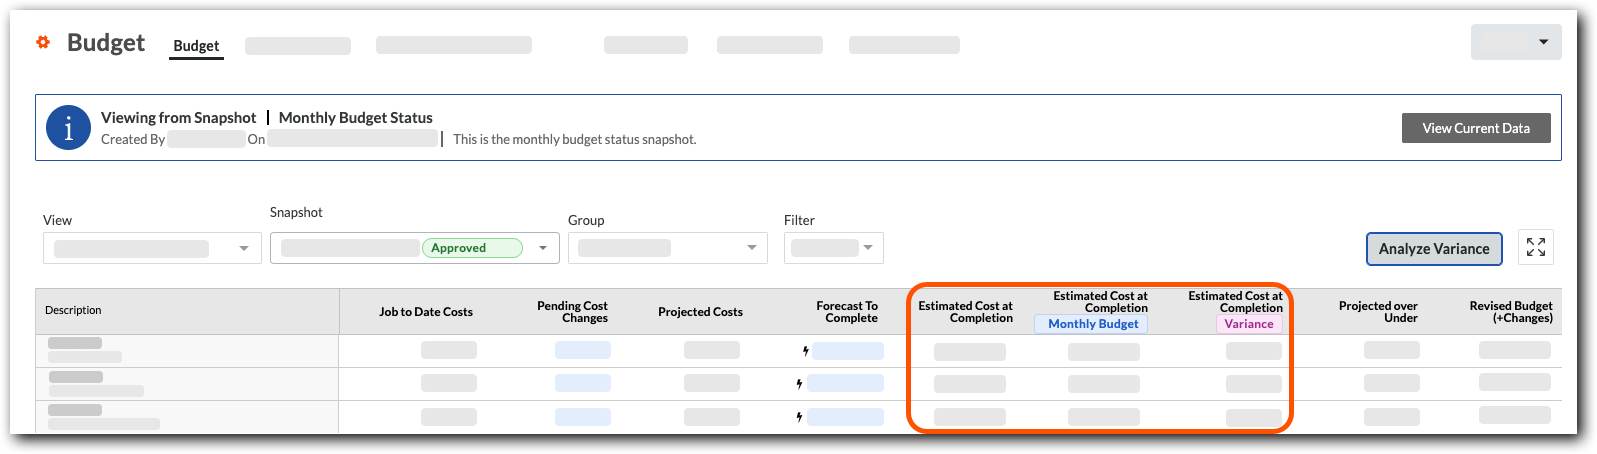
Procore analyzes the current budget and snapshot for variance.Example
This example shows the Comparison Column and Variance Column option using Estimated Cost at Completion as the comparison column. The blue column label shows the snapshot data. The column labeled Variance shows the difference between the snapshot and your budget.
Analyze Aggregate Variance Between Snapshots on the Project Status Snapshots Tab
This action analyzes the aggregate variance between two snapshots.
-
Navigate to the project's Budget tool.
-
Click the Project Status Snapshots tab and select a standard or custom budget view from the View menu.
-
Click the snapshot Name to open it.
-
On a column where it's available, click the Variance icon.
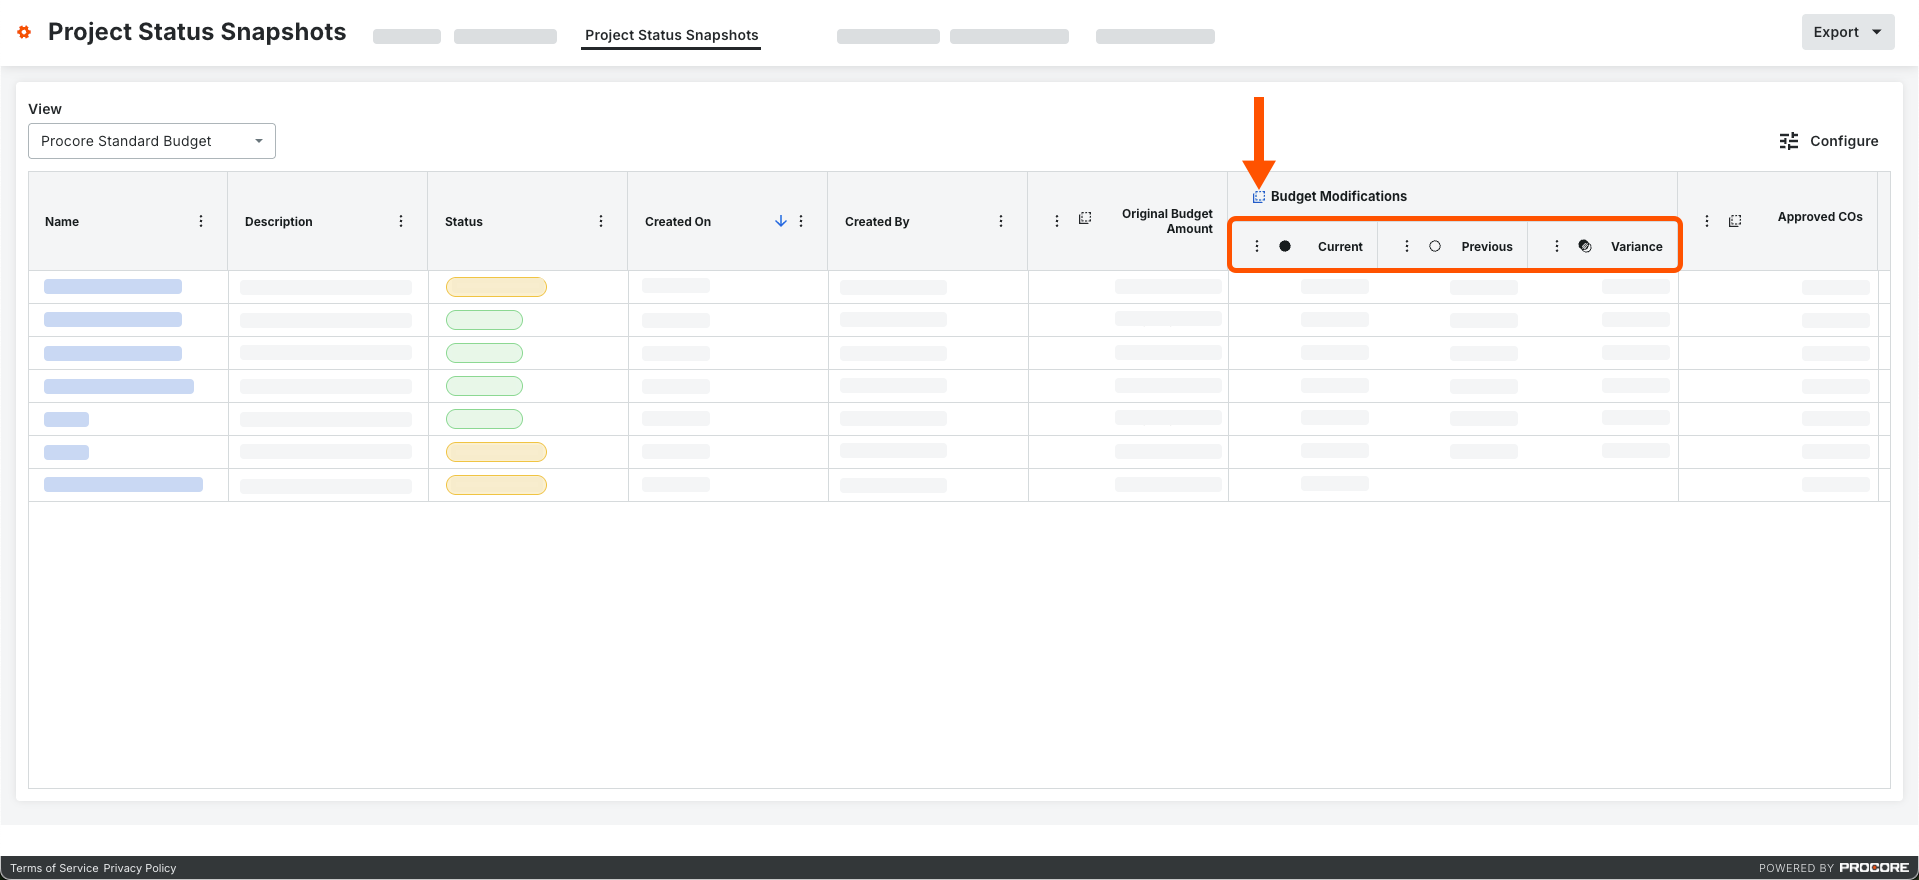
This expands the column to show the Current, Previous, and the Variance between the two snapshots.Example
This example shows the Current, Previous, and Variance columns that appear when you click the Variance icon on a column.
Export a Snapshot
- Navigate to the Budget tool.
- Click Budget or Forecasting tab.
- Create or view a snapshot.
Note
Ad Hoc and Project Status Snapshots are available for the Budget tab. Only Ad Hoc Snapshots are available for the Forecasting tab. - (Optional) Choose the budget view and apply any filtering or grouping options to the snapshot.
- Click Export.

Note
Because CSV is a flat file format, any applied grouping options are not included in exports to CSV. - Choose one of these options from the menu:
- CSV. This downloads a CSV file to the location configured in your web browser.
- PDF. This opens a PDF version of the file in a new browser window. To download it, use the options available in your web browser's PDF viewer.
Export a Snapshots List
- Navigate to the Project level Budget tool.
- Click the Project Status Snapshots tab.
- Modify the data table as needed. Your choices are:
- Select a standard budget view or one of your company's custom budget views from the View menu. See Set up a New Budget View.
- Click Configure Columns to show/hide columns from the display or to change the order of the column layout. See Configure Columns for the Project Status Snapshots Tab of the Budget Tool.
- Click Export and choose CSV from the menu.
This downloads a CSV file to the location configured in your web browser.
View Snapshots
- Navigate to the Company level Project Status Snapshots tool.
Tip
Want to filter the data you're viewing? See Apply Filters to the Project Status Snapshots Tool. - Locate a snapshot in the list.
- (Optional) If you want to view the snapshot, click the Open
 icon in the Project column.
Important
To see project status snapshots in specific Procore projects and their own ad hoc snapshots, grant users access to the Budget tools within those projects.

Configure Columns
- Navigate to the Company level Project Status Snapshots tool.
- Click Configure Columns.
This opens the Table Settings panel.

- Under Configure Columns, you have these choices for each available column:
- Show columns. Move the toggle switch to the right. The system's default setting is to show all available columns.
- Hide columns. Move the toggle switch to the left.
- When finished, click the Close (x) icon on the panel.
Apply Filters
- Navigate to the Company level Project Status Snapshots tool.
- Select a budget view from the View list.
- Click Filters.
This opens the Filters panel.

- Set the available filters to focus on the snapshots you want to view. Options are:
- Created By. Choose one or more snapshot creators.
- Created On. Set a time frame using the calendar.
- Project. Select specific projects to view their snapshots.
- Region. Pick a project region.
- Stage. Choose a project stage.
- Office. Select an office.
- Department. Pick a department.
- Program. Select a program.
Change Snapshot Status
- Navigate to the Company level Project Status Snapshots tool.
- Locate the project status snapshot in the table.
- Click the snapshot's Status cell and choose the desired status.

This updates the snapshot status at both the company and project levels.
Analyze Variance
Analyze Line Item Variance on the Budget Tab
In Beta
An enhanced budget table is available for analyzing line item variance between budget snapshots. See Analyze Line Item Variance Between Budget Snapshots (Beta).This action analyzes variance by comparing a snapshot with the active budget.
-
Navigate to the project's Budget tool.
-
Click the Budget tab and select a standard or custom budget view from the View menu.
-
Click Analyze Variance.
This opens the Select Comparison Columns to Analyze Variance window. -
From the Comparison Snapshot menu, select the snapshot to compare it with your budget data.
-
Under Columns to Display, choose one (1) option:
-
Comparison Column and Variance Column. Shows both values.
-
Comparison Column Only. Shows the value from the comparison snapshot.
-
Variance Column Only. Shows the variance between the comparison snapshot and active budget.
-
-
Under Comparison Columns, mark one or more checkboxes to select the columns to analyze for variance.
-
Click Save.
Procore analyzes the current budget and snapshot for variance.Example
This example shows the Comparison Column and Variance Column option using Estimated Cost at Completion as the comparison column. The blue column label shows the snapshot data. The column labeled Variance shows the difference between the snapshot and your budget.
Analyze Aggregate Variance Between Snapshots on the Project Status Snapshots Tab
This action analyzes the aggregate variance between two snapshots.
-
Navigate to the project's Budget tool.
-
Click the Project Status Snapshots tab and select a standard or custom budget view from the View menu.
-
Click the snapshot Name to open it.
-
On a column where it's available, click the Variance icon.
This expands the column to show the Current, Previous, and the Variance between the two snapshots.Example
This example shows the Current, Previous, and Variance columns that appear when you click the Variance icon on a column.
Export a Snapshots List
- Navigate to the Company level Project Status Snapshots tool.

- Click the Export menu and choose CSV.
This downloads a CSV file to the configured location for your web browser.