Resource Planning: Set Up Guide
Table of Contents
- Welcome
- Groups
- Job Titles
- Tags
- Custom Fields
- User Permissions
- Import Resource Planning Data
- Data Management
- Additional Configurations
- Update Users in Procore
- Invite Users to Procore
- Success!
Welcome
What are groups?
Considerations and Best Practices
Configuration Steps
- Navigate to the Company level Resource Planning tool.
- Click the Configure Settings
 icon.
icon. - Click Groups.
- Click New.
- Configure your group with the following properties:
Note: Required fields are marked with an asterisk (*).- Group Name. Enter the group's name.
- Timezone. Select the group's timezone.
- Group Address. Enter the group's street address.
- Group Address 2. Enter the group's street address, continued.
- City/Town. Enter the group's city or town.
- State/Province. Enter the group's state or province.
- Postal Code. Enter the group's postal code.
- Country. Enter the project's country.
- Contact Name. Enter the group's contact name.
- Contact Phone. Enter the group's contact phone number.
- Contact Email. Enter the group's contact email address.
- Color. Select the the group's color.
- Picture. Add the group's picture.
- Icon. Select the group's icon.
- Click Save.
What are job titles?
Considerations and Best Practices
- Required User Permissions
- Job titles can be rearranged in this list using the reorder
 icon.
icon.
Tip
- Set up your job titles as you would when building a labor plan. Job titles should be granular enough that you can easily assign the correct resource, but not so granular to have job titles that you never request.
- You can add an hourly rate to a job title which allows you to manage cost using job titles instead of individual people.
Configuration Steps
- Navigate to the Company level Resource Planning tool.
- Click the Configure Settings icon.
- Click Job Titles.
- Click New.
- Configure your job titles with the following properties:
- Name. Enter the name of the job titles.
- Color. Enter the color for the job titles.
- Type. Select whether the job is paid on an hourly or salaried basis.
- Globally Accessible to All Groups. Mark this checkbox if you want to make this job title available in all groups. See Configure Groups for Resource Planning.
- Groups. If you chose to limit the tag from being available in all groups, select which groups should have access to the job title.
- Hourly Rate. Enter the default or average hourly rate for that job title.
Note: This is typically the general rate for the job title and used for forecasting or estimating.
- Click Save.
What are tags?
Considerations and Best Practices
Configuration Steps
- Navigate to the Company level Resource Planning tool.
- Click the Configure Settings icon.
- Click Tags.
- Optional: To group tags in categories, click the Group Tags in Categories? toggle to ON.
- To create a new tag Category, click New in the 'Categories' section.
- Enter the Category Name.
- Click Save.
- In the Tags section, click New.
- Configure your tag with the following properties:
- Name*. Enter the name of the tag.
- Color. Enter the color of the tag.
- Require Expiration Date. Mark this checkbox if the tag requires an expiration date.
Note: If requiring an expiration date, the expiration date needs to be added when adding the tag to a person's profile. This is commonly used to track a person's certifications. For more information, see How do I use tags with expiration dates? - # Days Warning Ahead of Expiration. Enter the number of days in advance the person will be notified when their tag is expiring.
- Globally Accessible to All Groups. Mark this checkbox if you want to make this tag available in all groups. See Configure Groups for Resource Planning.
- Groups*. If you choose not to make the tag available to all groups, select which groups should have access to the tag.
- Abbreviations (5 Characters). Enter the tag's abbreviation.
- Categories. If you chose to categorize your tags, select the categories in which the tag should appear.
- Click Save.
What are custom fields?
Considerations and Best Practices
Configuration Steps
- Navigate to the Company level Resource Planning tool.
- Click the Configure Settings icon.
- Click Custom Fields.
- Click New.
- Configure your custom field with the following properties:
Note: An asterisks (*) indicates a required field.- Field Name*. Enter the name of the custom field.
- Field Type*. Enter the type of field you are configuring. S
Notes:
A dagger (†) indicates that you can also filter data by this field on the 'People List,' 'Project List,' 'Assignment List,' and 'Request List'.- Text †: Enter words or a short phrase as a value for the custom field.
- Number †: Enter numbers as a value for the custom field.
- Drop Down †: Create a single-select list to enter the value for the custom field.
- Drop Down Options Sort. Choose whether you want to sort the drop-down menu by Alphanumeric or the Order Listed in your Field Options.
- Field Options. Enter the options for the Drop Down menu.
- Multi-Select Drop Down †: Create a single-select list to enter the value for the custom field.
- Drop Down Options Sort. Choose whether you want to sort the multi-select drop-down menu by Alphanumeric or the Order Listed in your Field Options.
- Field Options. Enter the options for the Multi-Select Drop Down menu.
- Date †: Select a date as a value for the custom field.
- Checkbox †: Mark a checkbox as a value for the custom field.
- Color: Add a distinguishing color as a value for the custom field.
- Paragraph Text: Enter a large set of words as a value for the custom field.
Note: Paragraph Text is not available to use as a column on the Project List or People List. - Currency †: Enter a currency amount as a value for the custom field.
- Enable Use as Filter. For filterable custom fields with Field Types, mark the checkbox to make the custom field a filter on the relevant 'People List,' 'Project List,' 'Assignment List,' and 'Request List'.
- Integration Property Name. Reflects the name of the property the integrating system can map to.
- Integration Editable Only. Mark this checkbox if the field can only be edited in the system of origin.
- Make Available To*. Mark the checkboxes for where the custom field will be added. You can add custom fields to Projects, People, Assignments, and Requests.
- Field Description. Enter a description of the custom field.
- Click Save.
What are User Permissions?
Configure a Company Permission Template
Considerations and Best Practices for Resource Planning Templates
- Required User Permissions
- People who are 'Users' or 'Both' must be assigned a permissions template.
- Users can only be assigned one permissions template at a time in Resource Planning.
- You can click the Info
 icon next to each granular permission to see details.
 - The 'Admin' template has all granular permissions enabled and cannot be edited or deleted.
Tip
- Your permissions should reflect your user roles and their actions that are required.
- For example, your Superintendent would likely take different actions than a person on your Human Resources team.
- With the exception of the 'Admin' permission template, you can edit the existing templates or create new ones to match your actual workflow and access.
- We recommend creating a permission template for field workers, even if they have few or zero permissions selected for Resource Planning. This is because in Procore, you can manage timekeeping for your resource, as long as their User Type is 'Users' or 'Both'. Those users must have a permission template assigned.
Configure Resource Planning Permissions Templates
- Navigate to the Company level Resource Planning tool.
- Click the Configure Settings icon.
- Click Permissions.
- Click New.
- Enter the Name of the permissions template.
- Mark the checkbox for each granular permission you want to enable on the permissions template.
- Click Save.
Prepare Data
Objective
How to prepare data for a one time import to the Resource Planning tool.
Background
The Resource Planning tool at the Company level is Procore’s construction resource management solution that provides real-time insight into your job assignments and availability.
To set up your Resource Planning tool, Procore offers a data import to set up your projects, employees, and more. While only certain fields are required, it's recommended to fill out as much information as accurately as possible for the most complete setup.
Things to Consider
- Customers can use this process one (1) time to set up their Resource Planning Tool.
- No special characters (~`!@#$%^&*()_{[}]|:;“‘<,>.?/)
Tip
- Fill out as much information as possible for the most complete setup.
- Review the spreadsheet for accuracy before submitting it.
Video
Steps
- Navigate to the Company level Resource Planning tool.
- Click the Configure Settings icon.
- Click Data Upload.
- Click the Excel Template to download the template.
- Fill out the template with following information:
- Save the file.
Groups
Show/Hide Fields
Required fields:
- Group Name
The title of Resource Planning group. Hyphens (-) are accepted. Example: Kansas City - Group ID
The abbreviated group identifier. Example: KS - Time Zone
The time zone of the group location. Example: America/Chicago
Additional Options:
America/Chicago
America/Los_Angeles
America/New_York
America/Denver
Australia/Brisbane
Australia/Sydney
Australia/Adelaide
Australia/Darwin
Australia/Perth
Pacific/Auckland
Optional fields:
- Address 1
The address of the group location. Example: 1234 Main St - Address 2
The address of the group location. Example: Suite 320 - City/Town
The city of the group location. Example: Kansas City - State/Province
The state abbreviation code of group location, formatted with all uppercase letters. Example: MO - Postal Code
The postal code of the group location (for US Customers). Example: 62113 - Country
The country of the group location, formatted as a standard country code. Example: US - Contact Name
The name of the point of contact for the group. Example: John Smith - Contact Phone Number
The phone number for the group's point of contact.
The format is +[country code]XXXXXXXXXX. Examples: +19135558225, or +6421345687. - Contact Email
The email address for the group's point of contact. Example: test@test.com
Job Titles
Show/Hide Fields
Required fields:
- Job Title Name
The name of the job title. Hyphens (-) are accepted. Example: Apprentice - Job Title ID
The abbreviated job title identifier. Example: APP - Group ID(s)
The group(s) the job titles are a part of. The ID must match Group ID in the 'Group' tab exactly. Example: KS
If there are more than one group, each group must be separated by a pipe (|) with no spaces. Example: KC|LA
If the job title belongs to all groups, type 'All'. Example: All
Optional fields:
- Job Title Color
The HEX value associated with the Job Title. Example: #FFA500
Tags
Show/Hide Fields
Required Fields:
- Tag Name
The name of certification/training/badging tag. Hyphens (-) are accepted. Example: OSHA 30 - 5-Digit (Character) Identifier
The abbreviated name of tag that can be easily identified on the Boards and List views. This field can support up to five (5) characters. Example: OSH30 - Group ID(s)
The group(s) the tags are a part of. The ID must match Group ID in the 'Group' tab exactly. Example: KS
If there is more than one group, each group must be separated by a pipe (|) with no spaces. Example: KC|LA
If the job title belongs to all groups, type 'All'. Example: All - Does this Tag Expire? (Y/N)
Whether or not the tag can expire, like a certification. Example: Y
Optional Fields:
- Tag Color (HEX value)
The HEX value associated with the tag. Example: #FFA500 - # of Days Warning
If this tag expires, a warning period (in days) can be set to notify users about expiring tags. Example: 60 - Categories
The name of the tag category the tag belongs to. Example: Safety.
If there is more than one group, each group must be separated by a pipe (|) with no spaces. Example: Safety|Badging
Tag Categories
Show/Hide Fields
Required fields:
- Category Name
The category names that are used to organize tags. Example: Safety
People
Show/Hide Fields
Required fields:
- First Name
The first name of employee. Hyphens (-) and apostrophes (') are accepted. Example: John - Last Name
The last name of the employee. Example: Smith - Group ID(s) Available To
Which groups the employees should be visible. The ID must match Group ID in the 'Group' tab exactly. Example: KS
If there is more than one group, each group must be separated by a pipe (|) with no spaces. Example: KC|LA
If the job title belongs to all groups, type 'All'. Example: All - Status (active/inactive)
The current status of the employee. Example: active - Assignable (Y)
All employees must be added as assignable in the data upload. After the data upload is complete, you can update this in the Resource Planning tool. Example: Y - Employee ID
The employee's ID number. Example: B18283
Optional Fields:
- Job Title ID
The job title ID of the employee. The ID must match the Job Title ID exactly. Example: APP - Date of Hire (MM/DD/YYYY)
The date the employee was hired. Example: 01/26/2016 - Hourly Wage (XX or XX.XX)
The employee's hourly rate. Example: 25.50 - Mobile Phone
The employee's mobile number.
The format is +[country code]XXXXXXXXXX. Examples: +19135558225, or +6421345687.
Note
The same phone number can not be uploaded for different employees. Please remove any duplicate phone numbers.- Can Receive SMS (Y/N)
Whether the employee should receive alerts and messages via SMS. Example: Y - Email
The employee's email address. Example: test@test.com
Note
- If possible, this should be their work email address as this will be their log in to Procore, and receive notifications from Resource Planning.
- The same email address can not be uploaded for different employees. Please remove any duplicate email addresses.
- Can Receive Email (Y/N)
Whether the employee should receive alerts and messages via email. Example: Y - Address 1
The employee's address. This is required for the employee to appear on the Resource Planning map. Example: 1234 Main St - Address 2
The employee's address. Example: Suite 320 - City/Town
The employee's city. This is required for the employee to appear on the Resource Planning map. Example: Kansas City - State/Province
The employee's state abbreviation code, formatted with all uppercase letters. This is required for the employee to appear on the Resource Planning map. Example: MO - Postal Code
The employee's postal code (for US Customers). This is required for the employee to appear on the Resource Planning map. Example: 62113 - Country
The employee's country, formatted as a standard country code. Example: US - Date of Birth (MM/DD/YYYY)
The employee's date of birth. Example: 01/26/1980 - Gender (M/F)
The employee's gender. Example: M - Emergency Contact Name
The name of the employee's emergency contact. Example: Jane Smith - Emergency Contact Relationship
The relationship between the employee and their emergency contact. Example: Spouse - Emergency Contact Phone Number
The phone number of the employee's emergency contact.
The format is +[country code]XXXXXXXXXX. Examples: +19135558225, or +6421345687. - Emergency Contact Email
The email address for the employee's emergency contact. Example: test@test.com
Projects
Show/Hide Fields
Required fields:
- Project Name
The name of project. Hyphens, apostrophes, ampersand and periods are accepted. Example: Acme Stadium - Group ID(s)
The group(s) the projects are a part of. The ID must match Group ID in the 'Group' tab exactly. Example: KS
If there is more than one group, each group must be separated by a pipe (|) with no spaces. Example: KC|LA
If the job title belongs to all groups, type 'All'. Example: All - Status (active, pending, inactive)
The status of the project. Example: active. - Project Number
The tracking number for the project. Hyphens (-) accepted. Example: AC2997
Optional fields:
- Project Color (HEX value)
The HEX value associated with the Job Title. Example: #FFA500
Tip
Some customers color code their projects by Project Manager, Customer, Project Type, etc.- Address 1
The job site's address. This is required for the project to appear on the Resource Planning map. Example: 1234 Main St - Address 2
The job site's address. Example: Suite 320 - City/Town
The job site's city.This is required for the project to appear on the Resource Planning map. Example: Kansas City - State/Province
The job site's state abbreviation code, formatted with all uppercase letters. This is required for the project to appear on the Resource Planning map. Example: MO - Postal Code
The job site's postal code (for US Customers). This is required for the project to appear on the Resource Planning map. Example: 62113 - Country
The job site's country, formatted as a standard country code. Example: US - Time Zone
The time zone of job site. Example: America/Chicago
Additional Options:
America/Chicago
America/Los_Angeles
America/New_York
America/Denver
Australia/Brisbane
Australia/Sydney
Australia/Adelaide
Australia/Darwin
Australia/Perth
Pacific/Auckland - Default Daily Start Time (XX:XX AM/PM)
The default time assignments start on this project. Example: 07:00 AM - Default Daily Stop Time (XX:XX AM/PM)
The default time assignments stop on this project. Example: 03:30 PM - Estimated Start Date* (MM/DD/YYYY)
The estimated start date of the project. Example: 02/22/2021 - Estimated End Date (MM/DD/YYYY)
The estimated end date date of the project. Example: 08/25/2025 - Average Hourly Bid Rate (XX or XX.XX)
The the estimated average hourly rate? Example: 25.10 - Percentage Complete
Current percentage complete of the project. Example: 95 - Customer
The customer of the project. Example: ACME Construction Co - Project Type
The type of project. Example: Commercial
Next Step
Import Data
Objective
To import data into the Resource Planning tool.
Background
The Resource Planning tool at the Company level is Procore’s construction resource management solution that provides real-time insight into your job assignments and availability.
To set up your Resource Planning tool, Procore offers a data import to set up your projects, employees, and more. While only certain fields are required, it's recommended to fill out as much information as accurately as possible for the most complete setup.
Things to Consider
- Required User Permissions
- No special characters (~`!@#$%^&*()_{[}]|:;“‘<,>.?/)
Prerequisites
Steps
- Navigate to the Company level Resource Planning tool.
- Click the Configure Settings icon.
- Click Data Upload.
- Click Upload Files and select the prepared Resource Planning import template. Then click Open.
OR
Drag and drop the prepared Resource Planning import template from your desktop to the 'Drag and Drop' section. - Click Save.
Integrations
Background
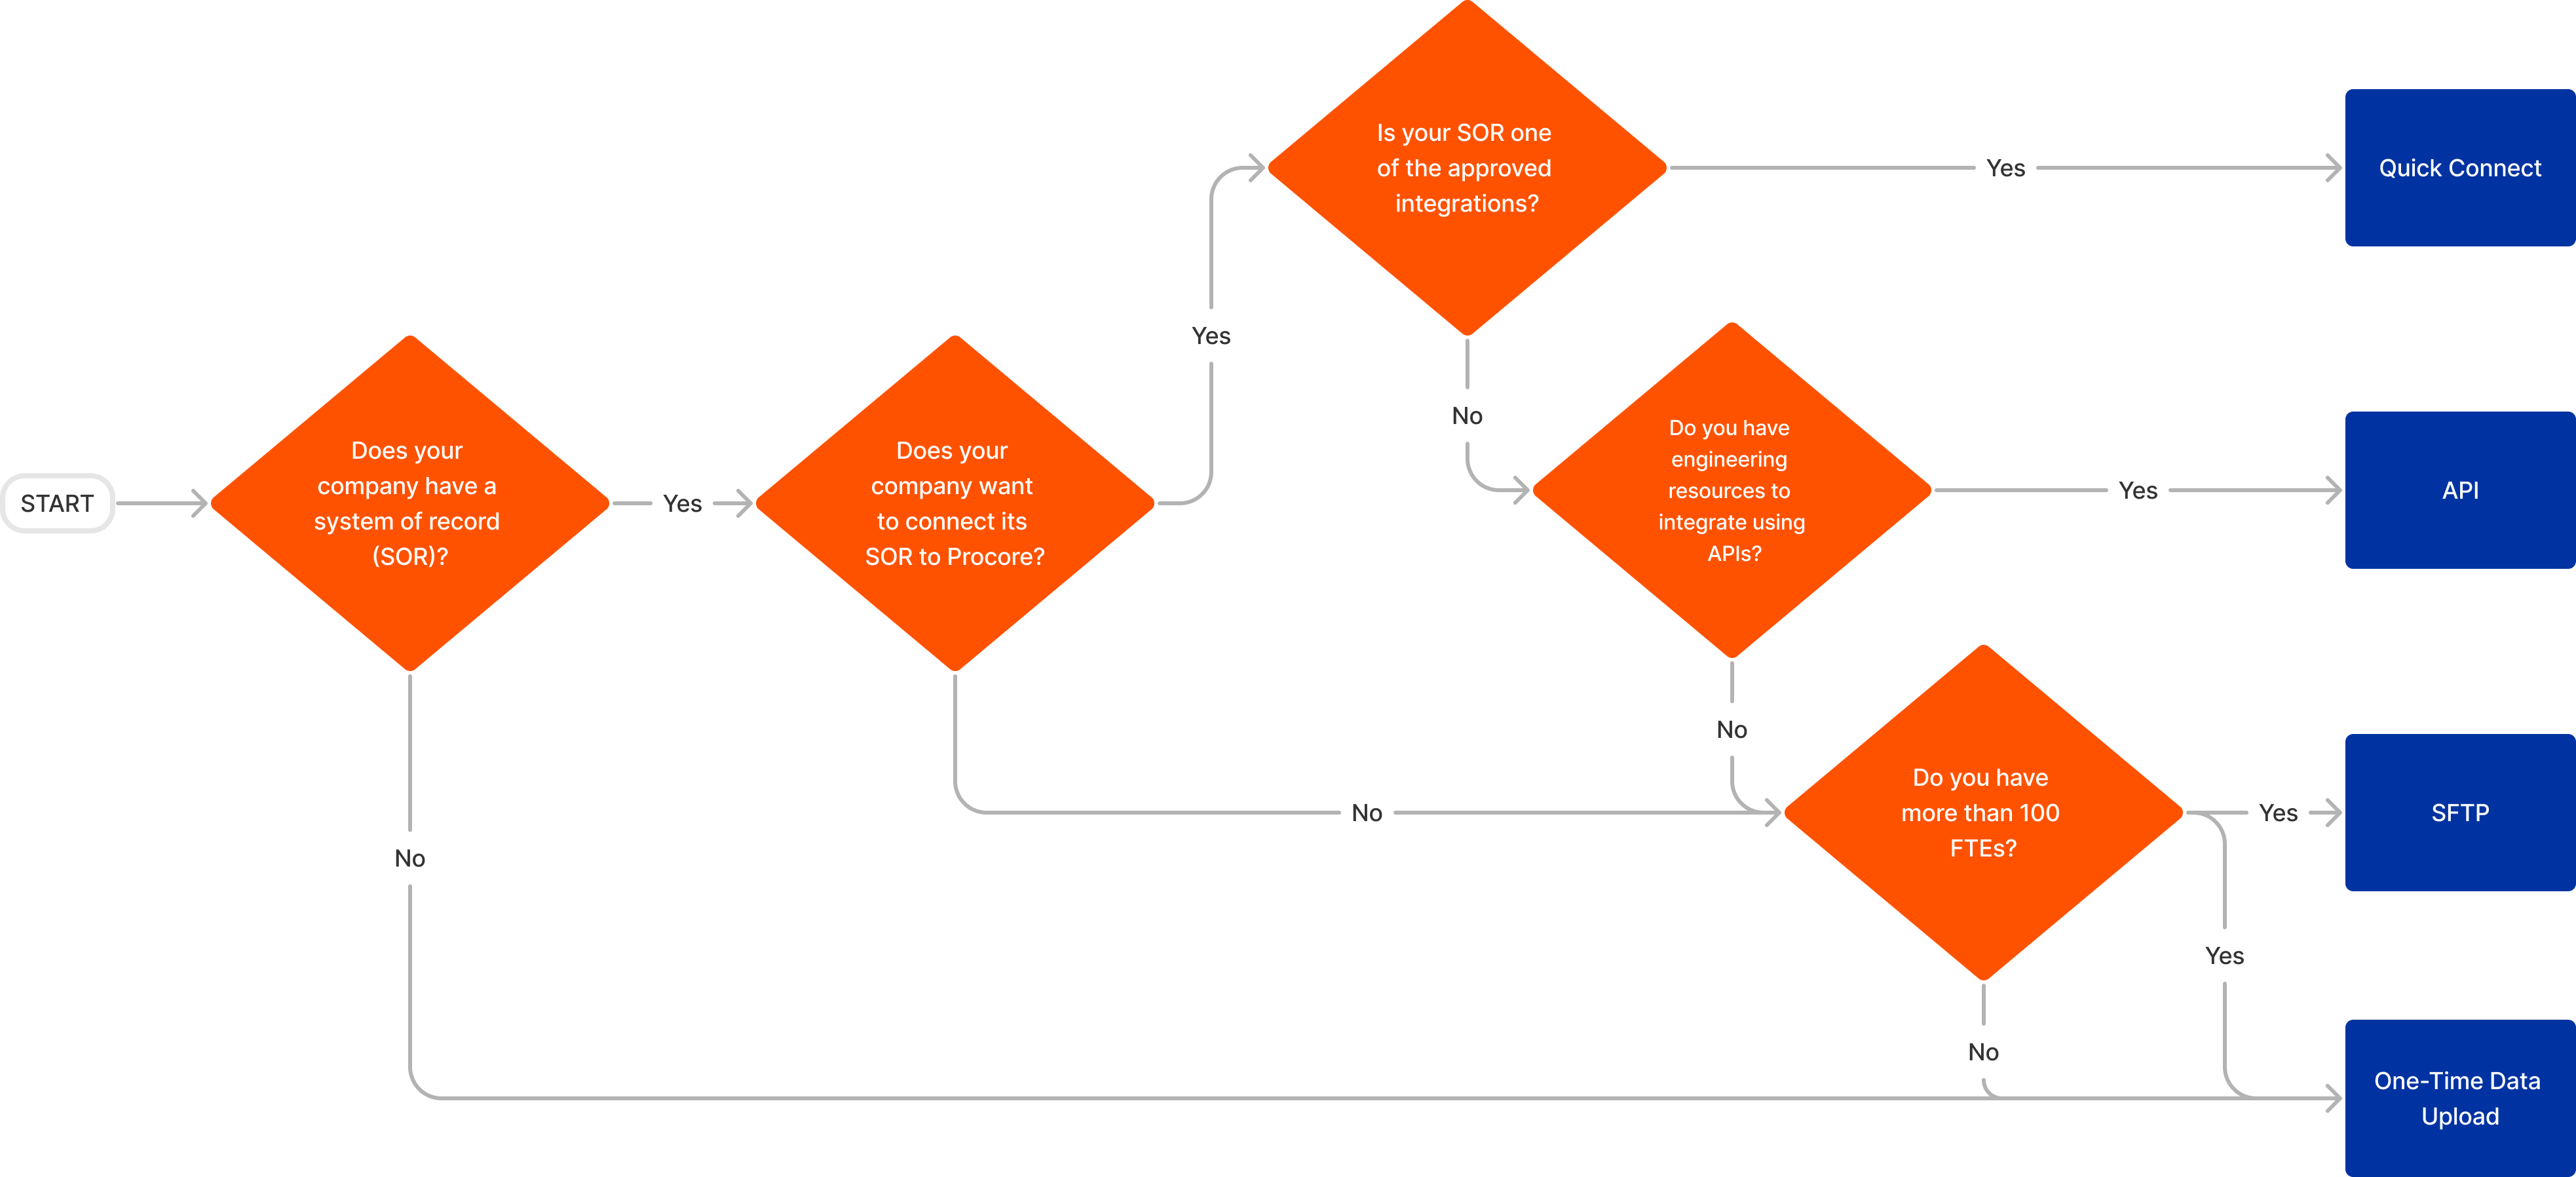
When you set up Resource Planning, you can choose to integrate a your system of record so that you can manage People and Projects in your system of record, and sync that data with Resource Planning. Work with your Procore account team to identify your system(s) of record and which integration option is right for your company.
Note
Not all information from your system of record can integrate with Resource Planning. Project roles and assignments, for example, do not integrate. To see a list of fields that integrate, see Resource Planning Detailed Data Mapping.After you have selected how to integrate your system of record, you can decide how you want to sync your data between Resource Planning and other Procore tools.
Answer
There are three integration options available:
- Quick Connect - see list of approved integrations.
- API
- SFTP
If none of the options work for your company, Procore can do a one-time data upload to add your people and projects.
Quick Connect
The QuickConnect integration syncs data from your system(s) of record to Resource Planning. This option is available to customers with an approved compatible system and takes approximately two weeks to implement.
QuickConnect syncs can run multiple times a day at desired times and sync one-way from your system of record to Resource Planning. There can be a separate source for people, and another source for projects; or both can come from the same source.
Note
If you are already integrating your ERP with Procore, it is recommend that you push projects from Procore's Portfolio tool to Resource Planning.To see what fields sync between your system of record and Resource Planning, see Resource Planning Detailed Data Mapping.
API
An API integration allows you to build your own APIs to connect your data to Resource Planning. This option gives you the most flexibility and customization for how data is integrated into Resource Planning. This option requires engineering resources from your company to build the integration, and as such, takes additional time to implement. We recommend this path only if you are familiar with using APIs to connect systems.
If you do not have experience working with APIs, but would still like to explore this option, the Technical Services Team can scope a Procore built connection.
To learn more about authentication and see a full list of available Resource Planning API endpoints, see Resource Planning API Documentation.
To learn more about testing, see What is the Monthly Sandbox Environment?
SFTP
SFTP is a secure, encrypted, way to transfer files over the internet. This integration option allows customers to use standardized CSV templates to upload the file(s) to a Procore hosted server when they want to update people and project data. This overwrites existing data and transfers it through the SQL database into Resource Planning automatically.
One-Time Data Upload
If an integration is not an option for your company, Procore offers a one-time data upload to add your people and projects to Resource Planning. After the upload, Resource Planning becomes the source of truth for People and Projects are manually updated in Resource Planning.
To get started with your data upload, see Prepare Data for Import to Resource Planning.
Data Syncing
Background
When setting up Resource Planning, customers first need to choose how you want to add information to Resource Planning. See What Integrations are available for Resource Planning?
After you select how to get information into Resource Planning, you can choose to sync people and project data so that information is kept in sync in Resource Planning and other tools in Procore.
Answer
Data syncing passes information between the Resource Planning tool and Procore’s Company level Directory and Portfolio tools.
When select people data is updated in either the Resource Planning People List or Company Directory tool, it is instantly synced to the other tool. See What people information is synced between Resource Planning and the Procore Company Directory?
When project data is updated in either the Portfolio tool or the Resource Planning Project list, it is instantly synced to the other tool. See What project information is synced between Resource Planning and Procore Projects?
data linking
If you are setting up data syncs for the first time, you may need to link existing records in the Portfolio tool and Company Directory with records in Resource Planning. We recommend that you do this step before your initial sync to avoid duplicates across the system.
Data linking happens automatically when matching records are found in both systems — no action needed on your end. Ensure that for contacts the employee numbers are populated and unique and that for projects the project numbers are populated and unique. If a record isn't automatically linking, reach out to your Procore point of contact for help troubleshooting.
Even if you don't sync data, people and projects automatically link  between the Portfolio tool, Company Directory, and Resource Planning when their information matches.
To avoid duplicate people records, ensure that the following fields match in both the Company Directory and Resource Planning People List:
-
Employee ID
-
Employee Email Address
To avoid duplicate projects, ensure that the following fields match in both the Portfolio tool and Resource Planning Projects List:
-
Project ID
-
Status: Active
Additional Configurations
Why do I need to Update Users in Procore?
Now that your data has been uploaded in Procore, there are some additional steps you need to take within Procore and the Resource Planning tool as some key information cannot be set in the one-time data upload. You will need to log in to Procore and update the following information about your users:
- User Type
- Permissions
You can also make additional changes if you notice inaccurate information was uploaded from your spreadsheet. See Edit People in Resource Planning.
User Type
By default, all people are uploaded into the Resource Planning tool as 'Assignable', meaning they can be assigned to work in Resource Planning. Set the users to the following user type based on what they need to do in Procore, and whether or not you need to track time for them.
|
Both
|
User
|
Assignable
|
 Can be tracked using Procore Timesheets
 Can NOT be assigned to resource assignments
Permissions
Permissions cannot be set in the one-time data upload. Permissions must be set in two places, in Procore's Permissions tool and in the user's profile in Resource Planning.
To access the Resource Planning tool, have 'Read Only' level permissions or higher to the Resource Planning tool. This is set by creating and applying permissions templates in Procore's Permissions tool.
Then, within the Resource Planning tool, People marked as 'Both' or 'User' must have a Resource Planning permission template assigned to them. You can update their Resource Planning permission template on the same screen where you update their user type.
Update Resource Types
-
Edit People Inline
-
Edit People from their Details
-
Bulk Edit People
-
Edit People from the Company Directory
Edit People Information from the People List
-
Navigate to the Company level Resource Planning tool.
-
Click People and select People List.
-
Click into the field and make edits.
Note: Not all fields can be edited inline. -
Click out of the field to save the changes.
Edit People Information from People Details
-
Navigate to the Company level Resource Planning tool.
-
Click People and select People List.
-
Click the person's name.
-
Click Edit.
-
Update information:
-
First Name. The person's first name.
-
Last Name. The person's last name.
-
Status. The person's user status.
-
Groups. The person's groups.
-
Job Title. The person's job title from the dropdown list. See Configure Job Titles for Resource Planning.
-
Classification. Select the person's classification.
-
Employee ID. The person's Employee ID.
-
Type. The person's user type.
-
Assignable. A person who can be given a resource assignment, but cannot login to Procore.
-
Assignable User. A person who can login to Procore, and be given a resource assignment.
-
User. A person who can login to Procore.
-
-
Email Address. The person's email address.
-
Phone Number. The person's phone number.
-
Notification Profile. The person's notification profile. See Configure Notification Profiles for Resource Planning.
-
Enable Email. Whether or not the person should receive email messages from Procore about their resource assignments.
Note: If enabling email notifications, an email is required. -
Enable SMS. Whether or not the person should receive SMS messages from Procore about their resource assignments.
Notes:-
Message and data rates may apply.
-
If enabling SMS notifications, a phone number is required.
-
-
Enable Mobile Notifications. Whether or not the person should receive notifications through the Legacy Resource Planning/LaborChart App.
-
Address. The person's address.
-
Address 2. The person's address, continued.
-
City. The person's city or town.
-
State. The person's state or province.
-
Postal. The person's postal code.
-
Country. The person's country of residence.
-
Hourly Wage. The person's hourly wage.
-
Language. The person's primary language.
-
Gender. The person's gender.
-
Hired Date. The date the person was hired.
-
Birth Date. The person's date of birth.
-
Emergency Contact Name. The name of the person's emergency contact.
-
Emergency Contact Phone. The emergency contact's phone number.
-
Emergency Contact Relation. The relationship between the person and their emergency contact.
-
[Custom Fields]. Any custom fields you have created for people. See Configure Custom Fields for Resource Planning.
-
Profile Photo. Select an image for the user's profile photo.
-
-
Click Save.
Bulk Edit People
-
Navigate to the Company level Resource Planning tool.
-
Click People and select People List.
-
Mark the checkboxes for the users you want to edit.
-
Click the edit
 icon.
icon. -
Update the information.
-
Gender. The person's gender.
-
Groups. The person's groups.
-
Job Title. The person's job title from the dropdown list. See Configure Job Titles for Resource Planning.
-
Status. The person's user status.
-
Type. The person's user type.
-
Assignable. A person who can be given a resource assignment, but cannot login to Procore.
-
Assignable User. A person who can login to Procore, and be given a resource assignment.
-
User. A person who can login to Procore.
-
-
Language. The person's primary language.
-
Hourly Wage. The person's hourly wage.
-
State. The person's state or province.
-
Country. The person's country of residence.
-
[Custom Fields]. Any custom fields you have created for people. See Configure Custom Fields for Resource Planning.
-
-
Click Save.
Edit People Information from the Company Directory
-
Navigate to the Company level Directory tool.
-
Click the Users tab.
-
Optional: Click Add Filter and select Resource Planning.
-
Click View next to the person's name.
-
Click the Resource Planning tab.
-
Click Edit in the 'Information' section.
-
Update information:
-
Groups. The person's groups. See Configure Groups for Resource Planning.
-
Job Title. The person's job title from the dropdown list. See Configure Job Titles for Resource Planning.
-
Type. The person's user type.
-
Assignable. A person who can be given a resource assignment, but cannot login to Procore.
-
Assignable User. A person who can login to Procore, and be given a resource assignment.
-
User. A person who can login to Procore.
-
-
Notification Profile. The person's notification profile. See Configure Notification Profiles for Resource Planning.
-
Enable Email. Whether or not the person should receive email messages from Procore about their resource assignments.
Note: If enabling email notifications, an email is required. -
Enable SMS. Whether or not the person should receive SMS messages from Procore about their resource assignments.
Notes:-
Message and data rates may apply.
-
If enabling SMS notifications, a phone number is required.
-
-
Enable Mobile Notifications. Whether or not the person should receive notifications through the Resource Planning/LaborChart App.
-
Address. The person's address.
-
Address 2. The person's address, continued.
-
City. The person's city or town.
-
State. The person's state or province.
-
Postal. The person's postal code.
-
Country. The person's country of residence.
-
Hourly Wage. The person's hourly wage.
-
Language. The person's primary language.
-
Gender. The person's gender.
-
Date of Hire. The date the person was hired.
-
Birth Date. The person's date of birth.
-
Emergency Contact Name. The name of the person's emergency contact.
-
Emergency Contact Phone. The emergency contact's phone number.
-
Emergency Contact Relation. The relationship between the person and their emergency contact.
-
[Custom Fields]. Any custom fields you have created for people. See Configure Custom Fields for Resource Planning.
-
Profile Photo. Select an image for the user's profile photo.
-
-
Click Save.
Update User Permissions in Resource Planning
Take the following actions from the following tools:
- Resource Planning
- Directory
Resource Planning
Edit a Single User's Permissions
- Navigate to the Company level Resource Planning tool.
- Click People and select People List.
- Click the person's name.
- Click Edit.
- Select the person's Permission Level.
- Click Save.
Bulk Edit User Permissions
- Navigate to the Company level Resource Planning tool.
- Click People and select People List.
- Mark the checkboxes for the users you want to edit.
- Click the edit
 icon.
icon. - Select the Permission Level.
- Click Save.
Company Directory
Edit a Single User's Resource Planning Permissions
- Navigate to the Company level Directory tool.
- Click the Users tab.
- Optional: Click Add Filter and select Resource Planning.
- Click View next to the person's name.
- Click the Resource Planning tab.
- Click Edit in the 'Information' section.
- Select the Permission Level for the user in the Resource Planning tool. See Create Permissions Templates for Resource Planning.
- Click Save.