Create a Meeting (Tucker HiRise)
| Back | Current Lesson - 3/28 | Lesson 4 - Next |
- Navigate to the project's Meetings tool.
- Choose from these options:
- To create a new meeting based on a meeting template, follow the steps in Create a Meeting from a Template.
OR - To create a new meeting, click Create Meeting.

- To create a new meeting based on a meeting template, follow the steps in Create a Meeting from a Template.
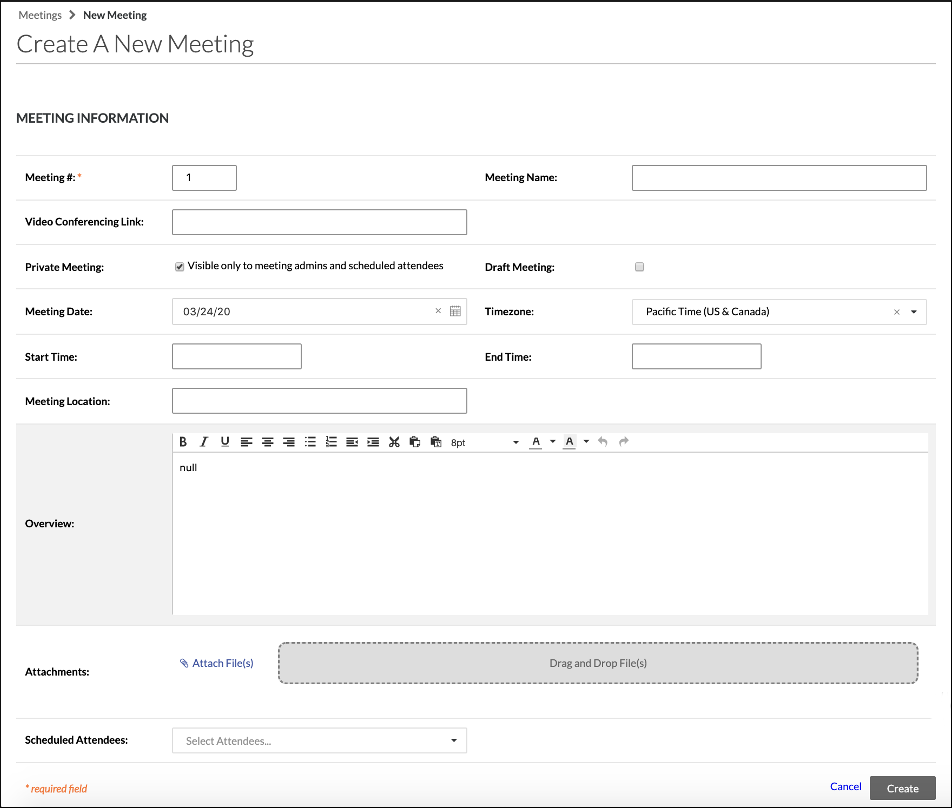
- Under Meeting Information, fill in the relevant fields for the new meeting.
-
Meeting #: Indicates the meeting number. When you create a meeting, Procore automatically assigns the first meeting in a series the number one (1). Then, when you create a follow-up meeting, Procore assigns the next meeting in the series the number two (2), and so on. Note: This field does not support the entry of letters, symbols, and leading zeros.
-
Meeting Name: Type a name, title, or descriptive subject line for the meeting. Do not use the same name for multiple meetings!
- Video Conferencing Link: Copy and paste the video conferencing link for your attendees to access.
Note: The full URL of the meeting link (starting with https://) must be included in order for it to display as a hyperlink. -
Private Meeting: Mark this checkbox so that the meeting is only visible to scheduled attendees and users with 'Admin' level permissions to the Meetings tool.
-
Draft Meeting: Mark this checkbox to save the new meeting as a 'Draft.'
-
Meeting Date: Use the calendar control to set the date for a meeting.
-
Timezone: Select a timezone for the meeting.
-
Start Time: Enter a start time for the meeting. Include a.m. or p.m. after the start time.
-
End Time: Select an end time for the meeting. Include a.m. or p.m. after the finish time.
-
Meeting Location: The the location where the meeting will be held (e.g., Conference Room A, Conference Room B, and so on).
-
Overview: Enter a meeting summary or description. You can use the controls in the formatting toolbar to format your overview.
-
Attachments. Attach any relevant files. You have these options:
- Click Attach File(s) and then choose the appropriate option from the shortcut menu that appears.
OR - Use a drag-and-drop operation to move files from your computer into the grey Drag and Drop File(s) box.
- Click Attach File(s) and then choose the appropriate option from the shortcut menu that appears.
-
Scheduled Attendees: Add meeting attendees by selecting people from this drop-down list. To appear as a selection in this list, a person must have a Procore user profile in the Project Directory. Additionally, if a permission template is applied to the person, the permissions must include 'Read Only' or higher on the Meetings tool.
- Click Create.
- A banner appears to confirm that the meeting was created and the page title changes to 'Meeting Agenda for '.
-
If you want to add additional categories to your meeting, see Create a Meeting Category.
-
If you want to add meeting items (a.k.a., agenda items) to your meeting, see Add a Meeting Item.
-
The system automatically adds one (1) category to the meeting (i.e., it is named 'Uncategorized Items'). You can rename this category by typing over the name. You now have these options:
-
Things to Consider
1. N/A