Add an Agenda or Meeting Item (Tucker HiRise)
| Back | Current Lesson - 5/28 | Lesson 6 - Next |
- Navigate to the project's Meetings tool.
- Choose from these options:
- If have not yet created a new meeting, click Create Meeting. See Create a Meeting.
OR - If you want to add meeting items to an existing meeting, locate the desired meeting in the list. Then click Edit.
This places the meeting into edit mode.
- If have not yet created a new meeting, click Create Meeting. See Create a Meeting.
- If you want to create categories to group your agenda items, complete Create a Meeting Category. Then click Add Item. Meeting items are automatically numbered in the order that they are created.

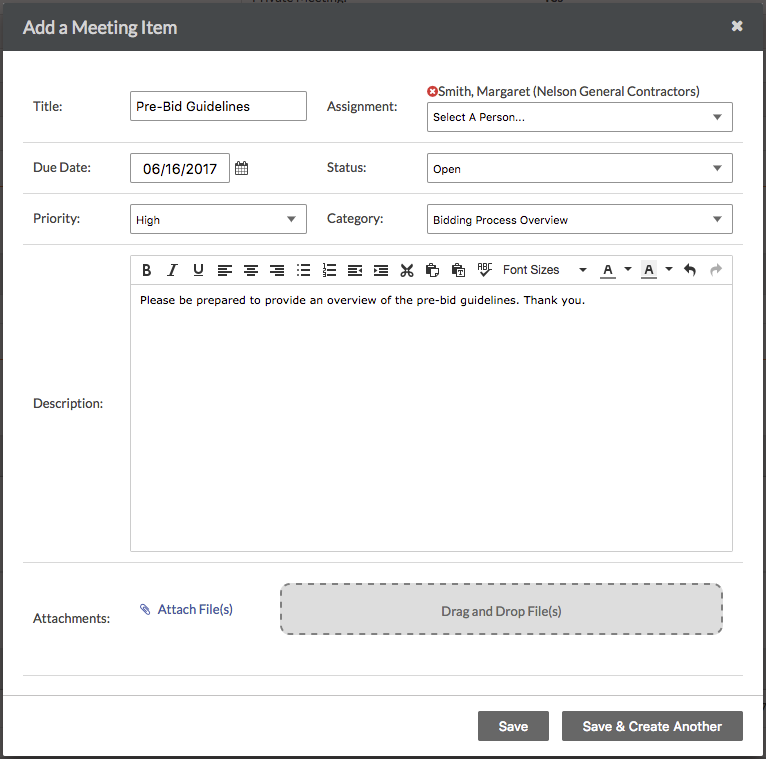
This opens the 'Add a Meeting Item' window. - In the 'Add a Meeting' window, do the following:
-
Title: Enter a descriptive meeting title.
-
Assignment: Type the name of a person to assign that person responsibility for completing the item. When you start typing, the system searches the Project Directory for the person who matches your entry. To be assigned to a meeting item, the person must be added to the Project Directory. See Add a User Account to the Project Directory.
Note: Email notifications are not sent to the assignee of a meeting item. However, the item will appear on their My Open Items list on the project's Home page. See View My Open Items in the Portfolio Tool. -
Due Date: Use the calendar control to specify a due date for the meeting item.
-
Status: Set the status as 'Open', 'On Hold', or 'Closed'. This lets the responsible parties designated in the Assignment field know whether or not they need to take additional action. The default setting for a new meeting item is 'Open.'
-
Priority: Set the priority as 'High', 'Medium', or 'Low'. Setting the priority of a meeting items gives responsible parties a better idea about which items should be addressed first, and which items can be addressed last and/or pushed to a follow-up meeting.
-
Category: Select the category for your meeting item. If you create a meeting item in a specific category, they system will display that category by default. Other selections display in alphabetical order. If you have not yet named a category, the selection 'Uncategorized' will display by default.
-
Description: Write a description for the meeting item that describes the item in fuller detail than the title.
-
Attachments. Attach any relevant files. You have these options:
- Click Attach File(s) and then choose the appropriate option from the shortcut menu that appears.
OR - Use a drag-and-drop operation to move files from your computer into the grey Drag and Drop File(s) box.
- Click Attach File(s) and then choose the appropriate option from the shortcut menu that appears.
-
- Choose from these options:
- If you want to save the item, click Save.
OR - If you want to save the item and immediately create the next meeting item, click Save & Create Another.
Note: The Meeting Origin column reflects the meeting number the item was created in.
- If you want to save the item, click Save.
- If you want to organize your meeting items into a specific category, you must first create a category. See Create a Meeting Category. If you do not create or specify a category for a meeting item, it is placed into the 'Uncategorized Items' area by default.