Procore – RFI’s and Drawing Upload process
Login into Procore (all estimators have been “invited” to join Procore, enter your username and password). If you are experiencing issues logging in, please contact Procore Help, procorehelp@kastbuild.com.
Once logged in, the company level portfolio will display a list of projects you are assigned to. Check to see if the project you need has been set up, if you do not see the project – there are two possibilities:
- You have not been added to the project.
- The project has not been created.
Email Procore help, they will either add you to the existing project or set up the new project and give you access.
DRAWING UPLOAD
You will upload the plans from the “To Subs” subfolder within the project folder on the “Y” drive/Egnyte. We use the “To Sub” folder because they are broken out per discipline and per page, making it easier in Procore.
Once you are in Procore and select the project that you need you will go to the “Project Tools” drop-down at the top of your screen and select drawings or specifications depending on what you need to upload.

Now you will need to open the plans in the “To Subs” subfolder within the project folder on the “Y” drive/Egnyte to familiarize yourself with the date on the plans as well as the KAST stamped date, you will need them to upload in Procore. Once you have this information you will click on the “Upload Drawings” button on the far right in Procore on the Drawings page.

When you click on “Upload Drawings” you will get the following dialogue box.
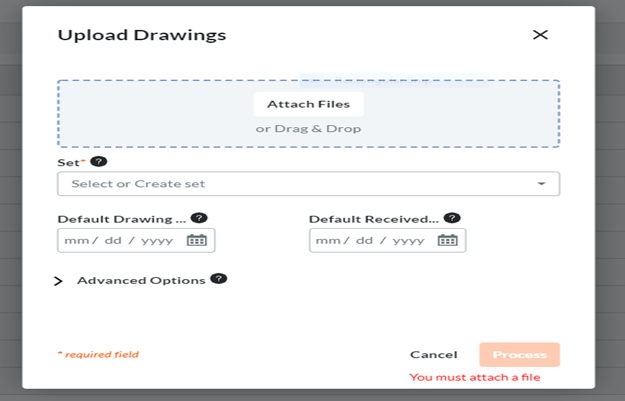
Only upload one discipline at a time, this will make it much easier to know that you have the correct number of pages when you publish them.
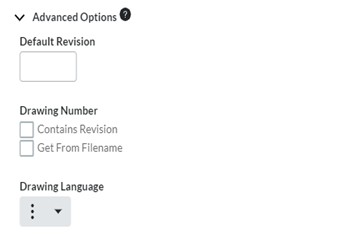
You will need to Create a set, example 220512 GMP Set or 220512 50% CD Set, should always by the date and what-ever set you are working on. If it is a clarification that you are uploading, example 220515 C1. Now enter the most used date on the set of plans “Default Drawing” (you can review and change the date per page during the review process if all pages are not the same date) and the KAST stamped date in “Default Received”, then click on the > Advanced Options and you will see “Default Revision” her you will enter something like 50%CD or PreGMP, PrePermit (Pre is for Precon so the field can distinguish the difference). If the plans are renamed correctly in the “Y” drive/Egnyte you will also select the box that says “Get From Filename”
Plans should be named with an underscore after the page number for Procore to read it properly.
****FP102A_2nd FLOOR PLAN AREA A FIRE PROTECTION
Now click “Process” at the bottom of the dialogue box. You will now see a small box on the right side of your screen that looks like the following on the left and change to the one on the right once plans are ready for review.

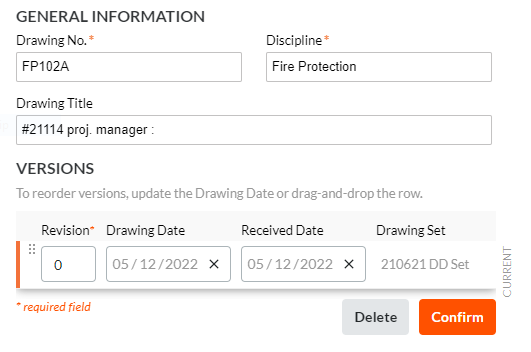
To review the plans, a dialogue box will open with a preview of a plan and you will need to select using the drop-down selections if you see the correct page number and page title, if you do not see the correct information select none at the bottom of each drop-down. (This tells Procore where to read the information from). Keep in mind that this dialogue box will not appear if you selected the “Get From Filename” box that was mentioned earlier. If you selected that box it will go right in to a screen that shows a list of all plans on the left a preview of the plan in the middle and the following area on the right. This is where you will confirm the page number, discipline, page title and dates, then click “Confirm” and go page by page thorugh the whole set.
***You will see a button at the top of the left side where the pages are listed that says “Confirm All” do not click this button, doing this will accept all plans with possible wrong information!!
Once all pages are confirmed for each discipline you will go back to the main drawings page and there will be a yellow box above the list of plans with a drop-down on the right side that will say “Publish & Distribute All” or “Publish All”, you want to select “Publish All”. Now you will want to check how many files are in each discipline from the “Y” Drive/Egnyte folder against how many files in each discipline in Procore to be sure you have uploaded all of them.
****During the upload if you get a little black box that pops up in the last screen shot on this page and it says duplicate, write down the page number that you are on and click delete. This means that you have another page with the same page number somewhere in the set. If you confirm and do not delete it will show up as a revision and you will have to delete both and re-upload them. You will need to find where the issue is and re-upload the one that was deleted. Usually, you can find the error by combing through the index page typically found in the architectural set of plans.
SPECIFICATION UPLOAD
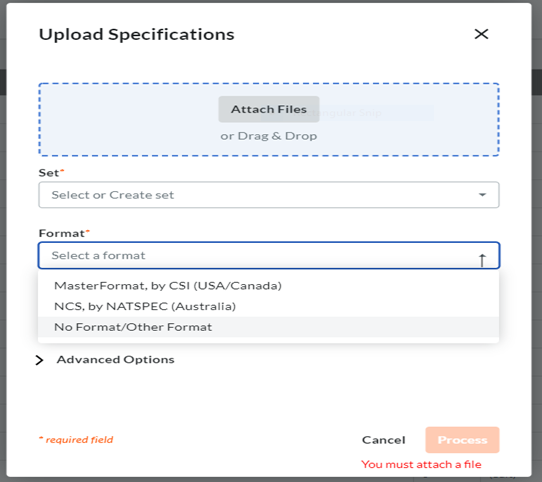
If you are uploading specifications, be sure that you are using the same set name you used to upload the plans if they are from the same deliverable. The process is similar to the drawings except you will see a different drop-down selection in the dialogue box. You will see a box that says “Format”. Here you will need to select if is a “Master Format by CSI”, if not you will need to select “No Format” for them to upload correctly.
***Only use “Master Format by CSI if it is a true project manual that uses CSI code sections.
***Should you have any questions during the process please reach out to Procore Help, procorehelp@kastbuild.com and they will be happy to assist you.
ENTERING RFIs INTO PROCORE:
All estimators have “Admin” permissions which allows creating Draft RFI or Open RFI.
Lead estimators are deemed as “RFI Managers” on each project they are involved in. They are the only ones who are authorized to create an Open RFI.
To check who should be listed as the “RFI Manager” for a particular project, please click on orange gear (upper left side) of screen:

On the RFI Manager line, make sure “If a Standard user creates an RFI, the RFI Manager will be:” is selected. Proceed to select the lead estimator responsible for this project.

Estimators should only create Draft RFI, where the RFI Manager (lead estimator) will receive a notification that a draft has been created.
Assignees are to be Architects and Owner. IMPORTANT: the check box next to Architect should always be marked as this makes them required to respond to an RFI.

Some RFI will require the response of other consultants (i.e. Civil, Geotech). The box next to their name should also be checked off.
Click on “Create RFI” orange button on the upper right hand side of the screen.

EXAMPLE:
- RFI creator (estimator) drafts an RFI, which goes to the RFI manager (lead estimator).
- In the Project Stage drop-down list, select Pre-Construction.

- RFI manager receives a notification of a new draft.
- RFI manager can either process the new draft as an RFI (open) or send a response back to the RFI creator:
- Response to RFI creator must be marked as “an official response”.
- Navigate to the project's RFIs tool. This reveals the RFIs page.
- Click the Items tab. This reveals a list of RFIs on the project.
- In the Add Filter drop-down list, select Status.
- Response to RFI creator must be marked as “an official response”.

- Place a checkmark in the Draft checkbox. This updates the list to include only RFIs in the 'Draft' status.
- Locate the desired RFI in the list. Then click View. This opens the RFI in view mode.
- Click Edit. This places the RFI in edit mode.
- Select your name from the Assignees field.
- Click Save as Open. This changes the RFI to the 'Open' status and also updates the Ball-In-Court responsibility to your court.
- Under Question + Responses, click Add Response.
- In the text entry area that appears, type your response to the request for information.
- Click Post Response. Your response now appears under All Responses.
- IMPORTANT: place a checkmark in the Mark Official box. A GREEN banner appears to confirm the update was successful.

- Click on “Return to Creator’s Court” to ensure the response is returned to the creator.
- RFI creator modifies draft and clicks on “Return to Manager’s Court” to ensure the edited draft is forwarded to the manager.
- If the edited draft is accepted by manager:
- Preconstruction RFI have the prefix “PC-XX”; the first RFI would be “PC-01” and the subsequent RFI would follow that numbering system.
- Select Assignees, check box for “Make Response Required”.
- Click on “Open RFI” button (bottom right – orange button) to forward the RFI to the targeted assignees.
REPORTS
Reports allows an RFI log to be created with customizable filters. KAST’s company standard RFI log is listed in the RFI tools, as “Questions and Responses Report”. You can either choose to export this, as a PDF file, with “All Reponses” or “Official Only”.
