Add 3D Model Takeoffs Using Auto-Mapping
Objective
To use auto-mapping to add takeoffs for 3D models in a project's Estimating tool.
Background
The auto-mapping functionality auto-detects materials used in 3D models and connects them to materials and assemblies in your cost catalog, to quickly create multiple takeoffs at once.
Things to Consider
- Required User Permissions
- The following quantities are available for 3D takeoffs at this time: Count, Linear, Area, and Volume.
- You cannot change the unit of measure when using auto-count.
- 3D takeoffs have a model
 icon next to them in the 'Takeoffs' list.
 - You can use assemblies to create more detailed estimates from the model. See Create Assemblies for a Cost Catalog.
Prerequisites
Steps
- Navigate to the project's Estimating tool on app.procore.com.
Note: The Estimating tool automatically opens to the Takeoff page. - Click the drawing drop-down menu.

- Click the Models tab and select the model you want to add takeoff for.
Note: This pulls model files from the project's Documents tool. See Upload Files or Folders to the Project Level Documents Tool.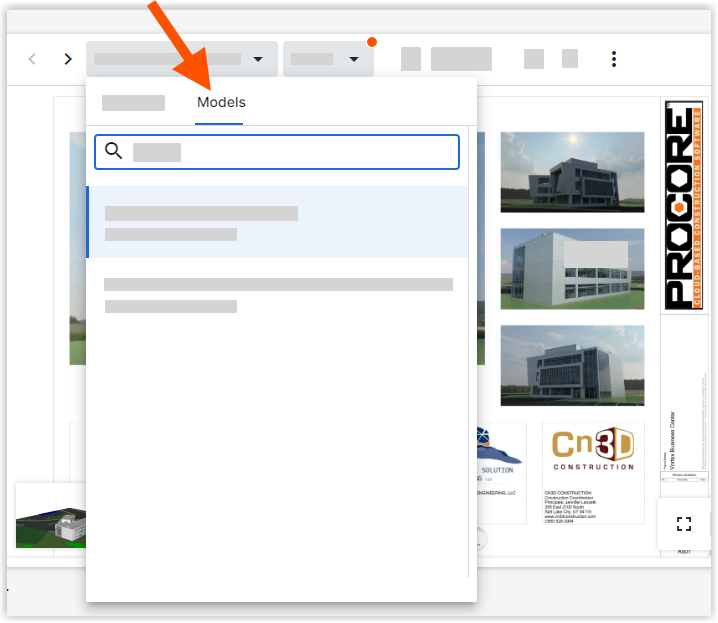
- Mark the checkboxes for the model objects you want to auto-map and create takeoffs for.
- Click Auto-Map Selected Materials.
- Select how to map item to your cost catalog.
- To auto map the objects to items in your cost catalog, move the Model Objects Maps to Catalog Items toggle to the ON
 position.
- Click the replace item
 icon to replace the item with another item in your cost catalog
 - Click the warning
 icon to see model objects without a cost catalog item. Click Browse Catalog to select an item or add a new one.
- Click the replace item
- To manually select the cost catalog items, move the Model Objects Maps to Catalog Items toggle to the OFF
 position.
- Next to the item, click Browse Catalog.
- Select the item in your cost catalog, then click Select.
- To auto map the objects to items in your cost catalog, move the Model Objects Maps to Catalog Items toggle to the ON
- Click Create Takeoffs to create takeoffs for each model object type.