
Procore

Create Action Plans by Asset

Background

 In Beta
Company Administrators can enable the Action Plans: Linking to Assets and Bulk Creation By Assets beta in Procore Explore. (US 1 | US 2 | UK)

When working with multiple identical units or equipment sets (such as HVAC units or electrical panels), you can automatically generate individual action plans for each asset in a single operation using an action plan template. Each generated plan links directly to its corresponding asset record and appears in the asset's Related Items tab.

Things to Consider

  • Required User Permissions

  • Action Plans are automatically linked to the selected asset records as a related item.

  • Procore appends the Asset Name to each newly generated action plann title to keep records distinct.

  • You will receive an email notifying you when your action plans have been created.

Prerequisites

  1. Create a new configurable fieldset for Action Plans with the 'Assets' field enabled, and assign it to the project.

  2. Ensure at least one project-level or company-level Action Plan template is available for the project.

  3. Enable the Assets tool on the project.

  4. Create the asset records.

Create Single Plan

  1. Navigate to the project's Action Plans tool.

  2. Do one of the following:

    • To create the action plan from a template, click Create and click the template name. Note: Action plan templates that are in edit mode can't be selected.

    • To create an action plan without a template, click Create and click Create New Plan.

  3. Enter your general information details.

    Show/Hide Fields

    • Name. The name for the action plan.

    • Status. The current stage of the action plan.

    • Type. Category or label to organize the action plan.

      • If the type is not listed, click +Create Type. Note: You must have 'Admin' level permissions on the Company level Admin tool to perform this action.

    • Private. Checkbox to make the action plan visible to only certain people.

    • Location. Where the work is taking place.

      • If the location is not listed, click +Create Location. Note: You must have 'Admin' level permissions on the Company level Admin tool to perform this action.

    • Assets (Beta). The asset that should be linked to the Action Plan.

    • Description. Explains the purpose, scope, and ground rules for why the plan exists.

    • Plan Manager. The user responsible for overseeing all stages of the action plan throughout its cycle.

    • Action Plan Approvers. Stakeholders who must review and sign off on the plan's requirements before work begins.

    • Completed Action Plan Receivers. People who automatically receive a final PDF record once the entire plan is finished.

  4. Click Create & Add Sections.

  5. Enter section and item details.

    Show/Hide Fields

    • Section Title. Title used to group your action plan item tasks.

    • Item title. Name of the specific task or step to be done.

    • Item status. Current stage of the action plan item.

    • Acceptance Criteria. The rules or standards a task must meet to be considered correct.

    • References. Links to helpful documents, like a specific blueprint or manual.

      • Click + Add Document to add photos, drawings, forms, documents, and attachments to the action plan for reference. Action Plans always reference the latest version of uploaded drawings.

      • Click + Add Procore Item to add items such as specifications, correspondence, submittals, observations, and meetings. The action plan will always reference the latest version of a specification.

    • Due Date. Add due dates for your action plan items. Any dates defined here will automatically carry over to new project-level templates or action plans created from this company level template.

    • Assignees. The specific individuals responsible for doing the work.

      • Under Blocking Functionality, select one of three options to manage the workflow linearity of your Action Plan.

      • Assignee signature required to release rest of section: This option requires the assignee's signature to unlock subsequent items within the same Action Plan section, ensuring linear progression.

      • Assignee signature required to release rest of plan: This option requires the assignee's signature to block the completion of all subsequent items and sections in the entire Action Plan.

      • None: This option allows item completion without an assignee's signature, enabling flexible, non-sequential task completion.

      • Select the Assignee drop-down menu (an entity or a specific person).

      • If the person is not listed in the drop-down menu, click Create Person to add a new contact as the assignee.

      • Select the Verification Method the assignee should use to verify the item's completion.

      • If the verification method is not listed in the drop-down menu, click +Create New Verification Method. Note: You must have 'Admin' level permissions on the Company level Admin tool to perform this action.

      • Under Required, select the checkbox to require an assignee signature. Note: If the 'Required' checkbox associated with the assignee is not selected, blocking functionality will not be enabled.

      • Click Add Assignee to add additional responsible parties.

      • Click Save.

    • Verification Methods. How you will prove the work was done (e.g., a photo or a signature).

    • Records. The actual files, photos, or documents attached to prove the work is complete.

      • Click Inspections, Correspondence, or Forms and mark one more checkboxes next to the template or type you want to request. Note: 'Read Only' level permissions or higher on the corresponding Project level tool is required to request records for that tool.

      • Click Submittals, Meetings, Observations, Attachments (including Documents), or Photos and mark the checkbox to request that record.

      • Click Save after selecting the requested records for the item.

    • Notes. A place to write extra comments or details about the task.

  6. Click Add Item to add a new item within the section.

  7. Click Add Section to add a new section.

  8. Continue adding sections and items as necessary.

  9. When you are finished adding sections and items, click Save Draft to save it as a draft, or click Publish if you're ready for the action plan to be approved to be performed.

     Note
    Clicking Publish shifts the action plan into 'View' mode where it can be approved and performed.

Create Multiple Plans

  1. Navigate to the project's Action Plans tool.

  2. Click Create, then select Create Multiple Plans.
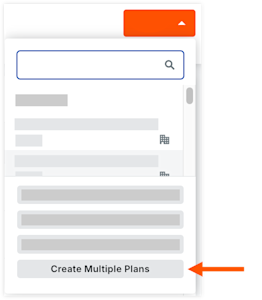
    action-plans-create-multiple-plans

  3. Select an Action Plan Template.

  4. Select the Assets.

  5. Click Create to generate an individual action plan for each selected asset.