Import Company Owned Equipment
PRIVATE ARTICLE
This page is set to 'Private' and is only visible to members of the PC-Internal group (a.k.a., Procore Employees).
The content on the United States (English) page below is exported as source content when publishing target content on the Australia (English) instance of the Procore Support Site at this link: ![]() Import Company Owned Equipment
Import Company Owned Equipment
Objective
To import company-owned equipment into your (Legacy) Company Equipment tool.
Background
In Procore, the Company Equipment registry contains the list of your company-owned equipment that is available for your field team to add and induct. Adding Company level equipment helps streamline the induction process and pulls maintenance information into the project. Your team can then quickly verify the information and complete the relevant checklist for your equipment as it arrives on site.
Things to Consider
- Required User Permissions:
- 'Admin' level permissions on the company’s Equipment (Legacy) tool.
- Additional Information:
- Imported equipment categories, types, makes, and models cannot be deleted when associated to equipment.
- You can edit a category, type, make, and model at any time after import.
- Only files in the XLSX format that have been properly filled out are accepted.
Prerequisites
Steps
- Navigate to the company's Equipment (Legacy) tool.
- Click Import.
- In the 'Download & Import Excel Document' window, click Download Template.
- Open, fill out, and save the template file. See Prepare Company Owned Equipment for Import for more information.
- In the 'Download & Import Excel Document' window, click Choose File.
- In the window that appears, select your file. Then click Open.
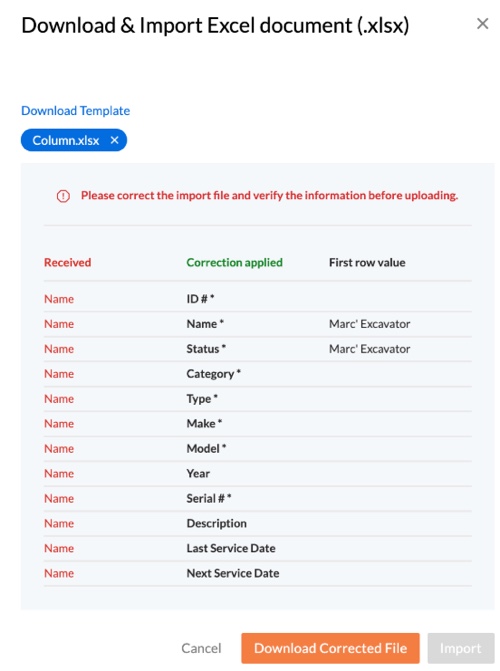
Note: If you receive the error message shown below, the information entered in the template may be mis-aligned. Download the corrected file and ensure the values in each row match up to the column headers.- The headers in the error message below mean the following:
- Received: Indicates the text in the column headers of your current file.
- Correction Applied: Indicates the column headers for the import file if you select "Download Corrected File" and what field the information will respect.
- First Row Value: Indicates the first row value in your import file so that you can verify that the column headers match the values on your excel file. It's recommended that you verify the values on your "corrected file" before import.

- The headers in the error message below mean the following:
- When the file name appears next to the 'Choose File' button, click Import.
Note: It may take a few minutes to successfully import your equipment file. - A banner appears on the screen with either of the following:
- A success message indicating how many items from your file imported.
- A failed message indicating how many items need to be corrected to import successfully.
- To correct the items in your import file, complete the following:
- Click the "Correct Failed Items" button.
- Follow the prompts in the file to update the data marked in red and Save or see Prepare Company Owned Equipment for Import for more information.
- In the 'Download & Import Excel Document' window, click Choose File.
- Select the corrected file and click Import.
- Repeat this process until all relevant information is successfully imported.
Note: If you would like to reset the import process, click the X on the banner to restart the import process.
The correction file will be unavailable for download after the message is dismissed.
- To correct the items in your import file, complete the following:

