Import Cost Catalog Items
Objective
To import items to the Cost Catalog tool in Procore.
Background
Procore supports multiple import types for adding items to the Cost Catalog tool. You can also export existing items from Procore to a Microsoft® Excel file. See Export Cost Catalog Items.
Users can also use the import and export options to bulk update items in your cost catalog. Export your existing items, edit them in the spreadsheet, then re-import them. Using the import feature to update cost catalog items also updates the assemblies within the global catalog.
Things to Consider
- Required User Permissions
- Using the import feature to update cost catalog items also updates the assemblies within the global catalog.
Steps
To Import Items from an Excel File
- Navigate to the Company level Cost Catalog tool in Procore.
- Click the vertical ellipsis
 icon at the top of the screen.
 - Select Download Template for Catalog Items Bulk-Import.
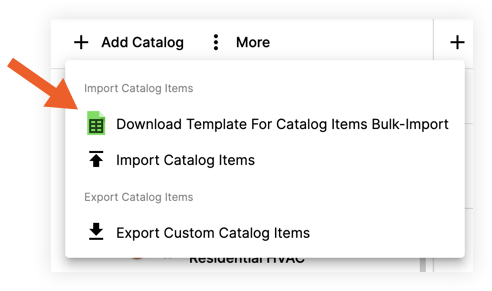
- A CSV file will download to your computer. The template contains different tabs for each catalog item type, and each page has at least one example of how to list your items in each column.
- Parts and Equipment:
- Item Name (required) - Enter the item name.
- Item Description - Enter the item description.
- Units of Measure (sold as) (required) - Select UoM from dropdown menu.
- Labor (hours) - Enter number of labor hours.
- Unit Cost - Enter unit cost amount.
- Cost Name - Enter the cost code description.
- Cost Code - Enter the cost code.
- Phase Name - Enter the sub job description.
- Phase Code - Enter the sub job.
- Manufacturer - Where the item comes from / Who made it.
- Catalog Number - Enter catalog number the item came from.
- Cut Sheet URL - Enter URL the item came from.
- Supplier - Who supplied the item.
- EPD URL - Enter Environmental Product Declaration URL if needed.
- Taxable - Select Yes or No from the dropdown to determine if taxable.
- Assemblies:
- Item Name (required) - Enter the item name.
- Item Description - Enter the item description.
- Units of Measure (sold as) (required) - Select UoM from dropdown menu.
- Catalog Number - Enter catalog number the item came from.
- Add an assembly multiplier to the below columns:
- Parts - The first number in the cell correlates to the row number in the Parts tab. The number in the parenthesis is the multiplier.
- Equipment - The first number in the cell correlates to the row number in the Equipment tab. The number in the parenthesis is the multiplier.
- Travel - The first number in the cell correlates to the row number in the Travel tab. The number in the parenthesis is the multiplier.
- Subcontractor - The first number in the cell correlates to the row number in the Subcontractor tab. The number in the parenthesis is the multiplier.
- Custom - The first number in the cell correlates to the row number in the Custom tab. The number in the parenthesis is the multiplier.
- Labor - The first number in the cell correlates to the row number in the Labor tab. The number in the parenthesis is the multiplier.
- Labor:
- Item Name (required) - Enter the item name.
- Item Description - Enter the item description.
- Units of Measure (sold as) (required) - Select UoM from dropdown menu.
- Unit Labor Cost - Enter a flat labor cost amount per unit of measure.
- Cost Name - Enter the cost code description.
- Cost Code - Enter the cost code.
- Phase Name - Enter the sub job description.
- Phase Code - Enter the sub job.
- Manufacturer - Where the item comes from / Who made it.
- Catalog Number - Enter catalog number the item came from.
- Cut Sheet URL - Enter URL the item came from.
- Supplier - Who supplied the item.
- EPD URL - Enter Environmental Product Declaration URL if needed.
- Travel and Subcontractor:
- Item Name (required) - Enter the item name.
- Item Description - Enter the item description.
- Units of Measure (sold as) (required) - Select UoM from dropdown menu.
- Unit Cost - Enter the unit cost amount.
- Cost Name - Enter the cost code description.
- Cost Code - Enter the cost code.
- Phase Name - Enter the sub job description.
- Phase Code - Enter the sub job.
- Manufacturer - Where the item comes from / Who made it.
- Catalog Number - Enter catalog number the item came from.
- Cut Sheet URL - Enter URL the item came from.
- Supplier - Who supplied the item.
- EPD URL - Enter Environmental Product Declaration URL if needed.
- Taxable - Select Yes or No from the dropdown to determine if taxable.
- Custom:
- Item Name (required) - Enter the item name.
- Item Description - Enter the item description.
- Units of Measure (sold as) (required) - Select UoM from dropdown menu.
- Unit Cost - Enter the unit cost amount.
- Cost Name - Enter the cost code description.
- Cost Code - Enter the cost code.
- Phase Name - Enter the sub job description.
- Phase Code - Enter the sub job.
- Manufacturer - Where the item comes from / Who made it.
- Catalog Number - Enter catalog number the item came from.
- Cut Sheet URL - Enter URL the item came from.
- Supplier - Who supplied the item.
- EPD URL - Enter Environmental Product Declaration URL if needed.
- Cost Type Name - Enter the cost type description.
- Cost Type Abbreviation - Enter the cost type abbreviation.
- Taxable - Select Yes or No from the dropdown to determine if taxable.
- Parts and Equipment:
- Add or copy items to the spreadsheet as needed and save the file.
- In the Cost Catalog tool, click the vertical ellipsis icon.
- Hover over Import Catalog Items and click Import from Excel File.
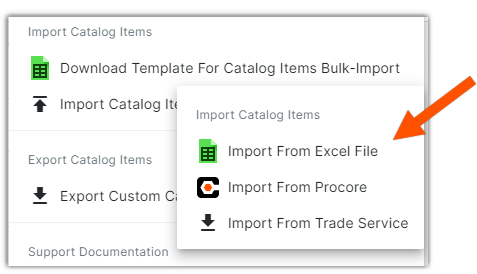
- Select the file and click Upload.
- After your items have successfully imported, they will appear on the left side panel under 'Imported Parts' or 'Imported Items'. The items are named based on the date and time of the import.
To Import Items from an Integration
- Navigate to the Cost Catalog tool in Procore.
- Click the vertical ellipsis icon at the top of the screen.
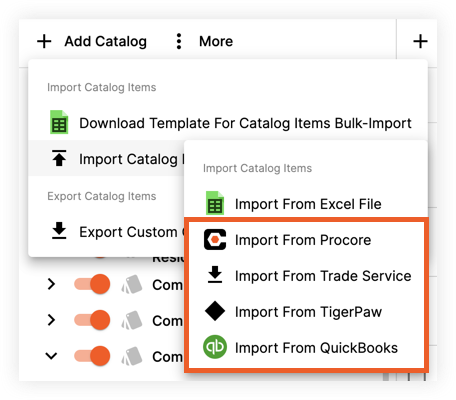
- Hover over Import Catalog Items.
- Click one of the following options (depending on the integrations you have with Procore Estimating):
- Import from Procore
- Import from Trade Service
- Import from TigerPaw
- Import from QuickBooks
- After your items have successfully imported, they will be available on the left side panel under 'Imported Parts' or 'Imported Items'. The items will appear in a folder with the integration's name.