Sage Intacct®: Setup Guide
Table of Contents
Welcome to the Sage Intacct® Setup Guide
On these pages, we will walk through a number of key things to know as you prepare for and complete your implementation of the Sage Intacct® integration.
If you have questions, be sure to direct them to your Integration Implementation Specialist or your Procore point of contact.
The navigation menu to the left will walk you through each of the key things to know and will highlight action items required of you.
Prerequisites
Sage Intacct® subscriptions
In order to use Procore's integration with Sage Intacct®, the following subscriptions will need to be enabled in Sage Intacct®:
- Web Services
- Construction
To enable these, go to Company → Admin → Subscriptions
-
Find ‘Web Services’ and click on it to Subscribe.
-
Repeat the process for "Construction Subscription". Sage Intacct® will have an additional charge for this. Please consult your Sage reseller about this.
-
Click Done when finish.
CONNECTION REQUIREMENTS
- Within Procore: Your Integration Implementation Specialist will ask you to add the required DMSA Apps to your account, more information here: ERP DMSA App Installation Guide
Create Web Service User
Web Server Users are used to access the Sage Intacct® data. They are automatically limited to the API through Web Service access. In other words, they can't be used to log into the company through the User Interface.
-
In Sage Intacct® ensure you are at the TOP LEVEL, then navigate to Company → Admin → Web Services Users
-
Click ADD
-
Input values for these fields
-
Enter a User ID for this user. This cannot be the User ID of an existing standard user.
-
Enter a User name, which will identify user in the Web Services Users list.
-
Enter the Account Email address for this user.
-
Select/create the Contact name for this user.
-
For the User Type, select Business User
-
The Admin privileges should be set to Full
-
Status should be set to Active
-
Select a Role that has "Full Admin" rights.
Note: User entity restrictions should be discussed with your Integration Implementation Specialist before any restriction is applied.
-
-
Click SAVE.
Note: The 'Welcome to Sage Intacct®' email will need to be forwarded to your Integration Implementation Specialist.
*To confirm that the Role has Full Admin permissions, do the following:
-
In Sage Intacct®, navigate to Company → Admin → Roles
-
Find the Role assigned to the Web Service User
-
Click on SUBSCRIPTIONS
-
Click on Permissions on the first module.
-
Confirm Permission is set to "All" and click Save
-
Repeat this process for each module after that.
-
Click SAVE
Company Setup to use Sender ID and ISO country codes
Note
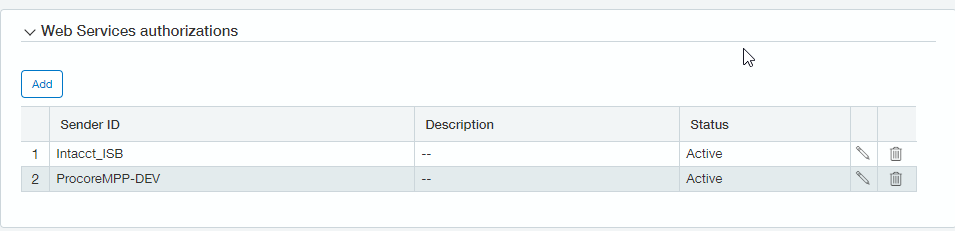
You must configure all settings at the TOP LEVEL.Add the Procore Sender ID to the allowed list.
1. Company → Setup → Company
2. Click Edit
3. Click on the Security tab
4. Go to the section labeled Web Services authorizations and add the Sender ID ProcoreMPP-DEV
To reduce the number of issues when the Province/State do not match the country code on the Vendor setup, use the Use ISO country code option in Sage Intacct®.
- Navigate to Company → Setup → Company
- Click Edit.
- Under Company information check the box "Use ISO country codes"
- Click Save to confirm the selection
Procore Specific Purchasing Configuration
Note
You must configure all settings at the TOP LEVEL.Three specific Purchasing Transaction Definitions will be required in order to export commitments from Procore to Sage Intacct®.
General Purchasing Configuration
- Navigate to Purchasing → Setup → Configuration.
- In the Unit of measure section:
- Select a Default Group from the dropdown menu.
- Check the "Enable Custom units of measure" box.
- In the Enable functionality section, check the box for 'Convert transactions by price - Allow override of item's default conversion type'.
- This enables the importation of commitments that are amount-based.
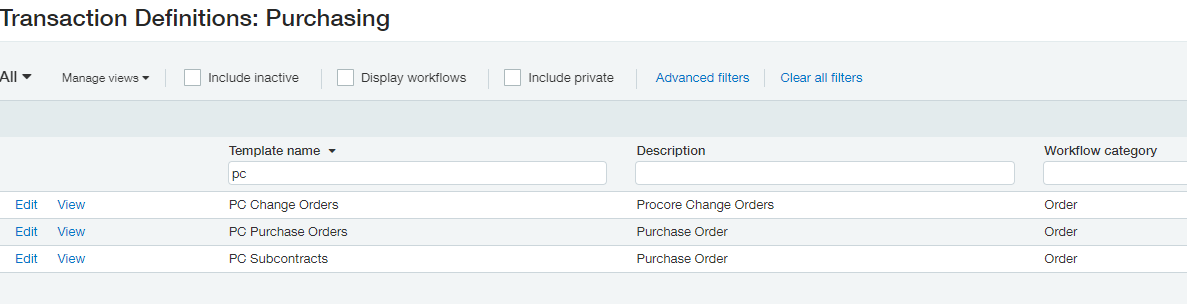
Transaction Definitions Used in the Sage Intacct® Integration
-
PC Purchase Orders
-
PC Subcontracts
-
PC Change Orders
-
PC Commitment Invoices
These transaction definitions can be configured to meet your organization’s needs combined with the following Procore specific requirements.
Create a PC Purchase Orders Transaction Definition:
-
Navigate to Purchasing → Setup → Transaction Definitions
-
Click ADD
-
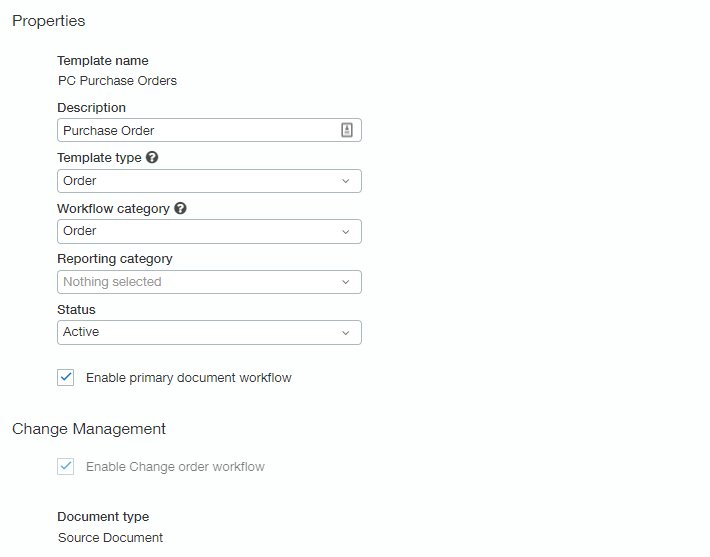
Input the following values into the Properties section:
-
Template name: PC Purchase Orders
-
Description: This field is optional, but can be Procore Purchase Orders.
-
Template type: Order
-
Workflow category: Order
-
Status: Active
-
Ensure that Enable primary document workflow is checked
-
Ensure that Enable Change order workflow is checked
-
Document type: Source Document
-
Transaction numbering will not need to be enabled
-
-
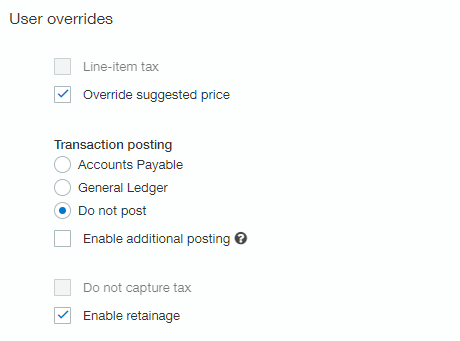
Now enter values into the Accounting section
-
For Transaction posting, it needs to be set to "Do not post". If you need another selection, please consult with your Sage Intacct® consultant.
-
Be sure that Enabled retainage is selected as in the below screenshot.
-
-
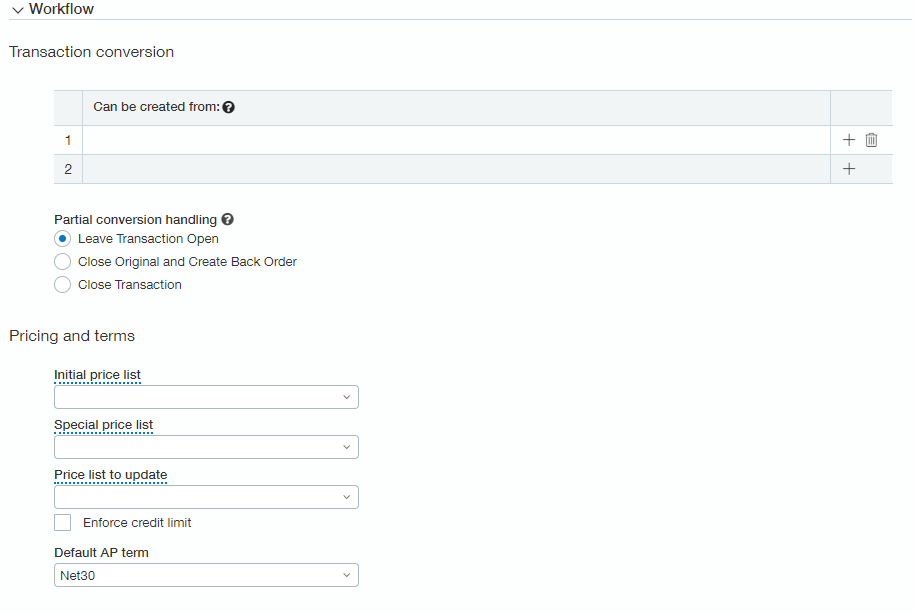
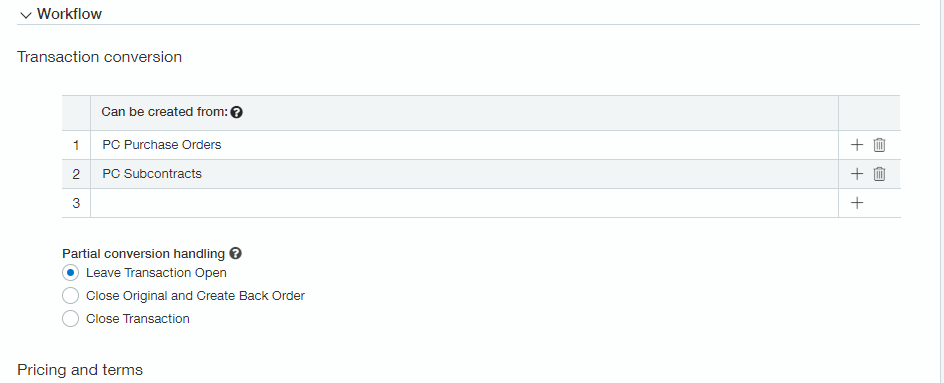
Now enter the values into the Workflow section
-
In the Partial conversion handling section, select Leave Transaction Open
-
For the Default AP term, from the dropdown menu select the most common AP term, such as Net 30.
-
-
Under the Additional information section, ensure that Enable Scope and Enable external reference are selected
-
If you selected General Ledger for Transaction posting, please consult your Accounting team on what to use on the Posting Configuration tab.
-
Navigate to the Security Configuration tab.
-
For the Document permissions section, the following settings will need to be applied:
-
The Edit policy needs to be set to "All".
-
The Allow edit of vendor should be set to "Never".
-
The Delete policy needs to be set to "All".
-
The Create policy needs to be set to "New document or Convert"
-
The option Create transactions in needs to be set to "Top level or Entity"
-
-
Click Save
Create a PC Subcontract Transaction Definition:
-
Navigate to Purchasing → Setup → Transaction Definitions
-
Click ADD
-
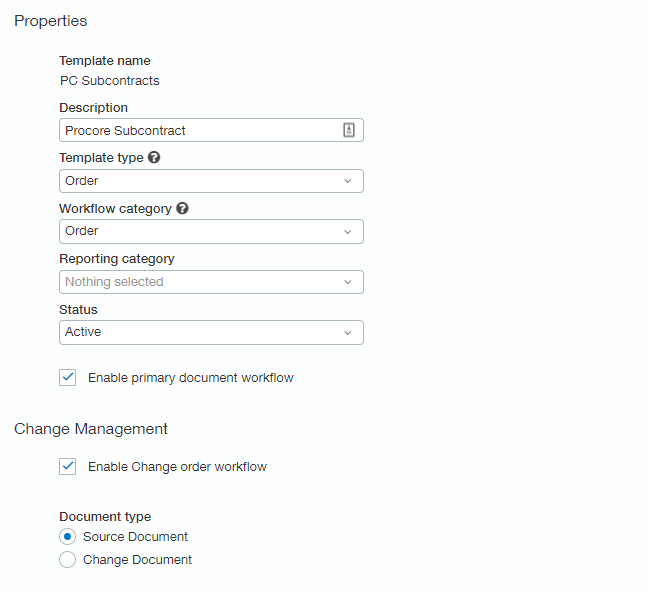
Input the following values into the Properties section:
-
Template name: PC Subcontracts
-
Description: This field is optional, but can be Procore Subcontract
-
Template type: Order
-
Workflow category: Order
-
Status: Active
-
Ensure that Enable primary document workflow is checked
-
Ensure that Enable Change order workflow is checked
-
Document type: Source Document
-
Transaction numbering will not need to be enabled
-
-
Now enter values into the Accounting section
- For Transaction posting, it needs to be set to "Do not post". If you need another selecting, please consult with your Sage Intacct® consultant.
-
Be sure that Enabled retainage is selected as in the below screenshot.
-
Now enter the values into the Workflow section
-
In the Partial conversion handling section, select Leave Transaction Open
-
For the Default AP term, from the dropdown menu select the most common AP term, such as Net 30.
-
-
Under the Additional information section, ensure that Enable Scope and Enable external reference are selected
-
If you selected General Ledger for Transaction posting, please consult your Accounting team on what to use on the Posting Configuration tab.
-
Navigate to the Security Configuration tab.
-
For the Document permissions section, the following settings will need to be applied:
-
The Edit policy needs to be set to "All".
-
The Allow edit of vendor should be set to "Never".
-
The Delete policy needs to be set to "All".
-
The Create policy needs to be set to "New document or Convert"
-
The option Create transactions in needs to be set to "Top level or Entity"
-
-
Click Save
Create a PC Change Orders Transaction Definition:
-
Navigate to Purchasing → Setup → Transaction Definitions
-
Click Add
-
Input values into the Properties section
-
Template name: PC Change Orders
-
Description is optional, but can be Procore Change Orders
-
Template type: Order
-
Workflow category: Order
-
Status: Active
-
Ensure that Enable Change order workflow is checked
-
Document type: Change Document
-
Transaction numbering will now need to be enabled, can be setup in Company → Setup → Document numbering
-
This can be called anything, but recommended is "Commitment Change Orders".
-
-
-
Now enter values into the Accounting section
-
For Transaction posting, consult with your Sage Intacct® consultant on whether you will want to make posting entires or not.
-
Be sure that Enabled retainage is selected.
-
-
Enter the following values into the Workflow section:
- For Partial conversion handling, select "Close Transaction".
- In the Default AP term dropdown, select the default AP term such as "Net 30". This must be selected, but the vendor will override it, if it is different.
6. Under the Additional information section, ensure that Enable Scope and Enable external reference are selected
Note: If you selected General Ledger for Transaction posting, please consult your Accounting team on what to use on the Posting Configuration tab.
-
Navigate to the Security Configuration tab.
-
For the Document permissions section, the following settings will need to be applied:
-
The Edit policy needs to be set to "All".
-
The Allow edit of vendor should be set to "Never".
-
The Delete policy needs to be set to "All".
-
The Create policy needs to be set to "New document or Convert"
-
The option Create transactions in needs to be set to "Top level or Entity"
-
-
Click Save
Create a PC Commitment Invoices Transaction Definition:
- Navigate to Purchasing → Setup → Transaction Definitions
- Click Add
- Input values into the Properties section
- Template name: PC Commitment Invoices
- Template type: Invoice
- Workflow category: Invoice
- Status: Active
- Transaction numbering: Vendor Invoice
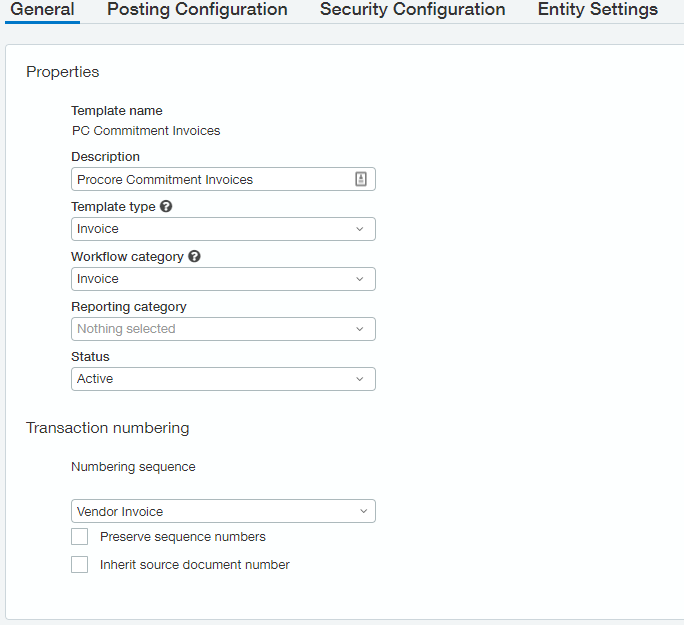
- In the Transaction numbering section, select Vendor Invoice
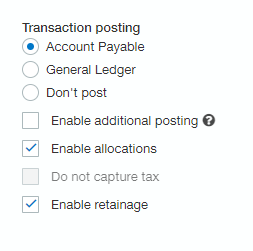
- Input values into the Accounting section
- Transaction posting: Account Payable
- Ensure that Enable retainage is selected
- Input values into the Workflow section
- Transaction Conversion: PC Subcontracts and PC Purchase Orders
- Partial conversion handling: Leave Transaction Open
- Navigate to the Posting Configuration tab
- Under Item GL Group, select all cost types that will be used in Procore
- Choose the appropriate Debit/Credit and GL Account information that should be associated with these cost types
- At least one account needs to be selected as “Is Offset
- Click Save
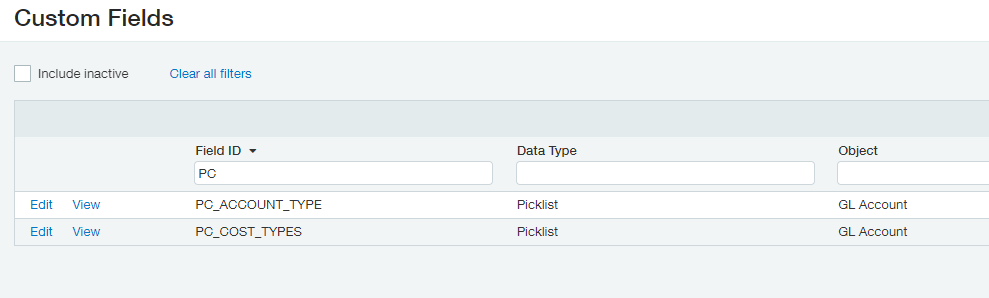
General Ledger Custom Fields
Note
You must configure all settings at the TOP LEVEL.When using the Procore integration with Sage Intacct®, two Custom Fields will need to be created: PC Account Type and PC Cost Types.
When these fields are populated on the General Ledger, Procore will identify them as Direct Cost accounts.
-
To create those fields, navigate to Platform Services → Custom Fields or to Customization Services → Custom Fields
-
The first custom field is called PC_ACCOUNT_TYPE.
-
Click Add
-
On "Step 1: Choose Object to Extend" select GL Account and click Next
-
On "Step 2: Choose Field Data Type" select Picklist and click Next
-
On "Step 3: Choose Pick List Field Characteristics" enter the following:
-
For the Label enter PC Account Type
-
Enter for Pick Values: Payroll, Expense, and Cash per snippet below
-
Type in the Field ID box, PC_ACCOUNT_TYPE and click Next
-
-
Click Done
-
-
The second custom field is called PC_COST_TYPES
-
Click Add
-
On "Step 1: Choose Object to Extend" select GL Account and click Next
-
On "Step 2: Choose Field Data Type" select Picklist and click Next
-
On "Step 3: Choose Pick List Field Characteristics" enter the following:
-
For the Label enter PC Cost Types
-
Enter for Pick Values: Payroll and Expense per snippet below
-
Type in the Field ID box, PC_COST_TYPES and click Next
-
-
Click Done
-
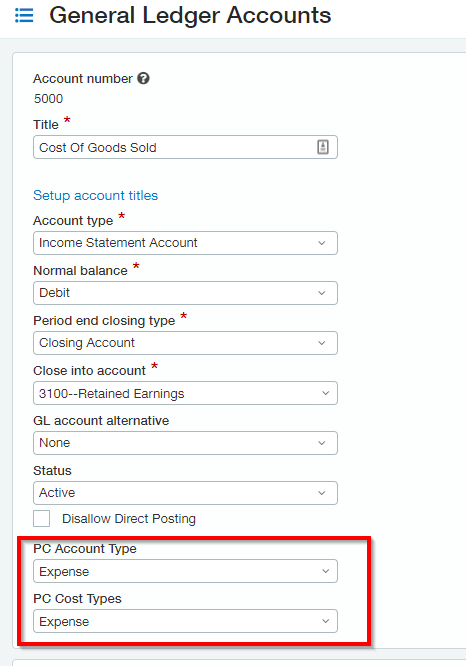
Once this is done, these custom fields will need to be filled out on the GL accounts that will bring costs over to Procore.
- In Sage Intacct® go to General Ledger > All > General Ledger Accounts
- Select the GL account that needs to be updated, by clicking Edit
- In the PC Account Type, select the appropriate account type: Payroll, Expense, Cash
- In the PC Cost Types, select either Payroll or Expense.
- Click Save to confirm the changes.
- Repeat for any additional GL accounts that need to be modified.
- Click Done when done.
Item ID Setup
Note
You must configure all settings at the TOP LEVEL.An Item ID needs to be set up for your Standard Cost Types.
Each Standard Cost Type needs to have an Item assigned to it.
-
Go to Purchasing → Setup → Items
-
Click Add to add a new Item (if an appropriate Item doesn't already exist).
-
The Item type has to be Non-Inventory.
-
Enter the Item ID, such as M for Materials
-
Enter the Name for the Item ID, such as Materials.
-
Select the Base unit of EA from the list.
Note: This is required for using commitments imported from Procore. -
Click Save when done.
Standard Cost Types
Note
You must configure all settings at the TOP LEVEL.Sage Intacct® has the ability to have hierarchical cost types. Procore does not support hierarchical cost types. All cost types used in the Procore/Sage Intacct® integration will be the Parent Cost Types that are setup in Sage.
Steps to create a Standard Cost Type.
-
Got to Projects → Setup → Standard cost type catalog
-
Click the Add button
-
For the ID, enter the ID needed for this cost type
-
A Name is required for the Cost Type. Enter an appropriate name for the Cost Type
-
Select the appropriate GL account
-
Select the appropriate Item ID from the drop down menu
-
Other fields on this setup are optional.
-
Click the Save button
Standard Cost Codes
Note
You must configure all settings at the TOP LEVEL.Sage Intacct® refers to Standard Cost Codes as Standard Tasks. When setting up a Standard Cost Code in Sage Intacct®, the ID will need to include the Parent ID.
Steps to create a new Standard Cost Code (Tasks) in Sage Intacct®:
- Got to Projects → Setup → Standard tasks catalog (Note this may be renamed to Standard cost code catalog)
-
Click the Add button
-
For the ID, enter the ID needed for this task including the Parent ID
-
A Name is required for the Cost Type. Enter an appropriate name for the Cost Type
-
Select the Parent ID from the drop-down menu
-
Other fields on this setup are optional.
-
Select the Standard Cost types needed for this task.
-
Click the Save button
NOTE: Cost codes (Standard tasks) must use either the dash/hyphen as the delimiter or use the dot. A combination dashes and dots is not supported.
Sage Intacct® Entities
Please consult with your Integration Implementation Specialist about entity support in Sage Intacct®.