Add Area or Volume Takeoffs
Objective
To add takeoffs to a Procore Estimating project using the Area / Volume measurement type.
Background
The Takeoff page in Procore's Estimating tool is where you can add and manage a wide variety of takeoffs for different trades. Procore Estimating offers advanced features to help manage takeoffs with ease. The Area / Volume type allows you to measure a mapped area of the plan to determine its area or volume.
Things to Consider
- Required User Permissions:
- 'Standard' level permissions or higher to the project's Estimating tool.
AND - 'Read Only' or higher level permissions to the project's Drawings tool.
- 'Standard' level permissions or higher to the project's Estimating tool.
- Additional Information:
- Before starting a material count, make sure that the plan scale is properly configured. See Set the Drawing Scale for Takeoffs.
- To see steps for all takeoff types, see Add Takeoffs.
Steps
- Navigate to the project's Estimating tool on app.procore.com.
Note: The Estimating tool automatically opens to the Takeoff page. - Click Create New Takeoff Layer.
- Complete the following information:
- Material Name: Enter a material name, or click Catalog to select an item from the material catalog.
Note: If you select a material from the catalog, always check to make sure that it matches the client’s specification and unit prices. - Measurement Type: Click the drop-down menu and select the Area / Volume measurement type.
- UoM: Click the drop-down menu to select a unit of measurement.
- Color: Click the drop-down menu to select a color.
- Material Name: Enter a material name, or click Catalog to select an item from the material catalog.
- Click Add to Plan.
Note: After adding the material, an indicator will be displayed that it is now active and ready for use. This takeoff should be selected (and highlighted in blue) before starting to plot the segments. - On the 'Active Plan' pane, click the starting point of the area followed by different points to cover the area that you want to measure.
- To delete a point, press the BACKSPACE or DELETE key on your keyboard. Delete multiple points by pressing the BACKSPACE key one point at a time. To delete the entire measured area, press the ESC key on your keyboard.
- Double-click to complete the measurement. The selected area will be highlighted by the selected color, and the measured area will appear under the takeoff name.
- Optional: You can add additional parameters for the takeoff to add more detail for the set on the estimate.
- In the list of takeoffs, click the vertical ellipsis
 icon for the takeoff you are working on.
 - Click Additional Parameters.
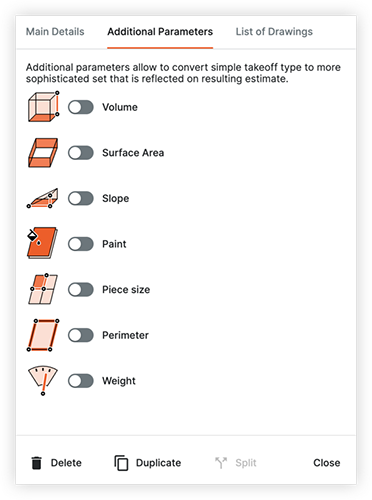
- Click the toggle
 ON for a parameter that you want to add details for.
 - Enter information as necessary.
- Click Close.
- In the list of takeoffs, click the vertical ellipsis