Accept or Reject Cost Codes for Export to QuickBooks®
Objective
To review cost codes that exist only in Procore (i.e., codes that do NOT exist in QuickBooks® Desktop) then accept those codes for export to the integrated QuickBooks® Desktop system.
Background
After adding Cost Codes to the company's Admin tool, you can then send the codes to the ERP Integrations tool where it can be accepted or rejected by an accounting approver. The accountant then has the option to 'Accept' or 'Reject' the code(s) as follows:
- Accept. An 'Accept' response exports the Company level cost codes from Procore and creates new codes in QuickBooks® Desktop.
OR - Reject. A 'Reject' response removes the cost codes from the ERP Integrations tool's 'Ready to Export' list and places it into an editable state in the project's Admin tool for updating (see Add Segment Items or Import Segment Items into your Company Level Admin Tool).
If there is at least one (1) item awaiting accounting approval in the ERP Integrations tool's 'Ready to Export' view, users who have been granted the privilege detailed above will receive one automated email notification perday (e.g., with the Subject Line "ERP Integrations Daily Summary") until all of the in the 'Ready to Export' view have been accepted or rejected.
Things to Consider
- Required User Permissions:
- Prerequisites:
- Review this support article: Configure Cost Code Preferences for QuickBooks® Desktop.
- Complete the steps in Send Standard QuickBooks® Desktop Cost Codes to ERP Integrations for Accounting Acceptance.
Steps
Accept the Cost Code
- Navigate to the company's ERP Integrations tool.
This reveals the QuickBooks® Desktop Integration page. - Click the Standard Cost Codes tab.
- Under Filter Standard Cost Codes By, make sure Ready to Export is selected.
- Review any cost code(s) and descriptions in the 'QuickBooks® Desktop Cost Code List'.
This list only shows unsynced cost codes. - Select an option in the following drop-down lists:
- General Ledger Account - Income. Choose the appropriate income account for each cost code. An income account is used for revenues, expenses, gains, and losses.
- General Ledger Account - Expense (Optional). If your company uses separate expense accounts, choose one from this list.
Note: Any changes you make will automatically be saved.

- Click Export Cost Codes.

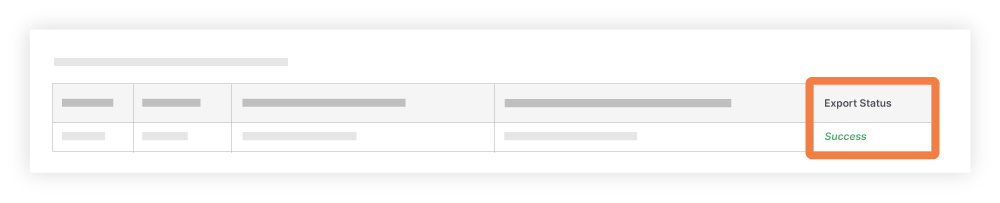
- Watch the 'Export Status' column in the QuickBooks® Desktop Cost Code list. It may take a few minutes to export your codes. When the export is complete, the column reads 'Success.'
Reject the Cost Code
- Navigate to the ERP Integrations tool.
This reveals the QuickBooks® Desktop Integration page. - Click the Standard Cost Codes tab.
- Under Filter Standard Cost Codes By, make sure Ready to Export is selected.
- Review the code(s) in the 'QuickBooks® Desktop Cost Code List'.
This list only shows unsynced cost codes. - Click Reject All.

The system removes the codes from the "Ready to Export" list in the ERP Integrations tool. A YELLOW banner appears at the top of the page to confirm that the code(s) have been removed.