Create Billing Periods in the Invoicing Tool
| Back | Current Lesson - 6/23 | Lesson 7 - Next |
A billing period defines the billing cycle used by your project's team and its subcontractors for invoicing. In addition to defining the frequency of the billing cycle (for example, monthly or weekly), a billing period also defines the cycle's start/end dates and an invoice's due date. Billing periods for Tucker HiRise are always the 1st to the 31st.
Only one (1) billing period is permitted to be open and active at a time. Invoice Contacts are allowed to submit one (1) invoice per billing period. After creating automatic billing period, keep in mind that you need to invite your invoice contact(s) to submit an invoice. See Send Subcontractor Invoice Invitations.
- Navigate to the project's Invoicing tool.
- Click Create Billing Period.
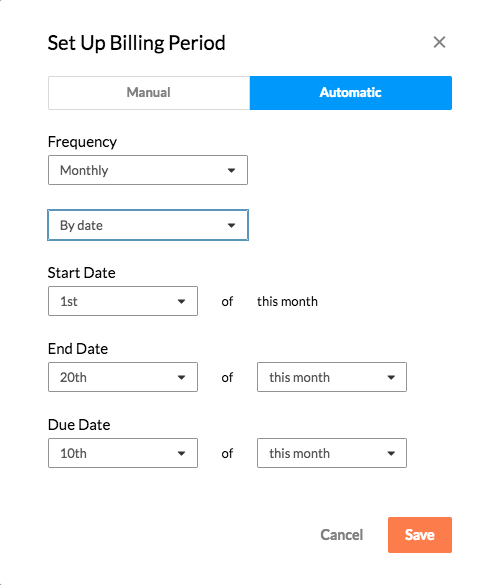
- Click the Automatic tab.
- Configure the billing period's settings as follows:
- Frequency
- Monthly. If you select this option, select the date you want the billing period to start.
- Weekly.
- Never.
- Start Date. Select the date of each month you want the billing period to start.
Note
To create automatic billing periods that occur after your selected 'Start Date', you will want to manually create the first billing period created on your project. See Create Manual Billing Periods in the Invoicing Tool. - End Date. Select the date of each month you want the billing period to end.
- Due Date. Select the date of each month you want the invoice to be due.
- Frequency
- Click Save.
Important
After creating automatic billing period, keep in mind that the system does NOT automatically notify subcontractors when it is time to submit an invoice. If you want to notify your subcontractors, you can send them an invitation to submit an invoice. See Send Subcontractor Invoice Invitations.
Create Manual Billing Periods
While this is not the recommended method for creating billing periods, the steps below are provided for informational purposes.
- Navigate to the project's Invoicing tool.
- Click the Create Billing Period button.

- Click Manual .
- Use the calendar controls to select dates for your billing period:
- From. Indicates the start date for the billing period.
- To. Indicates the end date for the billing period.
- Due Date. Indicates the date by which the commitment's Invoice Contact must submit their invoice to the contractor. See Add Invoice Contacts to a Commitment
Note
- To create a new invoice after the 'Due Date' passes, your Procore user account must be granted 'Admin' permissions on the Commitments tool.
- After the due date passes, an Invoice Contact with can no longer create a new subcontractor invoice. However, you may edit an existing invoice and submit that invoice for payment if the invoice is in the 'Draft' or 'Revise & Resubmit' status. For details, see Create and Submit an Invoice as a Subcontractor.
- Click Create.
Procore creates the new billing period and sets it to 'Open.' If you have previously created a billing period, Procore also automatically sets that billing period to 'Closed.'