Design Team Guide

Table of Contents
Welcome
Project Contacts
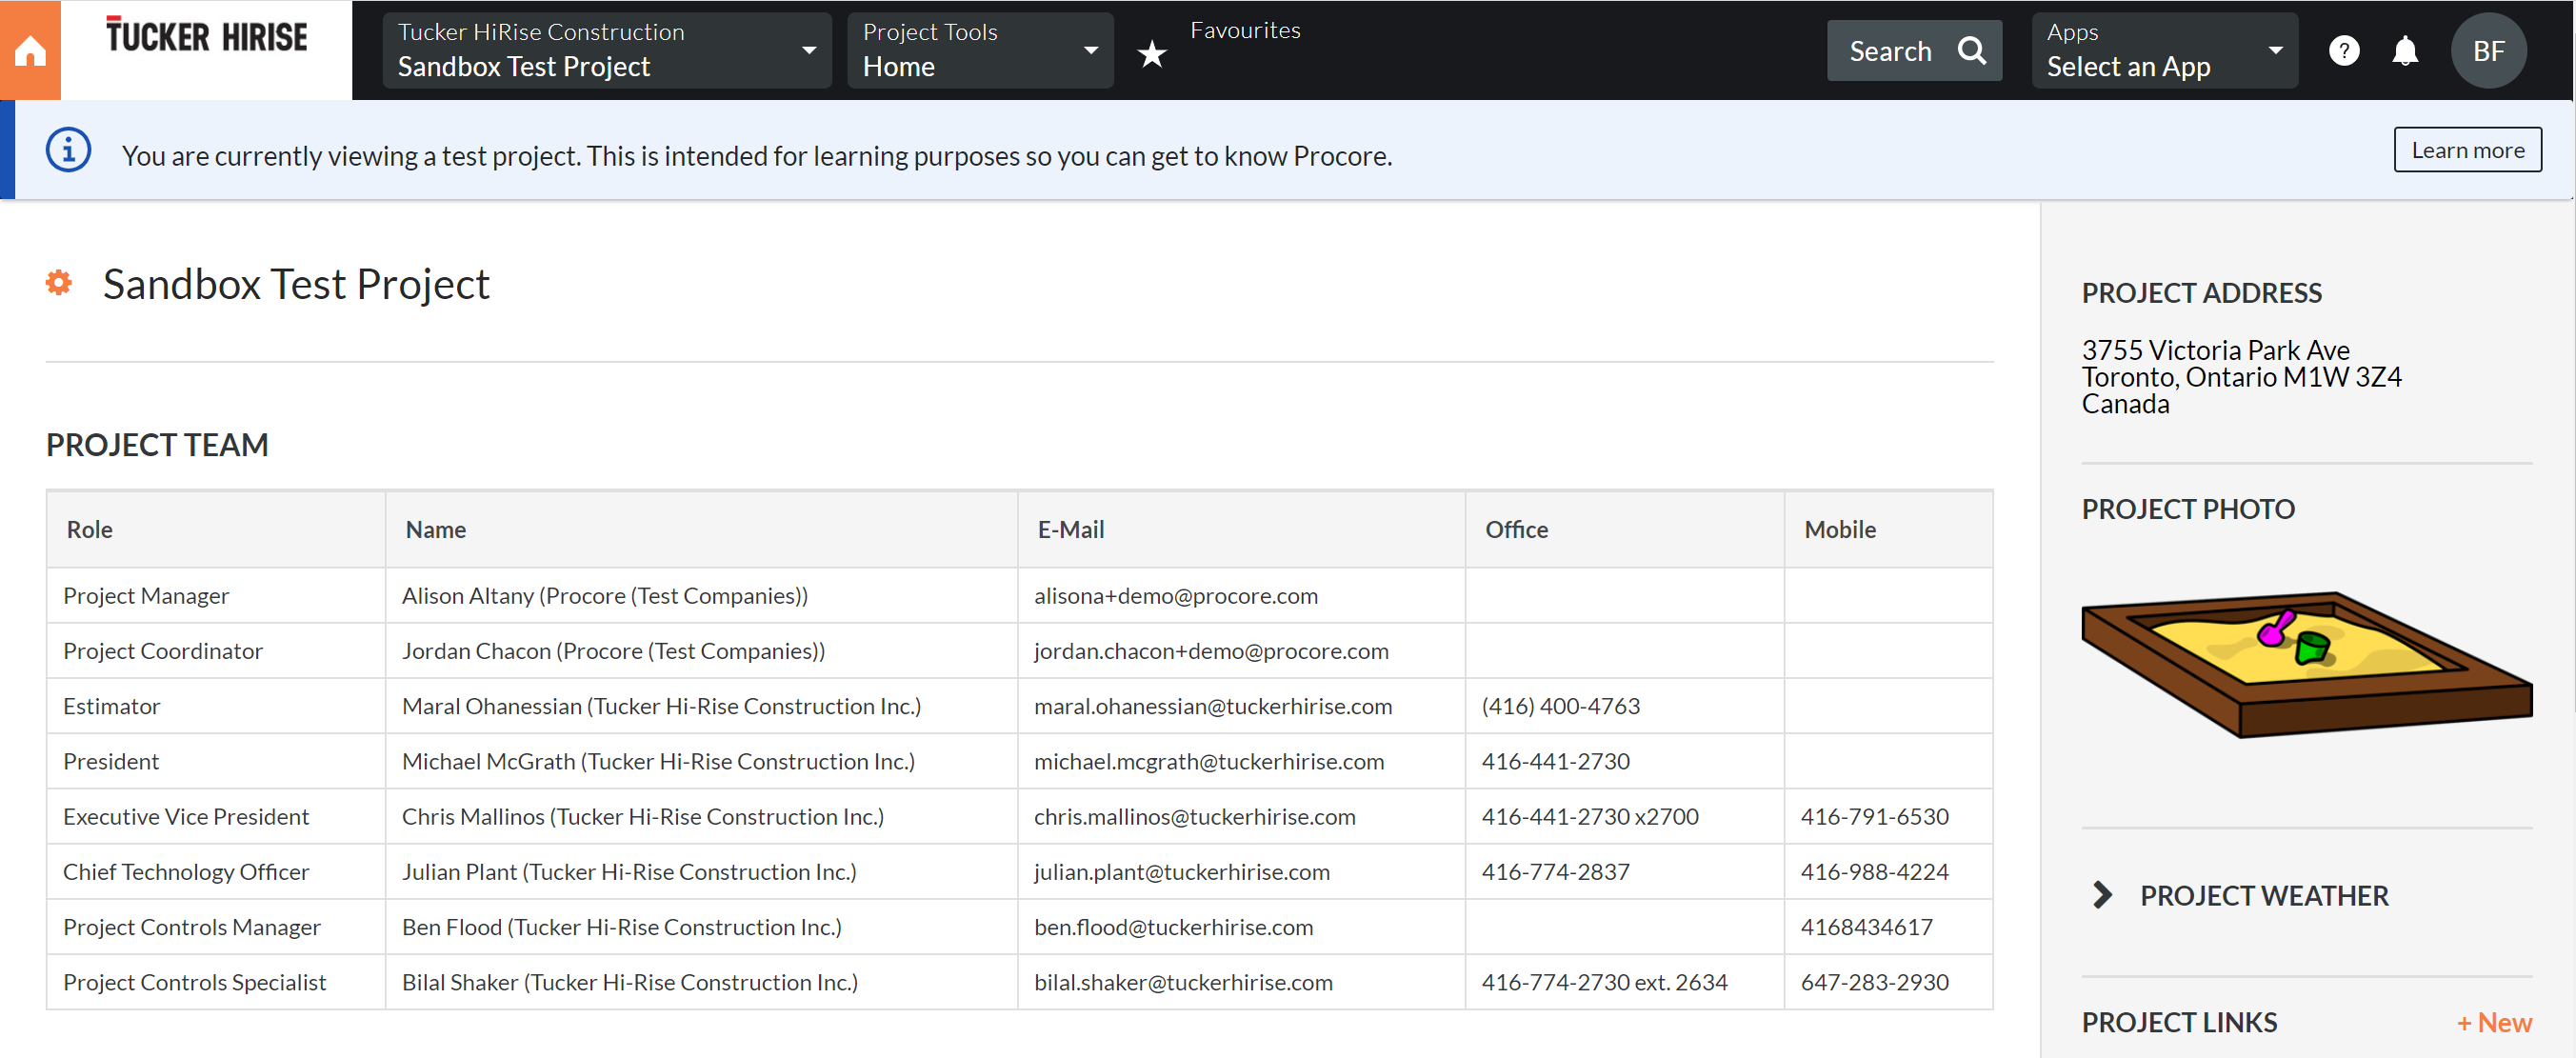
All relevant contacts for your Project can be found when logged into Procore on the Project Home Screen at the very top in the Project Team table. Here you will see relevant names and contact information for key parties on the project. For feedback and access beyond your site team, or for any help or questions regarding Procore, please email Procore@tuckerhirise.com
Training & Support
While specific quick-start tutorials can be found in the table of contents to the left, Tucker HiRise also recommends that all of your Procore users complete Procore Certification courses relevant to their role.
Support
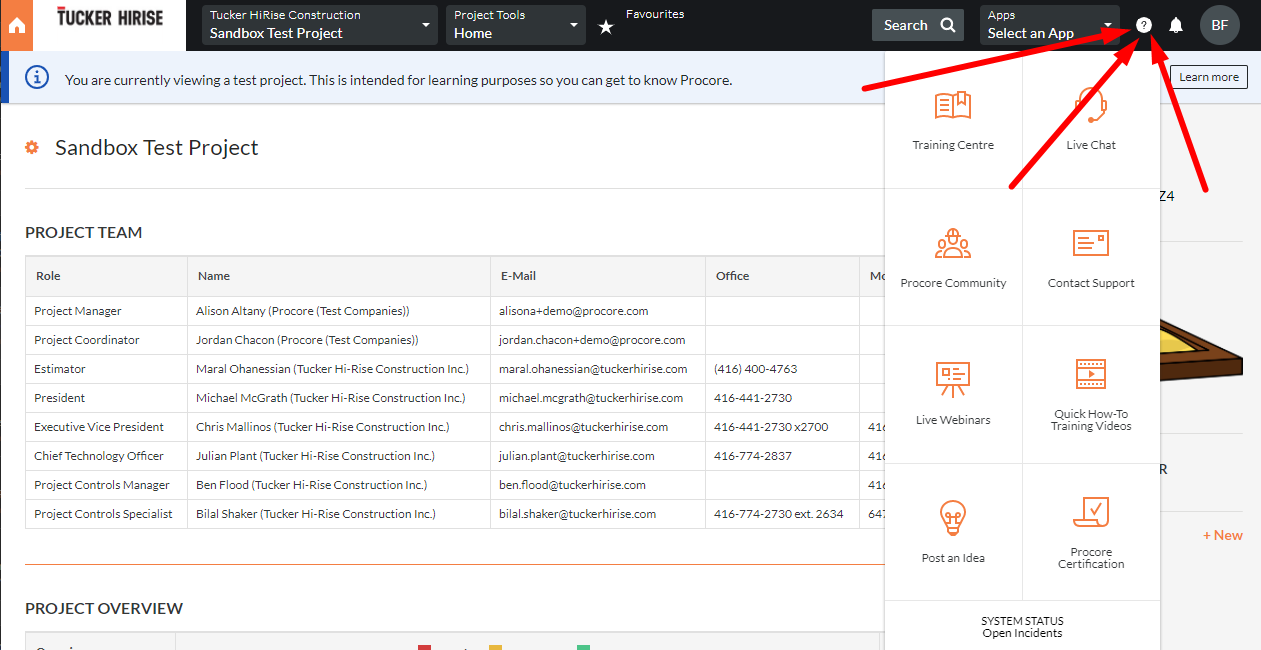
For how to support including accessing this guide, live chat, and more, please follow the steps below. If you are still unable to find the answers you need, please email Procore@tuckerhirise.com and we will be happy to assist you.
Log Into Procore and click on  in the upper right corner. From the drop down menu:
- Select Training Centre to return to this guide at any time.
- Select Live Chat to chat with a Procore Support Agent (great for general how-to questions)
- Select Procore Certification to view the certification course catalog listed above
Procore Uploads: Drawings, Specs, SIs, Addendums
Procore Uploads
All new Drawings, Specifications, Site Instructions, Addendums, Change Directives, or other types of contract documents are to be distributed to Tucker HiRise via Procore's Instructions tool by the responsible consultant or party using the following process:Note
In Procore, Drawings (Current and previous versions) are stored in the Drawings tool. Drawings are NOT stored in the Documents tool.All new drawings, specifications, or other pieces of updated project info are required to be uploaded into Procore by the responsible consultant using the following process. Note that this will often require documents to be uploaded into multiple locations or tools within Procore.
All updates to tender or contract documents are first uploaded and issued via the Instructions tool. For more information, please select the Instructions tool from the menu on the left.
Before uploading drawings, please double check that the drawing revision number, date, set name, and page date have all been updated accordingly.
1. Log In to Procore and select the project you wish to post drawings for and select it from the Portfolio View.

2. Select the Drawings Tool under Project Management from the Project Tools menu at the top of the screen.

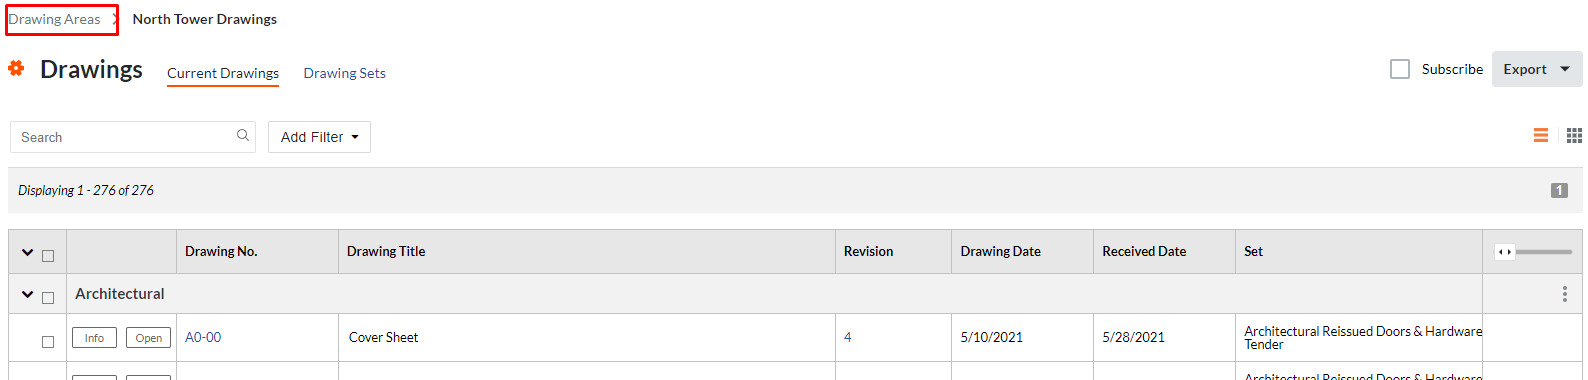
3. If Drawings are separated by area on your project, please select the area for which you would like to upload drawings. Note that each area requires separate drawing uploads. Once inside the Drawings Tool (or area), find the ‘Upload Drawings’ Button on the top right of the window.


4. This will open a smaller window where you can drag and drop your files for upload (or attach manually through your hard drive). Attach the Files you wish to Upload via the manual attachment or Drag and Drop. Drawings can be uploaded as a single PDF or individual files. Please do not include Site Instruction issuance sheets in your drawing upload (Drawing Cover Sheets such as A0.00 should be included in your upload).

5. Select a Set Name from those existing in the ‘Select a Set’ dropdown, if the set name does not exist, you may select ‘Create New Set’ and title the new set to the name of the issuance if it is a grouped issuance such as "Issued for Permit". If the set is discipline specific such as an addendum or bulletin, enter the set name as "Discipline - Set Name". Please DO NOT use duplicate set names in your drawing revisions. Also, please make sure that the Set Name you select enter exactly matches the Revision/Set name on the drawings. Example: if you are the structural engineer and the latest revision on the drawings you are uploading is “Issued For Construction”, your set name should be “Issued For Construction”. If you are the mechanical engineer and the latest revision on the drawings you are uploading is “PTA 05”, your set name should be “Mechanical - PTA 05”.

6. Set the 'Default Drawing Date' as the revision date noted in the revision log on your newly uploaded drawing sheets.
7. Set the 'Default Received Date' as the date the drawings are being uploaded.
8. Press Process – YOU’RE DONE! Please be advised that you will not receive any sort of email or confirmation of the upload, nor will the drawings be visible right away. A member of the Tucker HiRise team will be automatically notified of the up load, and will then review and publish the drawing sheets.
Thank you for using Tucker’s Platform for Drawing Submission.
Once in the platform, find the project you wish to post Specifications for and select it from the Portfolio View.
Once you are in your Project, Find the Toolbox at the top center of the screen, and find the Specifications Tool under Project Management

Once inside the Specifications Tool, find the ‘Upload Specifications Button on the top right of the window

This will open a smaller window where you can drag and drop your files for upload (or attach manually through your hard drive)
Attach the Files you wish to Upload via the manual attachment or Drag and Drop


Select a Set Name from those existing in the ‘Select a Set’ dropdown, if the set name does not exist, you may select ‘Create New Set’ and title the New Set accordingly
NOTE: Please make sure that the Set Name you enter matches the Revision/Set name on the Specifications. Example: if the latest revision on the Specifications you are uploading is “ISSUED FOR TENDER”, your set name should also be “ISSUED FOR TENDER”
Press Process – YOU’RE DONE ! Thank you for using Tucker’s Platform for Specification Submission
1. Navigate to the Instructions tool, click + Create in the top right corner of the screen, and fill out details as follows:
Type: Select the appropriate Instruction Type for your issuance specific to your discipline. If you believe a new type should be added, please contact the Project Manager. For projects with a Prime Consultant with consolidated cover sheets, only the Other / Prime types will be used
| Architectural | Structural | Mechanical | Electrical | Interior Design | Civil | Other / Prime | |
|---|---|---|---|---|---|---|---|
| Addendum | ADD-A | ADD-S | ADD-M | ADD-E | ADD-ID | ADD-C | ADD |
| Post-Tender Addendum | PTA-A | PTA-S | PTA-M | PTA-E | PTA-ID | PTA-C | PTA |
| Site Instruction | ASI | SSI | MSI | ESI | IDSI | CSI | SI |
| Issued For Construction | IFC-A | IFC-S | IFC-M | IFC-E | IFC-ID | IFC-C | IFC |
| Issued for Tender | IFT-A | IFT-S | IFT-M | IFT-E | IFT-ID | IFT-C | IFT |
| Other Issuance | ISS-A | ISS-S | ISS-M | ISS-E | ISS-ID | ISS-C | ISS |
#: Procore automatically assigns the next sequential number based on the document type selected above.
- Please ensure the label on your site instructions matches the next available number for your discipline in Procore.
- If you need to issue Instructions out of order (i.e. ASI-2 needs to be issued before ASI-1 is ready), save ASI-1 as a draft to preserve that ASI number, then return to the Instructions page to create and ASI-2 using the steps below. Once the previous (draft) ASI is complete and uploaded, proceed to Step 3 below.
Title: Provide a concise title explaining the update. This should me an exact match to the title shown on the cover sheet of your SI or Addendum. Do not include the # or Type in the Title.
Instruction From: Select your name
Date Received: Date you are uploading the Instruction
Attention: Ensure this includes all applicable members of the Tucker HiRise Project Team, including the Project Manager, Assistant Project Manager, Project Coordinator. If project is in Tendering/Precon, the Estimator and Project Controls Coordinator or Project Controls Manager should also be included. If unfamiliar with these contacts, a full and updated contact list is available on the project home screen in Procore.
Distribution: Leave blank. Tucker HiRise will assign to contacts from the affected trades as noted in the following section
Trade(s): Please note all trades whose work may be affected by this Instruction
Schedule Impact: Leave Blank
Cost Impact: Leave Blank
Private: Leave unchecked
Description: Provide a summary of the changes made, or copy the description from the cover sheet of your SI or Addendum.
Attachments
Attach all updated documents. Note that multiple files can be attached, and it is actually preferred if you do not consolidate the entire package into a single file. Attachments should be separated as follows:
- Cover Sheet: Must include # and Title that match those entered into Procore, as well as a description of all other attachments, and the changes represented (including documents added or deleted from the current drawing or specification set).
- Drawings: If your project has multiple Drawing Areas (i.e. High-Rise, Mid-Rise, Townhomes, etc), please provide a separate file for the drawings in each area. Please reference Procore's Drawings tool to ensure names and areas match those designated for your project.
- Specifications: One consolidated file with all added or modified specification sheets.
- Schedules: If schedules and appendicies (such as fixture schedules, mechanical schedules, electrical schedules) are included in your discipline's specification book, each schedule or apendix should be givin a unique specification number so we may easily track and organize such documents. A table or index of all schedules and their associated spec numbers should be provided at the beginning of the project, and any time a schedule is added or removed from the current set.
- CAD Files: If your project has multiple Drawing Areas (i.e. High-Rise, Mid-Rise, Townhomes, etc), please provide a separate file for the drawings in each area. Please reference Procore's Drawings tool to ensure names and areas match those designated for your project. Following IFC issuance, it is not necessary to provide updated CAD files l with every SI. New CAD files should be provided approximately once per month for clash detection purposes.
- Revit Files: One consolidated file with all additions or modifications. Following IFC issuance, it is not necessary to provide an updated model with every SI. A new model should be provided approximately once per month for clash detection purposes. Note: Please keep sheet views in the model.
- Other Documents: One consolidated file per "type" of document.
2. Click ‘Save As Draft’
3. Click "Email" and send the instruction ONLY to the Tucker HiRise Project Team (including TLogic if applicable). Tucker HiRise will assign the Instruction to the appropriate trades,update the status and distribute to trades.
Note:
Drawings, Specs, Instructions, Addendums, PTAs, CAD files, or Revit Models must be sent to Tucker HiRise via Procore's instructions tool. Other methods of delivery such as email, NewForma, WeTransfer, etc. will not be accepted
Respond to RFIs
RFIs in the Tucker Platform are digitally generated and will be sent to you via Email notification. RFIs can be viewed Online or by PDF by clicking on the relative buttons within the email, however the easiest way to respond to an RFI is simply to reply to the email which notified you. Any text or file attachment will carry through to the Tucker Platform and be logged appropriately as a response to the related RFI tagged with your credentials. Responses to RFIs and RFI emails should only contain answers, attachments, or questions for further clarification. Please DO NOT respond to RFIs or emails with something such as "We will review and respond shortly". This will incorrectly switch the Ball In Court away from you and the item will not show in the list of your open items.
Important
If your response to an RFI requires an SI, TA, PTA, Drawing Revision/Issuance, Sketch, Specifications, etc, you MUST follow these steps:
- Respond to the RFI stating it will be resolved by the forthcoming document with anticipated delivery date
- Create the new SI, TA, or PTA to address the issue (inclusive of cover sheet and updated documents) keeping in mind the following:
- Please bubble all changes
- Please Include references to which RFIs are being addressed on the cover sheet.
- For SIs that cover multiple disciplines, please update the model and drawings to ensure changes are communicated and coordinated.
- Please keep sheet views in the model.
- Upload the SI, TA, or PTA (with cover sheet and updated documents) to Procore's Instructions tool per instructions in the Procore Uploads tab.
Please note, if an RFI will be resolved in a forthcoming Site Instruction or revised set of documents, the RFI will remain open until such resolution is provided.
To view RFIs, select the RFIs tool from the Project Tools drop down menu:

Respond to Submittals
Once in the platform, find the project you are working on and select it from the Portfolio View.
Once you are in your Project, Find the Toolbox at the top center of the screen, and find the Submittals Tool under Project Management

Once inside the Submittals Tool, find the Submittal relevant to you and click on “View”
You can then open the attached PDF and add your markups directly on the platform, you do not need to download the file.

Once you open the PDF, you can use the toolbar on the left to markup the document, the system will automatically save it as the new revised document.

When you are done marking up the PDF, you can click the “Respond” button highlighted below to take the submittal to the next step.

The system will automatically attach the PDF with your markups, you can attach any other extra files if you wish by using the attach button below then clicking “Next”

Here you can select your response by using the dropdown list, use the comment box to make any other comments, then click “Preview”

Once you are all done, simply click “Respond”

Create & Review Completed Deficiencies
This guide includes only the steps that apply to consultants, owners, Q/A teams, PDI teams, and warranty teams. If you would like to view the start to finish Deficiency process, including steps performed by Tucker HiRIse, please Click Here.
Creating a Deficiency (Consultant or Owner or Tucker HiRise)
Important
To create multiple deficiencies for the same location such as a specific suite, follow these steps:
| 1. Open the Procore Mobile App on your Andriod or iOS device (the Procore Mobile App is the best and fastest way to create Deficiencies) | 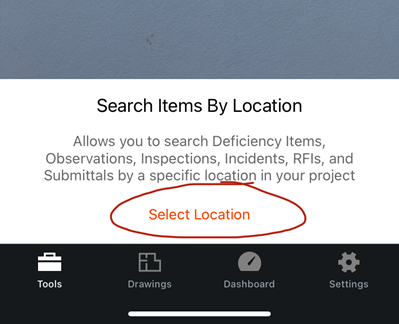 |
| 2. Open the Locations tool (not the Deficiencies Tool) | |
| 3. Scan a QR Code for the location or hit Select a Location at the bottom | |
| 4. Select Create Deficiency at | 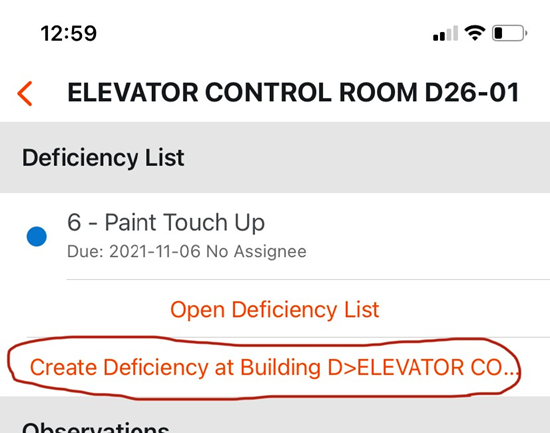 |
| 5. Create your Deficiency using the steps below | |
| 6. Once the deficiency has been created, you'll be taken back to the location in step 4 and can create another deficiency without having to re-enter the location. |
| Procore Mobile App (iOS & Android) | Procore Web App (app.procore.com) |
|---|---|
|
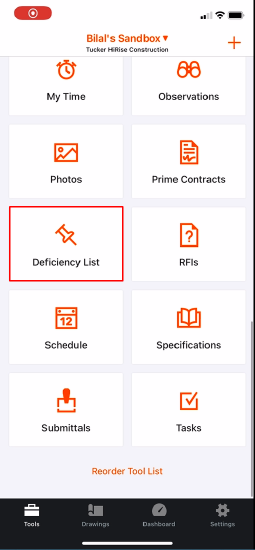
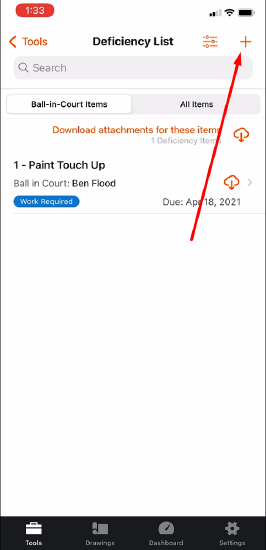
A. Navigate to the Deficiency List tool and select the + icon in the upper right corner
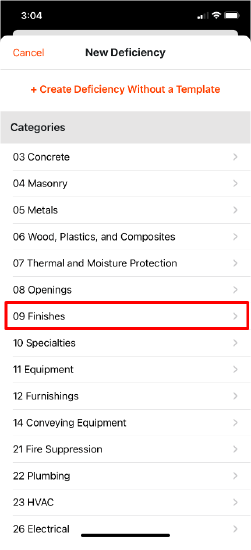
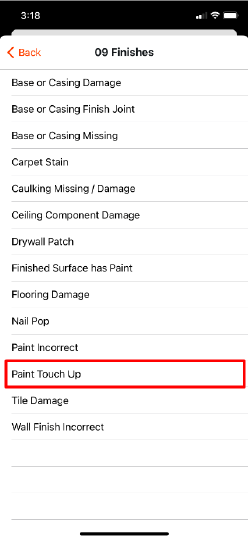
B. Select a deficiency template OR for Suites / Pre-PDI / PDI, select Create Deficiency Without a Template
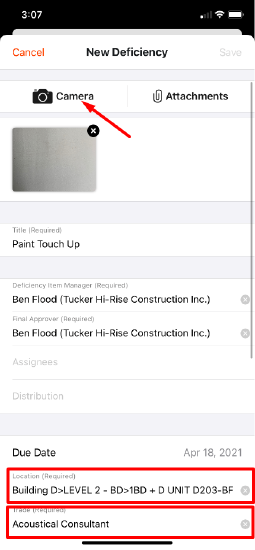
C. Add a photo of the deficiency, and complete fields as follows: Title: Unit Number (if applicable) - Deficiency - Specific Location (702 – Paint Touch Up – North Wall)
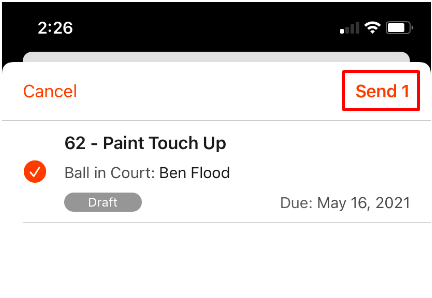
D. Hit "Save", and proceed to create further deficiencies using steps A-C. Once all Deficiency Items for the day have been created, send all items to Deficiency Item Manager for review. This should only happen once per day, at the end of each day. Please do not do this after each deficiency, otherwise the Deficiency Manager will receive hundreds of emails per day.
|
A. Navigate to the Deficiencies tool. On the top right corner click
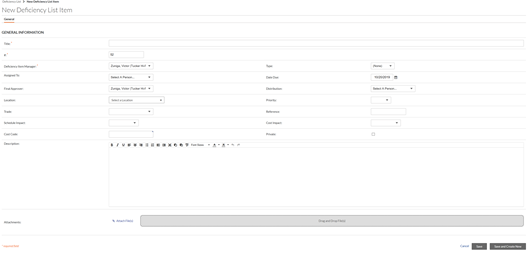
New Deficiency List Item window will prompt
B. Select a deficiency template OR for Suites / Pre-PDI / PDI, select Create Deficiency Without a Template C. Add a photo of the deficiency, and complete fields as follows: Title: Unit Number (if applicable) - Deficiency - Specific Location (702 – Paint Touch Up – North Wall) D. Click "Save", and proceed to create further deficiencies using steps A-C.
|


Final Approval & Closing a Deficiency Item (Consultant or Owner or Tucker HiRise)
| Procore Mobile App (iOS & Android) | Procore Web App (app.procore.com) |
|---|---|
|
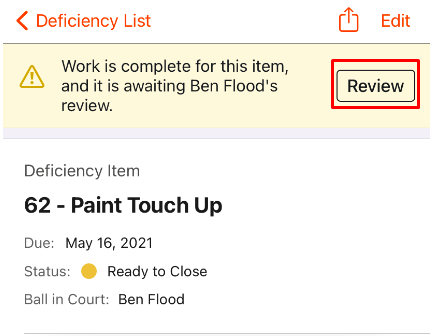
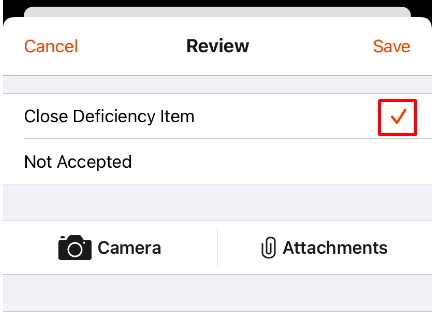
The creator or appropriate Q/A team member reviews the work. If completed, the Deficiency can be closed. If incomplete, the Deficiency can be marked as “Not Accepted”. Deficiency Item Manager should never close deficiencies unless they were also the creator.
|


View Drawings in Procore
Note
In Procore, Drawings (Current and previous versions) are stored in the Drawings tool. Drawings are NOT stored in the Documents tool.All new drawings, specifications, or other pieces of updated project info are required to be uploaded into Procore by the responsible consultant using the following process. Note that this will often require documents to be uploaded into multiple locations or tools within Procore.
All updates to tender or contract documents are first uploaded and issued via the Instructions tool. For more information, please select the Instructions tool from the menu on the left.
Before uploading drawings, please double check that the drawing revision number, date, set name, and page date have all been updated accordingly.
1. Log In to Procore and select the project you wish to post drawings for and select it from the Portfolio View.
2. Select the Drawings Tool under Project Management from the Project Tools menu at the top of the screen.
3. If Drawings are separated by area on your project, please select the area for which you would like to upload drawings. Note that each area requires separate drawing uploads. Once inside the Drawings Tool (or area), find the ‘Upload Drawings’ Button on the top right of the window.
4. This will open a smaller window where you can drag and drop your files for upload (or attach manually through your hard drive). Attach the Files you wish to Upload via the manual attachment or Drag and Drop. Drawings can be uploaded as a single PDF or individual files. Please do not include Site Instruction issuance sheets in your drawing upload (Drawing Cover Sheets such as A0.00 should be included in your upload).
5. Select a Set Name from those existing in the ‘Select a Set’ dropdown, if the set name does not exist, you may select ‘Create New Set’ and title the new set to the name of the issuance if it is a grouped issuance such as "Issued for Permit". If the set is discipline specific such as an addendum or bulletin, enter the set name as "Discipline - Set Name". Please DO NOT use duplicate set names in your drawing revisions. Also, please make sure that the Set Name you select enter exactly matches the Revision/Set name on the drawings. Example: if you are the structural engineer and the latest revision on the drawings you are uploading is “Issued For Construction”, your set name should be “Issued For Construction”. If you are the mechanical engineer and the latest revision on the drawings you are uploading is “PTA 05”, your set name should be “Mechanical - PTA 05”.
6. Set the 'Default Drawing Date' as the revision date noted in the revision log on your newly uploaded drawing sheets.
7. Set the 'Default Received Date' as the date the drawings are being uploaded.
8. Press Process – YOU’RE DONE! Please be advised that you will not receive any sort of email or confirmation of the upload, nor will the drawings be visible right away. A member of the Tucker HiRise team will be automatically notified of the up load, and will then review and publish the drawing sheets.
Thank you for using Tucker’s Platform for Drawing Submission.
View Specifications in Procore
Once in the platform, find the project you wish to post Specifications for and select it from the Portfolio View.
Once you are in your Project, Find the Toolbox at the top center of the screen, and find the Specifications Tool under Project Management
Once inside the Specifications Tool, find the ‘Upload Specifications Button on the top right of the window
This will open a smaller window where you can drag and drop your files for upload (or attach manually through your hard drive)
Attach the Files you wish to Upload via the manual attachment or Drag and Drop
Select a Set Name from those existing in the ‘Select a Set’ dropdown, if the set name does not exist, you may select ‘Create New Set’ and title the New Set accordingly
NOTE: Please make sure that the Set Name you enter matches the Revision/Set name on the Specifications. Example: if the latest revision on the Specifications you are uploading is “ISSUED FOR TENDER”, your set name should also be “ISSUED FOR TENDER”
Press Process – YOU’RE DONE ! Thank you for using Tucker’s Platform for Specification Submission
Email Notification Settings
By default, Procore is configured to send email notifications relevant to you for many types of updates in all of its various tools. With so much going on, it is easy for these emails to become overwhelming and clutter your inbox with items you may not find useful. Fortunately, we have the ability to customize which actions trigger emails in each tool.
ImportAnt
If you are receiving too many emails, irrelevant emails, or believe you are missing critical updates please send an email to Procore@tuckerhirise.com or contact the PM or APM on your project and they will adjust the project's email settings accordingly. 