CVM Manual for CM/FCA
1. THE CVM MANUAL FOR CM/FCA
1.1. Purpose
The CVM (Construction Vegetation Management) Standardization refers to the changes made to align the CVM Processes and establish a standard. The focus of this alignment is to review and redefine processes that are specifically used in Procore during Stage 5-Construction, and Stage 6- Closeout. This user guide will help SDG&E employees with detailed instructions on utilizing Procore while implementing the end-to-end CVM Standardization Process for their projects. Each project type follows a specific process with designated project roles, in this guide, you will learn what the overall Procore process is for a project, with more detailed user guides available to review specific Project submittal processes (e.g., Fuse, Hotline/Clamps).
1.2. Definitions and Acronyms
The CVM Standardisation process involves the following terms/acronyms as defined below:
List of Abbreviations and Technical Terminology
- SDG&E: San Diego Gas & Electric
- Instance: Group within Procore based on job and project type (e.g. Gas or FiRM)
- CMS: Construction Management Specialist
- MLP: Materials Logistics Planner
- FCA: Field Construction Advisor
- CSPM: Construction Services Project Manager
- CM: Construction Manager
- SPL: Strategic Project Lead
- FUS: Field Utility Specialist
- NTP: Notice to Proceed
- FEWA: Field Extra Work Authorization
- FACT: Field Audit Collection Tool
- CPD: Construction Planning and Design module in SAP
- WO: Work Order
- DBL: Design By Location
- JTO: Joint Trench Offer
- (Step #): If located next to a Section/Sub-section heading, represents Step in the Submittal/Review Process.
1.3. Roles And Responsibilities
- CMS (Construction Management Specialist): Receive incoming IFCs and issue the NTP to the Contractor. Receive the Submittal containing the Construction Redlines and/or QAQC, create a submittal for QAQC (if applicable). Receive the Construction Redlines from FCA or CM and complete the closeout process in Procore.
- CM (Construction Manager): Help with the Contractor assignment, add notes to CVM Data – Construction Readiness Correspondence in Procore (if applicable), Review the job package documents in Construction Bid Evaluation Correspondence in Procore.
- SPL (Strategic Project Lead): Verify job packages for construction readiness using the Documents tool.
- MLP (Materials Logistics Planner) Verify job package for construction readiness using the Documents tool.
- CSPM (Construction Services Project Manager): Data verification for internal stakeholders and contractors.
- Construction Contractor: Perform the construction activities, review and accept job packages using the Correspondence (NTP), issue Field Change Notices (FCNs) and respond to Field Change Orders (FCOs), issue and respond to Project Notice Forms, submit Construction Redlines using the Submittal and Punch list (if applicable) tools.
- FCA (Field Construction Advisor): Oversee construction in the fields, note conditions through the Daily log, facilitate changes coming from the field (FCO, EPIC), and review /approve Construction As-builts.
2. BEFORE YOU BEGIN
2.1. Before beginning, all users must have an account in Procore. If you are a new user an invitation will arrive in email prompting you to set up the password.

2.2. Please follow the link in the Welcome to Procore email. This will take you to Create a Password page. Please follow the requirements while entering the password and click Set Password.

Note: If Welcome to Procore email is not received, then please check the spam folder. If the email cannot be found, then please reach out to SDG&E Procore Support at ProcoreAdmin@sdge.com to request a new account.
2.3. After setting up the password, you can access your Portfolio by going to www.procore.com and clicking on Login located in the upper right corner of the landing page. Projects assigned to you can be found here – if you have not been added to a project, please reach out to the Procore System Administrator for your instance.
Note: It is Procore’s recommendation to use Chrome, however, you can use any Chromium/Modern browser.

2.4. Enter your email address and Procore password. Check the box Remember Me then hit the Log In orange button. This will take you to the Home Page.
Note: if you are assigned to multiple Instances in Procore, then it asks you to select the Instance after logging in, otherwise it will take you to the Portfolio.

3. NAVIGATION TO THE FIELD CHANGE NOTICE
This is a new form (Correspondence type) that represents officially agreed upon field changes from the Construction Contractor to the project team. If there is still a question about a potential change that needs review then that can go through the RFI tool as usual, however, once the change itself has been agreed upon, either in the RFI or in the field, then this form will have to be created for official project record. If the change is large enough to have effected design, then the FCN will follow with “IFC to CVM” submittal and “NTP”.
FCN (Field Change Notice) will be created by Construction Contractors for Engineers.
FCO (Field Change Order) will be initiated by Engineering team/ Construction Management for Construction Contractors.
Note: Depending on when the EPIC/FCO occurs during the project lifecycle there will be following variations to the process:
3.1. Click Project Tools from the Project Home page and select Correspondence from the drop-down menu.

3.2. From the Correspondence page, click the orange +Create button and select (Global) – Field Change Notice Form.

4. RESPONDING TO THE FIELD CHANGE NOTICE
4.1. Option 1: When a new FCN Correspondence is created and issued, an email will arrive prompting you to use a link and open the FCN. Click View Online to open Procore - you will be in the Correspondence area for the project.

4.2. Option 2: Navigate to the Project Tools menu, and the Correspondence tool, choose the corresponding Global Field Change Notice (You can find the correspondence item by its number).

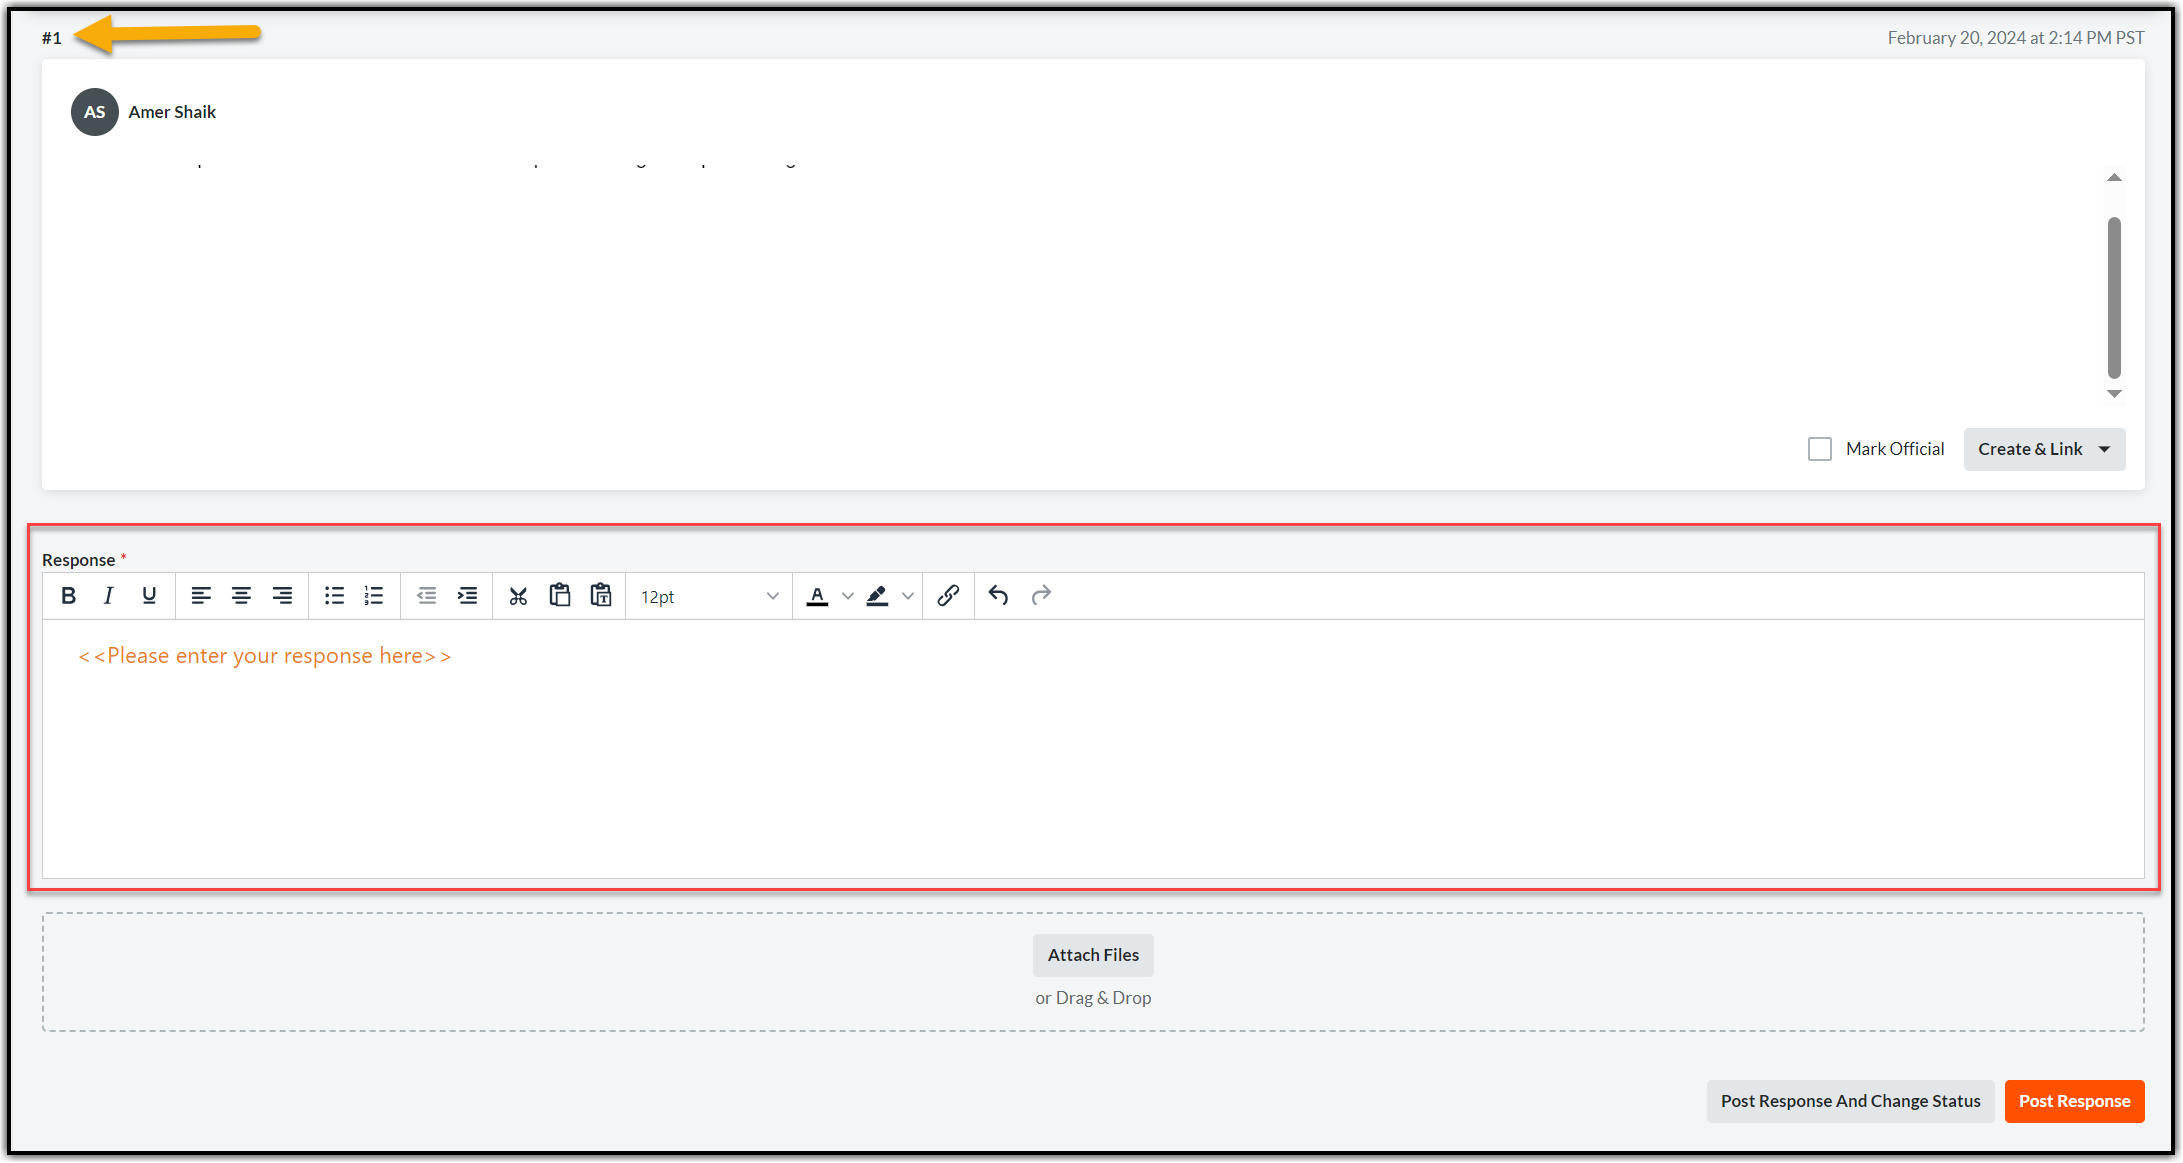
4.3. Add response in Procore in Activity section, you can add your response and attach documents (if needed) using the Attach Files option.
4.4. Responses will be cataloged in a numbered order in same FCN if the status of the form is open. The below screenshot is captured after entering the first response (indicated with an arrow).
Note: All FEWAs will take place in Smartsheet and are not outlined in this manual.
4.5. Close Field Change Notice (FCN) Correspondence
After all the responses have been provided, as applicable, it is time to close the Field Change Notice correspondence.
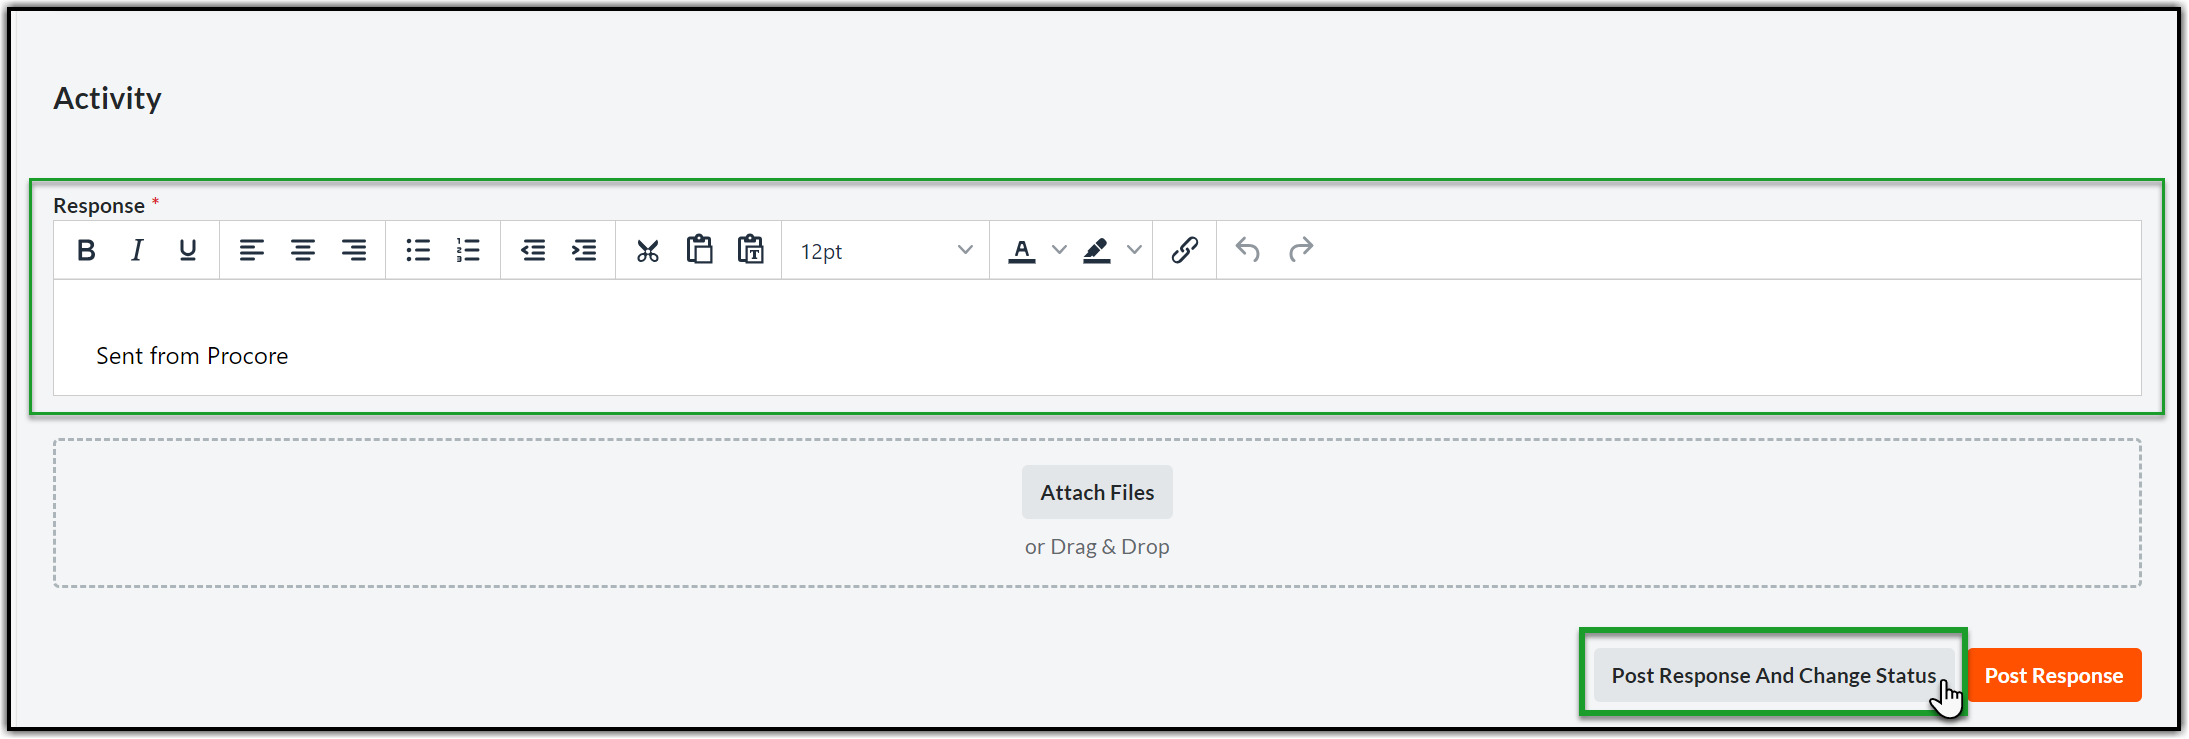
4.5.1. Open the Correspondence and scroll down to the Activity section. Enter the closing response in the Response section and click Post Response and Change Status at the bottom right corner of the page.
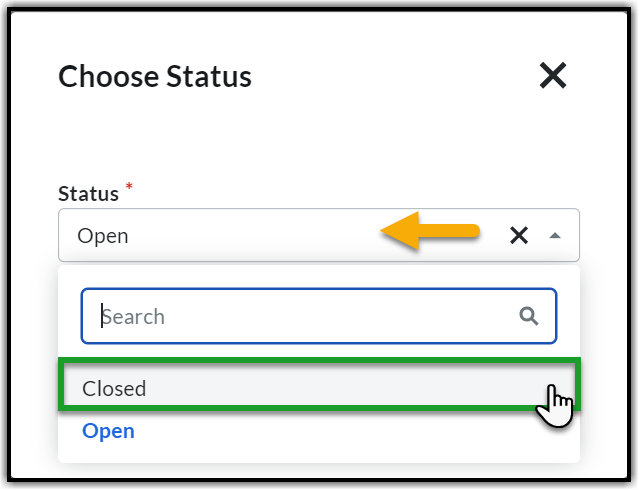
4.5.2. Click the Status dropdown and select Closed.
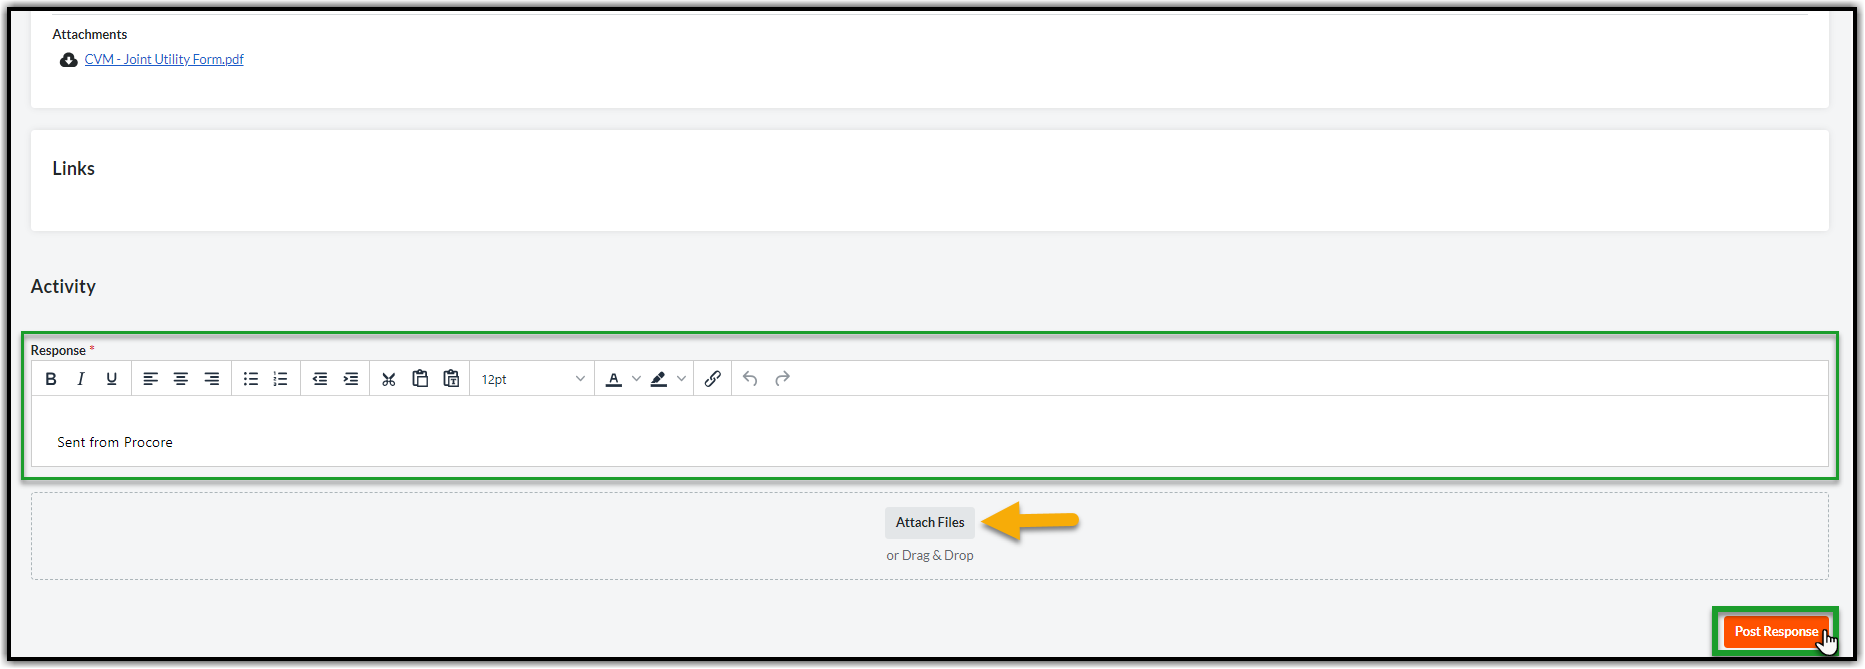
4.5.3. Click Save and Change Status to post the response and close the Field Change Notice(FCN) Correspondence.

5. FIELD CONSTRUCTION ADVISOR - FCA
The Field Construction Advisor (FCA) works on the job in the field and approves the submittal when the job is energized. The FCA will receive a submittal via email to indicate that the Ball in Court has been moved into their queue.
The FCA responsibilities in Procore are:
- Receive Action Plan via email.
- Review Job Package from the Documents tool.
- Conduct Inspections (Daily Log tool on a mobile device)
- Review Field Change Notice/Order Correspondence
- Review As-Builts and Approve Submittal (on laptop)

5.1. Before you Begin - Procore Mobile App
5.1.1. To access a Job Submittal in the field, you will need to have the Procore app downloaded onto your mobile device (iOS or Android). If you have not downloaded the Procore App from the Company Portal / InTune app, please do that now and then sign in using your standard @sdge or @sdgecontractor email and password. 5.1.2. Once you login you will be redirected to Auto Login page where you need to answer the question “Do you want Procore to automatically log you in next time?". Select your preference: Yes, ask for thumbprint/face ID, Yes, always auto-login, or Always ask for password. 

6. CREATE DAILY LOG - MOBILE VERSION
6.1. When you log in, you will see the Home screen with the Recent Projects that you are associated with. You can perform a variety of actions from your home screen:
6.2. Click the Select Project dropdown on the top or See All menu below the Filter to go to the Select Project page which has all the projects that you have access to.
6.3. Select the project you’re working on or type a keyword into the search bar to find. When you select a project, you will see the icons on your screen. You will only have the icons you need. You can also filter your search based on Company and sort the search results using Sort option.


6.4. Click the Filter icon to go to a specific instance. Check the box near the instance name and click Apply.
6.5. To change to a different project, click the arrow (drop-down) at the top of the screen. Select the project you need.
Note: Mobile version can be submitted without being connected to the internet using Offline Mode.

![]()
6.6. Open the Procore App and the correct project from the Home screen. Select the Daily Log from the Tools section.

6.7. You will be on the Daily Log page. Select the Module Name that you wish to fill in (Notes module is selected in the captured screen), and then select the Orange + sign on the top right and fill in the necessary fields. Follow the same for each Module.


Note: Each Module can be created more than once for that day if applicable.
6.8. Create a new Daily Log entry for the desired day as follows:
6.9. NOTES: This is a section for general notes or comments on the project that wouldn’t apply to another area on the log.
6.9.1. Select the Notes module from the Daily Log Page (Section 6.1. to 6.7).
6.9.2. Select the Orange + sign on the top right and fill in the necessary fields using the information below. Click Save to complete the Module.


- Camera: Use this to take live photo(s) from your phone that gets attached directly.
- Attachments: Add any reference documents as needed.
- Comments: This is where any general comments about the site for that day can be entered.
Note: Once the Module is complete – it will take you back to the main menu for the day. If you have multiple notes, you can create as many as you want.
6.10. MANPOWER: This is a section to capture the primary crew information, their subcontractor if applicable, and any activities being performed.
6.10.1. Select the Manpower module from the Daily Log Page (Section 6.1. to 6.7).
6.10.2. Select the Orange + sign on the top right and fill in the necessary fields using the information below. Click Save to complete the Module.


- Camera: Use this to take live photo(s) from your phone that gets attached directly.
- Attachments: Add any reference documents as needed.
- Company: Enter the company name of the Prime Construction Contractor for the designated crew. This is pulled from the Procore Directory, so there will be companies listed that may not be applicable.
- Workers: Select the number of workers in the crew for that day.
- Hours: Select hours worked by the crew. This defaults to 8 hours but can be changed, if necessary, by clicking on it.
- Comments: This is for general comments that do not apply to other fields.
- Sub Labor Source: If applicable, this the name of the Subcontractor Company that is performing the work on behalf of the Prime Contractor listed in the Company field. If not applicable, leave it blank.
- Foreman/Supervisor: Enter the crew Foreman’s first and last name.
- List of Monitors: This is a type-in field, you can use this for the Monitor type (Cultural, Biological, QAQC) and/or their name.
- Crew Activity Remarks: This is to enter the information about the activities being performed by the crew for the day.
Note: For companies that are not listed in the Company Field – choose SDG&E in the Company field and use the Sub Labor Source field for the company performing the work. This is only if they are not hired directly by the Prime Construction Contractor.
6.11. Equipment: This section is about any onsite equipment, and its use.
6.11.1. Select the Equipment module from the Daily Log Page (Section 6.1. to 6.7).
6.11.2. Select the Orange + sign on the top right and fill in the necessary fields using the information below. Click Save to complete the Module.


- Camera: Use this to take live photo(s) from your phone that gets attached directly.
- Attachments: Add any reference documents as needed.
- # Hours Operating: Enter how long the equipment was in operation.
- Inspected: Please skip this field and do not enable.
- Time: If there was an inspection, select the time when the inspection happened.
- Comments: Add any comments specifically about equipment being broken, idle, removed, or other issues.
- Equipment List - Civil: Select as applicable (Multiple Select) – however you cannot select an item more than once, so the quantity will be one if you choose this method.
- Equipment List - Electric: Select as applicable (Multiple Select) – however you cannot select an item more than once, so the quantity will be one if you choose this method.
Note: If you would like to showcase multiple pieces of the same equipment, you can make one entry per piece, and/or put in the comments how many of that equipment was there. Though this is not required.
6.12. PHOTOS: This is a section to upload the Photos either by capturing live using the capability or uploading the picture captured in your phone’s library or Photos already saved in Procore. The top three options are for the Camera, Photos from your Device or Photos from Procore.
6.12.1. Select the Photos module from the Daily Log Page (Section 6.1. to 6.7).
6.12.2. Select the Orange + sign on the top right and fill in the necessary fields using the information below. Click the Photos.


6.12.3. Option 1: Take a Photo (live from the camera roll)
6.12.3.1. Select an Album if desired in the Top Ribbon Drop-down.
6.12.3.2. Take a photo with the Photo button.
6.12.3.3. The photo will appear with an Orange notification bubble in the bottom left.
6.12.3.4. Click on the Photo and you have an option to add a description.
6.12.3.5. Exit the Camera and the photo will appear as a part of the log. Click Done.
6.12.4. Option 2: Choose from Procore (already in Procore)
If you have not already uploaded the photo to the Photos tool, then complete these steps:
6.12.4.1. Select Library to pull Photo From.
6.12.4.2. Choose desired Photo and Click Done.
6.12.4.3. Navigate to Photo tool and select Photo.
6.12.4.4. Click the Info button and fill in the Description. Click Save.
6.12.4.5. Return to Daily Log Tool and choose Photo from Procore. Click Done.
6.12.5. Option 3: Choose from Library (already in device).
6.12.5.1. Select Library that photo is in.
6.12.5.2. Select Photo.
6.12.5.3. Click on Photo and fill in Photo Description. Click Save.
6.12.5.4. Click the back button once and click Upload Photo. Click Done.
Note: To delete a photo, select that photo in the Photos Module main screen, then select the trash can icon at the bottom of the screen.
6.13. VISITORS: This is for any on site visitors that are not performing work, they are of two types: project team, and miscellaneous visitors.
6.13.1. Select the Visitors module from the Daily Log Page (Section 6.1. to 6.7).
6.13.2. Select the Orange + sign on the top right and fill in the necessary fields using the information below. Click Save to complete the Module.


- Visitor: Visitors who are in the project team that are not on site regularly (Project Manager, Program Director) these names pull from the Project Directory for Procore.
- Start/Stop Time: Select the time they were on site.
- Comments: Enter the notes related to the visit.
- Misc. Visitors: There might be visitors that do not have Procore access – this is where you would input them.
- Deliveries: Input any deliveries that need to be noted - Materials, Equipment, etc.
6.14. SAFETY VIOLATIONS: This section outlines any safety issues that occur onsite.
6.14.1. Select the Safety Violations modle from the Daily Log Page (Section 6.1. to 6.7).
6.14.2. Select the Orange + sign on the top right and fill in the necessary fields using the information below. Click Save to complete the Module.


- Camera: Use this to take live photo(s) from your phone that gets attached directly.
- Attachments: Add any reference documents as needed.
- Safety Notice: Tap the Safety Notice field. Enter the name/number of the safety notice issued.
- Time: Select the time when the violation happened.
- Subject: Briefly describe the violation in a few words.
- Issued To: Select the appropriate company.
- Compliance Due: Input any important date that needs to be met for the issue and other compliance standards.
- Comments: Input the details regarding the violation, please be as detailed as possible. If a subcontractor was involved, note that here.
6.15. DELAY: This section outlines any Project Delays that are not Safety related.
6.15.1. Select the Delay module from the Daily Log Page (Section 6.1. to 6.7).
6.15.2. Select the Orange + sign on the top right and fill in the necessary fields using the information below. Click Save to complete the Module.


- Camera: Use this to take live photo(s) from your phone that gets attached directly.
- Attachments: Add any reference documents as needed.
- Delay Type: Select the type of delay from the drop-down.
- Start and End Time: Select how long was the work delayed for the day.
- Location: Select the location of the delay (if applicable). This field pulls from the Project Location field.
- Comments: Describe any details of the delay, what happened, what it delayed, etc.
7. COMPLETE AND DISTRIBUTE DAILY LOG REPORT - MOBILE VERSION
7.1. Navigate to your project's Daily Log tool on an iOS/Android mobile device (Section 6.1. to 6.7).
7.2. Navigate to the date of the daily log you want to mark as 'Complete.'
7.3. Once all relevant logs for the selected day have been completed, tap Complete Day. You will see two options Complete & Distribute (to complete and send email notifications) and Complete Only (to complete but avoid sending email notifications), select the appropriate one.
Note: You should at least have one log entry to see the options to complete the Daily Log Report.


Note: When a daily log is marked as complete, entries cannot be added or modified. To make changes after this fact, the day must be re-opened.
Note: For Transmission, click Complete and Distribute since there is a default distribution list to be sent email notifications.
8. NAVIGATING TO PAST DAILY LOG ENTRIES - MOBILE VERSION
8.1. After selecting the Daily Log tool (Section 6.1. to 6.7), click the Calendar View option under the Daily Log date at the top of the menu. The calendar view lets the user navigate to different dates. Dates with Daily Log entries have dots on the calendar date.
8.2. To review past Daily Log entries, navigate to the desired date, make sure there is a dot signifying the log entries are available to view, then hit View Day.
Note: Dates in green have already been completed/closed.
8.3. The Daily Log menu for that day will appear, allowing the user to touch and open each entry section and review the entered information.
8.4. The general navigation in the top left corner allows the user to go back to the previous screen, the top right corner may have a + if the day is not yet closed, allowing for adding more entries.
8.5. To navigate back to the current date, select the Calendar View option again, navigate back to the current date, and hit View Day.


9. CREATE DAILY LOG FROM PREVIOUS ENTRY - MOBILE VERSION
This should be used only when the crew and work is the same as the previous day.
Note: Photos do not carry over.
9.1. Open the Procore App and select Daily Log from the tools (Section 6.1. to 6.7).
9.2. Select Copy icon at the top right corner of the screen to copy the Daily Log.
9.3. Choose the Copy from Date using the dropdown.
9.4. Choose Copy to Date using the dropdown (you cannot choose a future date at this time).
9.5. Select the modules you want to copy from the day using the Daily Log Modules option.
Note: if you repeat this, it will copy the same information into the new Daily Log over and over.
9.6. Hit Copy Logs then a new Daily Log populates and opens.
![]()

10. NAVIGATING TO DAILY LOG TOOL - DESKTOP VERSION
10.1. From Project Tools in the top menu bar select Daily Log.

11. CREATING THE DAILY LOG TOOL - DESKTOP VERSION
11.1. You will be on the Daily Log page. You should simply find the Module Name (indicated in green in the below captured screen) that you wish to fill in and complete the required fields in that Module. Click Create to create that module. Each Module can be created more than once for that day (if applicable).

12. CREATE A NEW DAILY LOG ENTRY FOR THE DESIRED DAY DESKTOP VERSION
12.1. NOTES: This is a section for general notes or comments on the project that wouldn’t apply to another area on the log

- Comments: This is where any general comments about the site for that day can be entered.
- Attachments: Attach any reference documents as needed. Click Attach files(s).
12.1.1. Click Create to complete the Module.
Note: This will also create a new module underneath the completed one. If you have multiple notes, you can create as many as you want.
12.2. MANPOWER: This is the section to capture the primary crew information, their subcontractor if applicable, and any activities being performed.

- Company: Enter the company name of the Prime Construction Contractor for the designated crew. This is pulled from the Procore Directory, so there will be companies listed that may not be applicable.
- Workers: Select the number of workers in the crew for that day.
- Hours: Select hours worked by the crew. This defaults to 8 hours, but can be changed, if necessary, by clicking on it.
- Comments: This is for general comments that do not apply to other fields.
- Attachment: Attach any reference documents as needed. Click Attach file(s).

- Sub Labor Source: If applicable, this the name of the Subcontractor Company that is performing the work on behalf of the Prime Contractor listed in the Company field. If not applicable, leave it blank.
- Foreman/Supervisor: Enter the crew Foreman’s first and last name.
- List of monitors: This is a type-in field, you can use this for the Monitor type (Cultural, Biological, QAQC) and/or their name.
- Crew Activity Remarks: This is for information about the activities being performed by the crew for the day.
Note: For companies that are not listed in the Company Field – choose SDG&E in the Company field and use the Sub Labor Source field for the company performing the work. This is only if they are not hired directly by the Prime Construction Contractor.
12.2.1. Once this is filled out, click Create.
12.3. EQUIPMENT: This section is about any onsite equipment, and its use.

- Hours Operating: Enter how long the equipment was in operation for the day.
- Inspected: Please skip this field.
- Inspection Time: Please skip this field.
- Comments: Add any comments specifically about the equipment being broken, idle, removed, or other issues.
- Attachments: Attach any reference documents as needed. Click Attach file(s).
- Equipment List: Select all applicable equipment (Multiple Select) – however you cannot select an item more than once, so the quantity will be only one if you choose this method.
Note: if you would like to showcase multiple pieces of the same equipment, you can make one entry per piece, and/or put in the comments how many of that equipment there was. Though this is not required.
12.3.1. Once this is filled out, click Create.
12.4. PHOTOS: In this section you can upload photos.

12.4.1. For uploading the photo, click + Upload.

12.4.2. You will be in the Upload Photos window. Perform the necessary actions using the below information and click Upload.

- Attach File(s) or Drag and Drop. These are the two options for uploading photos. Select photos from Procore saved photos from the Photos tool or just drag and drop from your local computer.
- Album: Select the album name.
- Location: Select the project site.
- Trade: Is the work being done Civil, Electric, SCADA.
- Note: All photos will appear within the Photo module and a copy will be saved in the Photos Tool.
12.5. VISITORS: This is for any on site visitors that are not performing work, they are of two types: project team, and miscellaneous visitors.

- Visitor: Visitors who are in the project team that are not on site regularly (Project Manager, Program Director) these names pull from the Project Directory for Procore.
- Start/Stop Time: Select the time when they were on site.
- Comments: Enter the notes related to the visit.
- Attachments: Attach any reference Documents as needed. Click Attach file(s).
- Misc. Visitors: There might be visitors that do not have Procore access – this is where you would input them.
- Deliveries: Were there any deliveries that need to be noted - Materials, Equipment, etc. If yes, you would input them.
12.5.1. Once this is filled out, click Create.
12.6. SAFETY VIOLATIONS: This section outlines any safety issues that occur onsite.

- Time: Select the time when the violation happened.
- Subject: Briefly describe the violation in few words.
- Safety Notice: Tap the Safety Notice field. Enter the name/number of the safety notice issued.
- Issued to: Select appropriate company.
- Compliance Due: Is there a compliance date that needs to be input.
- Comments: Input the details regarding the violation, please be as detailed as possible. If a subcontractor was involved, note that here.
- Attachments: Attach any reference documents as needed. Click Attach file(s).
12.6.1. Once this is filled out, click Created.
12.7. DELAYS: This section outlines any Project Delays that are not Safety related.

- Delay Type: Select the type of delay from the drop-down.
- Start and End time: Select how long was the work delayed for the day.
- Location: Select the location of the delay (if applicable). This field pulls from the Project Location field.
- Comments: Describe any details of the delay, what happened, what it delayed, etc.
- Attachments: Attach any reference documents as needed. Click Attach file(s).
12.7.1. Once this is filled out, click Create.
12.8. CHANGE HISTORY: Scroll to the Change History to view the detailed information about who has modified this report and when. This will be helpful if there is more than one report being generated for the day.

13. COMPLETING AND DISTRIBUTING DAILY LOG REPORT - DESKTOP VERSION
13.1. Navigate to your project's Daily Log tool.
13.2. Once all relevant logs for the selected day have been completed, Check the box at the bottom left of the page to acknowledge that the information is accurate. Click Complete Only to complete the logs for the day or Complete and Distribute to complete the logs for the day and distribute it to other team members.

Note: You should at least have one log entry to see the options to complete the Daily Log Report.
13.3. To make further changes to a completed log, the day must be re-opened by clicking Re-Open Day under the green banner on the Daily Log page of the respective date.

14. NAVIGATING TO PAST DAILY LOG ENTRIES - DESKTOP VERSION
14.1. After selecting the Daily Log tool, click the Calendar view option beside the Daily Log List view. The Calendar view will let you navigate to different dates. Dates with Daily Log entries have dots on the Calendar date (indicated in yellow in the below captured screen).
14.2. To review past Daily Log entries, navigate to the desired date, make sure there is a dot signifying the log entries are available to view, then hit View Day.

14.3. The Daily Log menu for that day will appear, allowing the user to touch and open each entry section and review the entered information.
14.4. To navigate back to the current date, select the Calendar View option again, navigate back to the current date, and hit View Day.
Note: Dates in green have already been completed/closed.
15. CREATE DAILY LOG FROM PREVIOUS ENTRY - DESKTOP VERSION
This is mostly applicable when the crew and work is the same as the previous day.
Note: Photos do not carry over.
15.1. Navigate to Project Tools menu at the top of the Project Home page and select Daily Log from the tools.
15.2. Click the date dropdown and select the date to which you wish to copy the previous Daily Log Report from any of the past dates. Click Copy on the top right corner of the page.

15.3. Choose from the drop-down the date you want to copy from.

15.4. Select modules you want to copy from the date. Click Copy Entries New daily log populates and opens.

Note: if you repeat this, it will copy the same information into the “new” Daily Log over and over.
16. RESPONDING TO THE CONSTRUCTION BID EVALUATION
This Construction Bid Evaluation is a CVM specific Correspondence created to keep all information in one place and to limit its visibility to the internal CVM team during the bid event.
This new Correspondence will streamline activities under the CMS who will create this Correspondence for the Quick Bid jobs. You (Construction Manager) will be assigned to this Correspondence for reviewing the RFP documents and providing feedback in the process of awarding the contract to the appropriate Contractor
16.1. Once the CMS assigns the Correspondence to you, an email arrives prompting you to use a link, click View Online to open the Correspondence directly.

16.2. Alternatively, you can Navigate to Projects Tool menu and select the Correspondence tool.

16.3. You will be on the Correspondence page. Find the Construction Bid Evaluation Correspondence using the Number (‘2’ in the screenshot) or Subject (‘Test’ in the screenshot) provided in email. Click either of these two to open.

16.4. Review the information in the Correspondence. When you have completed your review and are ready to share your feedback, please open this correspondence by following the above two steps. Go to the Response text area in the Activity section. Type in your response (you may also attach any documents using Attach Files option (if necessary) and hit Post Response orange button on the bottom right corner.
Note: Alternatively, you can also communicate your feedback to CMS by replying to the email notification from Procore.
17. RESPONDING TO CONSTRUCTION REDLINES SUBMITTALS – AS AN APPROVER
Responding to a Submittal as an approver will complete the workflow. Once the contractor submits the Construction Redlines and responds to the Submittal you will be indicated via email notification with a link to the Submittal. The ball is in your court to review and approve/send it back.
17.1. When the email arrives prompting you to use a link, click View Online to open the Submittal directly.

17.2. Alternatively, instead of using the email link, Navigate to the Project Tools menu and select the Submittals tool.

17.3. Choose the corresponding Submittal (You can find the Submittal item by its Number provided in email) and click Edit to open the Submittal.

17.4. The yellow banner indicates that the Ball is in your court. Review the Construction Redlines and click Respond orange button on the right side of the page to provide appropriate response (you should see Edit Response or Respond option to respond).

17.5. A popup window will appear. Click Attach Files (if applicable) or skip this step and the next step (17.5 to 17.6) and click Next.
17.6. Select Documents in the left pane. Navigate to the Correct Work Order, Stage 5 Folder, and Construction Redlines subfolder in the Documents tool (all the documents should be first uploaded to the Documents tool) and select the documents you wish to upload. Click Attach and then click Next.

17.7. You will be on the Respond page. Choose an appropriate response. Enter any special notes for the Contractor related to the documents in the Comments section (If any). Click Preview.

17.7. If the Construction Redlines need to be revised:
17.7.1. If the Construction Redlines have errors, and cannot be approved, the Submittal should be marked as “Revise and Resubmit” (refer step 5.7.) by stating the reasons in the comments section to resolve any issues.
17.7.2. The Contractors will create a new Submittal and resubmit the Construction Redlines based on your review comments.
18. ISSUING THE PUNCH LIST (Applicable to Substation Instance Only)
Anytime during the construction if you identify any correction items then you can issue the Punch List and list them out for the Contractor to act. The Punch List will also be updated, or new Punch List Items may be issued additionally while reviewing the Construction Redlines Package submitted as a part of Preliminary Construction Redlines Submittal. As a standard, you will use Punch List tool in Procore to create the punch list items.
Note: Punch List will be required per job unless there are corrections indicated by the Contractor.
Note: Additional Punch List items may be identified before the Final Construction Redlines review.
19. CREATING THE PUNCH LIST
19.1. Navigate to Project Tools dropdown from the top menu and select Punch List tool.

19.2. Click +Create orange button on the top right corner of the page.

19.3. Please fill out the following fields in the General Information section using the below details. Click Save & Create New button at the bottom after filling in the required fields.

- Title: Enter the Job Package title.
- Punch Item Manager: As a default it should select your name. Add the assigned CM or FCA.
- Assignee(s): Select the primary contact of the Contractor Company.
- Due Date: Provide the date when the corrections will be due.
- Final Approver: As a default it should select your name. Add the assigned CM or FCA.
- Distribution: Select those who need to be notified of the Punch List (Optional).
- Trade: Please select from Civil, Electric or SCADA based on the job.
- Description: Enter the punch list items. Describe the corrections in as much detail as possible.
- Attachments: Click Attach File(s) or use Drag and Drop Files to attach any necessary markup drawings or documents (If applicable).
- RFI Required: Check the box if required or else keep it clear.
19.4. Navigate back to Punch List tool page (refer section 18.1.). You should see a yellow banner on the top of the page with a prompt that there is an unsent Initiated Item. You can hit Send Only My Items to send only your items to the Contractor or Send All Items to send all the items.
19.5. Find the recently created Punch List based on #, Title or Status and click View.
Note: At this point the Status of the Punch List will be ‘Initiated’ (refer the below screenshot).

19.6. Review the information under each section before sending the Punch List items/corrections to the Contractor. You can also add any additional comments in the Comment (optional) box or attach documents from the Documents tool using Attach File(s) option. When you are ready, hit the Send to Assignee(s) button to send the corrections to the Contractor.

20. REVIEWING AND CLOSING THE PUNCH LIST
Once the Contractor completes the work on the corrections and responds to the Punch List you will receive an email notification. The Status of the Punch List will change to Ready for Review.
20.1. When the email arrives prompting you to use a link, click View in Procore to open the Punch List directly.

20.2. Alternatively, instead of using the email link, Navigate to the Project Tools menu and select the Punch List tool.
20.3. Choose the corresponding Punch List (You can find the Punch List by its Number provided in email or the Status – Ready for Review) and click View to open the Punch List.
20.4. Review the information and the correction documents submitted by the Contractor. Select All Work Complete to approve and Work not Accepted to send it back to the Contractor. Please use the Comment box to notify the changes expected or the information needed to approve the Punch List. You can also use the Attach File(s) option (if applicable). Click Submit.

20.5. If you select the Work not Accepted option, the workflow will move back to Contractor with a change of Status – Work Not Accepted (indicated in yellow banner on the top of the page). The Contractor will receive an email notification that you have not accepted the work and the ball is now in their court.

20.6. Once you hit Submit then you should see a change in Status – ‘Ready to Close’ (indicated in yellow banner on top of the page). You can add any closing comments or attach any documents (if any) and click Close Punch Item to close the Punch List.

21. APPENDIX
There are certain process exceptions for ESH. Please refer the below guide:
CVM Process Exceptions for ESH.pdf