New Project Setup
This document assumes that your job already exists in Procore. It could get into Procore from the bid board process (which is a different tutorial) or from the Sage integration.
The process is numbered for clarity. Not all steps will apply in all cases and some steps may occur in a different sequence. There are 4 main tools you will use in the process: Admin, Home, Directory and Daily Logs.
1. At the project level, open the “Admin” tool.

2. Opening the “Admin” tool will start in “General”. You will need to verify or enter the fields marked below. You must do this before sending the project to Sage (ERP). Edits made after sending to ERP will have to be done manually in Sage for them to match. This is only done once per job.
a. Enter the expected contract value or best estimate. Use $1 if unknown.
b. Enter the planned on-site dates for Start and Completion. While many dates will change between setup and execution, the tool requires these fields to be completed to save changes. Use your best estimate.
c. Set the stage to the appropriate place. In most cases, it will be “Pre-Construction” or “Work Order” at time of setup.
d. Select the type that best fits the project. This will be used for reporting and marketing purposes.
e. Input the full project address. It is important to use the jobsite, and not an administrative location. This is what shows up in the mobile tool for Superintendents and Subs.
f. Select a “Program” if applicable. The primary use for this is filtering and reporting.
g. Do not enter a project number or Sage ID!! This will be assigned when adding to Sage.
h. Press the “Update” button at the bottom right of the page.
i. Press “Send to ERP” at the top right of the page. Send a request for a job number to both Nathan and Scott. This is important to avoid duplication of projects. Over time, we will phase out the email request.
i. If the “Send to ERP” number is grey, you have missing data on other pages. Most common are “No cost codes” and “Missing cost type assignment”.
ii. See #4 below to correct this condition.
j. You may use the optional fields as needed.

3. Verify the active tools for your project. In nearly all cases, the template assigned tools will be correct. The tools highlighted below are required for all projects. Work orders only require Directory, Daily Log and Timesheets.

4. The work breakdown structure consists of cost codes and cost types. You must have cost codes assigned and each cost code must have at least one type.
a. Click on “Cost Code”
b. Click on “+ Cost Codes from Company”
c. Add the standard labor codes highlighted below at a minimum. Your budget cost codes may be added at this time or may be added later. If you are importing your budget from Sage, it will automatically add the codes at that time. If you are building your budget from Procore, you will need to add them in this tool prior to writing your budget.
i. All projects that will have any employee time require the standard codes.
ii. You may substitute the “new cost codes” for project roles to avoid errors.


d. Cost types are assigned to all codes imported from Sage. If you have an error related to cost type, seek help if you do not know how to fix it. This should be very rare.
5. At the Project Level, select the “Directory” tool. This is where you will assign access to the project, define permissions and roles, and enter/update key information regarding members of the project team.
a. IMPORTANT - Everything that you put in an individual’s contact stays with them in all of our jobs EXCEPT Project Role. Don't use fields for something other than they are or you will impact other projects.
b. You will update this tool throughout the project as the team changes.
c. You will work with 3 tools within the “Directory” tool. These are “users”, “companies” and “distribution groups”. There are multiple methods to work with these 3 tools. This document will show 1 method.
6. Add the P&C Project team members.
a. Do not remove any employees added by the template. The required employees are highlighted in the image below.

b. P&C will always exist in your project by default. Click on it to open up the company.
c. Click on “Users”
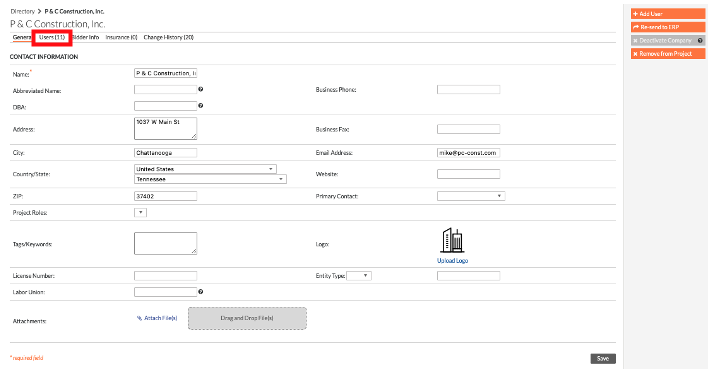
d. Click the “add” button for the people you need to grant project access to. Pay attention to the Active column and don’t assign inactive people to the project.
i. There will be a settings screen for individual employees. If you do nothing, it will apply their Procore defaults.

e. As mentioned previously, all information below except project role applies to ALL projects the person is assigned to. Exercise caution with the “Copy to Personal Information” link. You do not want an office phone/address for a field person.

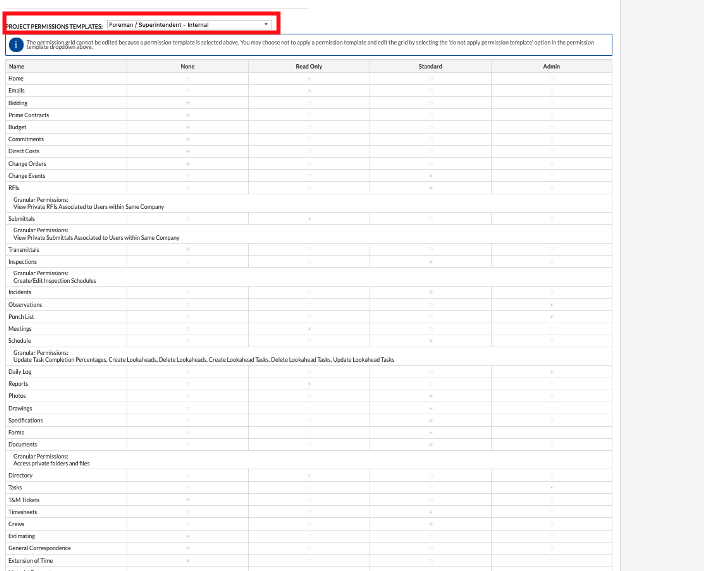
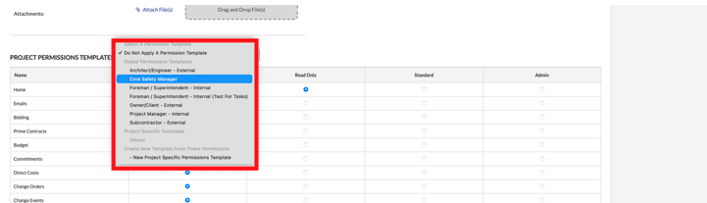
f. Project permissions templates will apply a default if one is set. Otherwise they will have no permissions until you either apply a template or assign individual permissions. In nearly all cases, you should use an available permissions template. Seek guidance from Scott if you want to modify permissions until you are fully informed what they grant access to. IT IS A VERY RISKY PRACTICE TO JUST INCREASE SOMEONE’S PERMISSION LEVEL.

g. Designate any default distributions needed. (You may do this in the affected tools as well.)
7. Add the companies that will be involved in your project. If you don’t know all the subs selected, add the ones you do know and update as new information is available.
a. IMPORTANT. Always use the ERP linked companies. If the company you need is not available request Cassie add them as a new vendor.
b. Core Safety should be added to every PROJECT. You do not need to do so for work orders. Forrest Reed should be assigned to the job.
c. Add people to these companies in the same way list in item 6 above.


8. Add any Inspectors, 3rd party testing or other external contacts as needed for the project.
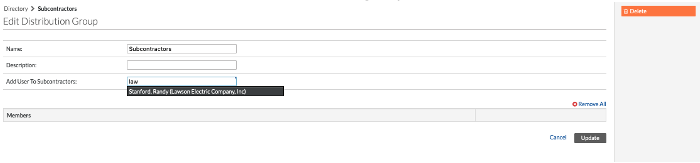
9. Create Distribution Groups. Distribution groups help to make sure communications go to the right people and that they have access to information they need within the tool.
a. Click “+ Add Distribution Group”. The popup will allow you to name the group. Use standardized groups where possible (subs, MEPs, submittals, etc). Some company standard groups exist, such as “Daily Logs”. Only member of the project team can be added to a distribution group.

b. Add/delete users from distribution groups as needed.
10. At the Project level, select the “Home” tool. If you added project roles as you added people, this step will be complete. If not, click “edit”.

a. Add people to the key project roles. You will likely not use every role available and may need roles that are not available (this should fade over time).
b. Add PM, APM, Superintendent and both the office and field person for each trade. This will cause the mobile app that is critical for our field team to provide a simple and effective tool for identifying their contacts without having to guess.

11. At the Project level, select the “Daily Log” tool.

a. Click the gear to enter the “Daily log settings”. Where it says “Select a person” add the “daily logs” distribution group and any project team members who read logs.
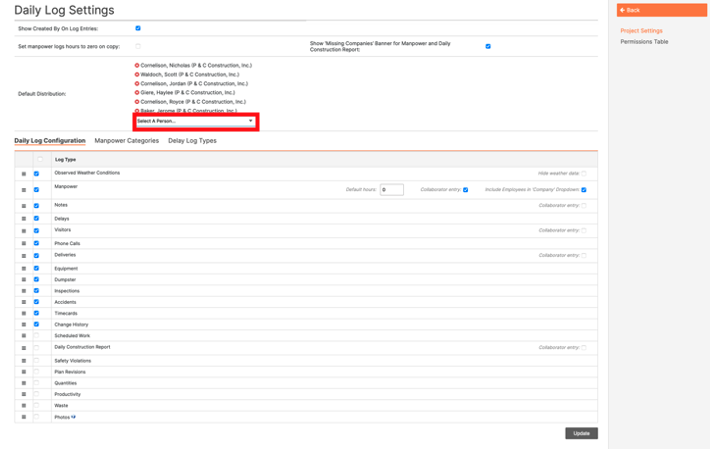

b. Don’t change the daily log configuration. It is setup the way we are training supers and for consistency of presentation. The choice of order and which fields to use was deliberate.