IMPORT DESIGN MODELS
Objective
- Open a Design or 3rd party developed model utilizing Revit and develop a conditioned/reduced file size 3D model and import into cmBuilder
- Locate model in cmBuilder using overlays and move/rotate/adjust model in relation to the project site
- Note: if you do not have a design model, or a 3rd party developed model you will need to defer to the “Create A Massing Model” Module
Helpful Resources
- cmBuilder tutorial “cmBuilder Tutorial 8: Upload and Manage BIM Models”
EDITING AND EXPORTING REVIT MODEL
Getting a design model from Revit into cmBuilder involves 5 main steps:
- Opening Revit Model
- Creating a 3D View for Exporting
- Reducing Model Size by Hiding Objects
- Exporting 3D Model to cmBuilder
- Importing 3D Model into cmBuilder

- Open Revit from Desktop and click “Open” under the Models column on the left of the screen.
- Navigate to the file location on your local drive, select the desired Revit file, and click “Open”.

Note: When model opens it will open with a default “Home” page (middle of screen) that the design team has setup but we want to start with a 3D view.
- Hover your mouse over the “Home” icon at the top left toolbar, this will create a new 3D view.

- Next we need to condition this model to reduce unnecessary content so that when the model is uploaded to cmBuilder the file size is not too large and contains only the information needed to convey the logistics and sequencing.
- Typically structure and architectural envelope are priority
- Items that we are looking to remove would include: MEP equipment and systems (including light fixtures and plumbing fixtures), furniture, detail items, any annotations (including section and scope boxes), and anything that not is not considered Structure (Beams, columns, floors), Envelope (Walls, Doors, Window, Curtainwalls), or Standard Interiors (Walls, Doors, Ceilings).
- Typically we want to keep the file sizes below 1 GB, and the smaller the file size the faster the model can load and be manipulated for viewing
- Select “Edit” next to the “Visibility/Graphics Overrides” in the Properties Toolbar on the far left.

- To turn off/on any object under Model Categories tab click the box under the Visibility column, if you uncheck this will “hide” the object in the 3D view and if the box is left checked then the object will be visible in the 3D view.
- To turn off/on any annotations, click the Annotation Categories tab and then uncheck “Show Annotation Categories in this View” which will then turn off ALL annotations
- Once you have turned off all objects/annotations not desired, Click the “Apply” button on the lower right hand and then click “OK”

- The 3D view should now look this image above, but the style and shading will need to be adjusted before exporting.
- Click the “Checkered Box” and select “Fine”
- Next Click the 3D box next to the Checkered Box, and select “Shaded"

- To export the model from Revit, click on the “File” tab at the top toolbar.
- Select “Export” and then “FBX” as the file type
- Save the FBX file to the desired file location on your local drive and “Save” with desired File Name
Note: Name the file so that when you are in cmBuilder the file name tells any viewer what it contains, ie. Arch, Struct.
IMPORTING MODEL INTO CMBUILDER

- To import the model into cmBuilder, select “Buildings” in the upper left toolbar and then select “BIM Import” from the options.
- The pop-up toolbar on the right hand side will appear with an option to “Upload File” which you will click and then navigate to the folder location where you saved the model and select the file to open.

Note: the model will come into the Scenario with an arbitrary insertion point (ie. where the model lives in 3D space), so the model will need to be moved to the correct location and elevations for the model on the project site. Also, make sure there is overlay imported into the project (per Import Overlay steps above).
- Using the selection tree highlighted above, under “BIM Import” you will double click the model you want to move.
- Next you will need to click “Go to Parent” in the upper right toolbar, which will then open the model settings.
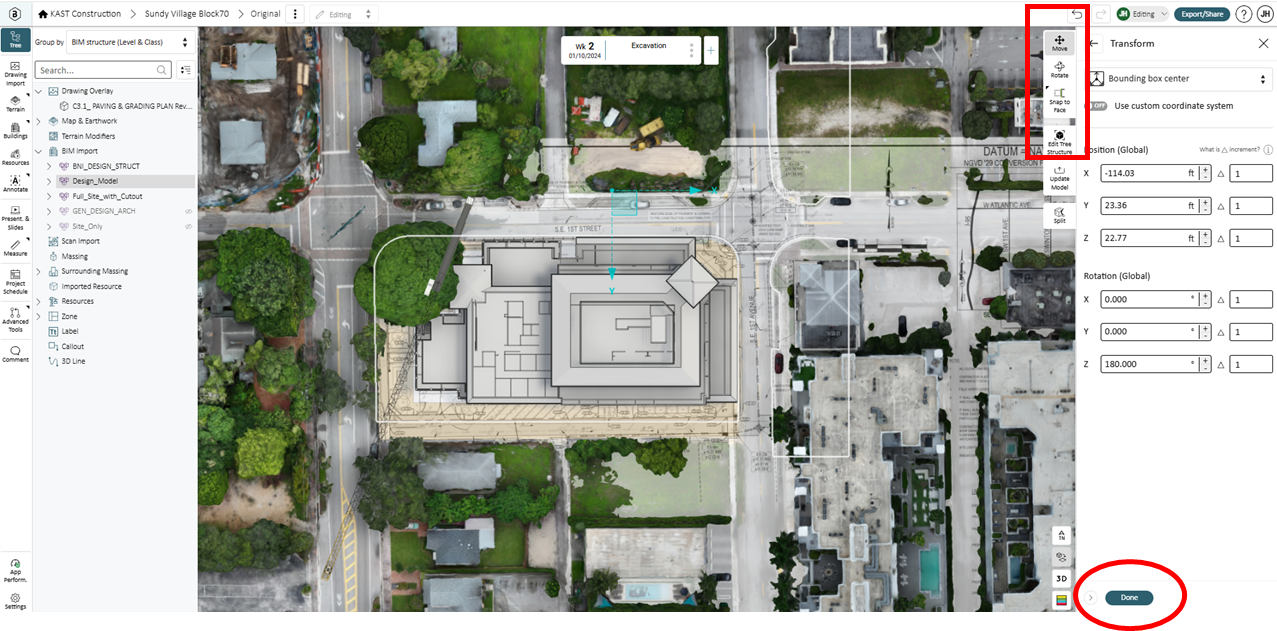
- In 2D view, move and rotate the model in the X and Y axis to align with the imported overlay, then adjust the view to 3D again and using the move tool you can adjust the elevation using the Z axis.
- Click “Done” when you have the model located to the desired location and elevation.

Note: the 3D model is now ready for you to associate specific objects in the model to their respective milestones.

- Double click any object in the model and adjust the milestones (from and to, ie. start and end) in the far right toolbar.
- Note: You can select more than one object using a selection box and also adjust all of the milestones simultaneously
- Also, the color of the object can be changed at this step
- Repeat Step 18 until you have associated each object in the model to the respective milestones.
CMBUILDER TUTORIAL - UPLOAD AND MANAGE BIM MODELS