Resource Tracking and Unit Quantity Based Budget: Setup Guide
Table of Contents
- Welcome
- Configure Work Breakdown Structure (WBS)
- Configure Company Time Settings
- Configure Project Settings
- Set up your Unit Quantity Based Budget
- Enter Time and Production Quantities
- View the Labor Budget to Actual Report
- View the Field Production Report
Overview
Permissions
Configure Company Level WBS
- Navigate to the Company level Admin tool.
- Click Work Breakdown Structure.
- Click the Configure Settings
 icon.
icon. - Configure one or more of the following settings:
- Sub Jobs
Make sub jobs an option on any projects within your Company.Note
Once sub jobs are in use on at least one project's budget code structure, this setting cannot be turned off. - Budget Code Structure Edits at Project Level
This setting allows users to change the order of segments in the budget code structure at the Project level. - Custom Budget Code Descriptions
This setting allows users to create custom budget code descriptions for all projects within your company.Note
Once this setting is enabled at the Company level, the budget code descriptions setting must be enabled on an individual project's Work Breakdown Structure configuration settings. - Copy Over WBS Sub Job and Cost Code Details When Project Templates Are Used
When this setting is ON and you create a new project from a template, it will inherit both the company-level standard cost codes and any custom cost codes added specifically to that project template. It will also inherit sub-jobs (if enabled). To learn more, see How do my project-specific 'Cost Code' segment items get carried over from a project template to a new project?
Note: Yardi Voyager® and MRI Platform X® users creating a Procore project with this setting enabled must ensure that all cost codes in the project template also exist in the corresponding ERP project (Yardi Voyager® or MRI Platform X®) before applying the template to the Procore project. See Things to Know about the Project Financials + Yardi Voyager® Connector or Things to Know about the Project Financials + MRI Platform X® Connector.
- Sub Jobs
- Click Save.
Add Custom Segments
- Navigate to the Company level Admin tool.
- Under 'Company Settings', click the Work Breakdown Structure link.
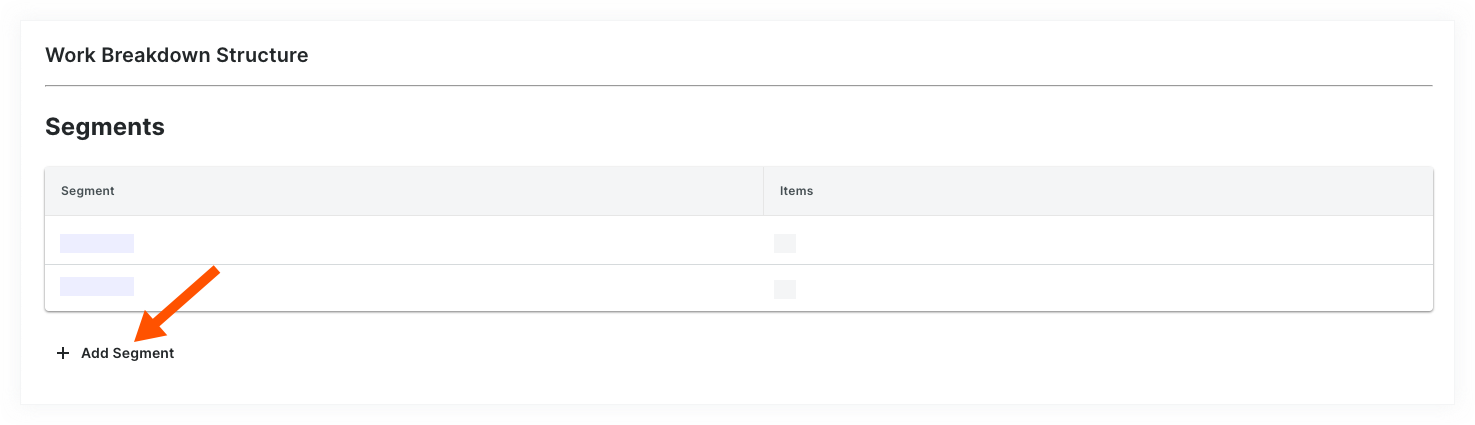
- In the 'Segments' table, click the Add Segment button.
- In the 'New Segment' window, do the following:
Note
An asterisk (*) in the list below indicates a required field.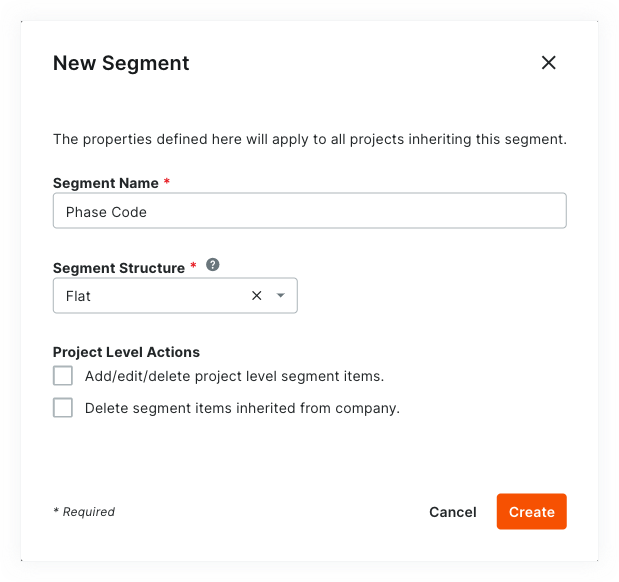
- Segment Name*. Enter a name for your new segment. This is a required field. Duplicate segment names are NOT permitted. A 'Segment Name is in use' message appears to notify if you attempt to enter a name that already exists.
Tip
Not sure what custom segments to create? To learn how other Procore clients use Work Breakdown Structure, see What custom segments should we create for our company's Work Breakdown Structure? - Segment Structure*. Select a value from the drop-down list. This is a required field. Your choices include:
- Flat. Select this option to add your segment to the list with no hierarchy.
- Tiered. Select this option to nest your segment into a tree (hierarchical) structure.
Tip
What's the difference between a flat and tiered segment? To learn the difference, see What is the difference between a flat and tiered segment in Procore's WBS?
- Segment Name*. Enter a name for your new segment. This is a required field. Duplicate segment names are NOT permitted. A 'Segment Name is in use' message appears to notify if you attempt to enter a name that already exists.
- Under the Project Level Actions section, choose one (1) or all of these options:
Note
When the 'Project Level Actions' settings are turned ON, your project administrators (users with 'Admin' level permissions on the Project level Admin tool) are permitted to perform specific tasks on segments and segment items at the project level. These settings are turned OFF by default.- Add/Edit/Delete Project Level Segment Items. Place a mark in this checkbox to provide project administrators with the ability to add, edit, and delete unused segment items on a project. This setting is turned OFF by default.
Note
When this setting is turned ON, project administrators can perform these tasks:
- Delete Segment Items Inherited from Company. Place a mark in this checkbox to provide project administrators with the ability to delete segment items inherited at the Project level from the Company level Admin tool. This is useful to project administrators who don't want new segment items created at the company level to be used on a project. See Delete Unused Segment Items from a Project.
- Add/Edit/Delete Project Level Segment Items. Place a mark in this checkbox to provide project administrators with the ability to add, edit, and delete unused segment items on a project. This setting is turned OFF by default.
- Click Create.
Procore adds the new segment to the bottom of the 'Segments' list. - Repeat the steps above for all of the new segments to add.
Tips
- Need to edit your new segment's settings? The best time to edit a new segment is before you start using it on a project. Once a custom segment is used to create a project budget code, you can edit it at any time. For details, see Edit Custom Segment Settings.
- Want to delete a custom segment? Its important to note that a custom segment cannot be deleted after it has been added to the budget code structure on one (1) or more projects in your company's Procore account. To learn more, see Delete Custom Segments.
- Want to add segment items? If your new segment is created, you can add new items now. For instructions, see Add Custom Segment Items.
- Ready to define your company's default budget code structure? You can arrange your segments in any order you want. This arrangement defines your company's budget code structure. For instructions, see Arrange Segments to Form the Company's Budget Code Structure.
Create Your Project's WBS
Objective
To adjust your company's Work Breakdown Structure (WBS) for a Procore project.
Background
After creating a new project in your company's Procore account, you can use the built-in WBS features to define the cost structure for Procore's Project Financials tools. When defining a project's WBS cost structure, you have two choices. If you are unsure which choice to make, contact your company's Procore Administrator for guidance:
- Apply your Company's Default WBS
This is the WBS defined by your company's Procore Administrator and you can use it exactly as it was created. - Copy the WBS from Another Project
This is the WBS defined on one of your existing Procore project templates. Keep in mind that you can create a unique WBS for each project in your company's account. In order to copy the WBS from another source project to your new target project, you must first save the source project as a project template. See Configure a Project Template.
Things to Consider
- Required User Permissions:
- 'Admin' level permissions on the Project level Admin tool.
- Additional Information:
- The Project level 'Work Breakdown Structure' page is similar to the Company level page. The primary differences are:
- You cannot add custom segments at the Project level. They must always be added at the Company level. See Add Custom Segments.
- You cannot edit the budget code structure at the Project level. The budget code structure is always defined at the Company level. See Arrange the Company Budget Code Structure.
- You cannot add sub jobs at the Company level. Sub jobs are always added at the Project level. See Enable Sub Jobs on Projects for WBS and Add Sub Jobs to a Project.
- The Project level 'Work Breakdown Structure' page is similar to the Company level page. The primary differences are:
- Limitations:
Prerequisites
Tip
Do you want to copy the WBS from an existing project to your new project? If so, a Procore user who meets the required user permissions will need to configure the source project as a project template. A source project is the project that contains the WBS you want to copy to your new one. For instructions see, Configure a Project Template. One that step is complete, you'll be able to select the 'Copy the WBS from Another Project' option detailed in the Steps below.Steps
- Navigate to the Project level Admin tool.
- Under 'Project Settings', click the Work Breakdown Structure link.
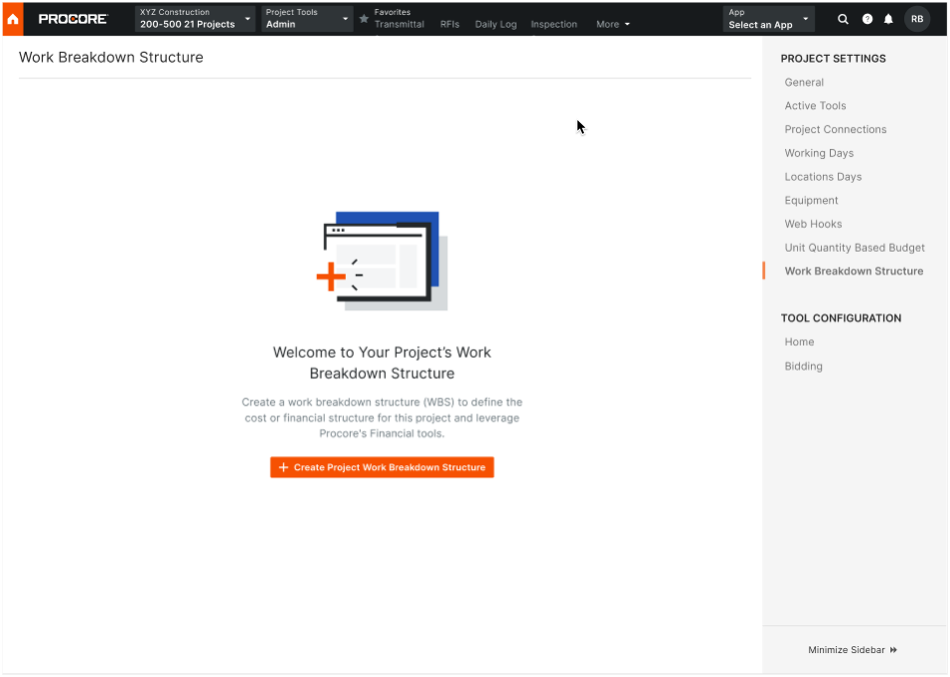
- Review the information about WBS, Budget Codes, Budget Code Segments in the dialog box sequence. Click Next.
- In the 'Create Project WBS dialog box, choose one of these optons:
- Apply the Company's Default WBS
Choose this option button if you want the project to use your company's default WBS. Your company's Procore Administrator is responsible for creating this structure.
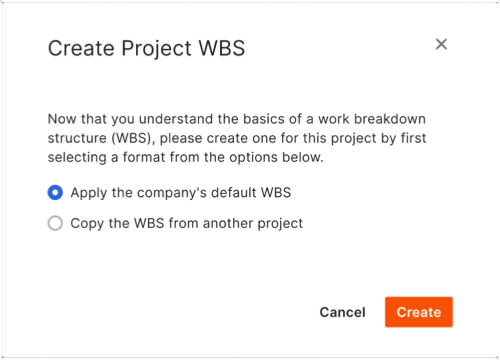
- Copy the WBS from Another Project
Choose this option button if you want to use an existing project's WBS. Then, start typing a project name and when the match appears, choose it in Select a Project list.

- Apply the Company's Default WBS
- Click Create.
Next Steps
Enable Task Codes
- Navigate to the Company level Admin tool.
- Under 'Tool Settings', select Timesheets or My Time.
- Click the Task Codes tab.
- Take one of the following actions:
- Move the toggle to the ON
 position to enable task codes.
 - Move the toggle to the OFF
 position to disable task codes.
- Move the toggle to the ON
Assign Default Cost Type
Assign the Default Cost Type for timecard entries in the Company Timesheets tool.
- Navigate to the company's Timesheets tool.
- Click the Configure Settings icon.
- Default Cost Type for Timecards. Select the cost type to assign to your project's timecard entries. If your company is using Procore's Project Financials, this action ensures that the labor costs from your project's timecards are reflected in the 'Procore Labor Productivity Cost' and 'Real-Time Labor Costing' budget views.
Note: By default, this option is set to 'Labor'.- Click Update to apply the default cost type to any future timecard entries.
- Click Apply to Existing Entries to apply the default cost type to all existing timecard entries.
Important
- Applying a new default cost type to existing timecards by clicking Apply to existing timecards is a one-time action and cannot be undone without contacting your Procore point of contact.
- If your company is using Resource Tracking with Project Financials, you must assign a Default Cost Type to timecard entries before your project teams can work with the following budget views:
- Create a Real-Time Labor Costing view for the budget. See Add a Budget View for Real-Time Labor Costing.
- Set Up the 'Procore Labor Productivity Cost' budget view. See Set Up the Procore Labor Productivity Cost Budget View.
To configure additional settings, see Configure Advanced Settings: Company Level Timesheets.
Add Tools to Project
- Navigate to the project's Admin tool.
- Under 'Project Settings', click Tool Settings.
- Move the relevant toggle to 'Active' to add the following tools to your project:
- Daily Log with the Timecard Log (optional)
- Timesheets
- Click Update.
Considerations
Import your Budget
Enter Time in Timesheets
Enter Production Quantities in Timesheets
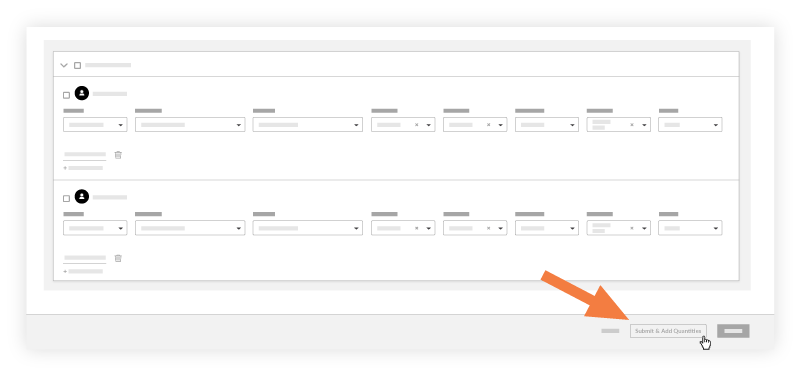
Now that you have filled out your timesheet, perform the following actions before you submit:
-
Click Submit and Add Quantities.
Note: This button will be disabled if quantities have not been uploaded to the project. See Import a Unit Quantity Based Budget.
-
Enter an amount in the Units Installed field.
Notes
- The Add Quantities page only shows cost codes that have an imported budgeted quantity associated with it.
- If the Sub Jobs feature is enabled on your project (see Enable Sub Jobs on Projects for WBS), the 'Sub Job' associated with your 'Units Installed' entry will appear in the Add Quantities window. If Sub Jobs is disabled, the 'Sub Job' field will display the word 'None.'
- The appropriate Percent Complete (%) and Unit of Measure (UOM) and Percent Complete (%) automatically with the data that was imported. See Import a Unit Quantity Based Budget.
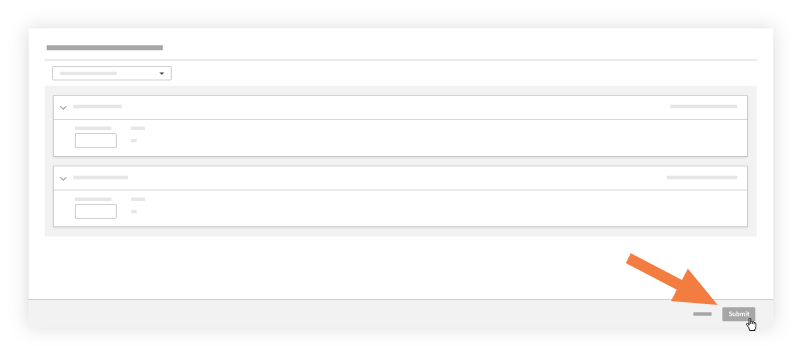
-
Enter any notes in the 'Notes' field.
-
Click Submit.
View the Labor Budget to Actual Report
View a Report from the Project's Reports Tool
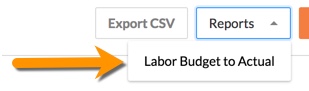
- Navigate to the project's Reports tool.
- Scroll to the Project Reports section.
- Click Labor Budget To Actual.

The columns in the Labor Budget to Actual Report are as follows:- % Hours Used: The percent of hours used that you have imported against the hours you have entered. Calculated as follows:
- Actual Hours ÷ Budgeted Hours = Percent Used
- Budgeted Hours: The number of Budgeted Hours you imported to Procore's project Admin tool.
- Actual Hours: The number of hours you have entered to date in Procore's labor tracking tools (Timesheets, Company Timecard, and Daily Log).
- Remaining Hours: The number of hours you have remaining from the hours you imported against the hours you have entered. Calculated as follows:
- Budgeted Hours - Actual Hours = Remaining Hours
- % Hours Used: The percent of hours used that you have imported against the hours you have entered. Calculated as follows:
View a Report from the Project's Timesheets Tool
- Navigate to the project's Timesheets tool.
- Click Reports.
- Click Labor Budget to Actual.
The columns in the Labor Budget to Actual Report are as follows:- % Hours Used: The percent of hours used that you have imported against the hours you have entered. Calculated as follows:
- Actual Hours ÷ Budgeted Hours = Percent Used
- Budgeted Hours: The number of Budgeted Hours you imported to Procore's project Admin tool.
- Actual Hours: The number of hours you have entered to date in Procore's labor tracking tools (Timesheets, Company Timecard, and Daily Log).
- Remaining Hours: The number of hours you have remaining from the hours you imported against the hours you have entered. Calculated as follows:
- Budgeted Hours - Actual Hours = Remaining Hours
- % Hours Used: The percent of hours used that you have imported against the hours you have entered. Calculated as follows:
View the Field Production Report
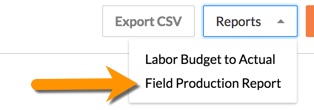
From the project's Reports tool
- Navigate to the project's 360 Reporting tool.
- Scroll to Project Reports.
- Click Field Production Report.
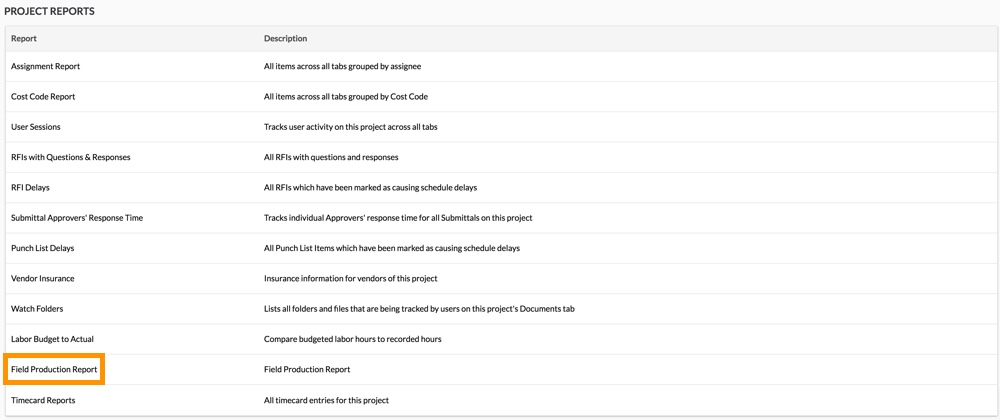
This reveals the Field Production Report. To learn about the data columns, see Which data columns are in a Field Production Report?
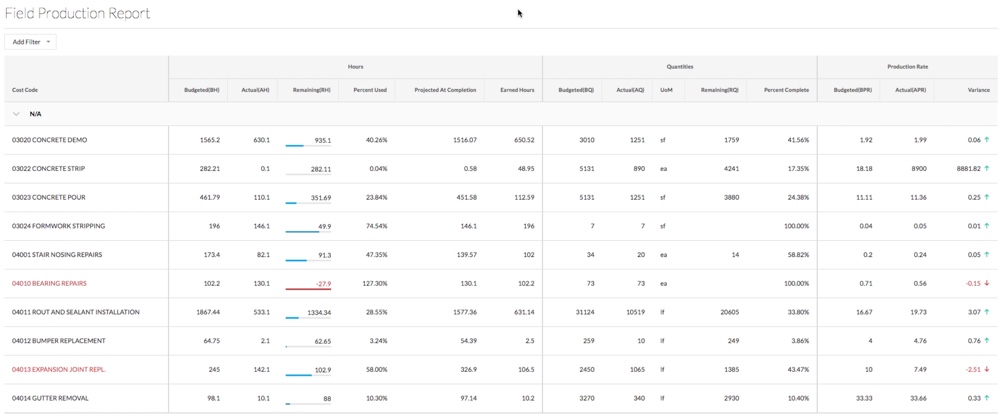
- Click Add Filter to narrow the display results.
- Select one of the following:
- Cost Code
- Sub Job Name
- Unit Of Measure
From the project's Timesheets tool
- Navigate to the project's Timesheets tool.
- Click Reports.
- Click Field Production Report.
This reveals the Field Production Report. To learn about the data columns, see Which data columns are in a Field Production Report?
- Click Add Filter to narrow the display results.
- Select one of the following:
- Cost Code
- Sub Job Name
- Unit Of Measure