Customize the Column Display in the Correspondence Tool
Beta OPTION
A modernized user experience is now available for the Correspondence tool's List view. Learn more about this open beta and how your Procore point of contact can help you enable it. This article provides directions for using the new beta view and the legacy view.Objective
To customize the columns in the project's Correspondence tool.
Background
You can customize the columns in the Correspondence tool so it shows data that is relevant to you and your project.
Things to Consider
- Required User Permissions:
- 'Read Only' level permissions or higher on the project's Correspondence tool.
Steps
Show and Hide Columns
- Navigate to the project's Correspondence tool.
- Click the List or Archive tab.
- Click the Table Settings
 icon.
icon. - Click the toggle to the ON
 position for the fields you want to display in the table.
Tip
Click Show All to have all available columns shown in the table. - Click the X to save your changes.
- To reset all columns to their default state, select Reset Columns from the vertical ellipsis
 on any column.
Note: Pinned and sorted columns also return to their original state when Reset Columns is chosen.
Rearrange Column Order
- Navigate to the project's Correspondence tool.
- Click the List or Archive tab.
- Click the header for the column that you want to move.
- Drag and drop the column in the desired location.
- To reset all columns to their default state, select Reset Columns from the vertical ellipsis on any column.
Note: Pinned, sorted, hidden, and now-showing columns also return to their original state when Reset Columns is chosen.
Group by Type
- Navigate to the project's Correspondence tool.
- Click the List or Archive tab.
- From the Select a column to group menu, select Type.
- Refresh the search results by clicking an empty space outside the selection window.
- To undo group by Type, click the X next to Group by: Type in that same menu.

Column Configuration
- Navigate to the project's Correspondence tool.
- Click the List or Archive tab.
- Click the Configure
 icon to open the Table Settings menu.
 - Click the toggle to the ON position for the columns you want to display in the table.
Resize Column Width
- Navigate to the project's Correspondence tool.
- Click the List or Archive tab.
- Hover over the line that separates one column from another in the column header, until you see a double arrow.
- Click and drag the column to the desired width.
- Auto-size one or more columns: From the vertical ellipsis of a column, click Autosize This Column or Autosize All Columns.
Pin Columns
Sometimes you want certain columns to stay visible and unmoving while you scroll through other columns.
- Navigate to the project's Correspondence tool.
- Click the List or Archive tab.
- Click the vertical ellipsis on the column you want to pin.
- Click Pin Column.
- Click Pin Left or Pin Right, depending on which side of the table you want the column pinned.
- To unpin a column, select No Pin.
Sort Column Data
By default, your Correspondence table data is sorted by dates in the Last Activity column. Items with recent activity are listed first.
You may want to sort your correspondence items differently, such as by Number.
- Navigate to the project's Correspondence tool.
- Click the List or Archive tab.
- Find the column you want to sort by.
- Click that column header once for an ascending sort.
- Click that column header a second time for a descending sort.
- Click that column header a third time to return to the default where the list is sorted by Last Activity date.
LEGACY VIEW
If you have not opted for the open beta for the Correspondence List View, then you will see the legacy view as described below.
Legacy View
Steps
- Navigate to the project's Correspondence tool.
- Click the Items or Archive tab.
- Choose from these options:
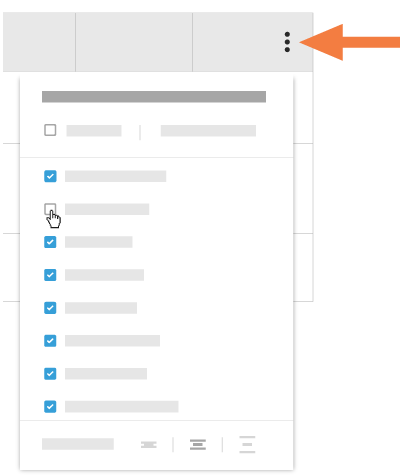
- Show a Column
Place a check mark in the box next to column to show on the Correspondence page. The default setting is to show all available columns.
OR - Hide a Column
Remove the checkmark from the box that corresponds to the column to hide on the Correspondence page. This immediately removes the column from the page.
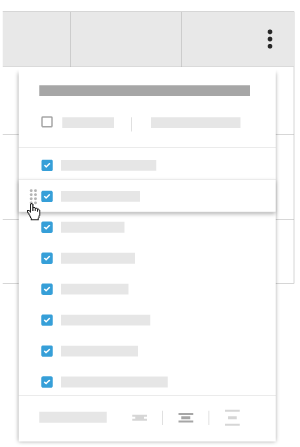
OR - Reorder the Columns
Grab the column name by the dots (⁞⁞). Then use a drag-and-drop operation to place the column into the desired position in the list. This immediately moves the column into the specified position.
OR - Restore the Default Settings
Click the Reset to Default link at the top of the drop-down menu.
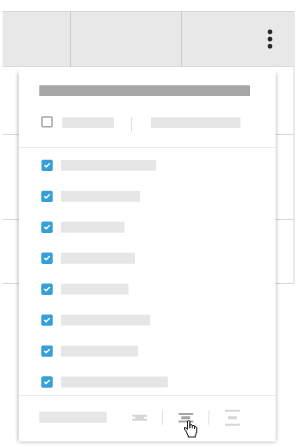
OR - Adjust the Row Height of the Table
Click the desired Row Height button to adjust the row height of the table on the Correspondence page.
- Show a Column