

Manage Draft Messages for Resource Planning
Things to Consider
-
Messages sent in Resource Planning will NOT appear in the Emails tool in Procore.
-
Messages are limited to 1,200 characters.
-
Message and data rates may apply when sending or receiving SMS messages.
-
Messages that are only visible to you have a lock
 icon.
icon. -
Draft messages that are only visible to you have a lock icon.
-
Deleted messages are permanently removed from Resource Planning and cannot be recovered.
Manage Draft Messages for Resource Planning (Beta)
-
View Draft Messages
-
Send Draft Messages Now
-
Edit Draft Messages
View Draft Messages
-
Navigate to the Company level Resource Planning tool.
-
Click Communications (Beta).
-
Select Messages from the drop-down menu.
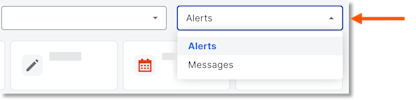
-
Select Drafts.
-
In the 'Date/Time Sent' column, select the envelope
 icon for the message you want to view.
Send Draft Messages Now
-
Navigate to the Company level Resource Planning tool.
-
Click Communications (Beta).
-
Select Messages from the drop-down menu.
-
Select Drafts.
-
In the 'Date/Time Sent' column, select the envelope
icon for the message. -
Click Send.
Edit Draft Messages
-
Navigate to the Company level Resource Planning tool.
-
Click Communications (Beta).
-
Select Messages from the drop-down menu.
-
Select Drafts.
-
In the 'Date/Time Sent' column, select the envelope
icon for the message. -
Edit the message.
-
Send As.
-
Individual Message. Select to send the same message to multiple recipients, as individual messages.
-
Group Message. Select to send the message to multiple recipients.
-
-
Recipients.
-
Select recipients from the 'Add Recipient' drop-down menu to add them to the message.
-
Click remove next to a recipient to remove them.
-
-
Subject. Enter the subject of the message.
-
Message Content. Enter the message.
-
Schedule Delivery. Select whether the message is scheduled for delivery.
-
Move the 'Schedule Delivery' toggle
 ON to schedule the message. Then enter the date and time for the message to be sent.
 -
Leave the 'Schedule Delivery' toggle
 OFF to keep the message as a draft.
-
-
Optional: Mark the 'All Users Can See This Message' checkbox to allow other users to access the message in the Resource Planning Communications tab.
-
-
Click Save Draft.
Manage Draft Messages for Resource Planning (Legacy)
You can manage your draft messages in the following ways:
-
View a Draft Message
-
Send a Draft Message Now
-
Edit a Draft Message
-
Delete a Draft Message
View a Draft Message
-
Navigate to the Company level Resource Planning tool.
-
Click Communications and select Messages.
-
Click Drafts.
-
Click the draft to view.
Note: Individual drafts are created for each recipient.
Send a Draft Message Now
-
Navigate to the Company level Resource Planning tool.
-
Click Communications and select Messages.
-
Click Drafts.
-
Click the message to send now.
-
Optional: Edit the message.
-
Subject. Enter the subject of the message.
-
Message. Enter your message.
-
Click Add Recipients and select the person to send the message to.
Notes:-
You can repeat this step to add additional recipients.
-
If you need to remove a recipient, click the remove
 icon next to their name.
-
-
Mark the checkbox 'All Users Can See This Message' if you want all users to be able to access the message in the Messages tool.
Note: This option can only be edited if the originally-drafted message had the checkbox marked. See Send a Message for Resource Planning.
-
-
Move the toggle for 'Schedule Delivery' to the OFF position.
-
Click Send Now.
Edit a Draft Message
-
Navigate to the Company level Resource Planning tool.
-
Click Communications and select Messages.
-
Click Drafts.
-
Click the message to edit.
-
Edit the message.
-
Subject. Enter the subject of the message.
-
Message. Enter your message.
-
Click Add Recipients and select the person to send the message to.
Notes:-
You can repeat this step to add additional recipients.
-
If you need to remove a recipient, click the remove
icon next to their name.
-
-
Mark the checkbox 'All Users Can See This Message' if you want all users to be able to access the message in the Messages tool.
Note: This option can only be edited if the original draft had the checkbox marked. See Send a Message for Resource Planning.
-
-
Schedule Delivery. Select whether the message is scheduled for delivery.
-
Leave the 'Schedule Delivery' in the ON position and enter the date and time for the scheduled message to be sent. Then click Schedule.
OR -
Move the toggle for 'Schedule Delivery' to the OFF position to un-schedule the message. Then click Save to save it as a draft.
-
Delete a Draft Message
-
Navigate to the Company level Resource Planning tool.
-
Click Communications and select Messages.
-
Click Drafts.
-
Click on the message you want to manage.
-
Click Delete.